You can add integration with CallGear by following the path: admin account → Settings → Integrations subsection → Add Integration button → CallGear option.
Before connecting the integration, you need to perform several settings in the CallGear personal cabinet, which are described in detail in this article.
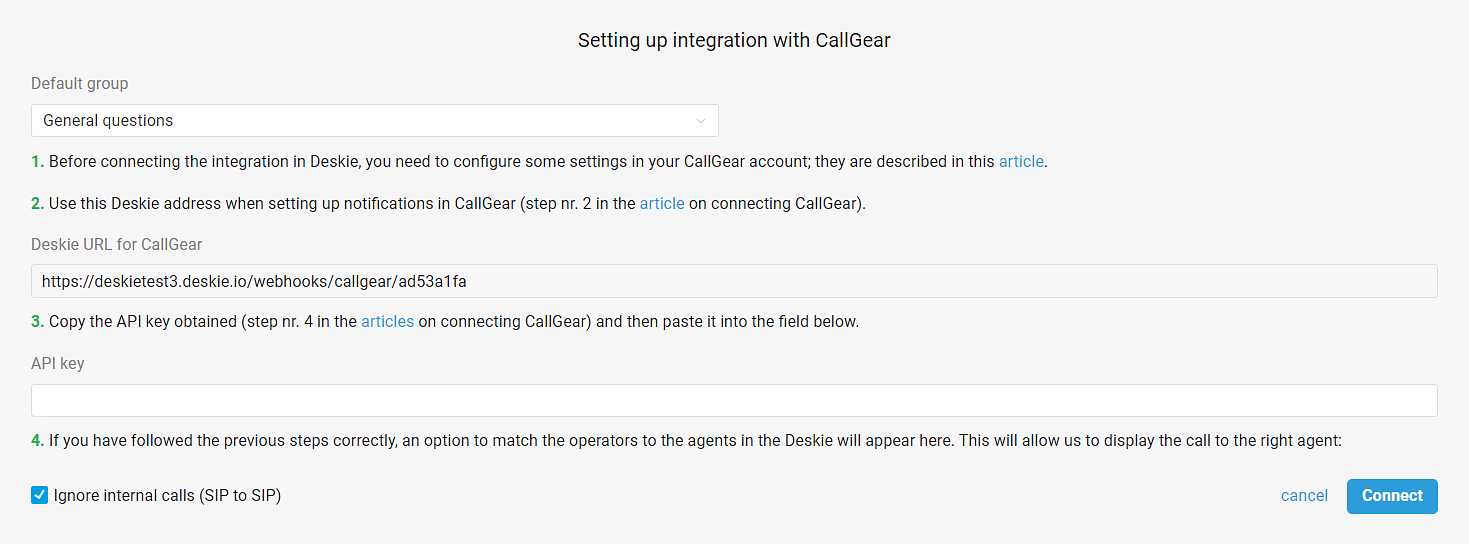
Setting up integration in CallGear
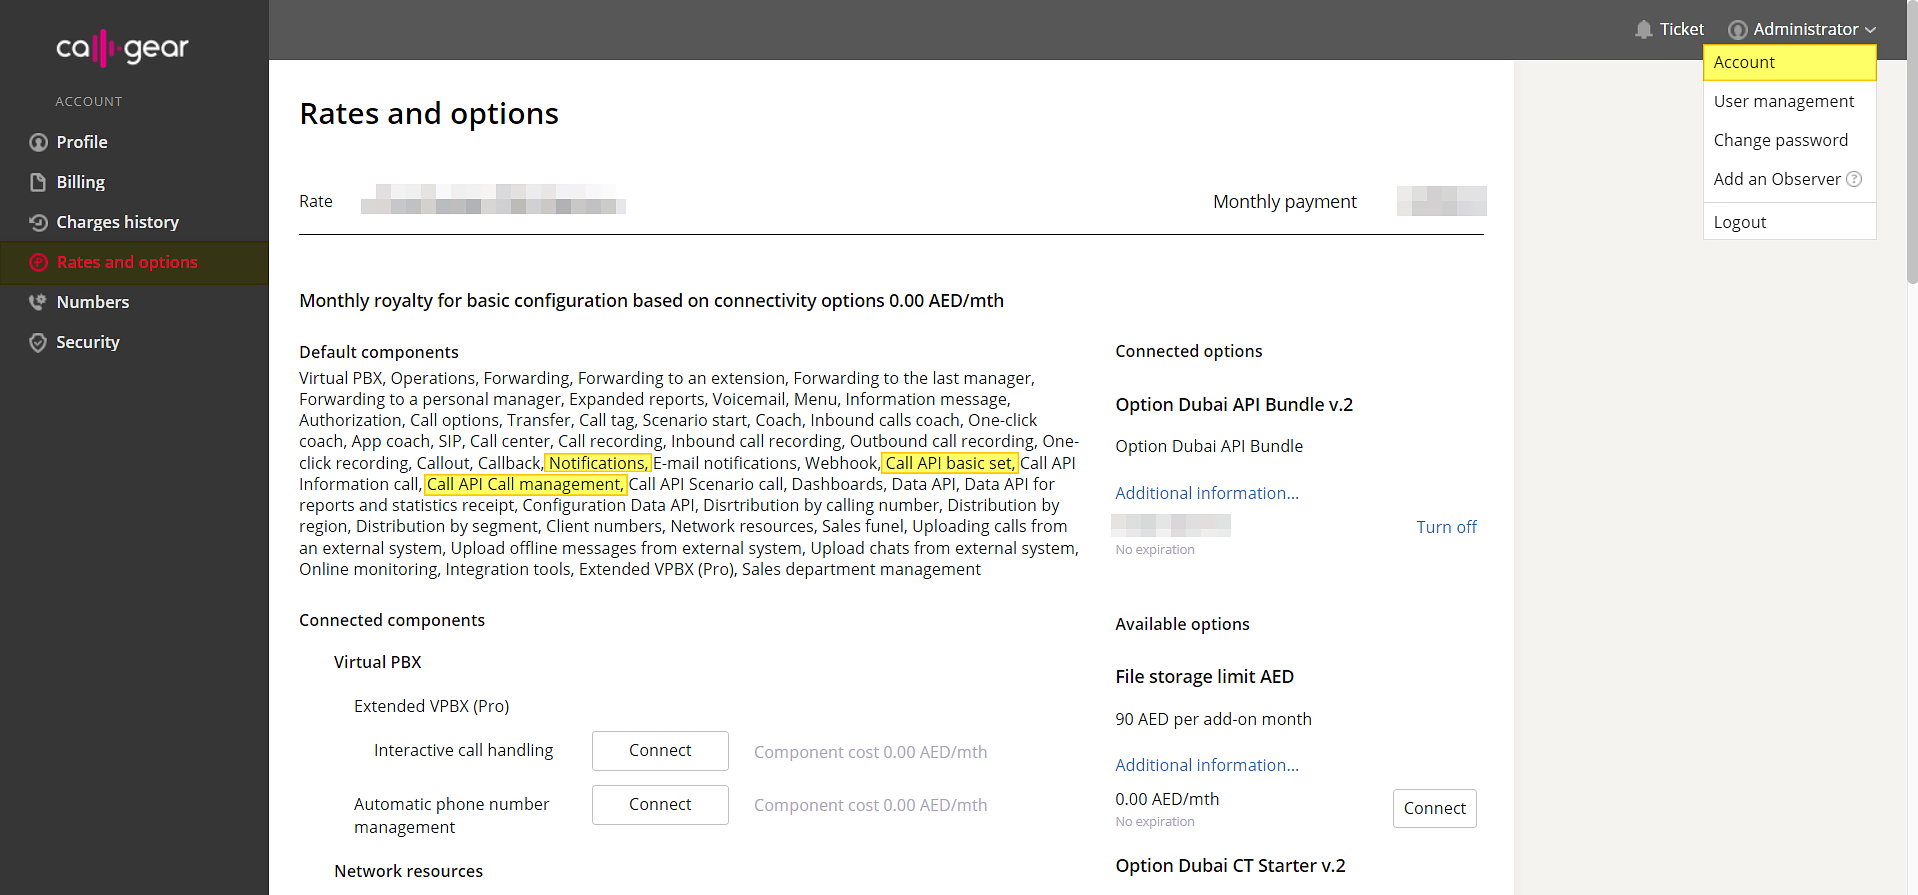
1) Check if the required components are available in the rates settings of your account (Administrator — Account — Rates and options). Three components must be enabled for the integration to work:
Notifications;
Call API basic set;
Call API Call management.
Note: Integration is available on all CallGear plans, except for the "First Step" plan.
2) Set up notifications for important events. To do this, go to the "Notifications" section in your CallGear account and add six notifications following the example in the GIF.
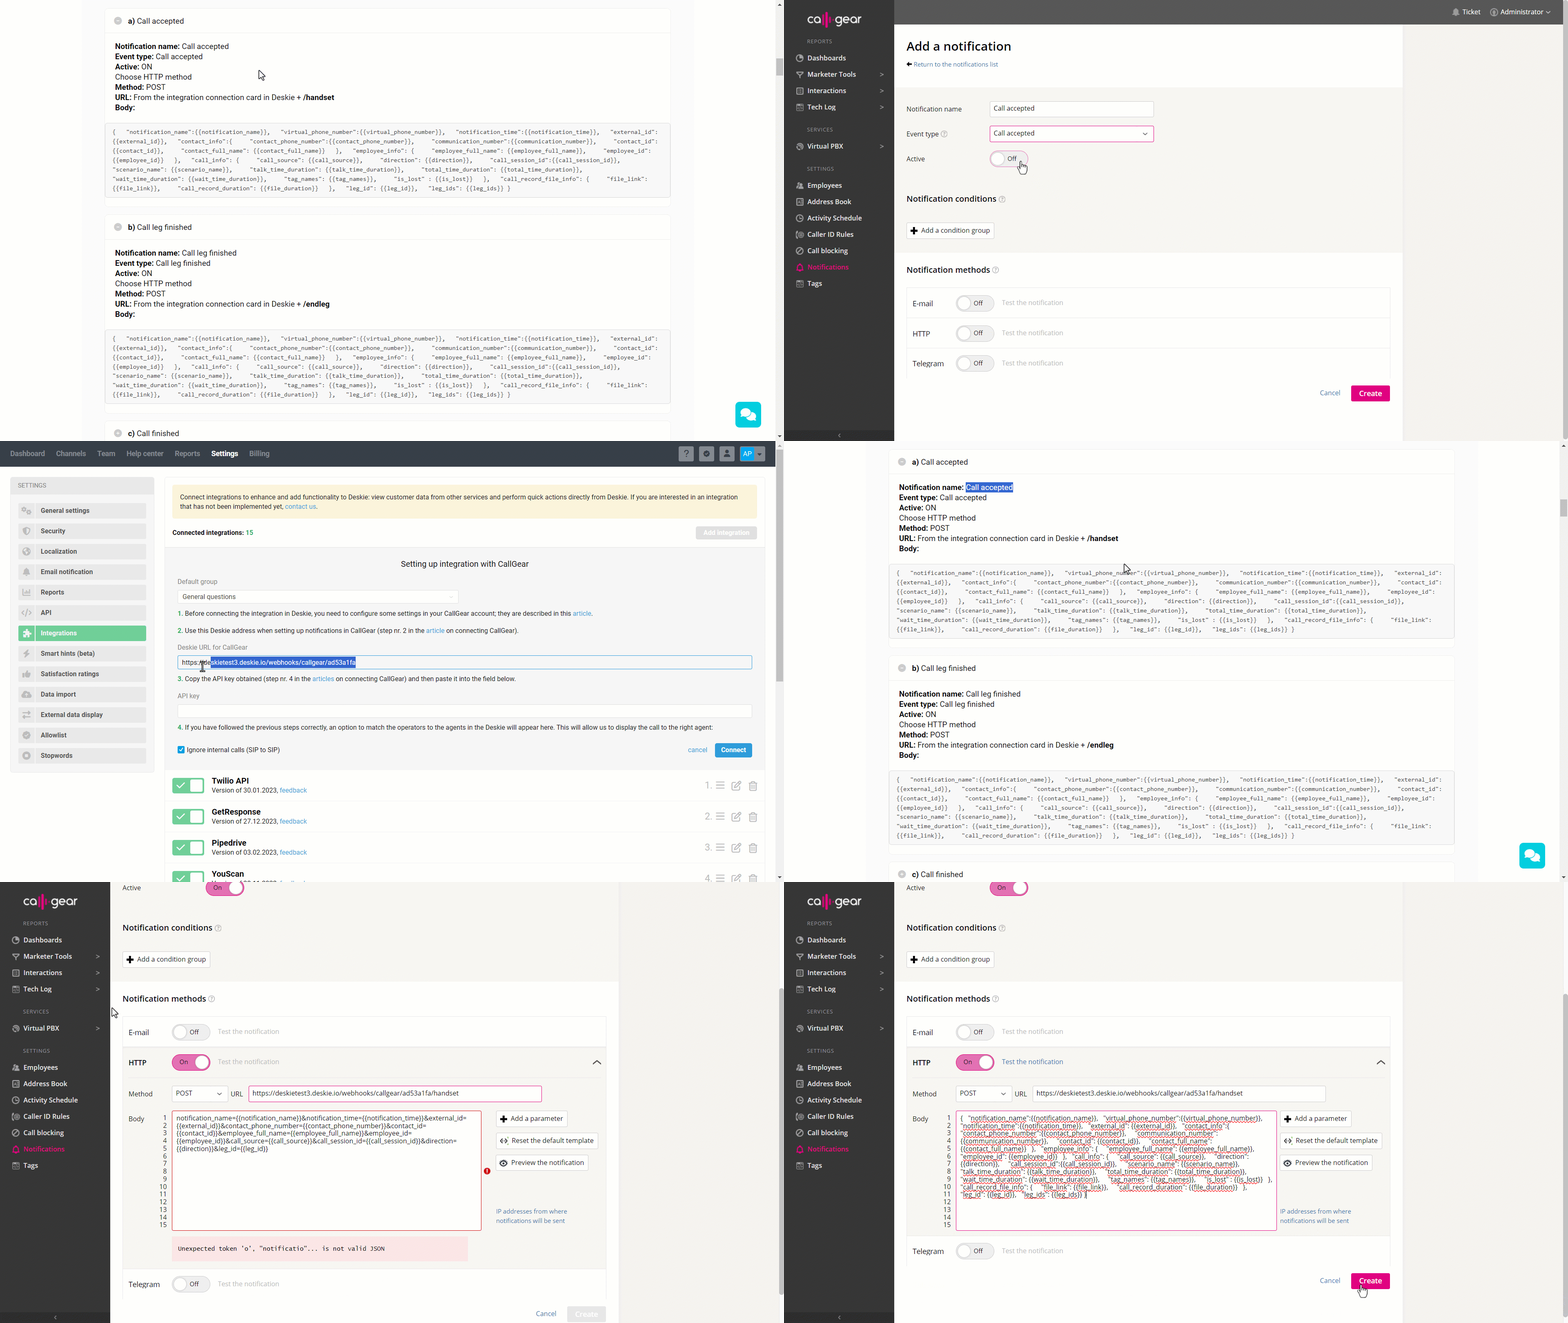
a) Call accepted
Notification name: Call accepted
{ "notification_name":{{notification_name}}, "virtual_phone_number":{{virtual_phone_number}}, "notification_time":{{notification_time}}, "external_id": {{external_id}}, "contact_info":{ "contact_phone_number":{{contact_phone_number}}, "communication_number":{{communication_number}}, "contact_id": {{contact_id}}, "contact_full_name": {{contact_full_name}} }, "employee_info": { "employee_full_name": {{employee_full_name}}, "employee_id": {{employee_id}} }, "call_info": { "call_source": {{call_source}}, "direction": {{direction}}, "call_session_id":{{call_session_id}}, "scenario_name": {{scenario_name}}, "talk_time_duration": {{talk_time_duration}}, "total_time_duration": {{total_time_duration}}, "wait_time_duration": {{wait_time_duration}}, "tag_names": {{tag_names}}, "is_lost" : {{is_lost}} }, "call_record_file_info": { "file_link": {{file_link}}, "call_record_duration": {{file_duration}} }, "leg_id": {{leg_id}}, "leg_ids": {{leg_ids}} }b) Call leg finished
Notification name: Call leg finished
{ "notification_name":{{notification_name}}, "virtual_phone_number":{{virtual_phone_number}}, "notification_time":{{notification_time}}, "external_id": {{external_id}}, "contact_info":{ "contact_phone_number":{{contact_phone_number}}, "communication_number":{{communication_number}}, "contact_id": {{contact_id}}, "contact_full_name": {{contact_full_name}} }, "employee_info": { "employee_full_name": {{employee_full_name}}, "employee_id": {{employee_id}} }, "call_info": { "call_source": {{call_source}}, "direction": {{direction}}, "call_session_id":{{call_session_id}}, "scenario_name": {{scenario_name}}, "is_operator":{{is_operator}}, "talk_time_duration": {{talk_time_duration}}, "total_time_duration": {{total_time_duration}}, "wait_time_duration": {{wait_time_duration}}, "tag_names": {{tag_names}}, "is_lost" : {{is_lost}} }, "call_record_file_info": { "file_link": {{file_link}}, "call_record_duration": {{file_duration}} }, "leg_id": {{leg_id}}, "leg_ids": {{leg_ids}} }c) Call finished
Notification name: Call finished
{ "notification_name":{{notification_name}}, "virtual_phone_number":{{virtual_phone_number}}, "notification_time":{{notification_time}}, "external_id": {{external_id}}, "contact_info":{ "contact_phone_number":{{contact_phone_number}}, "communication_number":{{communication_number}}, "contact_id": {{contact_id}}, "contact_full_name": {{contact_full_name}} }, "employee_info": { "employee_full_name": {{employee_full_name}}, "employee_id": {{employee_id}} }, "call_info": { "call_source": {{call_source}}, "direction": {{direction}}, "call_session_id":{{call_session_id}}, "scenario_name": {{scenario_name}}, "talk_time_duration": {{talk_time_duration}}, "total_time_duration": {{total_time_duration}}, "wait_time_duration": {{wait_time_duration}}, "tag_names": {{tag_names}}, "is_lost" : {{is_lost}} }, "call_record_file_info": { "file_link": {{file_link}}, "call_record_duration": {{file_duration}} }, "leg_id": {{leg_id}}, "leg_ids": {{leg_ids}}, "last_scenario_operation_name":{{last_scenario_operation_name}}, "group_ids":{{group_ids}} }d) Call recording completed
{ "notification_name":{{notification_name}}, "virtual_phone_number":{{virtual_phone_number}}, "notification_time":{{notification_time}}, "external_id": {{external_id}}, "contact_info":{ "contact_phone_number":{{contact_phone_number}}, "communication_number":{{communication_number}}, "contact_id": {{contact_id}}, "contact_full_name": {{contact_full_name}} }, "employee_info": { "employee_full_name": {{employee_full_name}}, "employee_id": {{employee_id}} }, "call_info": { "call_source": {{call_source}}, "direction": {{direction}}, "call_session_id":{{call_session_id}}, "scenario_name": {{scenario_name}}, "talk_time_duration": {{talk_time_duration}}, "total_time_duration": {{total_time_duration}}, "wait_time_duration": {{wait_time_duration}}, "tag_names": {{tag_names}}, "is_lost" : {{is_lost}} }, "call_record_file_info": { "file_link": {{file_link}}, "call_record_duration": {{file_duration}}, "record_file_links": {{record_file_links}} }, "leg_id": {{leg_id}}, "leg_ids": {{leg_ids}} }e) Outbond call leg
{ "notification_name":{{notification_name}}, "virtual_phone_number":{{virtual_phone_number}}, "notification_time":{{notification_time}}, "external_id": {{external_id}}, "contact_info":{ "contact_phone_number":{{contact_phone_number}}, "communication_number":{{communication_number}}, "contact_id": {{contact_id}}, "contact_full_name": {{contact_full_name}} }, "employee_info": { "employee_full_name": {{employee_full_name}}, "employee_id": {{employee_id}} }, "call_info": { "call_source": {{call_source}}, "direction": {{direction}}, "call_session_id":{{call_session_id}}, "scenario_name": {{scenario_name}}, "talk_time_duration": {{talk_time_duration}}, "total_time_duration": {{total_time_duration}}, "wait_time_duration": {{wait_time_duration}}, "tag_names": {{tag_names}}, "is_lost" : {{is_lost}} }, "call_record_file_info": { "file_link": {{file_link}}, "call_record_duration": {{file_duration}} }, "leg_id": {{leg_id}}, "leg_ids": {{leg_ids}} }f) Outbond call
{ "notification_name":{{notification_name}}, "virtual_phone_number":{{virtual_phone_number}}, "notification_time":{{notification_time}}, "external_id": {{external_id}}, "contact_info":{ "contact_phone_number":{{contact_phone_number}}, "communication_number":{{communication_number}}, "contact_id": {{contact_id}}, "contact_full_name": {{contact_full_name}} }, "employee_info": { "employee_full_name": {{employee_full_name}}, "employee_id": {{employee_id}} }, "call_info": { "call_source": {{call_source}}, "direction": {{direction}}, "call_session_id":{{call_session_id}}, "scenario_name": {{scenario_name}}, "talk_time_duration": {{talk_time_duration}}, "total_time_duration": {{total_time_duration}}, "wait_time_duration": {{wait_time_duration}}, "tag_names": {{tag_names}}, "is_lost" : {{is_lost}} }, "call_record_file_info": { "file_link": {{file_link}}, "call_record_duration": {{file_duration}} }, "leg_id": {{leg_id}}, "leg_ids": {{leg_ids}} }3) Open access to use the CallGear API. To do this, go to Administrator → Account → Security → API, and add access for the IP address 0.0.0.0/0.

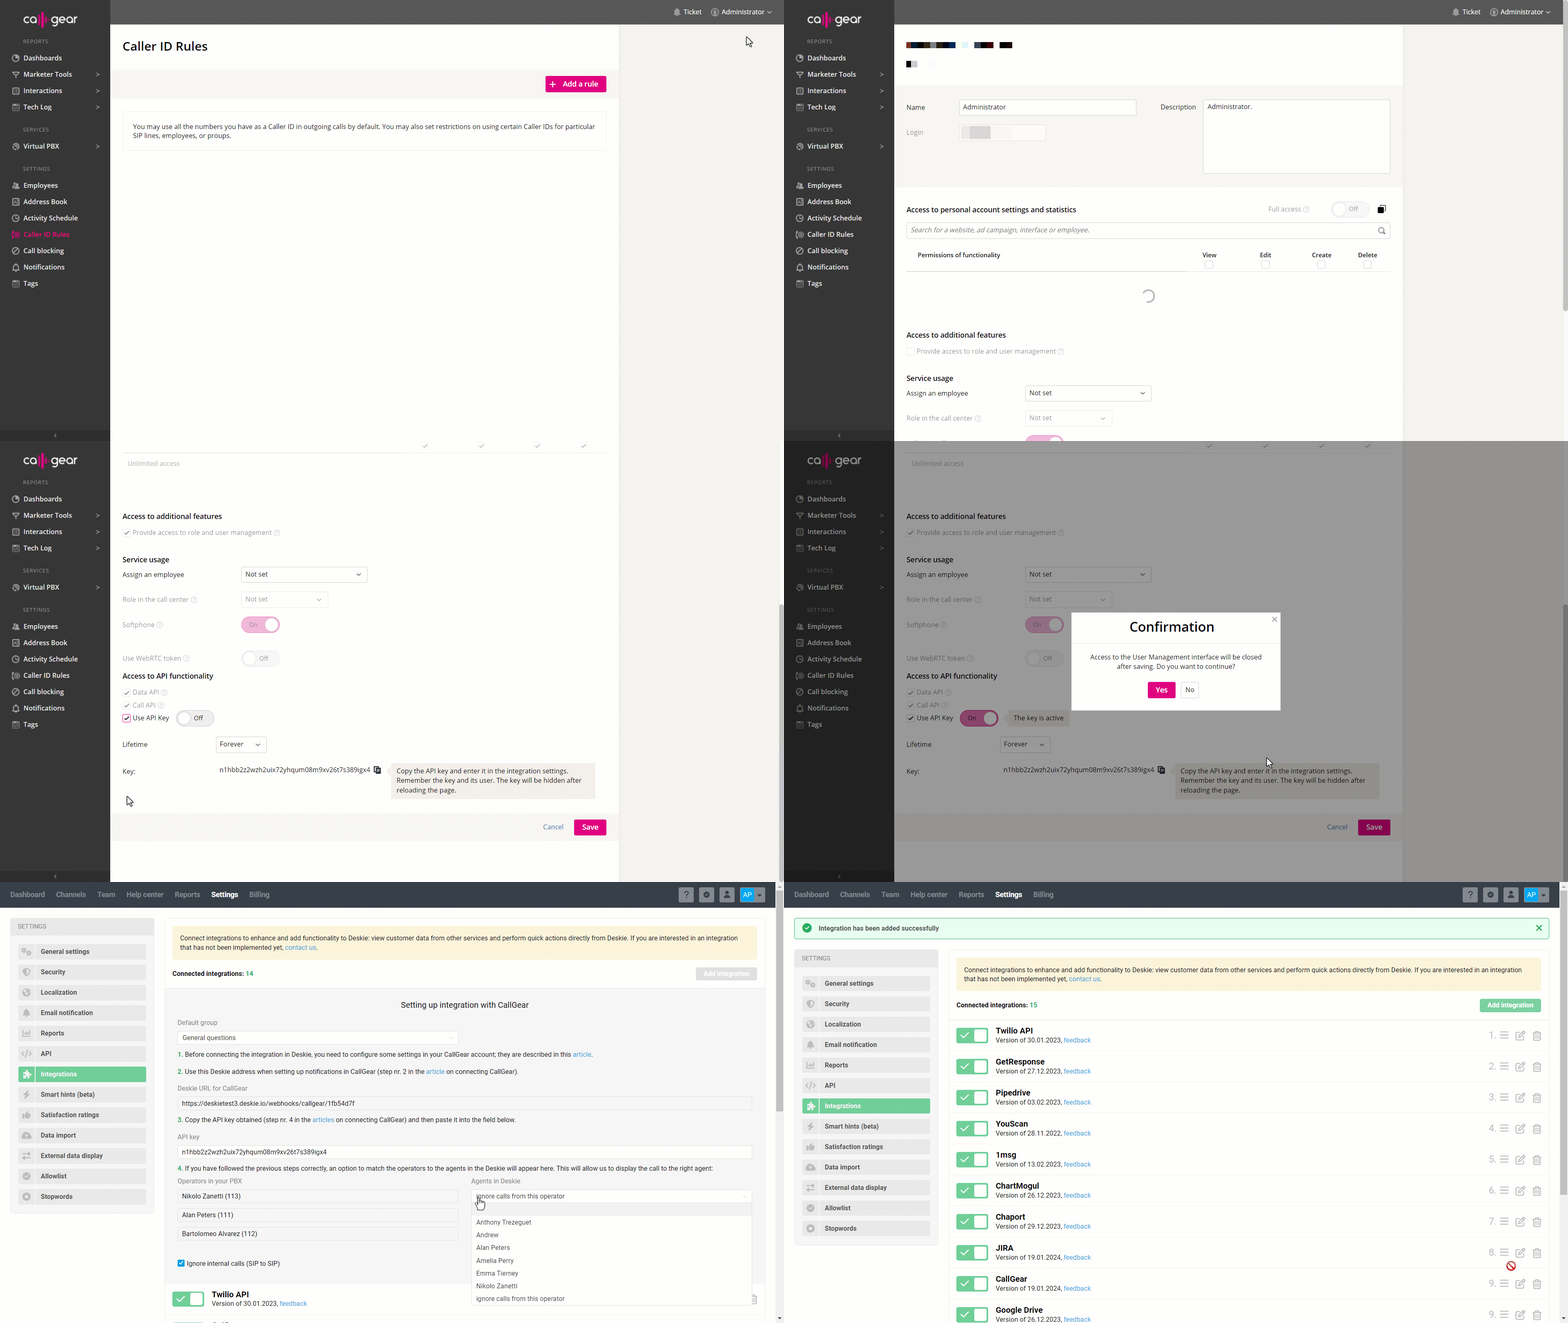
4) Create an API key in CallGear (Administrator → User management → Administrator → Use API key) and paste it into the corresponding field in the integration connection form in Deskie.
To ensure that calls are displayed to the correct agent, match operators in CallGear with agents in Deskie. If a call is placed to an operator that is not associated with an agent, the call will be ignored and no case will be created.
Integration worflow
To learn more about the main points on how the integration works, let's look at the following scenarios:
Incoming call from a known user
1) Incoming call notification is displayed in the upper right corner. If there is no user with the same phone number in Deskie yet, it will be stated in the notification:
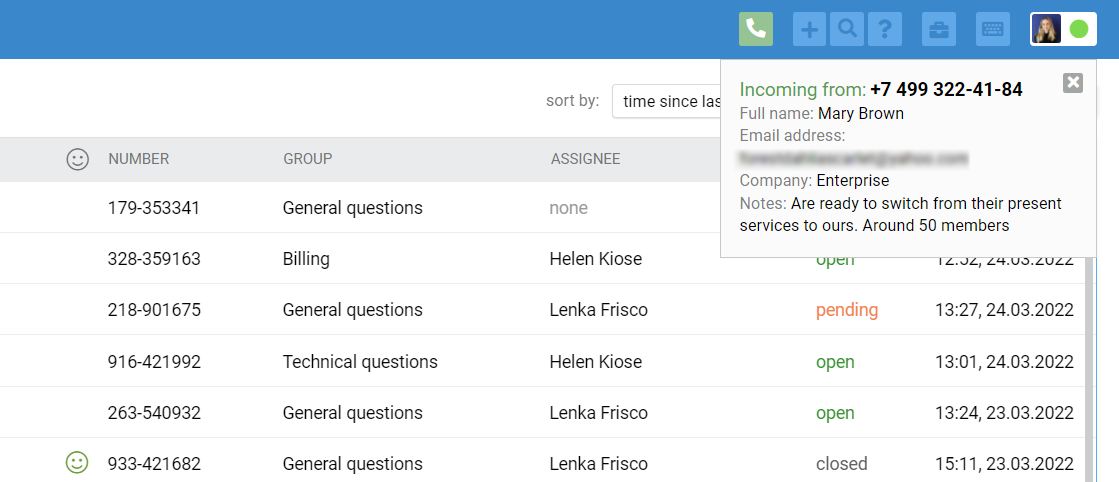
You can choose which user data to display in the notification. To do this, activate the "Incoming call" form for the required fields (administrator account — section "Data fields" — editing the field):
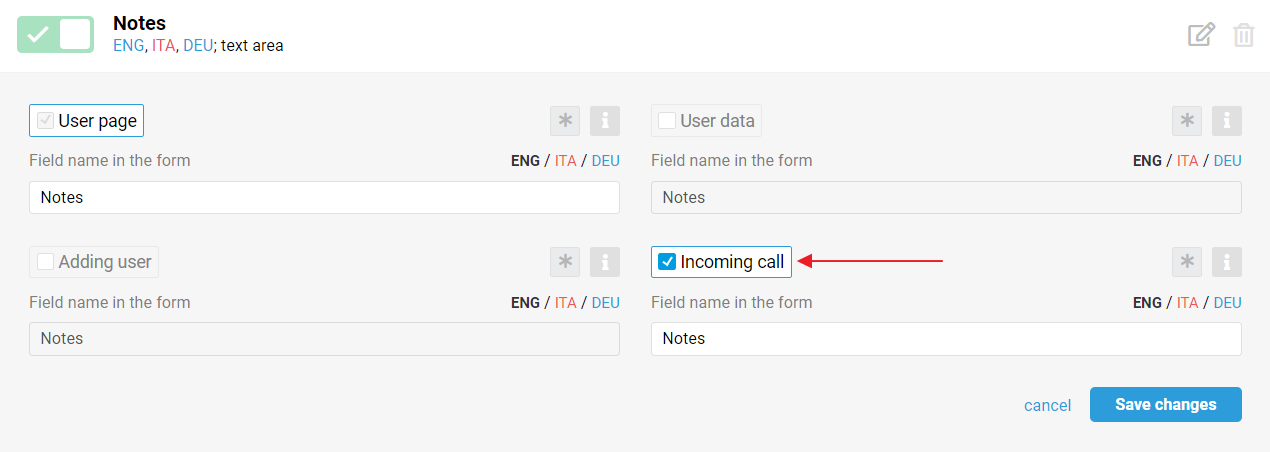
By default, we display the fields "Full name", "Email address" and "Company".
2) When an agent receives a call via softphone, we automatically open the user profile in a new tab:
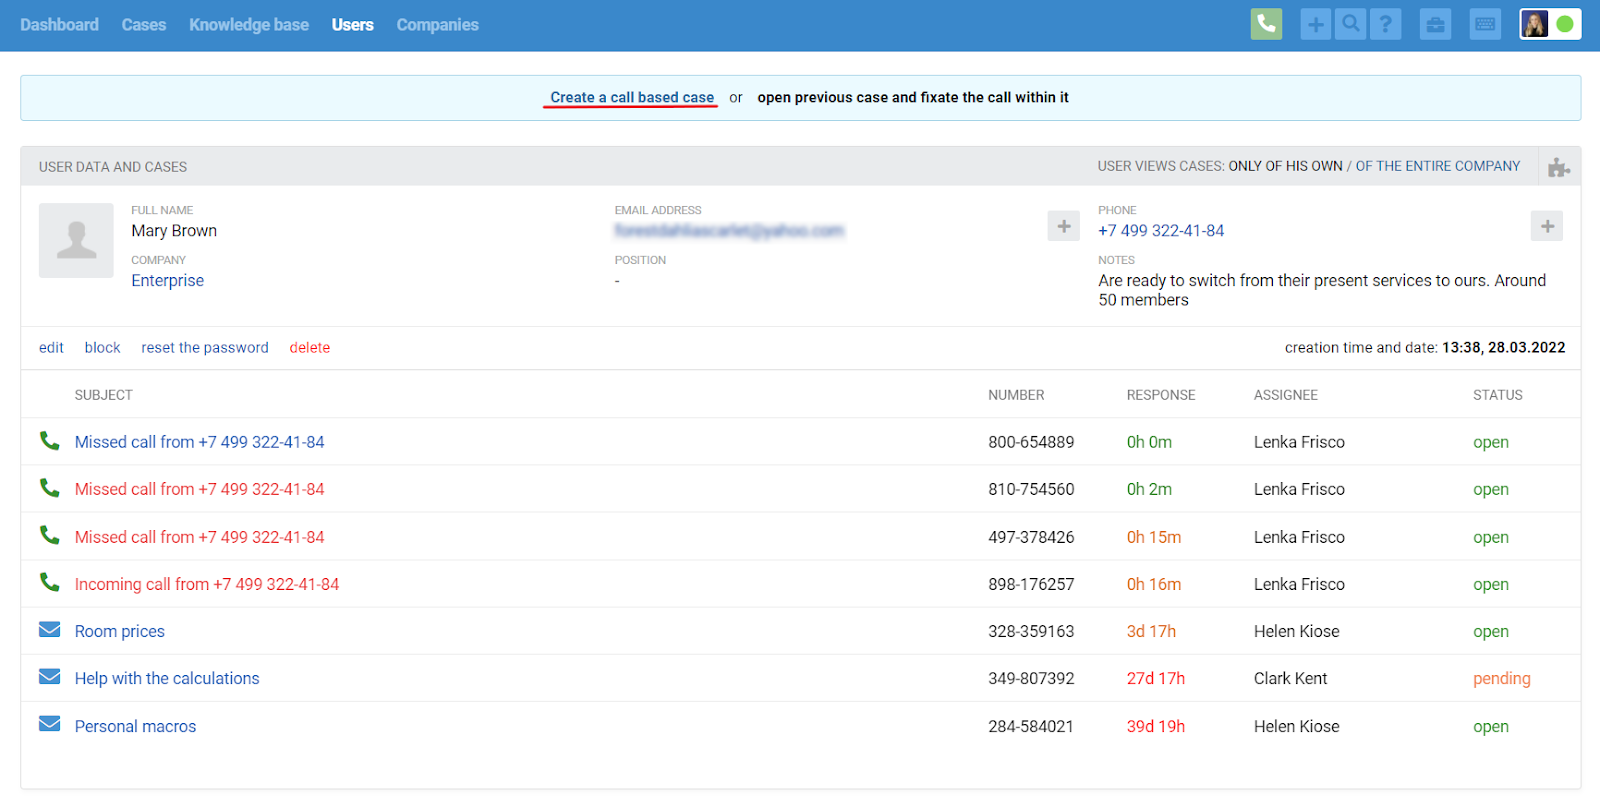
Next, there are two options:
a. create a call based case (via the link above the main area);
b. fixate the call within one of the previous cases of the "Telephony" channel, if the user calls again with another issue.
Let's take a closer look at each of the options.
a. With this option, an agent opens the page for creating a call based case with the "User" field already filled in. From this page, an agent can:
capture the subject and essence of the call by filling in the appropriate fields and clicking on the "Create" button. This information will help in the future to quickly understand what the conversation was about, without having to listen to the record;
add or change the user's data by clicking on the link "edit";
return to the user profile (via the link "go to user profile" in the header of the main area) in order to still select one of the previous cases to link with the current call.
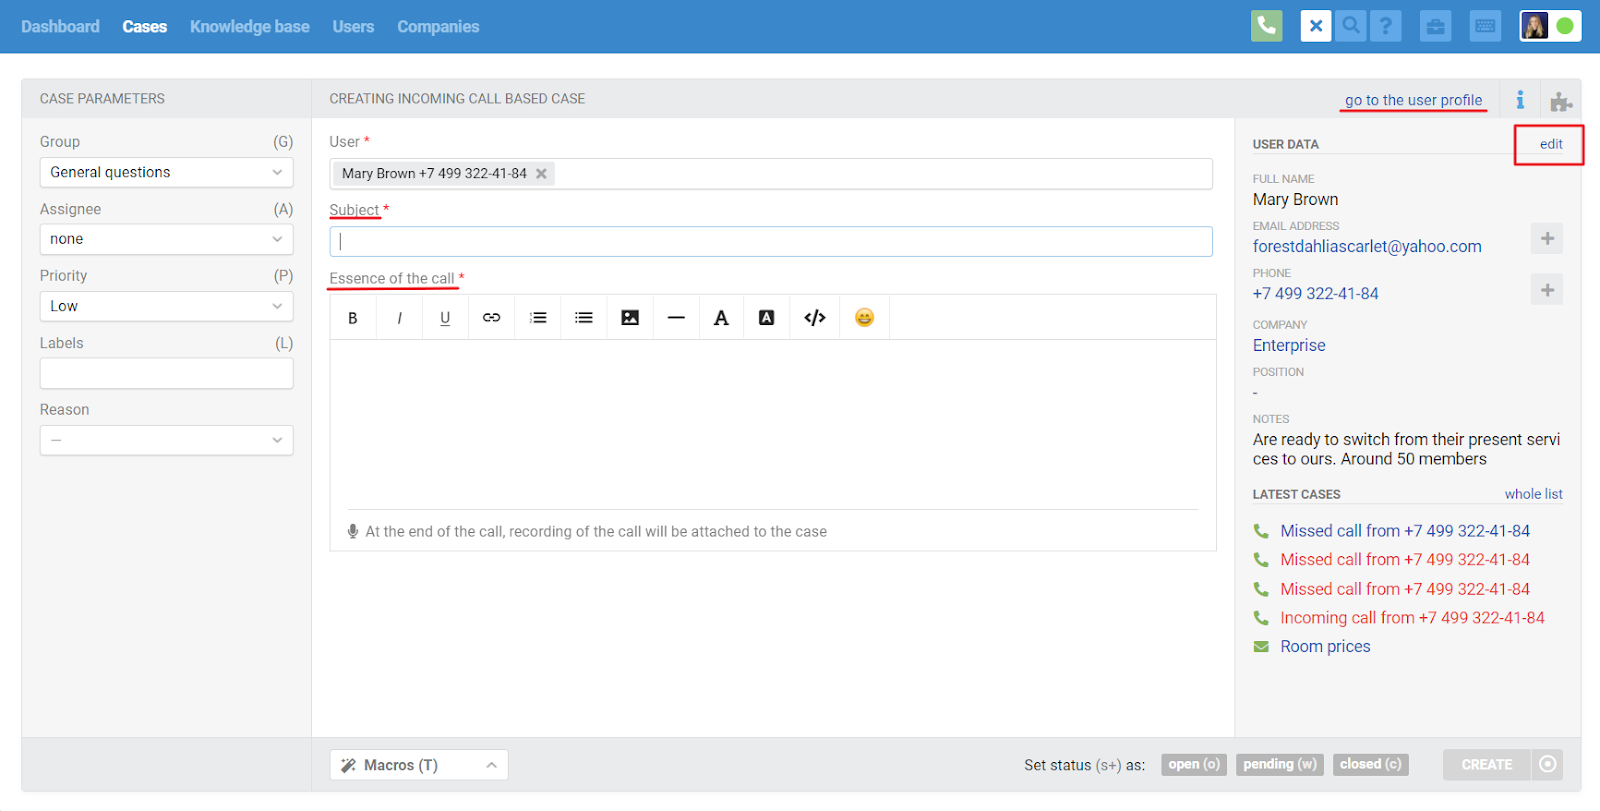
After the agent fills in the fields "Subject", "Essence of the call" and clicks on the "Create" button, the page of the created case will open:
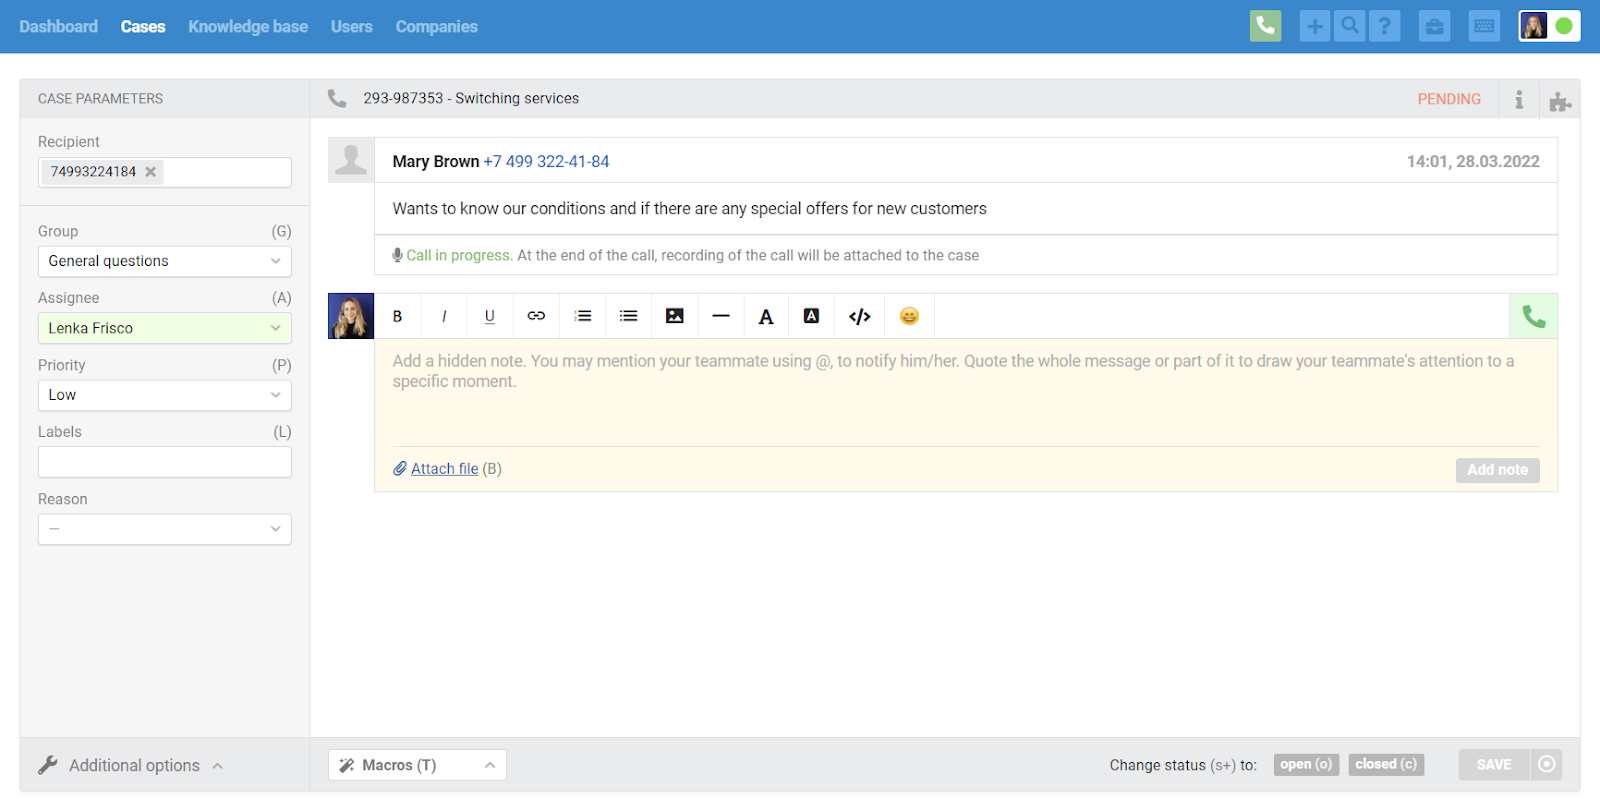
While the agent continues to communicate with the user, the message displays "Call in Progress" and there is no record of the conversation. After the conversation is over, the page is refreshed and a record of the conversation is attached to the message.
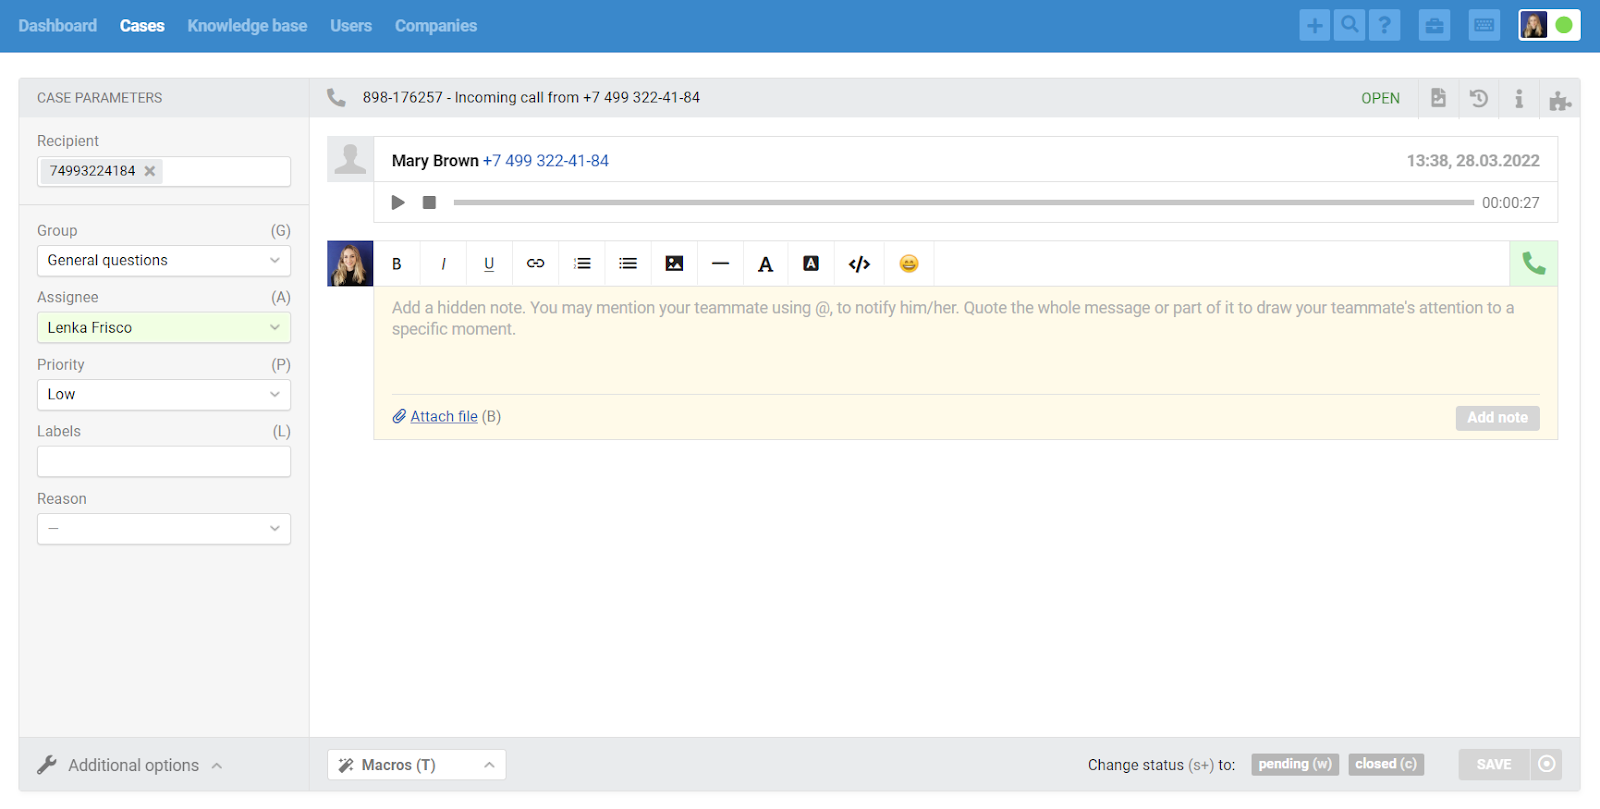
b. If an agent selects one of the user's previous cases to link it to the current call, then after going to the page of the case, the agent can:
fixate the call within the current case by clicking on the appropriate link;
go back to the user profile to select another case or create a new one.
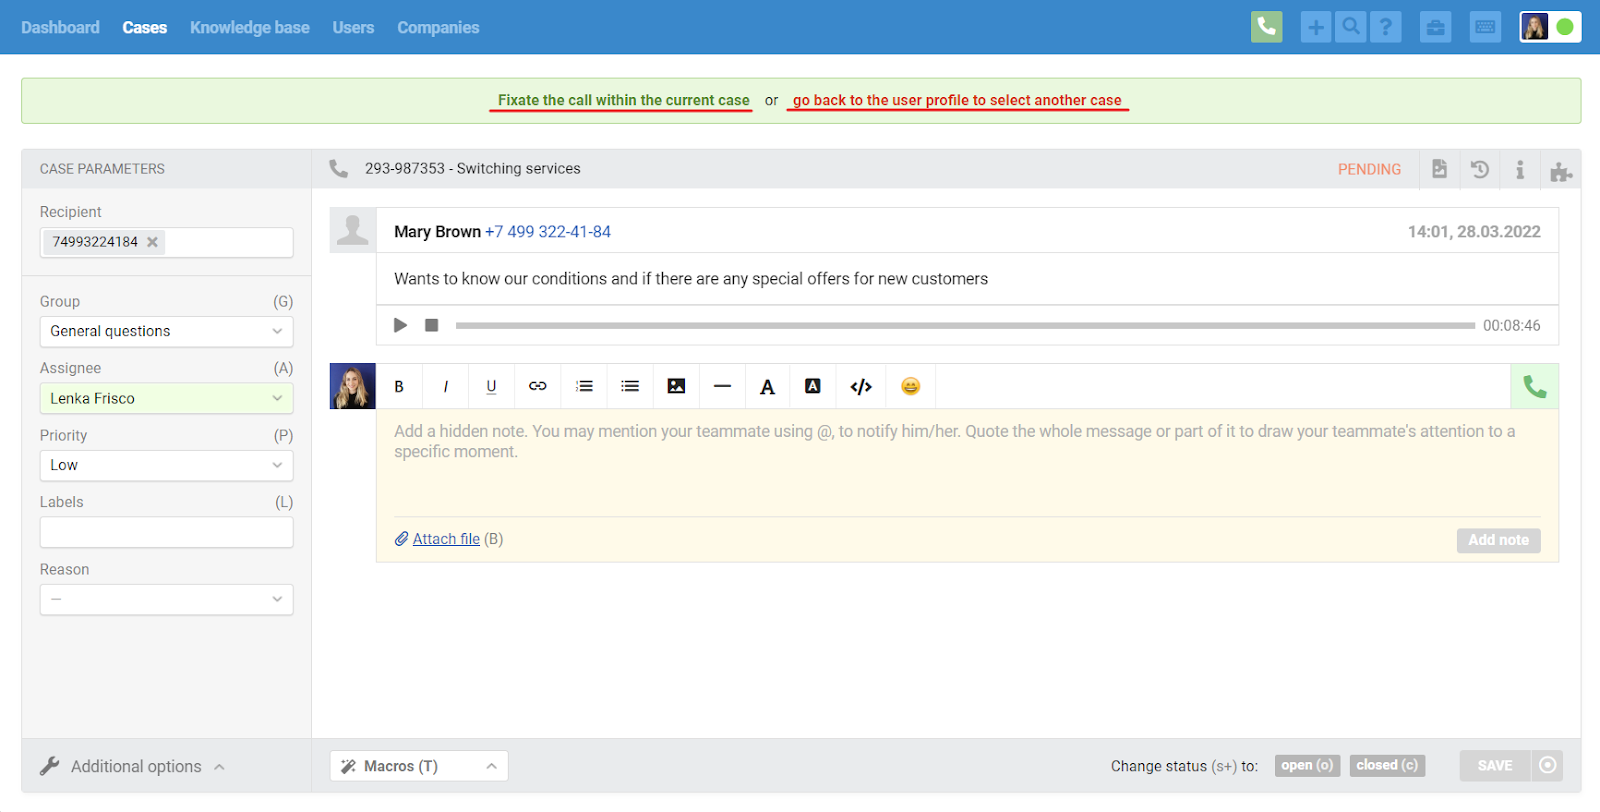
When you click on the "Fixate the call within the current case" link, a special field appears to indicate the nature of the call. After saving changes to the case, a new message appears with a call record.
Incoming call from an unknown user
3) Incoming call notification is displayed in the upper right corner. If there is no user with the same phone number in Deskie yet, it will be stated in the notification:
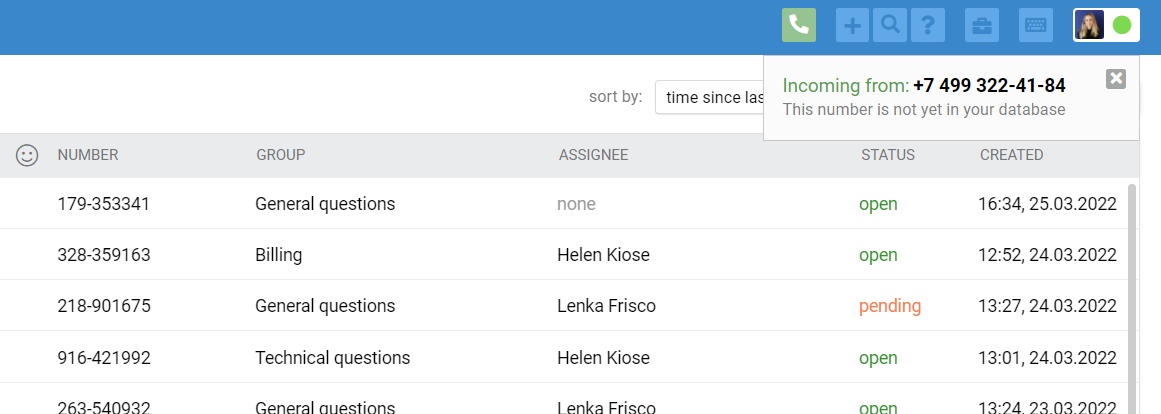
4) When an agent receives a call via a softphone, two options appear in the notification: "Find a user from the database for the profile linking" and "Create a call based case".
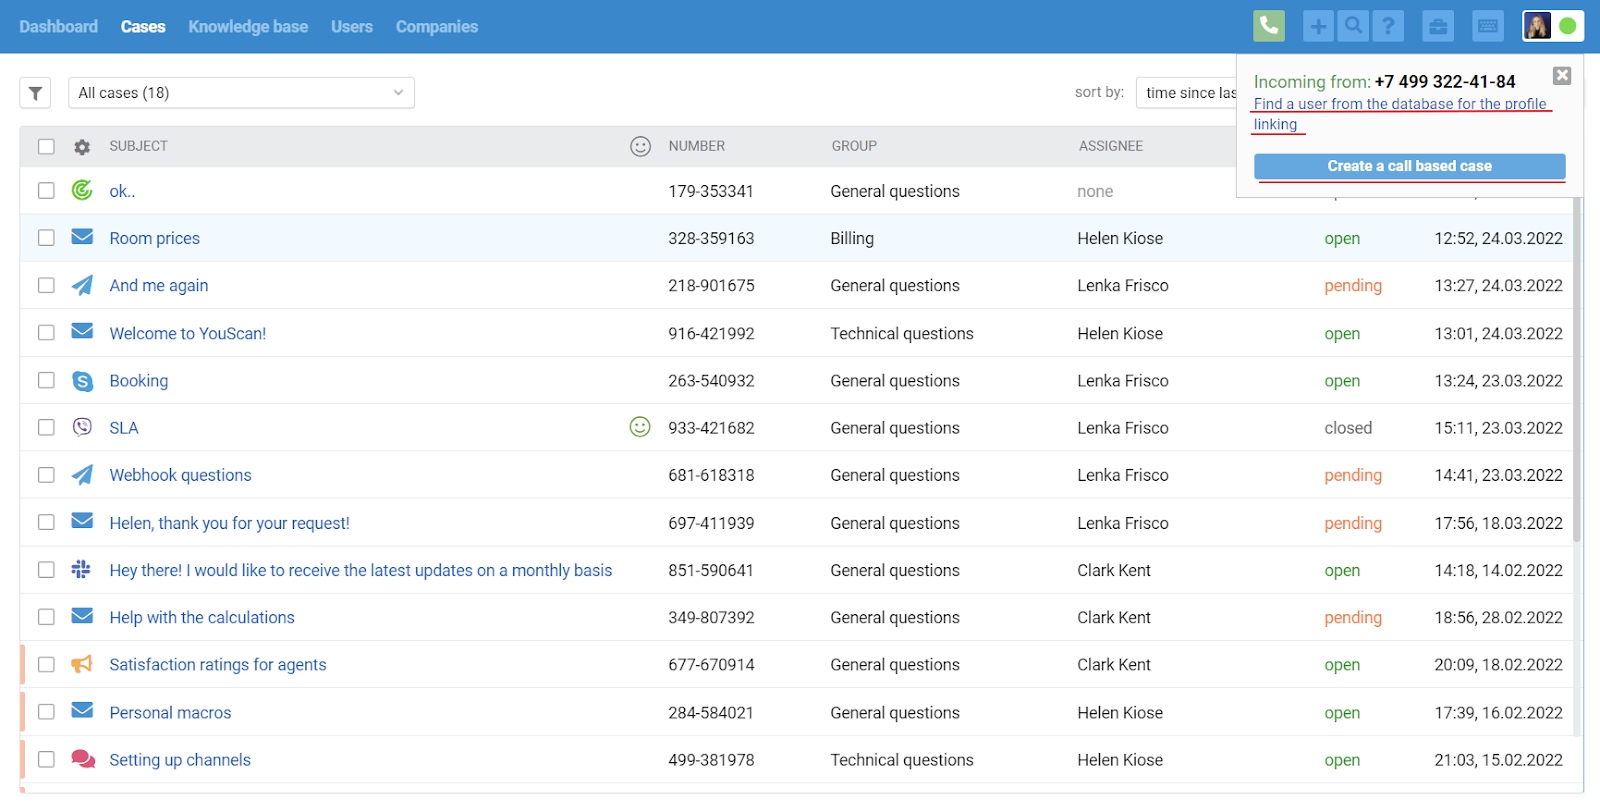
Let's take a closer look at each of them.
а. The link "Find a user for profile linking" opens the search page in a new tab and automatically sets the "users" filter so that only users are in the search results.
An agent can find the right user by any data: name, email address, company name, text in a note, values in custom fields, etc.
After the agent has found the desired profile and associated the calling user with it, the phone number that this user calls from is automatically added to their data.
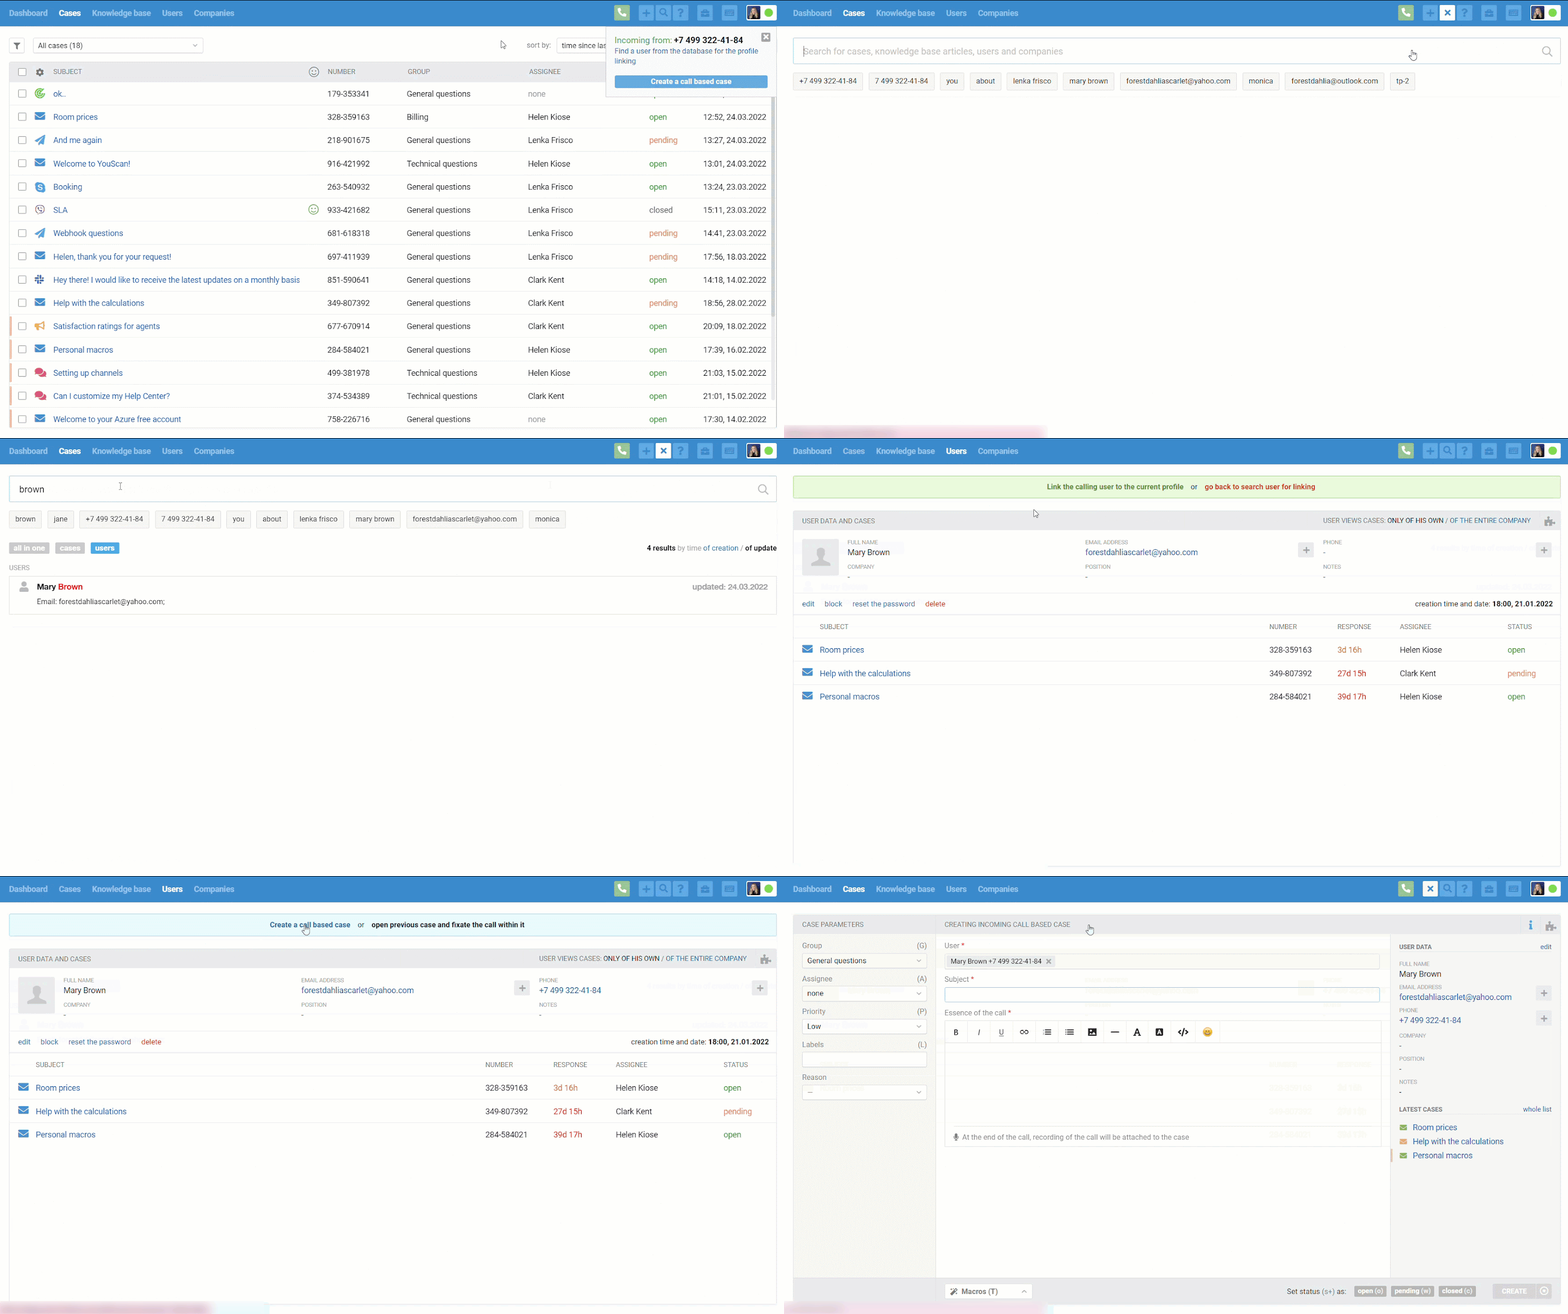
Further actions of the agent are identical to those described in the first example when the user was known at the time of the call.
b. If, after answering the call, the agent selects "Create a call-based case", they will be redirected to the page for case creation in a new tab. In this scenario, we automatically create a new user by phone number. There is an opportunity to add or change information about the user by clicking on the "edit" link in the information block.
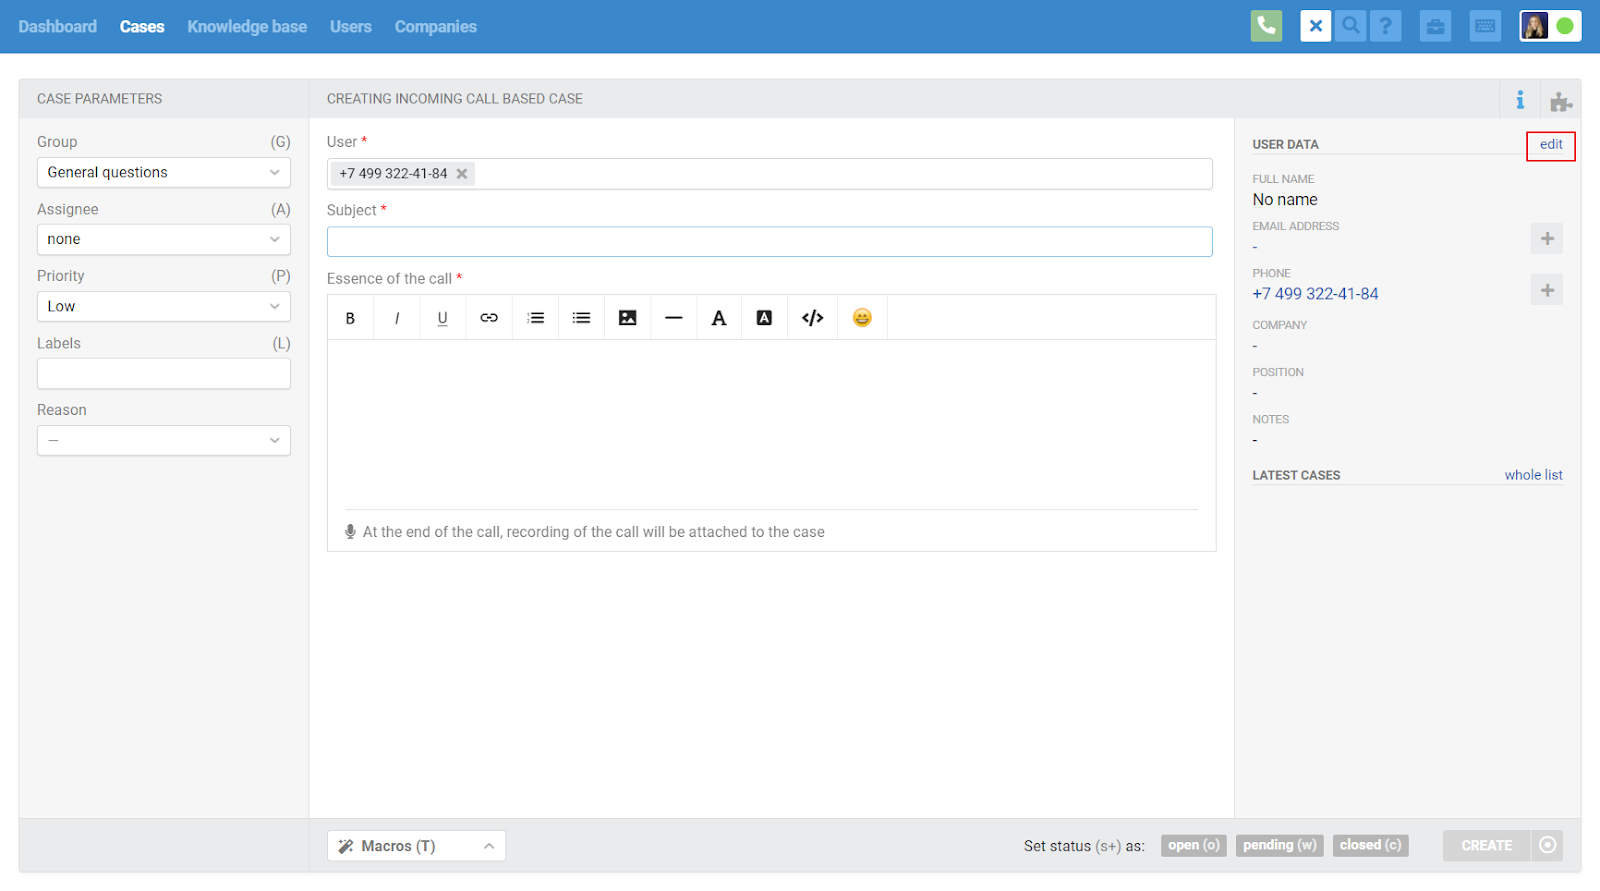
In a situation where the call ends before the agent creates a case, we create it automatically, picking up the subject and essence of the call if the agent filled them out.
Transfering incoming call to another agent
5) If an agent answers a call and then transfers it to a colleague who is also connected to Deskie, we treat these events as two separate calls, i.e. a case will be created for each agent.
The agent who received the call can create a call based case himself and then transfer the call to a colleague, or he can do nothing in Deskie and just transfer the call. In the latter situation, we will create a case with the standard subject "Incoming call from [phone number]" and status closed.
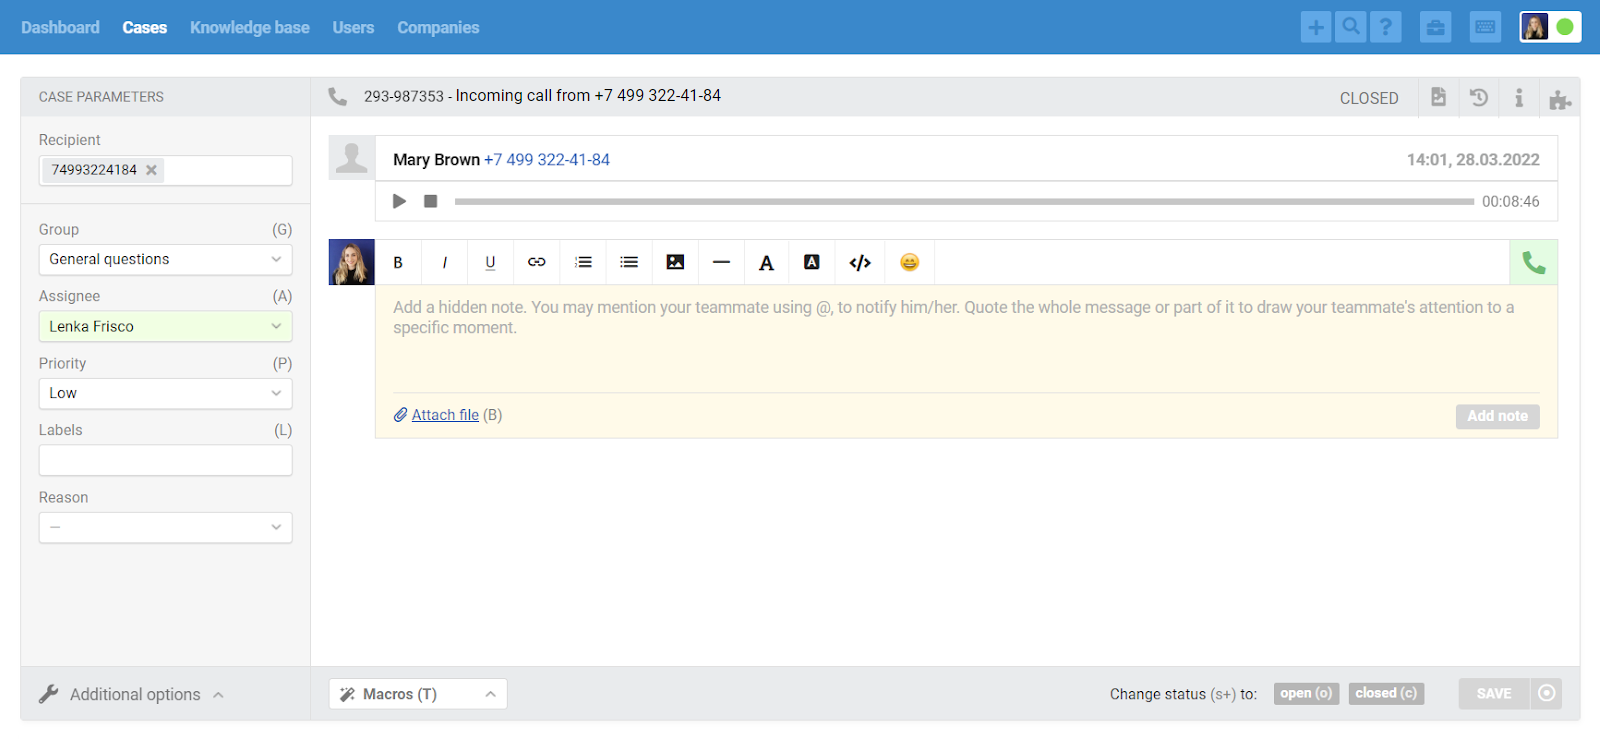
The actions of the agent to whom the call was transferred are no different from the already described examples of working with incoming calls.
Outgoing call to a user from the current case
6) To call a user from a case, click on the green handset icon in the upper right corner of the editor. After that the softphone will display an incoming call from the dialed number (don't be scared :)). Click on the green handset and the call will start. This is the tricky scheme of dialing from third-party applications connected to IP telephony.
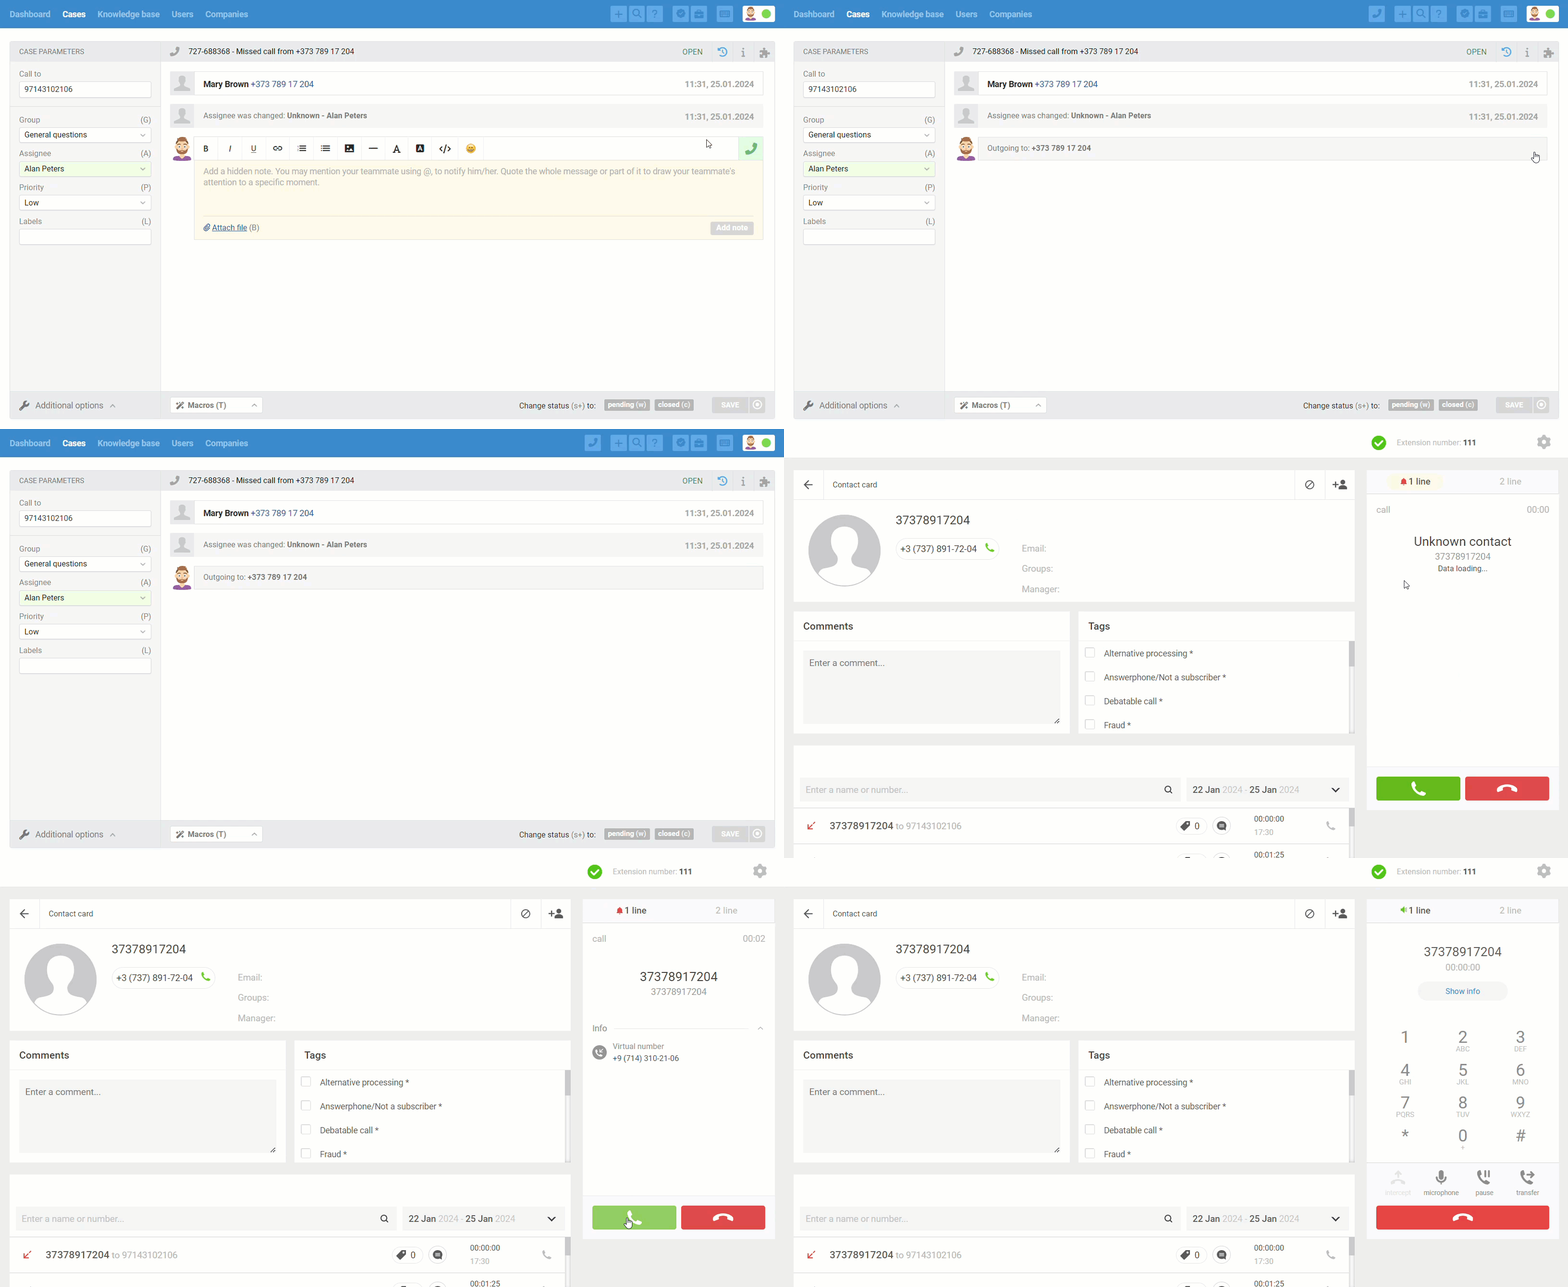
7) A special block is displayed in the case during dialing:
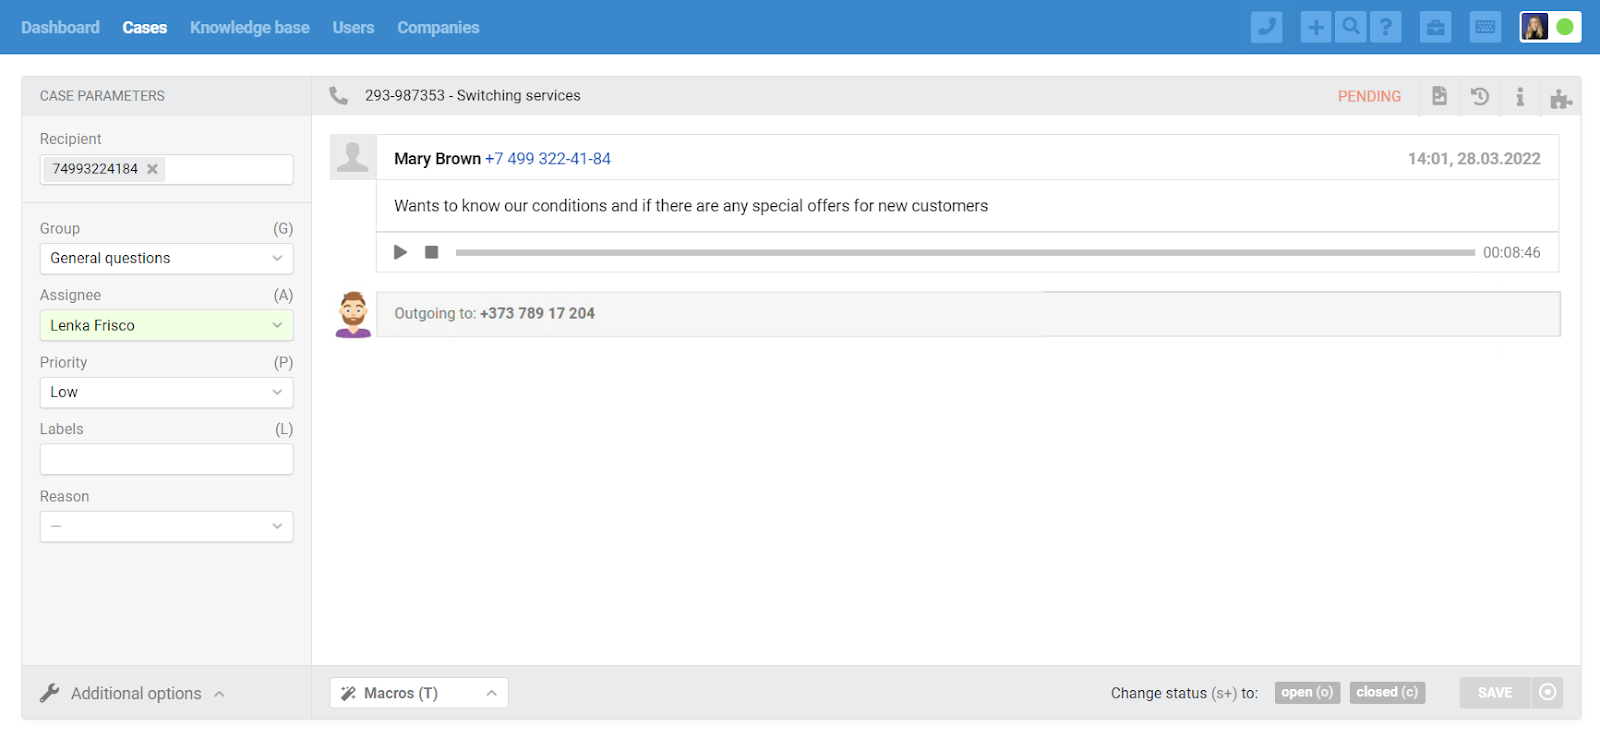
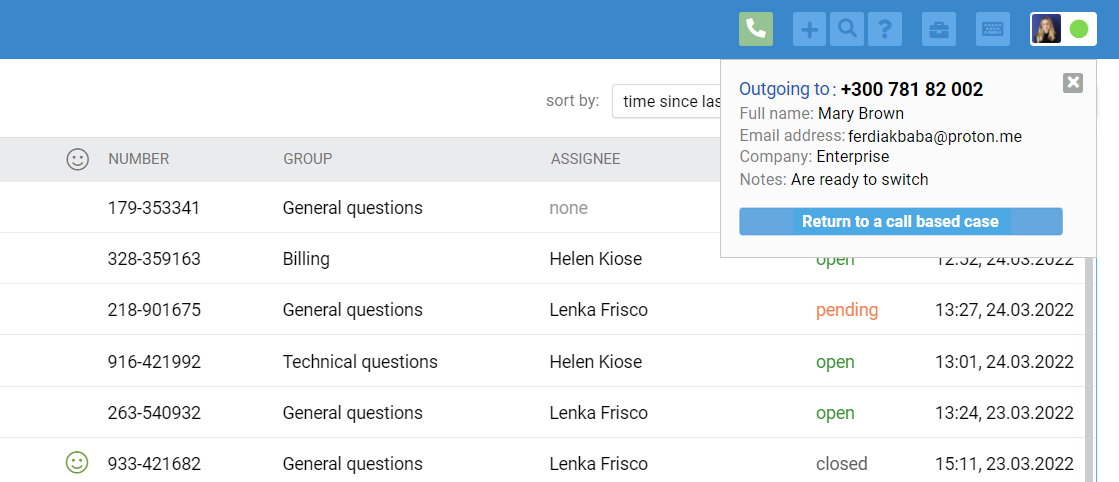
If an agent leaves the case page at this point, a notification will appear in the upper right corner with a button to return to the current call based case:
8) If the user answers the call, the agent will have the opportunity to capture the essence of the call:
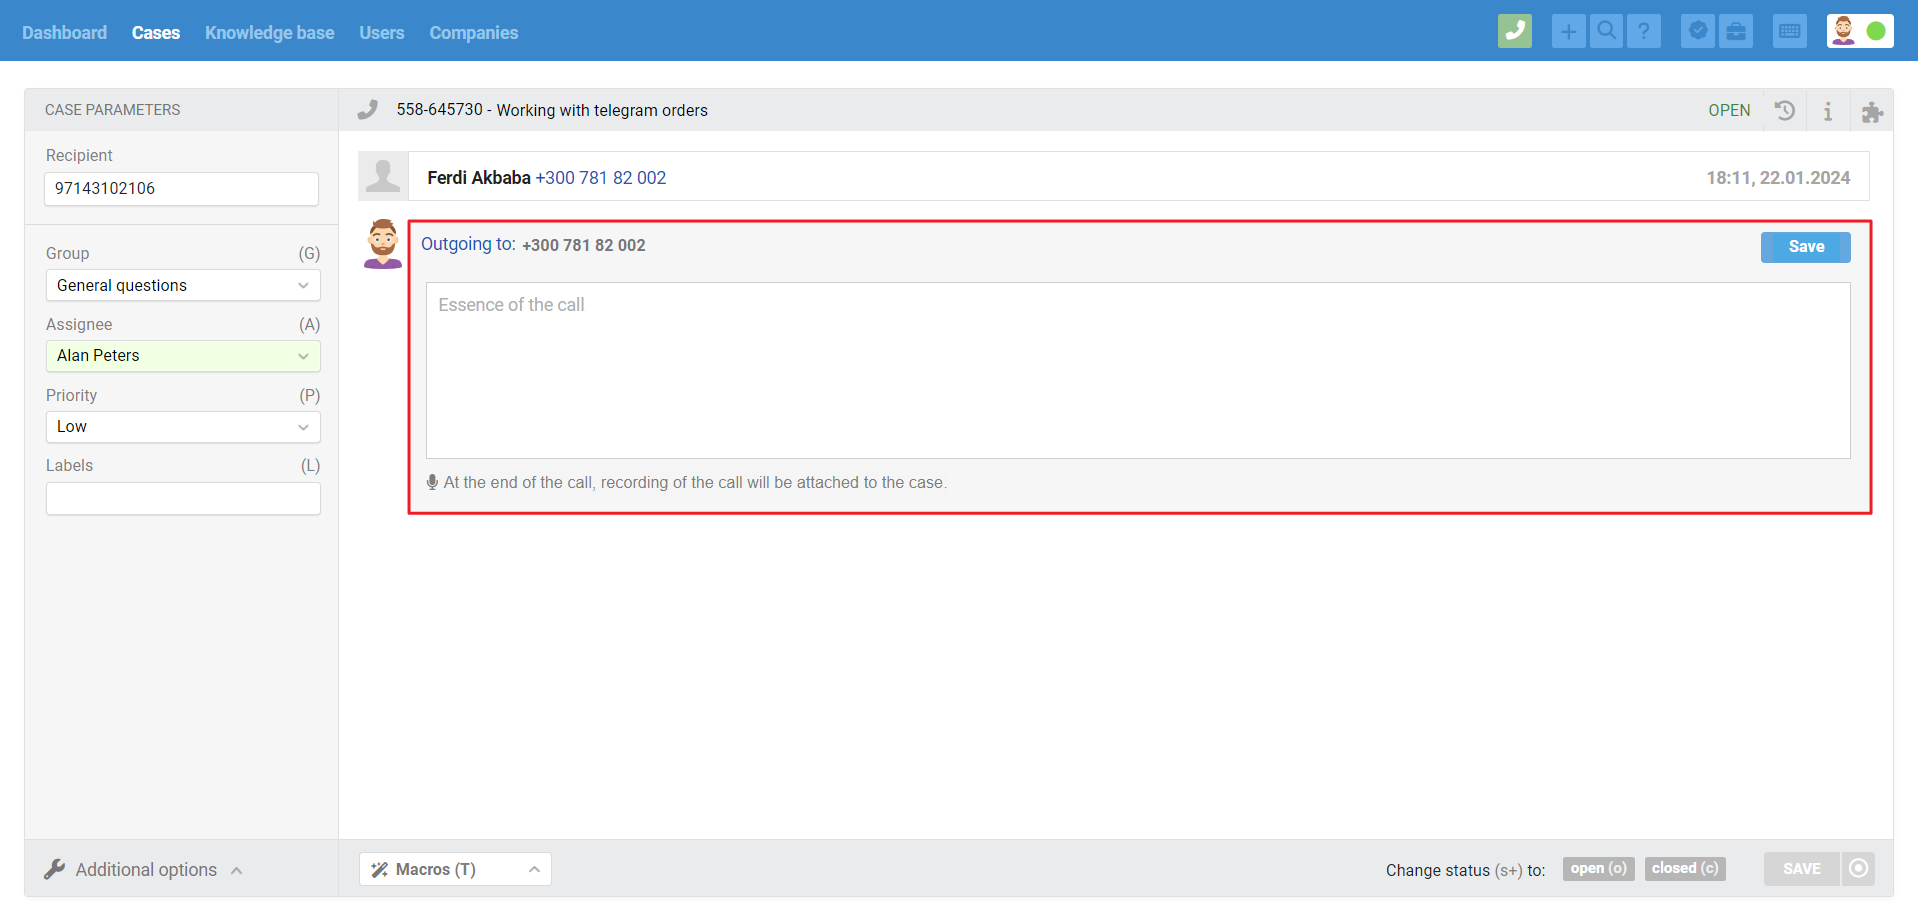
Once the changes are saved, the case will display a message on behalf of the agent to which the call recording will be attached when the call ends:
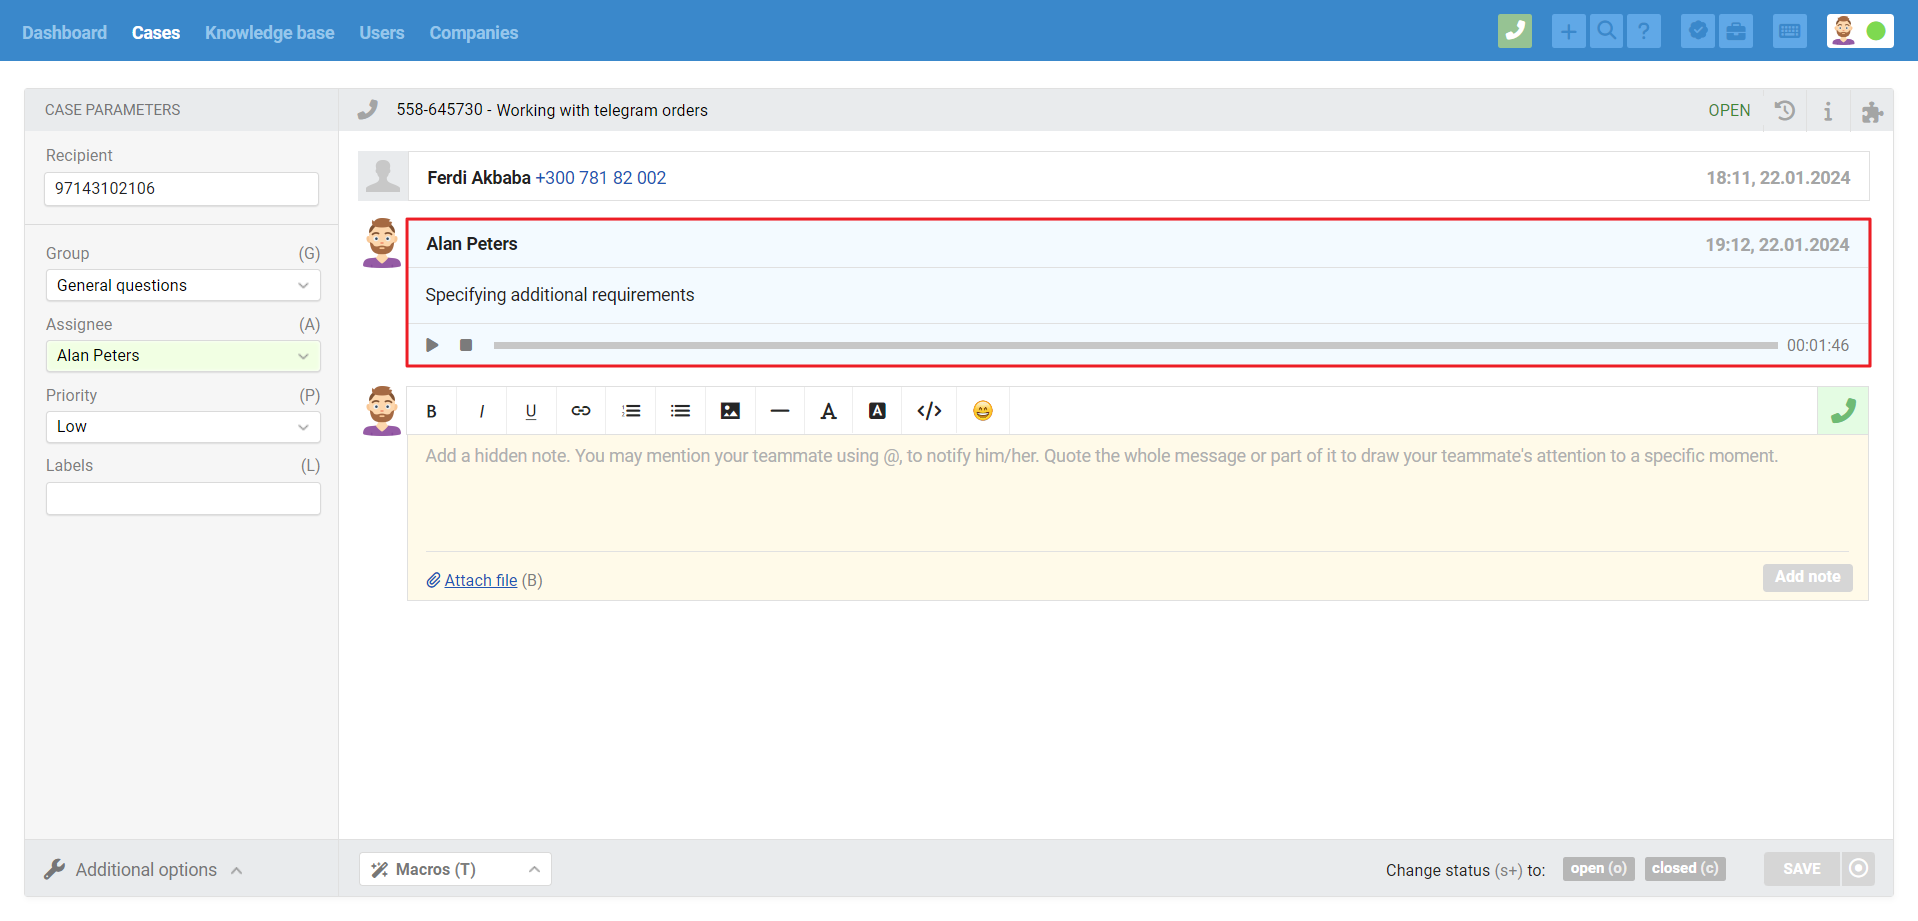
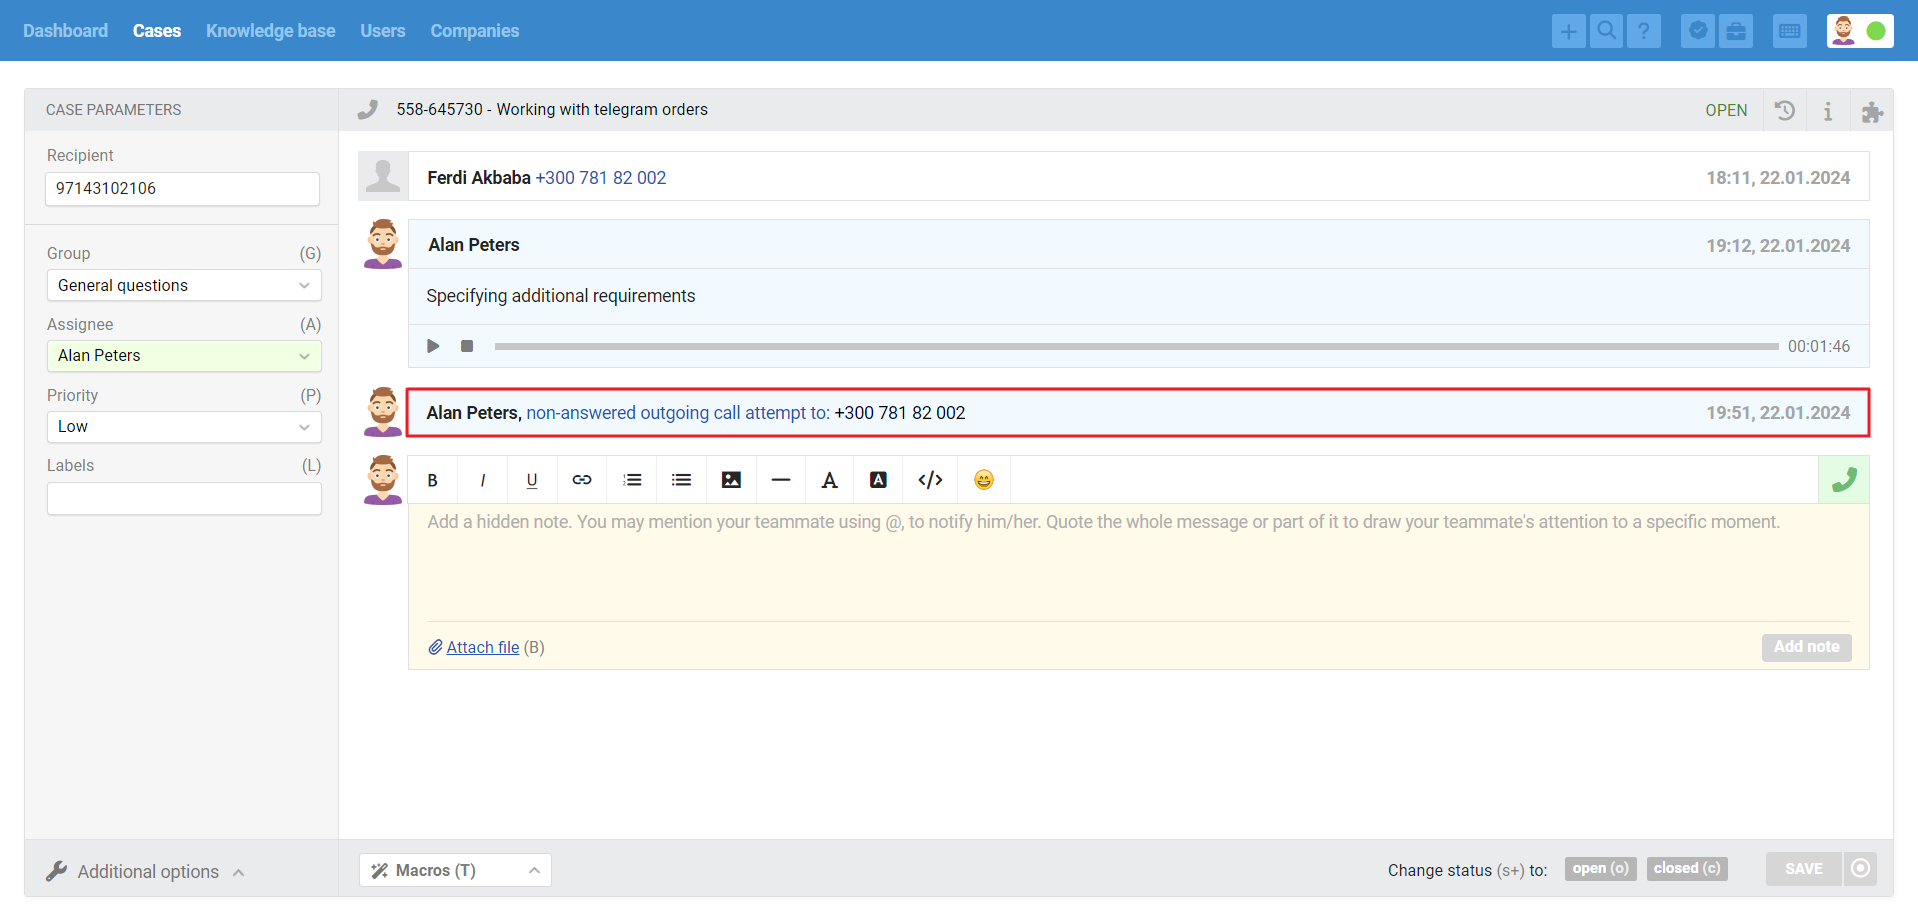
9) If the user never answers the call, we record the attempted call in the case:
Outgoing call to a user via softphone
In this case, we will also pull the information about the outgoing call to Deskie, and the agent will be able to perform the necessary actions by analogy with incoming calls:
create a new user if such a number is not yet in the Deskie database;
create a new call-based case;
link the call to an existing case.
10) If, when making a call via softphone, an agent does not open Deskie and does not create a case (or fixate the call within one of the previous cases), when the call ends, Deskie automatically creates a case with the status “closed” and the assignee.
Capturing missed calls from the user
11) If the user's call goes unanswered, we create a case with a standard subject "Missed call from [phone number]" and a red handset icon to make it easier for agents to identify missed calls in the all cases list:
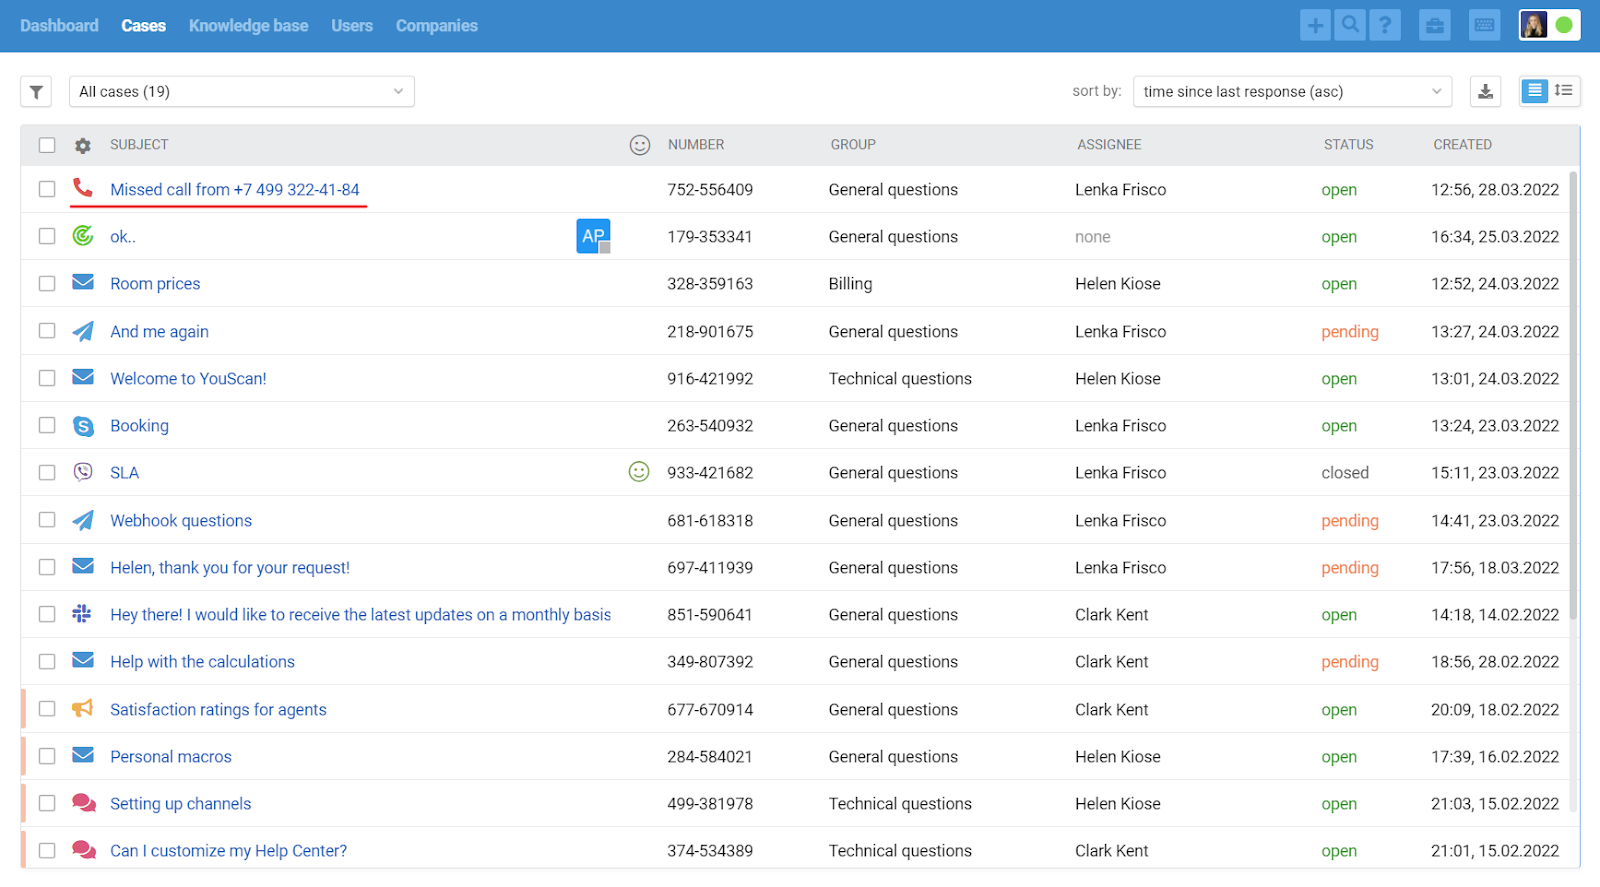
Missed call cases are created when:
— the call was routed to operators associated with agents in Deskie — in this situation, the call based case will be assigned to the agent to whom the call was distributed last;
— when the call was ended by the user before it reached the distribution, for example, the user hung up while listening to the voice menu — in this scenario, the call based case will not have the assignee.
12) Missed calls from one user are grouped to exclude the situation where a persistent user will create dozens of calls and clog the list with them:
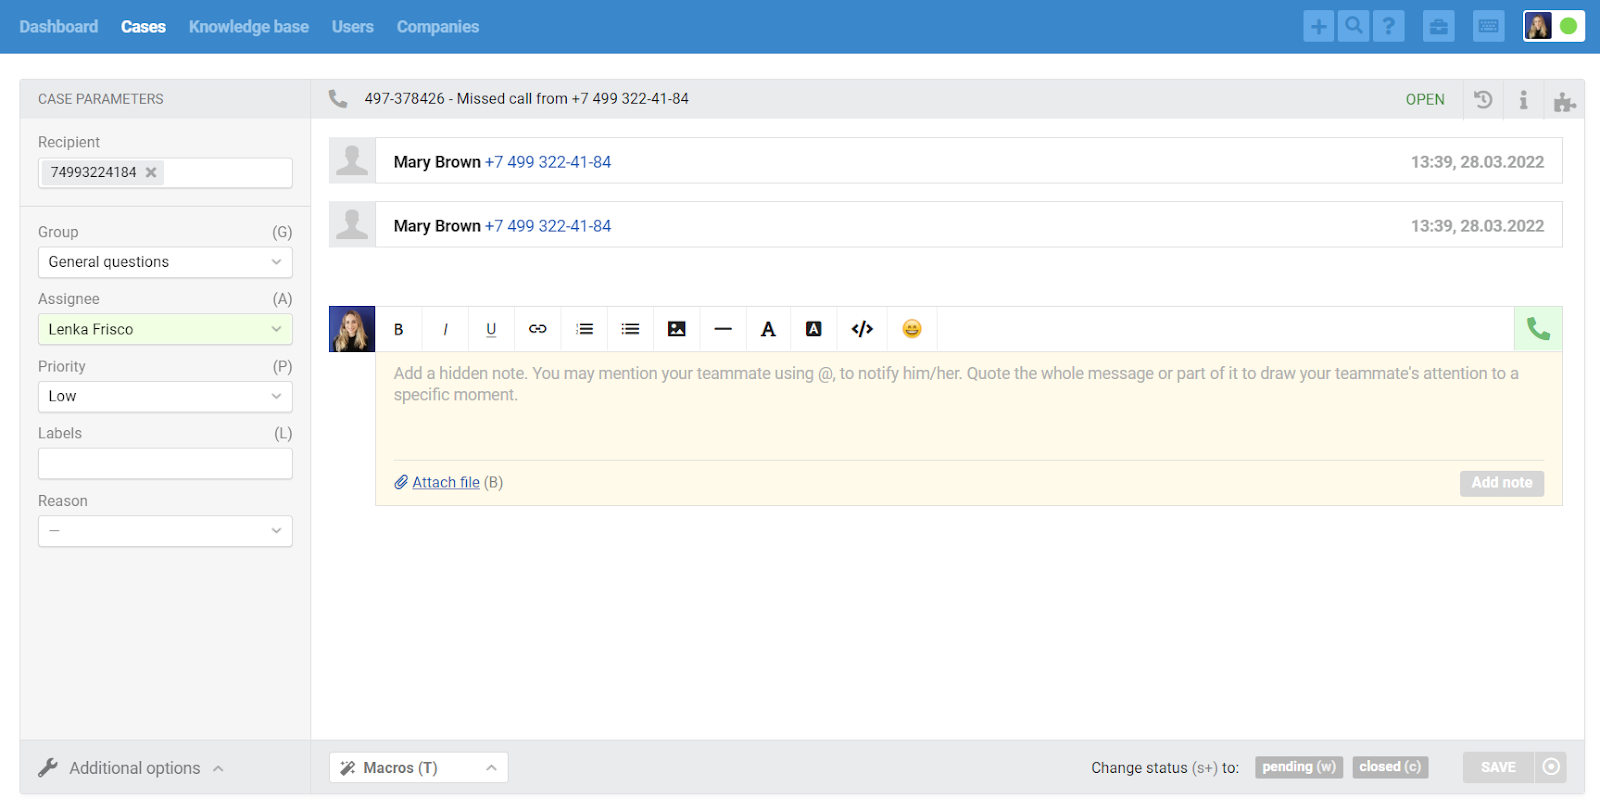
However, the grouping of missed calls within one case occurs only if between these calls there was no completed call between the user and the agent. If there was a conversation, we will create a separate case for the next missed call.
13) When an outgoing call from an agent appears in the missed call case (the customer needs to answer and there should be a record of the conversation), then the color of the handset changes to the standard green one.
14) If you have specific business hours and you do not want cases to be created in Deskie for missed calls during non-business hours, you need to set up call forwarding to voicemail in the telephony service interface.
Statuses logic
15) If the agent has accepted the user's call, at the end of the conversation, the status of the case will be set to "pending".
16) Cases created based on missed calls are set to "open" status.
17) If the agent calls the user back, but the user does not pick up the phone, the status "open" will remain.
18) When the list contains a call-based case from a user, the following options are available to change the status of such a case:
a. The user calls again, the agent receives the call and creates a new call-based case
We automatically change the status of a missed call case to "closed", meaning that the user and the agent resolve all issues within the framework of the new case created by the agent.
b. The user calls again, the agent receives the call and adds it to the missed call case
When the agent completes such a call, the status of the case will be set to "pending", since the agent has discussed everything that is needed with the user (see paragraph 15).
c. An agent dials the user from the case of a missed call, and the user accepts the call
At the end of the call, the case will receive the status "pending".
d. The agent dials the user directly through the softphone, the user receives the call, and the agent creates a new call-based case
In this case, we also automatically change the status of the missed call case to "closed", meaning that the user and the agent resolve all issues within the framework of the new case created by the agent.
e. The agent dials the user directly via the softphone, the user receives the call, and the agent adds the call to the missed call case
At the end of the call, the case will receive the status "pending".
19) If, when making a call via softphone, an agent does not open Deskie and does not create a case (or fixate the call within one of the previous cases), when the call ends, Deskie automatically creates a case with the status “closed” and the assignee.
How are calls reflected in the statistics?
20) "Overall workload" subsection
