"Users" and "Companies" are sections within an agent's account in Deskie for managing these entities.
Users section
This section stores information about users who have reached out to your support team, as well as contacts you’ve imported via CSV or API.
1. The Users section has filters. There are three standard filters: active, blocked, and deleted.
It's also possible to create custom filters through the filter panel, where the following options are available:
last contact;
creation time;
cases;
company;
custom user-related fields of the "dropdown" and "checkbox" types.
Therefore, you can filter users according to the desired parameters very flexibly, which is especially useful for export, which we'll talk about next. For now, here's a screenshot for demonstration purposes:

2. Users can certainly be sorted as well. The following options are available for selection:
last contact (new ones first);
last contact (old ones first);
creation time (new ones first);
creation time (old ones first);
number of cases (desc);
number of cases (asc).

3. Similar to the all cases list, there is an option to configure the table columns. By default, we display the following columns:
- full name (a link to the user profile page);
- contact details (button(s) to open the case creation page with the "User" field pre-filled, displayed as the communication channel icon);
- last contact (a link to jump to the latest reply from or to the user);
- cases (a number of user cases and a total number of responses to understand who contacts you most often);
- created.
Additionally, in the list of users, you can activate the "Company", "Phone number" columns and any custom fields of the "drop-down list" or "checkbox" types using the gear icon.
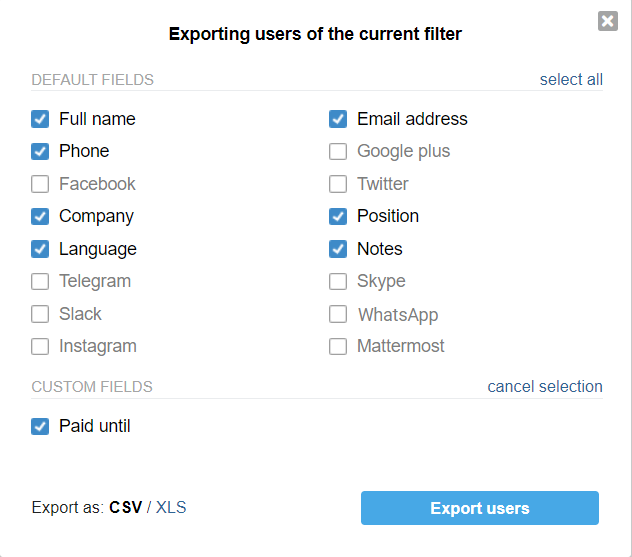
4. To the right of the sorting drop-down list, there is an icon for exporting the list of users either in CSV or XLS.
It is the users of the current filter that are exported. Using the filter you can narrow the selection. For example, to get only those users that were created within a certain period.

The user export is available only to those agents that have the corresponding permission checkbox ticked in their access settings.
5. In the upper right corner of the user's profile there is an option that allows you to control which cases a user sees: only of his own or of the entire company.

By default, the option "only of his own" is selected. When switching to "of entire company", in the help center under the "Cases" section, the user can see all cases from their company, modify their settings, and respond to email-based cases.
6. The company in the user's data is a link that allows you to quickly go to the company profile.
7. You can add additional email addresses and phone numbers to a user's data by clicking the plus icon.

Additional contact information can also be added in the user data on the case page.
When a customer contacts you through any communication channel, Deskie creates separate customer profiles for each channel. However, you can link customer profiles from different channels by specifying the same email address or phone number in different profiles to see a unified history of the customer's cases across all channels.
Company section
8. The Company section also has filters. The standard filters are: active, blocked, and deleted.
The custom filters are created through the filter panel with the following options available:
- creation time;
- users;
- cases;
- last contact.
9. Companies can also be sorted. The following options are available:
last contact (new ones first);
last contact (old ones first);
creation time (new ones first);
creation time (old ones first);
number of users (desc);
number of users (asc);
number of cases (desc);
number of cases (asc).
10. The following columns are displayed in the list of companies:
company (a link to the user profile);
last contact (a link to the last message from or to the company);
users (a number of users in the company);
cases (a number of cases from the company and a total number of responses to understand how often you communicate with employees of the company);
created (company's data creation in Deskie).
11. When blocking/deleting a company, we block/delete all its users as well. However, blocking/deleting a specific user does not affect the company.
12. In the upper right corner of the company profile, there is an option that allows you to control which cases users of the company see in the help center: only of their own or of the entire company.
Default settings are set through this option, but if any user has a different option, this setting does not overwrite it.
13. In the "Domains for auto linking" field, you can specify the domains, separated by commas, so we can automatically assign new users to this company if their email includes one of the specified domains.
a) The domain should be specified without an at sign (@).
b) We do not allow you to specify domains such as "yahoo.com", "outlook.com", or "gmail.com", as they are used by a large number of regular users.

14. "Default group" — a drop-down list for selecting a group that is set for all new cases from users of the company. This group is overwriting the channel group through which the case came.
15. If the company has custom fields of any type (text, checkbox, date, drobdown), they are also displayed in the company profile. Read more
16. There is a separate block under the company's data, which displays cases and company users.
Both lists use the columns that are configured in the "Cases" and "Users" sections.
17. When browsing company users, there is a "Create user" link in the header of the list to quickly add a user through a modal window (similar to the "add new user" link on the page for creating a new case).
