The "Agents" subsection in the "Team" section allows you to add agents and flexibly configure their access level/additional permissions. Let's take a look at the main features:
Adding agents
To add agents, go to the "Team" section. You will find yourself in the right subsection — "Agents".
By default, we add you (administrator) as the first agent. If you are not planning to process cases at all, you can disable or delete your agent account.
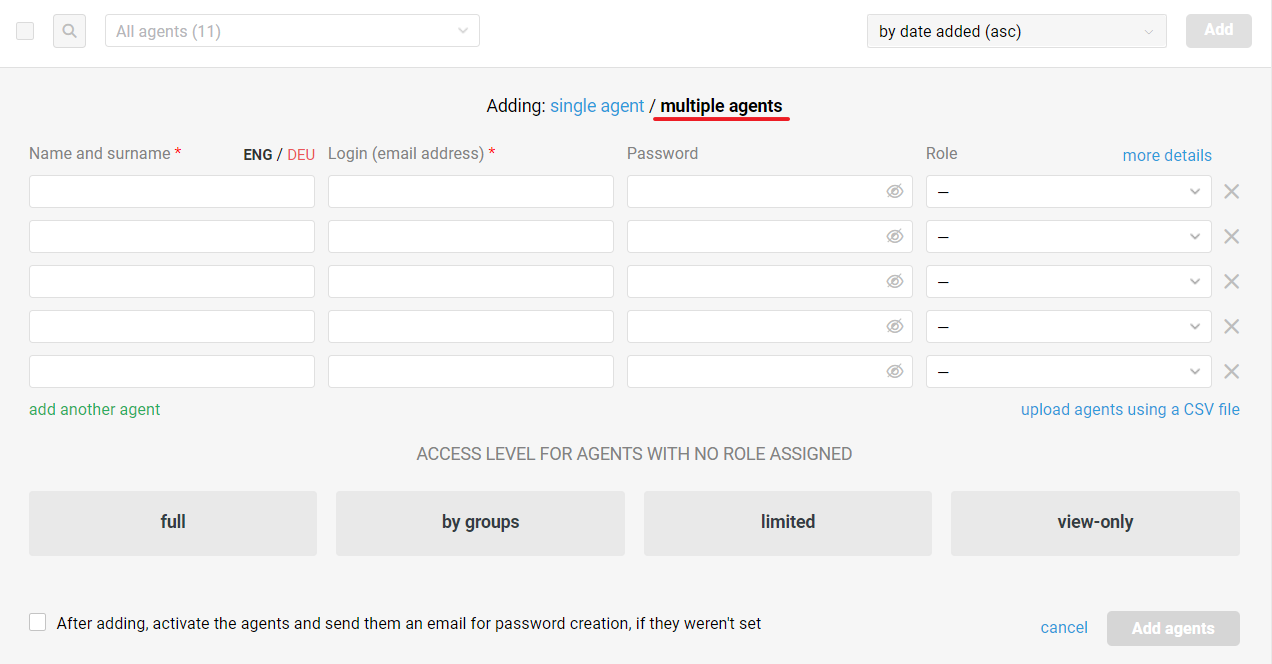
To add a new agent, you need to fill out a short form:
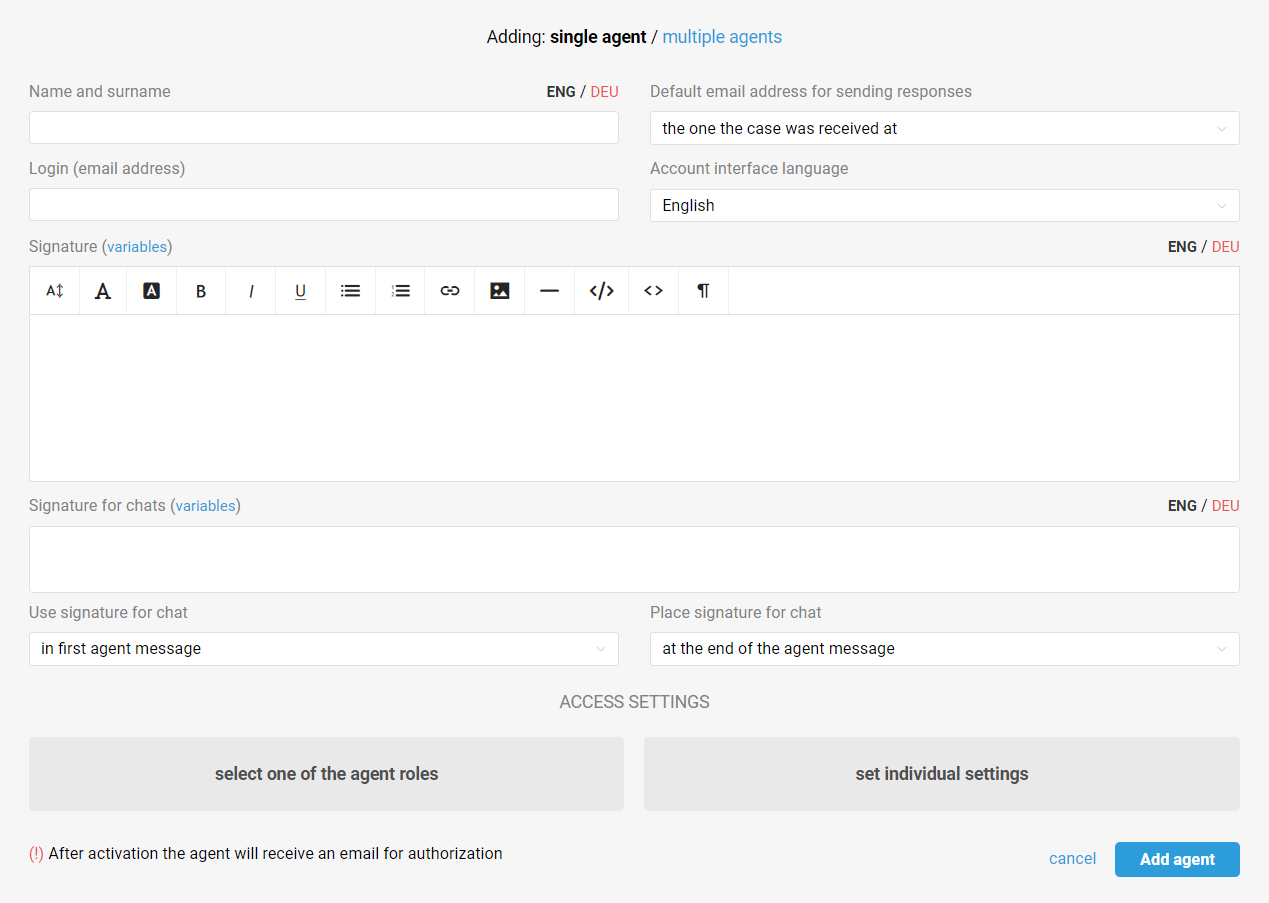
The only fields that must be filled in are the agent's name and email, which will be used by the agent as a login to the account. Next, you also need to select the access level.
Access levels
Access can be configured either individually for each agent or using agent roles — predefined sets of settings for signature, access, and additional permissions.
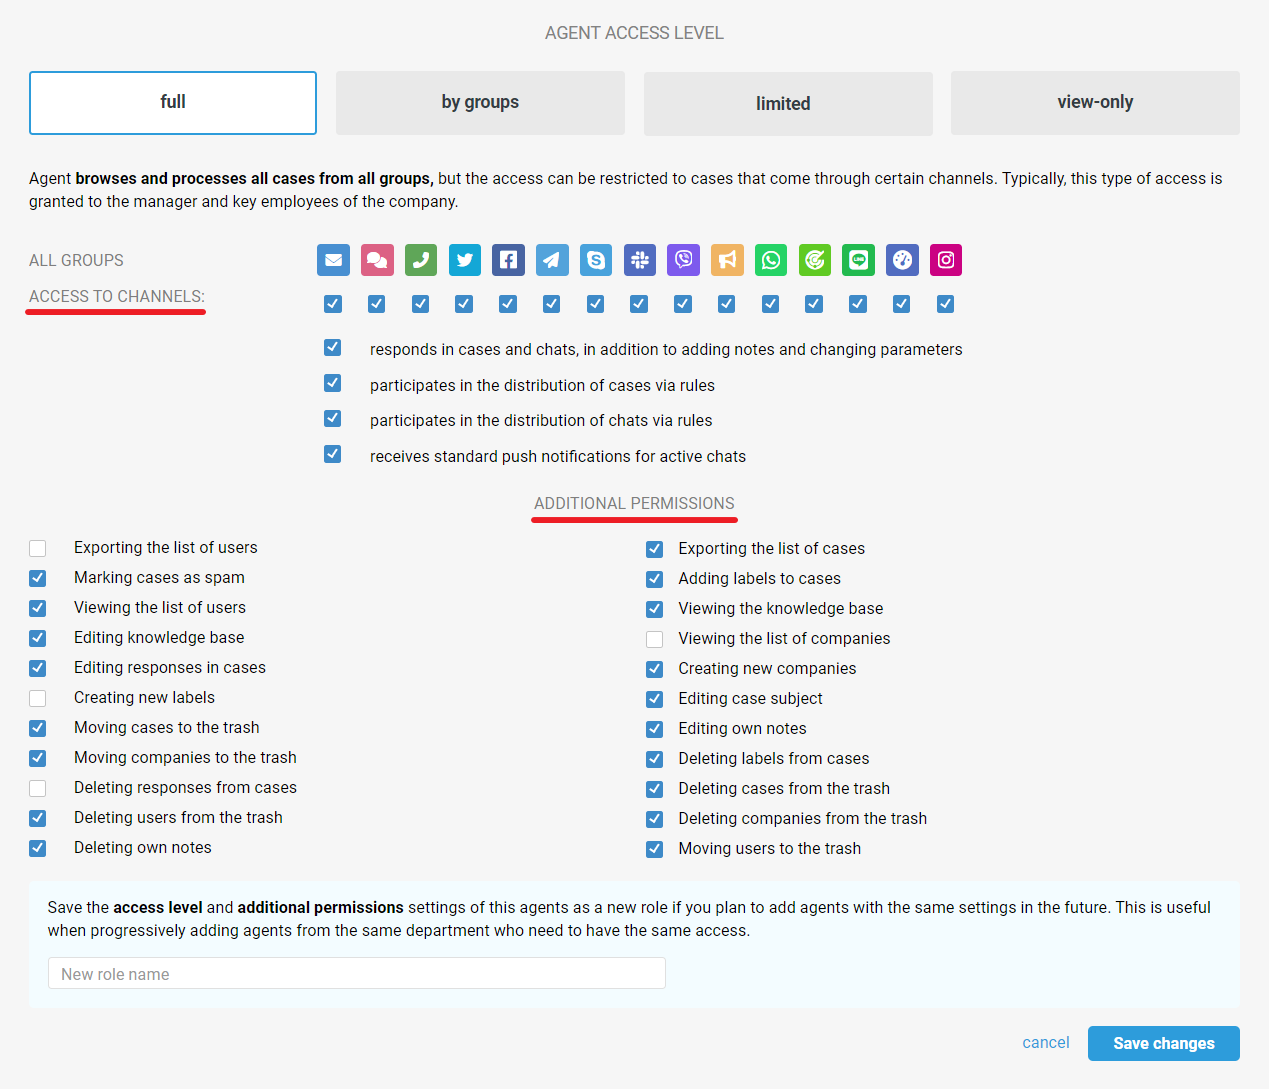
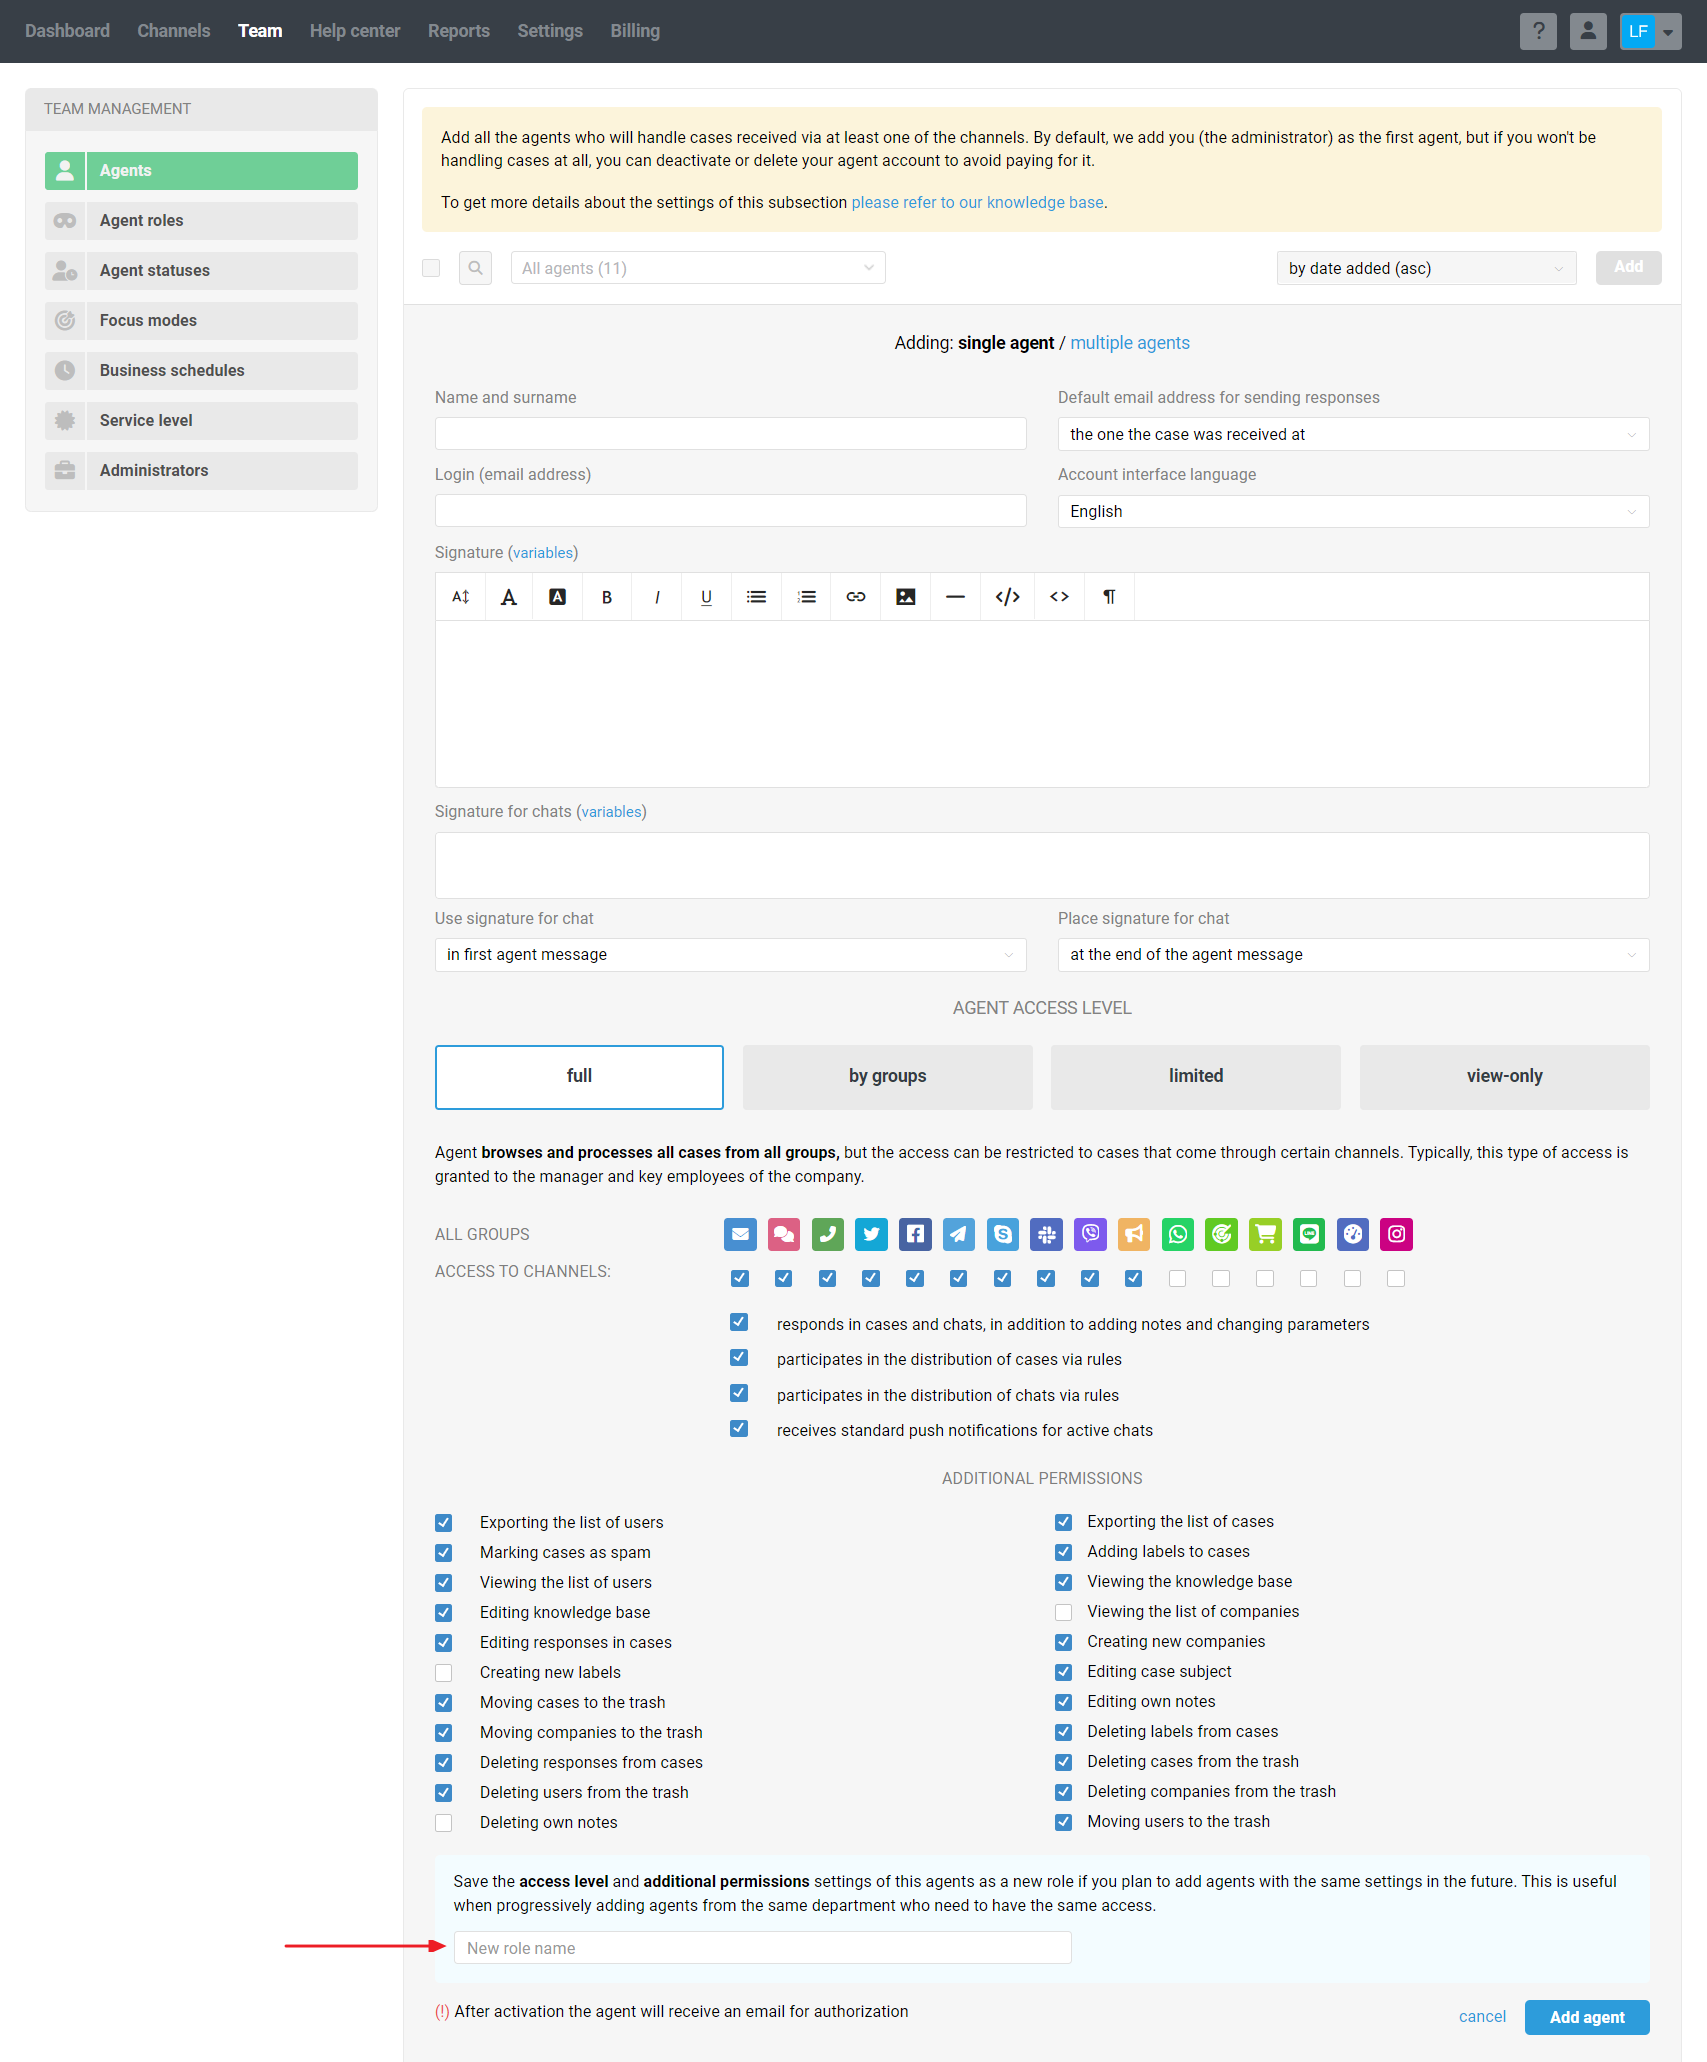
Full access allows an agent to browse and process all cases in all groups. This level of access should be granted to managers, executives, and senior agents.
Access by groups gives an agent the possibility to see all cases in permitted groups. Appropriate for regular support agents.
Limited access allows agents to browse and process only those cases that are assigned to them. No additional settings. The option would work well for novice support staff, outsourced specialists, or employees who rarely deal with customer issues and questions.
View-only allows you to view cases, leave notes, change parameters, but not to respond to cases. Also, agents with this access level don't see active chats but can participate in the distribution of cases through asynchronous channels, if the corresponding checkbox is ticked in the access level settings.
At Deskie we call such agents light ones, their cost is 10€ per month. As "light" we recommend adding company agents who do not communicate directly with customers: developers, accountants, marketers, etc.
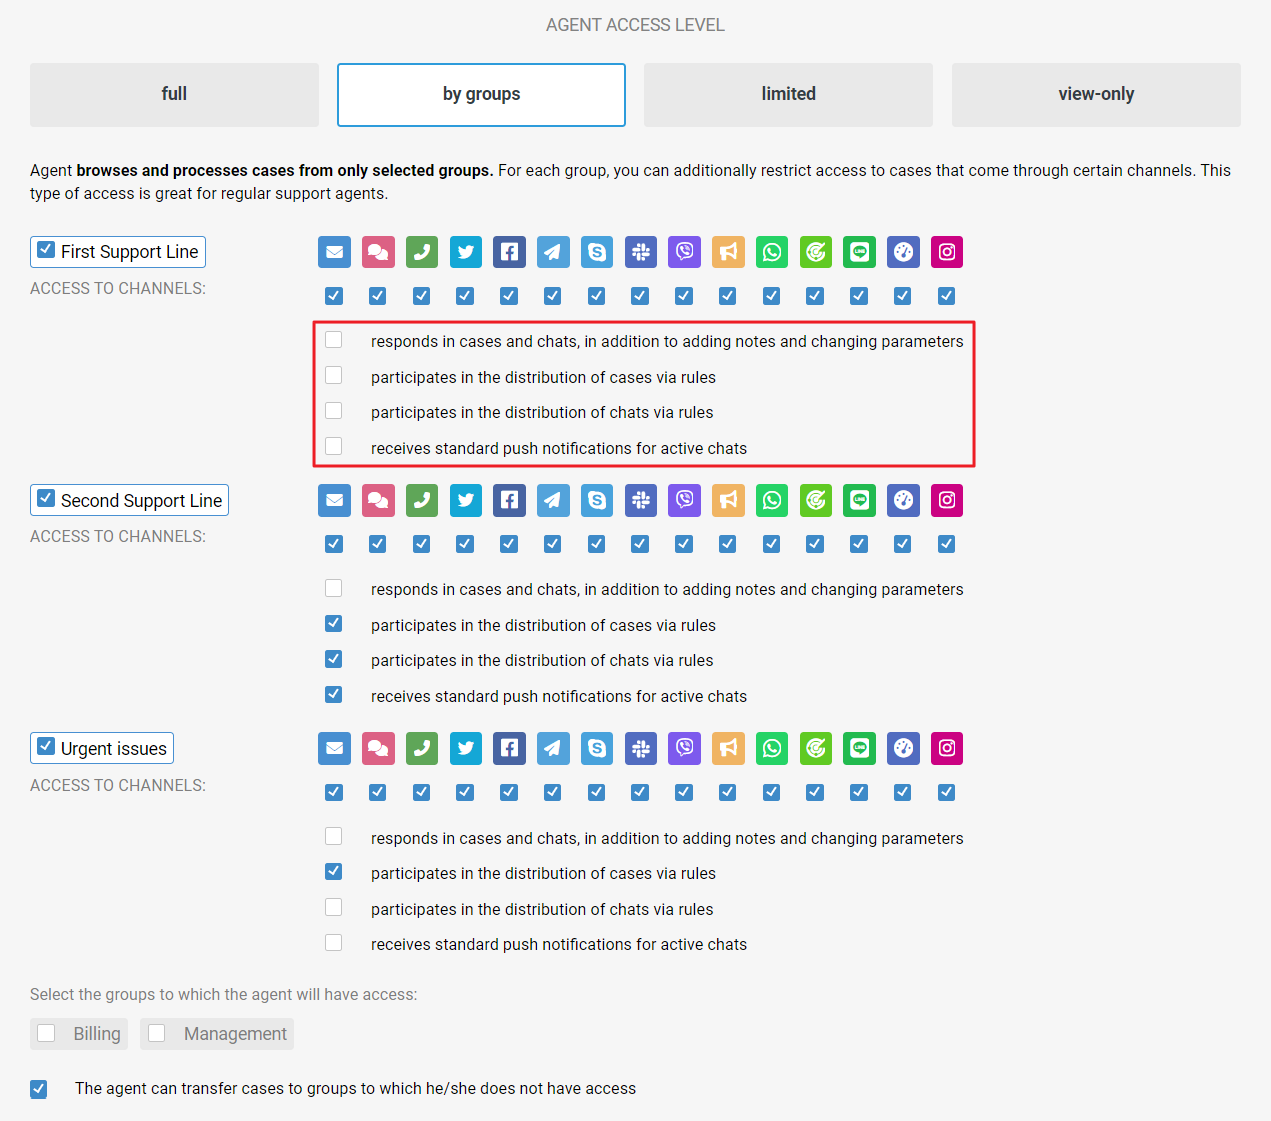
Different access settings for different groups
In some cases, it is necessary to set up different access levels for an agent depending on the group. For example, developers only need "view only" access for the "First Support Line" group, so that the First Line agents can ask them to view the correspondence about the problem and give comments. And in the "Second Support Line" and "Urgent Issues" groups they should send answers themselves to solve complex issues more quickly.
You can, for each group, choose whether an agent should:
be able to respond in cases and chats;
participate in the distribution of cases and/or chats;
receive standard notifications for active chats.
Channel access and additional permissions
You can flexibly customize the capabilities of an agent depending on his/her role in the company. For example, you can restrict access to certain channels (for example, hide cases from the Calls channel).
Here you can also set permissions to edit and delete notes and messages, create and delete labels, companies, users, etc.
If some agents — for example, a head of the support team or an accountant — need access to the administrator account, then separate sub-administrators should be added for them with access levels adequate to their tasks.
Agent Signature
The text in the "Signature" field is automatically added to the end of each agent's response. Therefore, phrases such as "If you have any questions, please do not hesitate to contact me" should not be used, as in some cases they will look inappropriate.
Email
HTML editor is available in the field for adding a signature for email messages. You can format the text to your taste, add an image or insert ready-made code if you use the signature generator. Read more
Chats
You can add a separate signature for chats, and choose where and when to add it. Read more
Group sender name
If you don't want to personalize communication with your customers, you can use a group signature. Read more
Signature Prioritization
If you have a signature set in the agent role settings, it will be used. If you want to display personal agent signatures to customers, leave the signature field blank when configuring the role.
If you also have a group signature activated, it will have a higher priority than the role signature in the groups for which it is configured.
Activation
In order for an added agent to receive an email to create a password and log in to their account, they must be enabled. Initially, all agents are added disabled.
PRO hint: To help agents get a quick start with Deskie, send them links to articles that will show them the key features of the service.
Adding agents in bulk
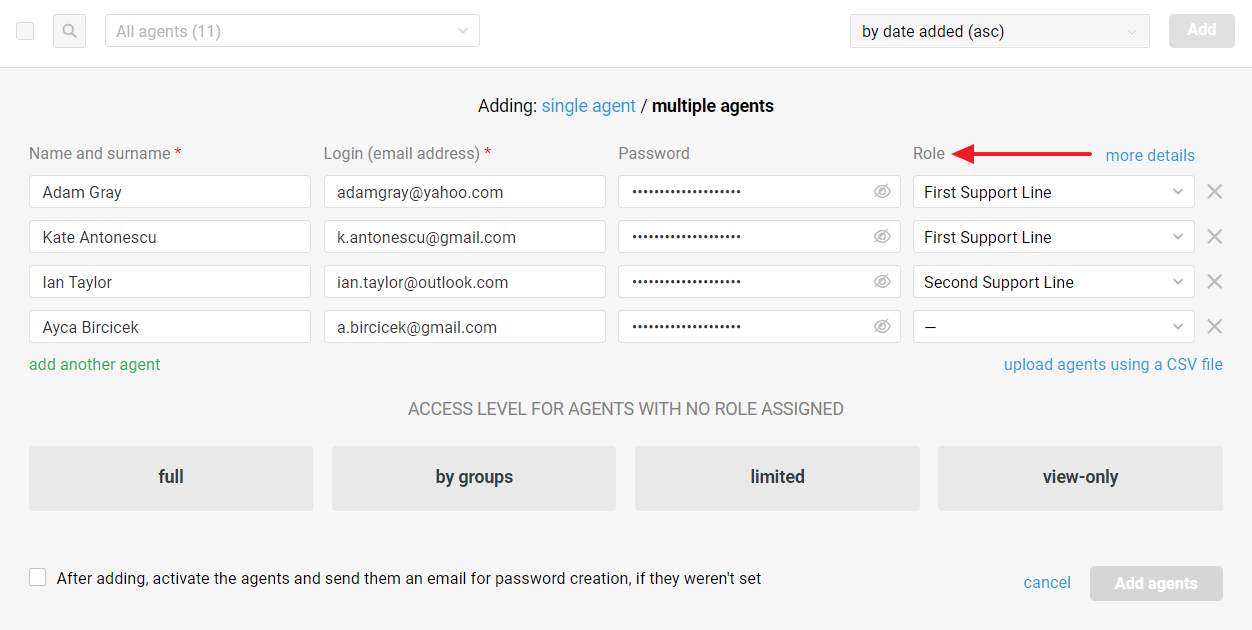
When adding agents in bulk, you only need to specify a few parameters.
a. The fields "First and last name" and "Login (email address)" are mandatory.
b. The "Password" field is optional. You can set passwords for agents in advance or leave the fields empty for agents to come up with them on their own.
Filling in the Password field is also related to the checkbox at the bottom of the form — "After adding, activate the agents and send them an email for password creation, if they weren't set":
if the "Password" field is filled in for all agents, you can choose whether to tick the checkbox or not. When the checkbox is not ticked, we will create new agents, but will not activate them, i.e. payment for them will not be deducted yet. This is convenient if you create agents in advance, at the stage of Deskie customization. When agents are ready to start working, it is enough to activate their accounts. You can quickly find such agents using the "Deactivated" filter in the list of agents;
if the "Password" field is not filled in for any of the agents, the checkbox will be ticked immediately, and after clicking on the "Create" button all agents will be activated. Those agents for whom no password has been set will be sent an email with a link to create a password.
"Emails containing links for password creation or password recovery following a reset are sent from your designated default mailbox, i.e. the one connected to Deskie as a channel, and marked with an asterisk. Ensure that the mailbox is working properly."
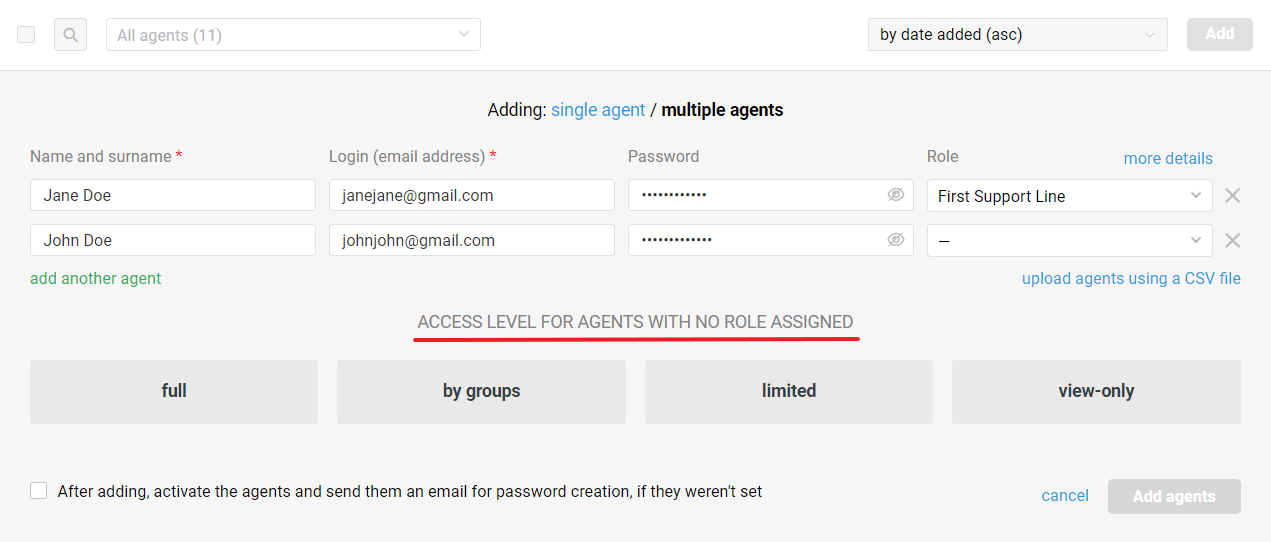
c. The "Role" field is also optional. If at least one of the agents does not have a role selected, a block for selecting access level for agents with no role assigned is displayed.
Loading agent data via CSV
You can create new agents not only manually, but also by importing data from a CSV file where you can specify name, email address, password, and role.
Requirements for the uploading file:
a) UTF-8 encoding;
b) a comma "," as a separator between values;
c) the column with email addresses must be filled in.
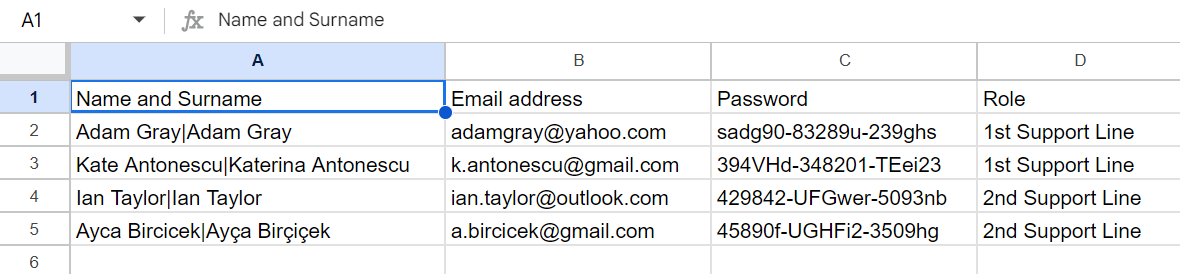
Example of a correct file.
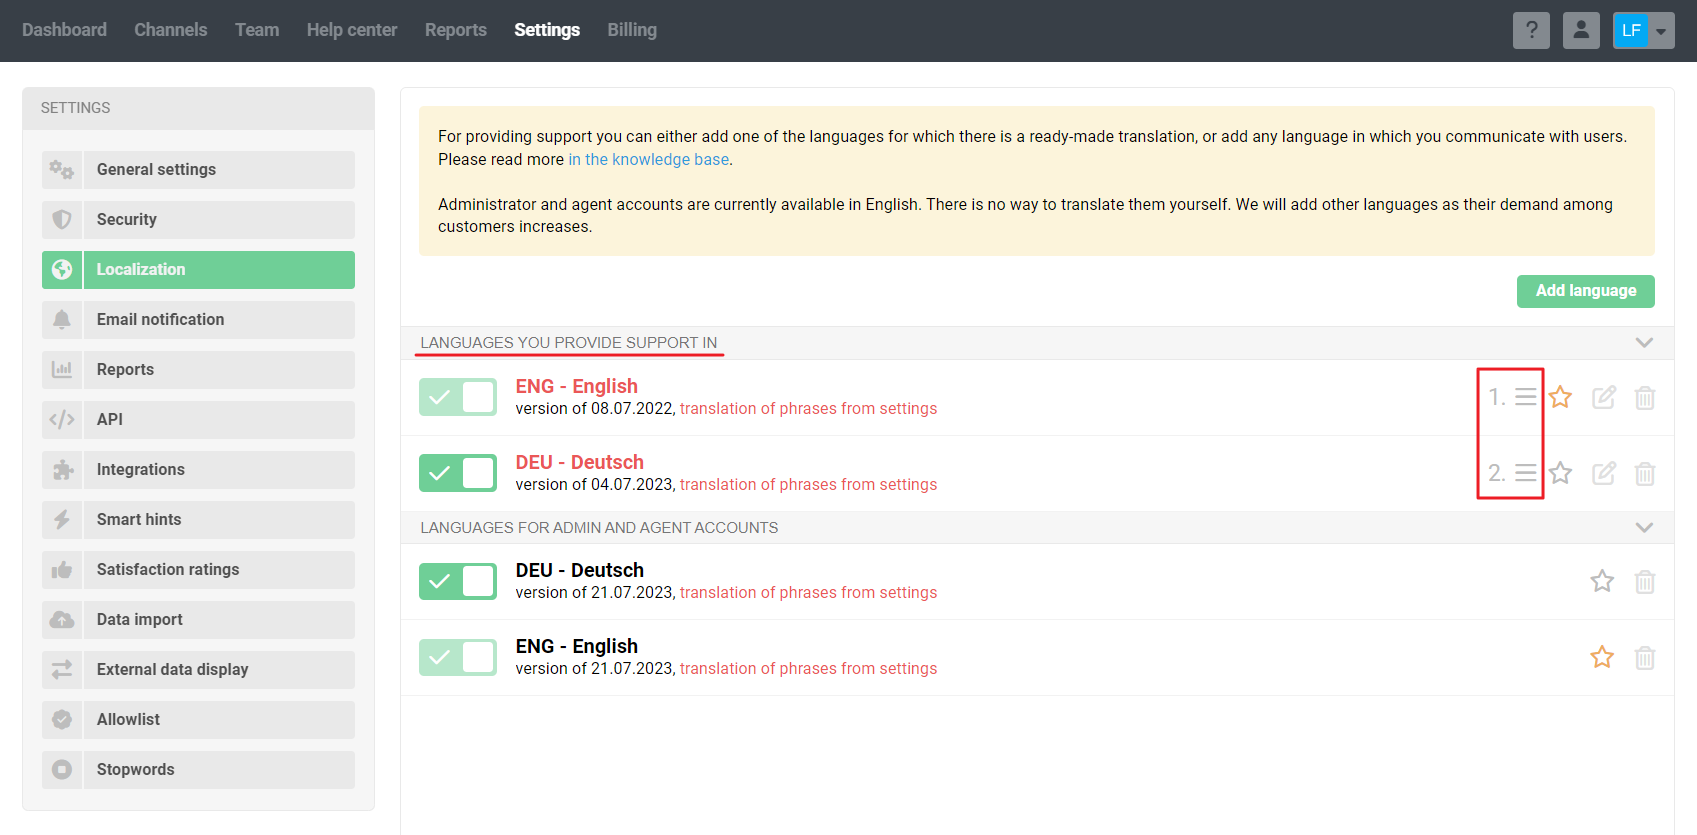
PRO hint: If you have added several languages to provide support, you can pass versions of the agent's name in all languages at once in the cell with the agent's name. To do this, use a vertical line "|" as a separator and specify the names in different languages in the same order in which they are added in the settings (Administrator account → Settings → Localization subsection).
If you have up to and including three languages added, you will be able to see all agent name options at once in the form for adding agents.
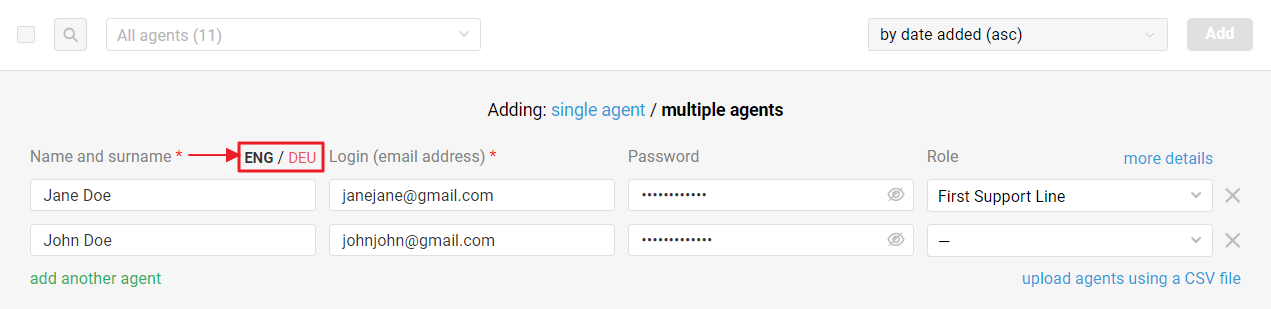
If you have more than three languages added, then in the form of adding agents you will only see the version in the default language (marked with an asterisk in the localization settings), but when you create agents, the versions of names in all languages from the file will still be added.
Agent roles
Roles — pre-defined sets of signature, access, and additional permissions settings. You can set the necessary settings only once, for example, for different company departments or support lines, and then simply specify the appropriate role when making changes within the team or adding a newcomer.
Let's take a closer look at how to work with roles:
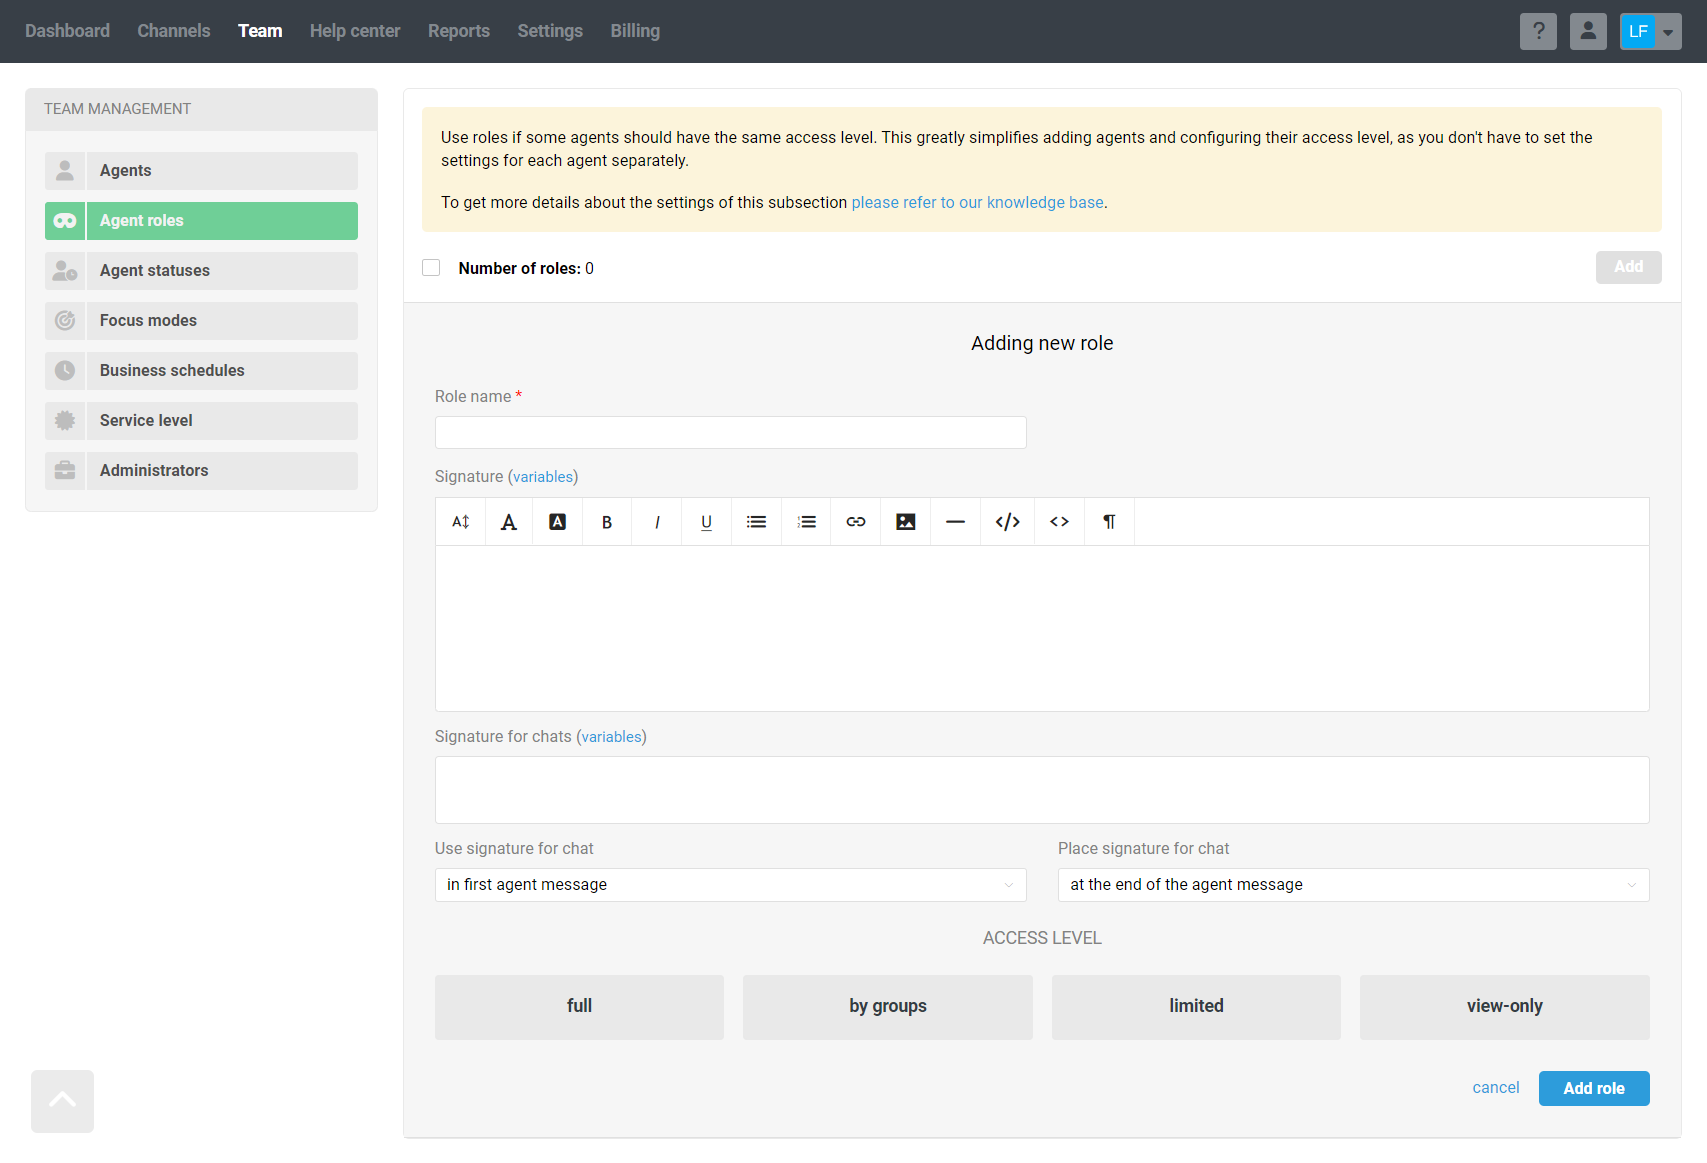
How to create a role
You can create a role in two ways.
1. Add in the "Roles" subsection (administrator account → "Team" section).
2. When creating or editing an agent, the role can be specified in the field after the block with additional permissions settings (Administrator account → "Team" section → "Agents" subsection).
How to assign an existing role to an agent
When you already have roles created, there are four ways to add them to an agent.
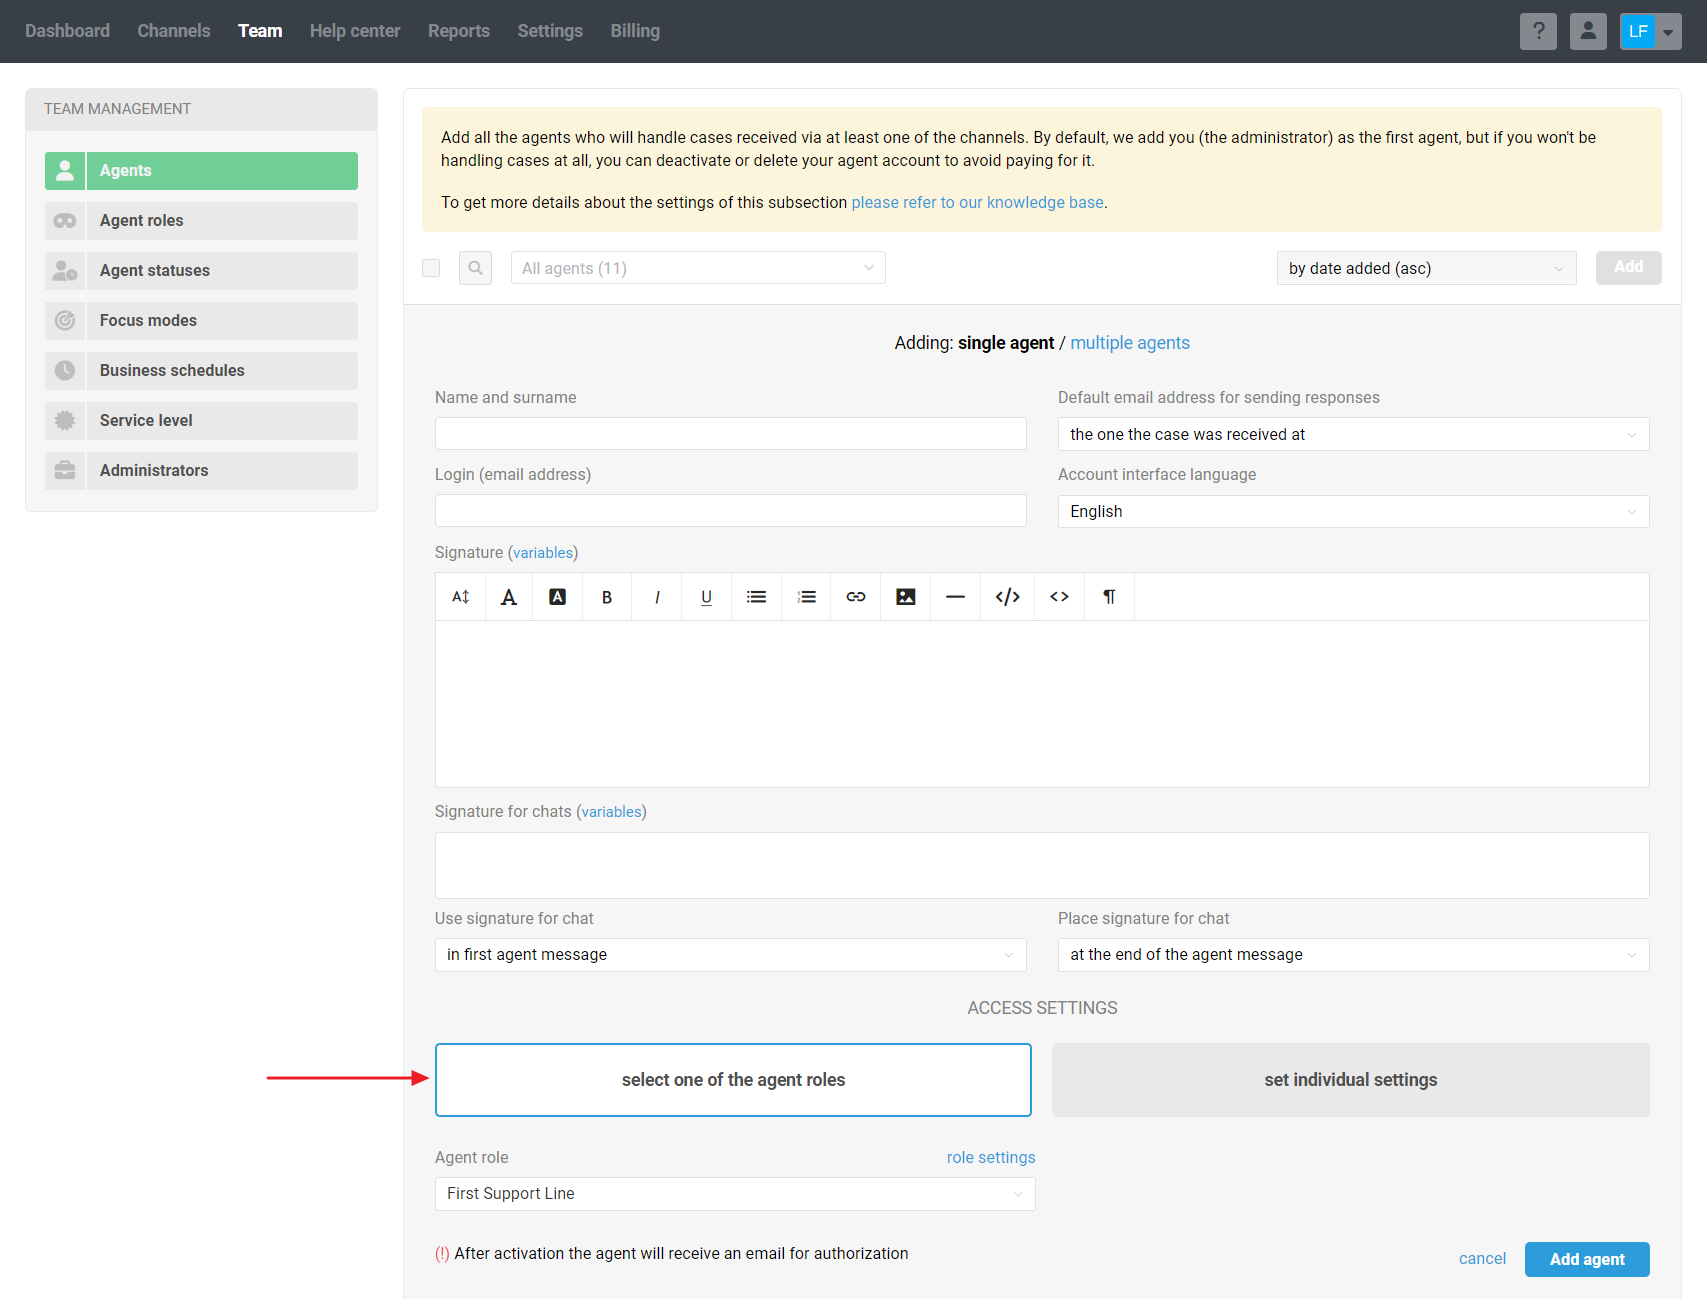
1. In the form of creating or editing an agent in the "Access settings" block → "select one of the agent roles".
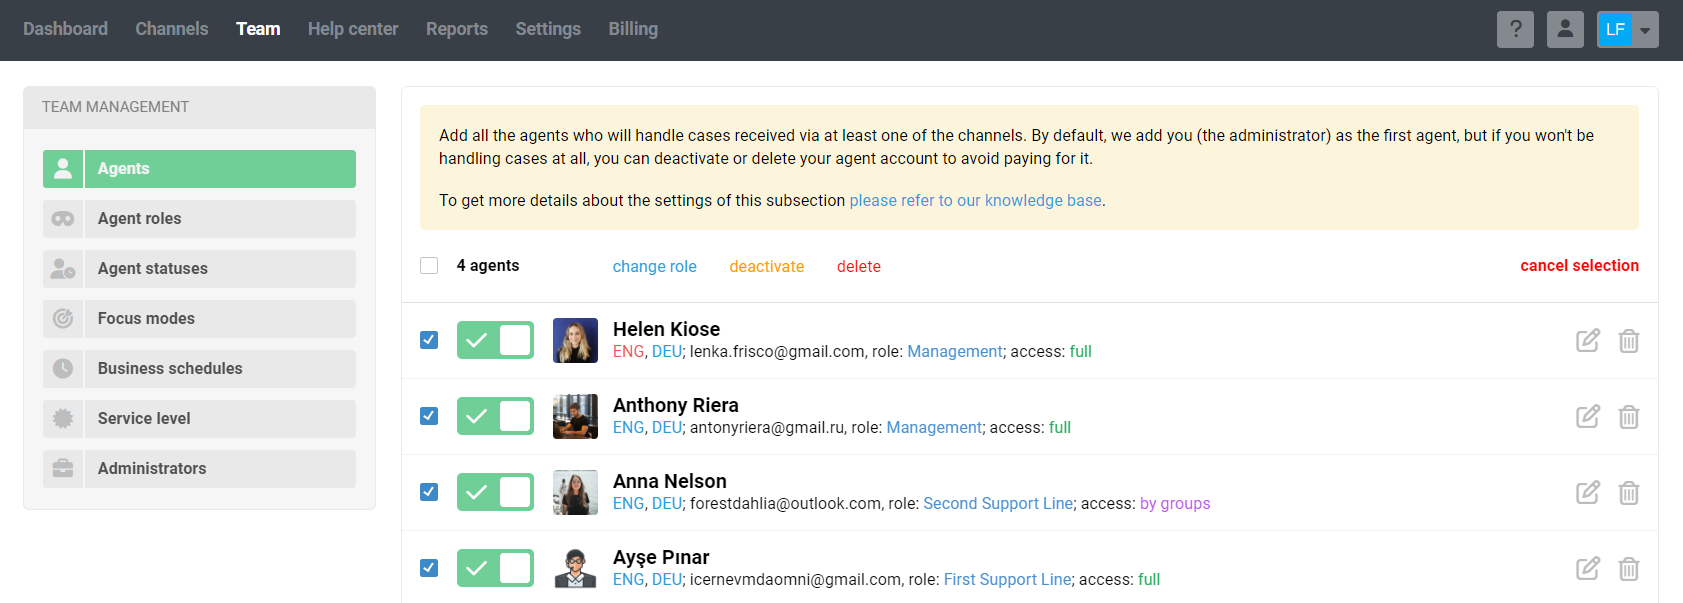
2. Via bulk actions in the agents' list. Select the checkboxes against the desired agents and click on the "change role" link at the top of the list.
3. If an agent already has a role, you can change it when viewing the list of agents with a specific role.

4. If you create agents in bulk, you can immediately assign the required roles to each agent.
How to view agents with a specific role
There are three ways to find out what role an agent has or to quickly find agents with a specific role.
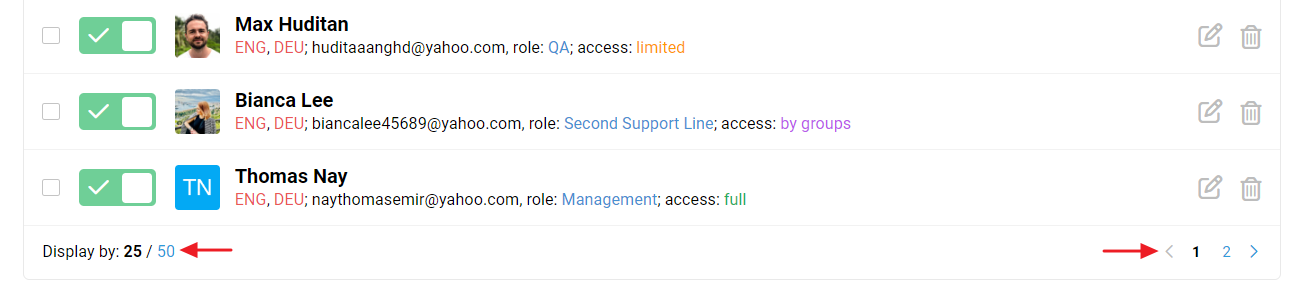
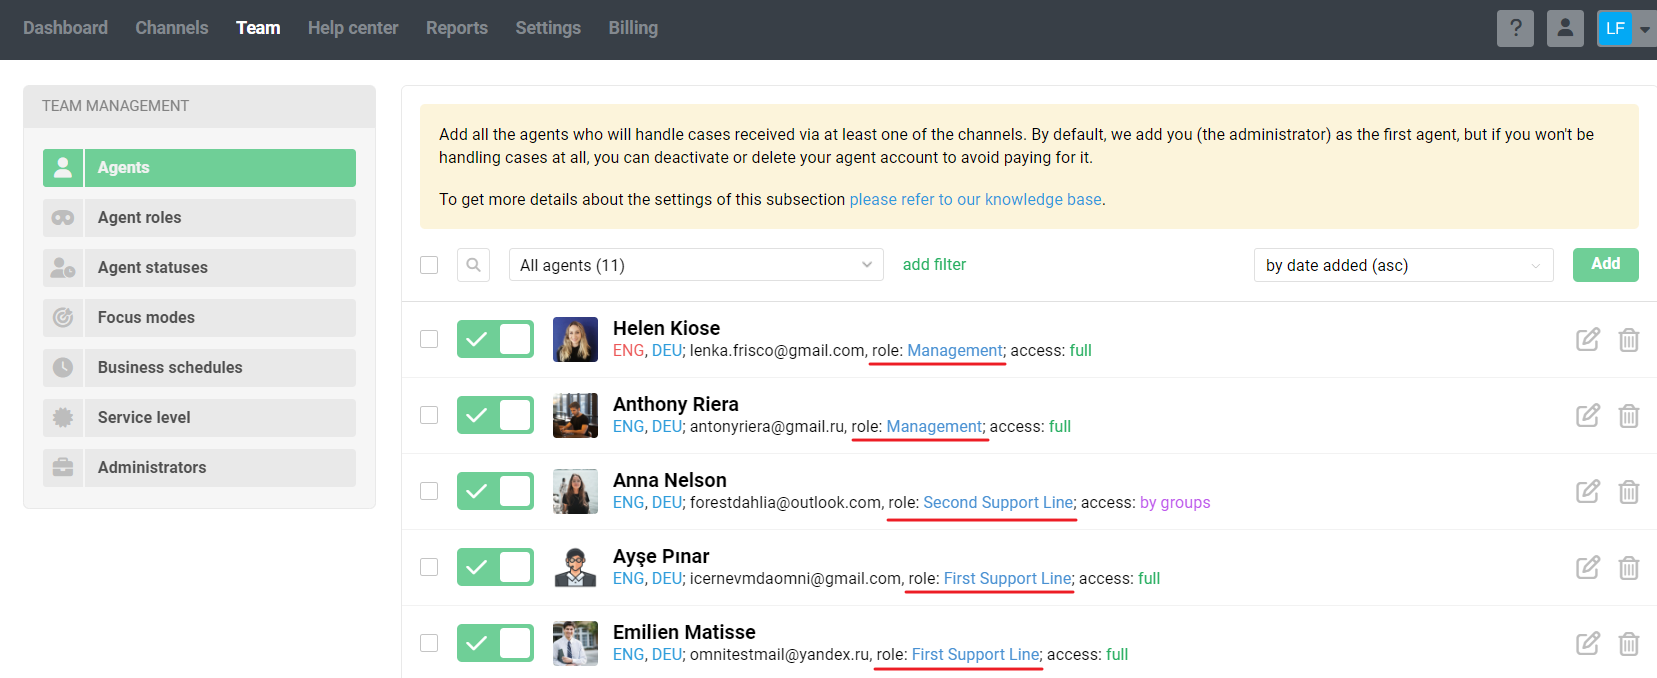
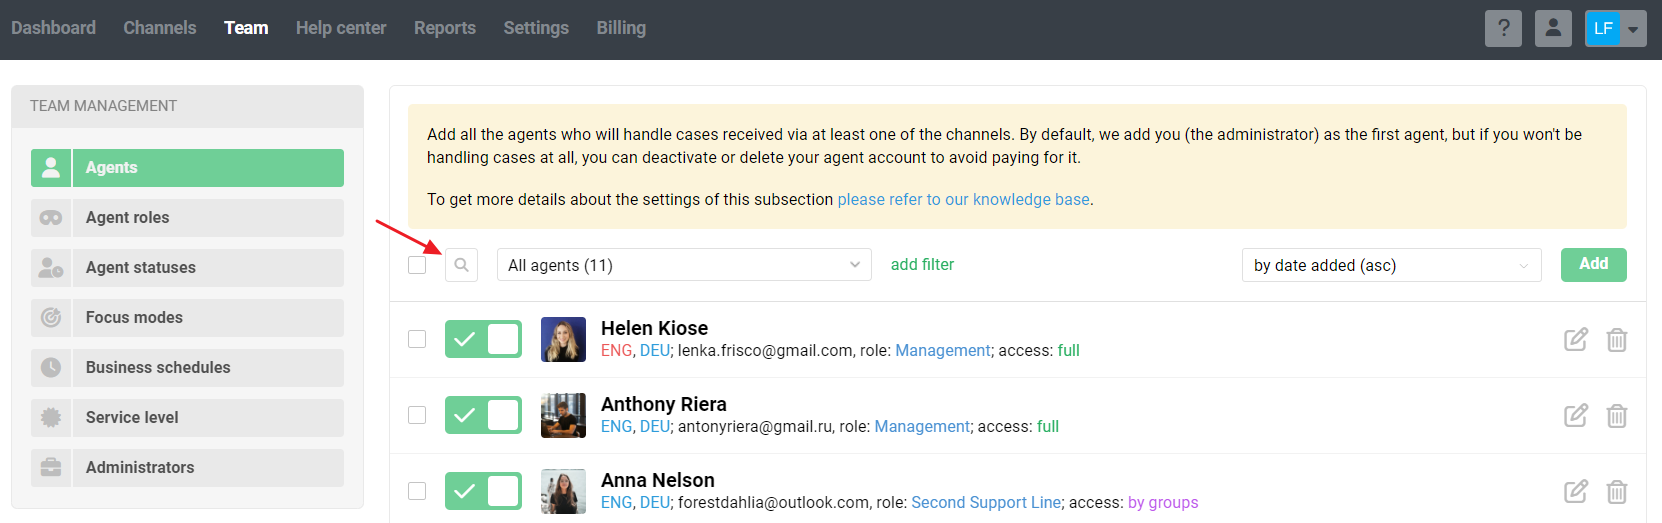
1. In the list agents list: if a role is set, it is displayed in the brief description of the agent's access.
2. Through the filter in the list of agents. When working with the filter, the following mass actions are available: you can disable or delete agents or change their role to another one.
3. In the Agent Roles subsection, by clicking on the link with the number of agents in the specific role description.
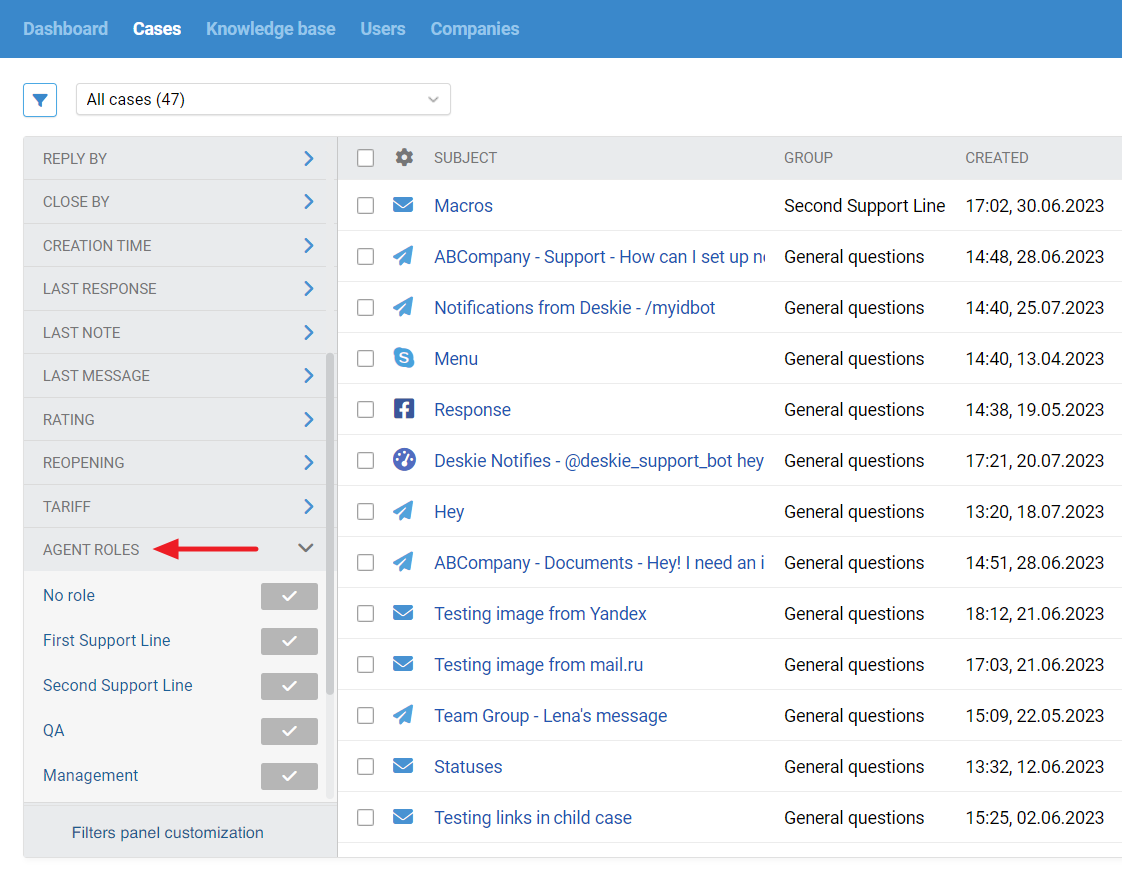
How to view agent cases with a specific role
When there are created roles, a separate filter is added to the all cases list. This filter displays cases in which agents with a certain role are set as assignees.
Navigating through the agent list
The agent list has search, filters, sorting, and paginated navigation — it is easy to work with the list regardless of the number of agents.
Search
If you need to find a specific agent, use search. It searches by names and logins (email addresses) of agents in the currently selected filter.
Filters
If you need to find agents with certain access settings or any specific additional permissions, agents who haven't logged into their accounts for a long time, or agents whose accounts have been disabled for a long time, use filters.
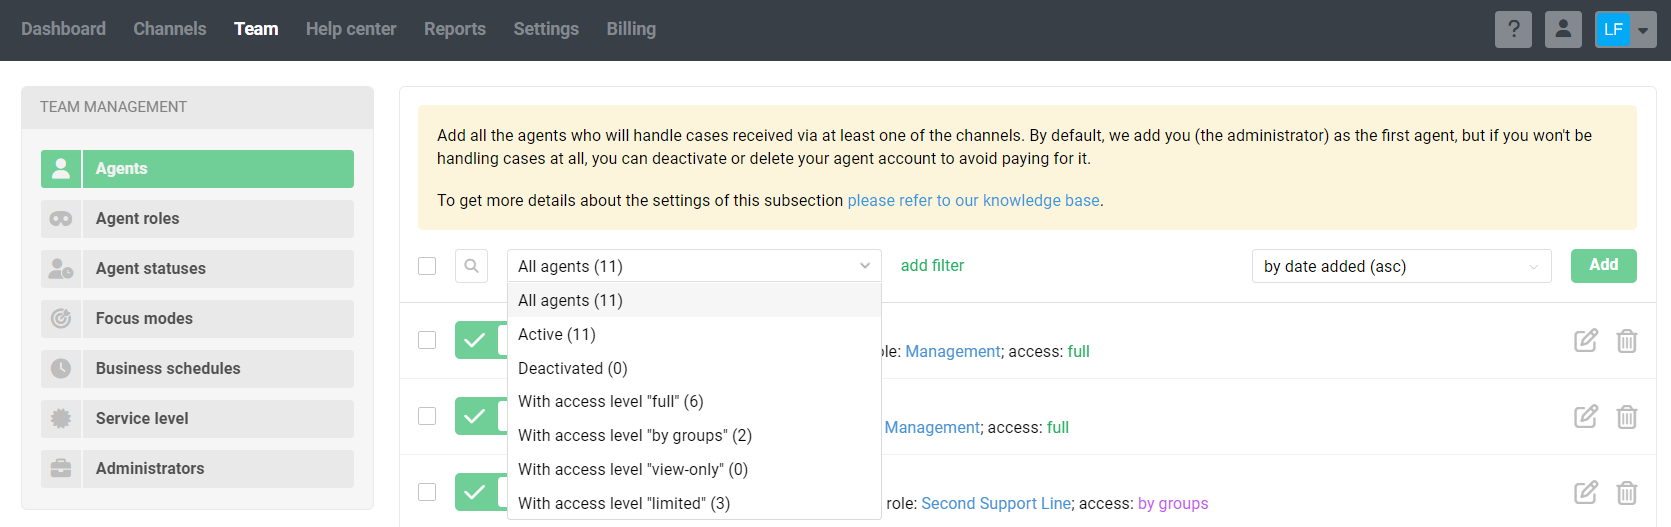
By default, there are seven standard filters:
all agents;
active;
deactivated;
with access level "full" ;
with access level "by groups";
with access level "view-only";
with access level "limited".
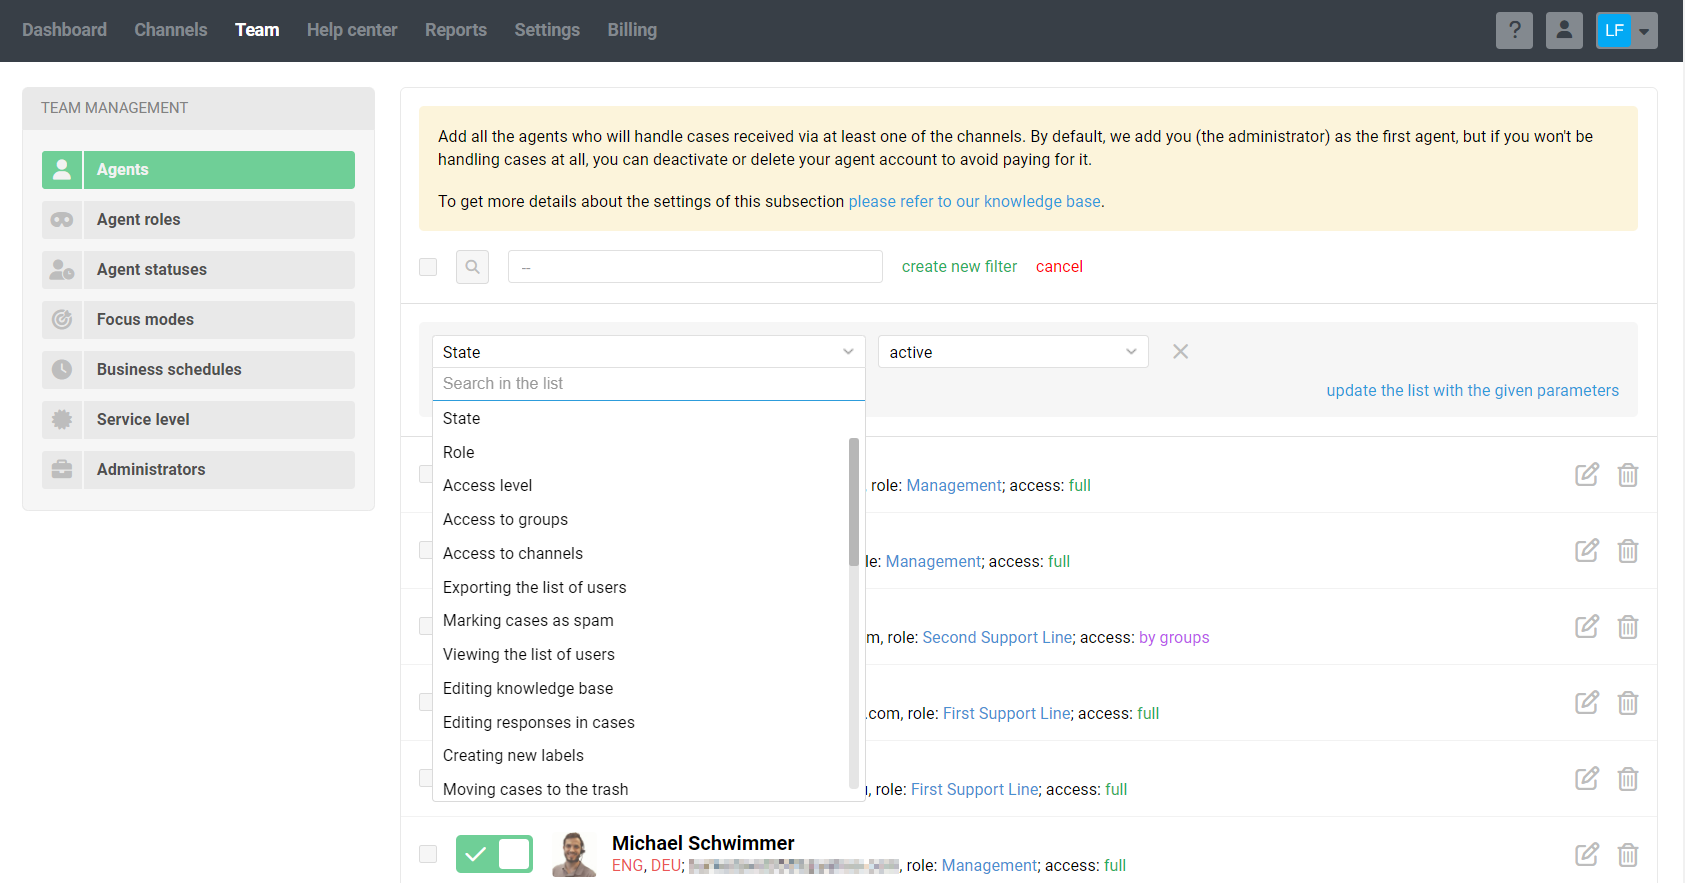
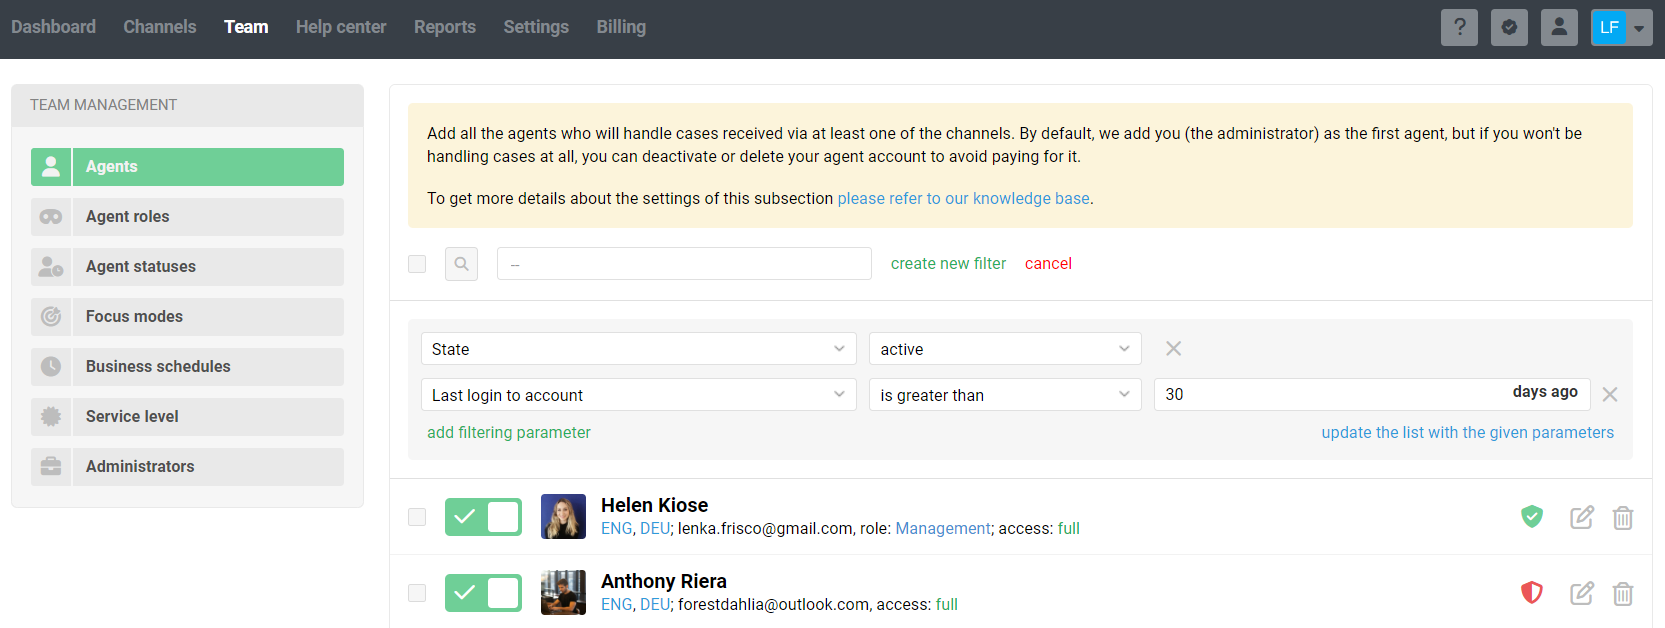
You can also create and save your own filters by selecting the desired parameters, taking into account the agent's state, role, access level, settings by group or channel, additional permissions, time of last login, or the period during which his/her account is deactivated.

PRO tip: The filter by last login will help you easily find agents who haven't logged in to their accounts for a long time. For example, if an agent hasn't been in Deskie for more than a month, perhaps he/she doesn't need an account in general, and it's worth disabling/deleting it so as not to spend extra money.
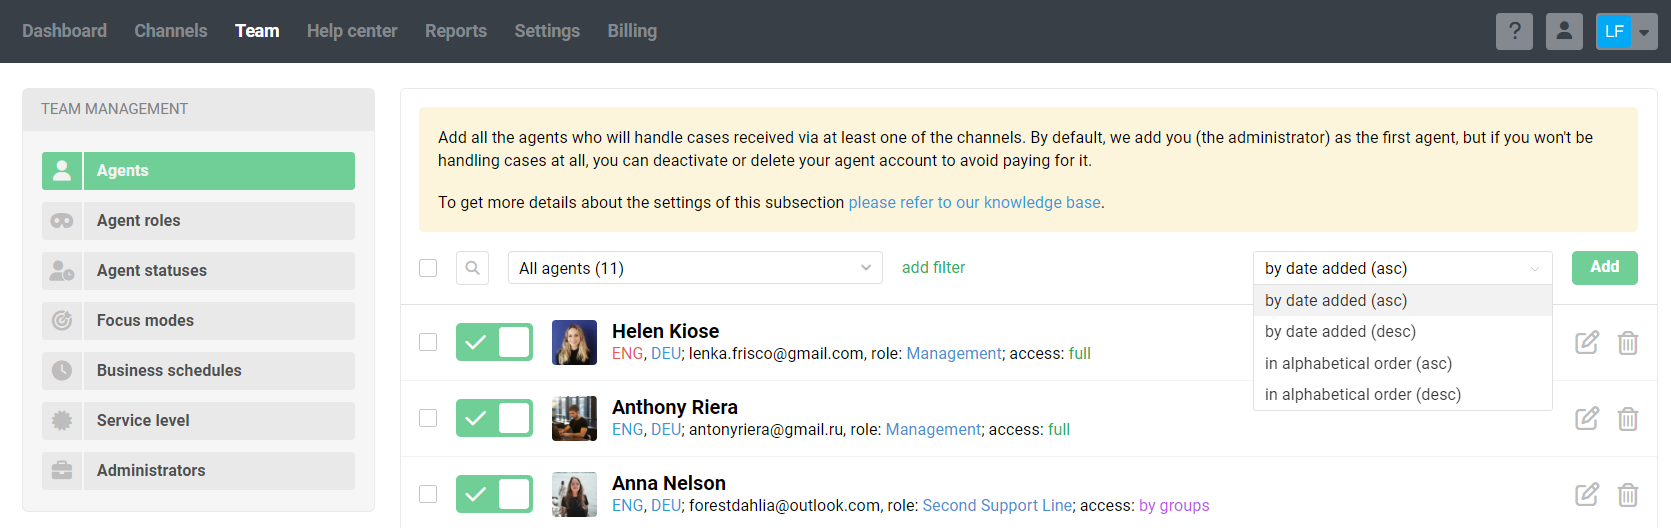
Sorting
Depending on your tasks, choose to sort the agent list by date added or alphabetically.
Paginated navigation
The list of agents has paginated navigation. You can choose the number of agents displayed on one page — 25 or 50.