Labels allow you to organize cases to better understand:
what improvements do customers want the most?
what articles to add to the knowledge base in the first place;
what features of your product to focus on in promotional materials.
At the beginning of the article, we will look at the primary examples where labels can help process key information from customer cases. In the end, we will demonstrate practical steps for using them:
1) Basic use cases for labels
1) Basic use cases for labels
a. Keep developers up to date on bugs
There are no perfect products, and bugs happen from time to time. Customer bug reports help you find undetected defects and improve product quality.
To work effectively with such cases, we recommend using at least two labels (general and detailed). For example:
"Bug" — to set up a rule according to which cases with such a label will be duplicated to developers (agents of the technical department)
"No email", "No card discount", etc. — to track the frequency of specific errors. This way, you can quickly identify the parts of the product that need to be improved in case of frequent failures.
If necessary, agents can leave notes in cases with explanations or essential information for developers that will not be available to customers.
PRO tip: After fixing a bug, send a message to the customer who reported it about the work done and thank them for their vigilance.
b. React when your service is unavailable
(Touch wood)
In such situations, a quick response is essential. Use the "Service failure" label to notify agents responsible for keeping the service up and running.
With the help of automation rules, you can even set up sending SMS or messages to instant messengers to increase the level of attention of those responsible.
Also, a similar label can be added with a date, for example, "Failure on 07/03/2017", and it is easy to separate old failures from new ones.
PRO tip: After troubleshooting, send a message to customers explaining the situation and apologizing for what happened.
c. Find out what customers want
Add labels to use cases that contain requests for new features, services, or products.
It is better to add at least two labels in such cases:
General (for example, "New features").
Specific, to avoid confusing labels from different types of cases (error, request for new functionality, questions about settings), use additional prepositions, conjunctions, or abbreviations in label names. For this example, we use the abbreviation NF — "New Features", i.e., "NF — Service Calculator", "NF" — Integration with Trello".
Analyze these requests from time to time to consider customers' wishes when planning future product development.
PRO tips:
a) To understand customer needs correctly, it is imperative for support staff to ask additional questions about specific tasks that the new functionality will help them solve. This information is most valuable for you and developers because customers can not always give the correct definition of what they need.
b) If you implement what customers have asked for, be sure to tell them about it. Usually, such messages cause plenty of emotions from how attentive you are to their needs.
d. Create suitable learning materials
Are you facing situations where your customers cannot figure out the product settings and write about it to your help center? Add a label to such cases to track the need for training materials.
Single cases are not always informative, but if there are already several questions with a specific label, this is a clear signal to write a manual, add an item to the FAQ, or at least write a macro answer for support staff.
PRO tip: Add the conjunction "How" to the label's name (for example, "How to set up a mailing list", "How to add a signature") so as not to confuse customer setup questions with other types of cases.
e. Talk about overlooked features
Are customers asking for something that is already there? This is the exact information that a marketer needs. It would be best to write about it on the mailing list, blog, social networks, and other promotional materials.
To notify a marketer, use the "Overlooked Feature" label, and to track the frequency of specific requests, use a more specific one (for example, "Yes: import from CSV", "Yes: notifications in Telegram").
f. Analyze the reasons why customers leave
If the customer does not leave in silence but tells support about the reasons for a such decision, they provide you with precious information.
Add a label to such cases, like, "Lost Customer — Review", so they can be tracked and forwarded to relevant colleagues.
Conduct a reason-to-leave analysis and act proactively to prevent mass churn.
g. Be proud of the work you've done
Appreciation reviews should find their heroes so that they receive additional motivation to complete the following tasks.
Add labels (for example, "Thanks to designers") to forward messages to colleagues or easily find them in the crowd for analysis.
Such reviews can be collected and published on a website or blog, and they can also serve as a good source for important points that should be reflected in promotional materials.
2) Using labels in Deskie
We hope you appreciated the capabilities of labels, so now let's look at the specific steps for creating and using them in Deskie.
a. How to create a label
If you don't have a label yet, let's create one. You can do it in two ways:
1. Administrator account — section "Channels" — subsection "Labels" — click on the button "Add label" — write the label's name — click on the button "Create label".
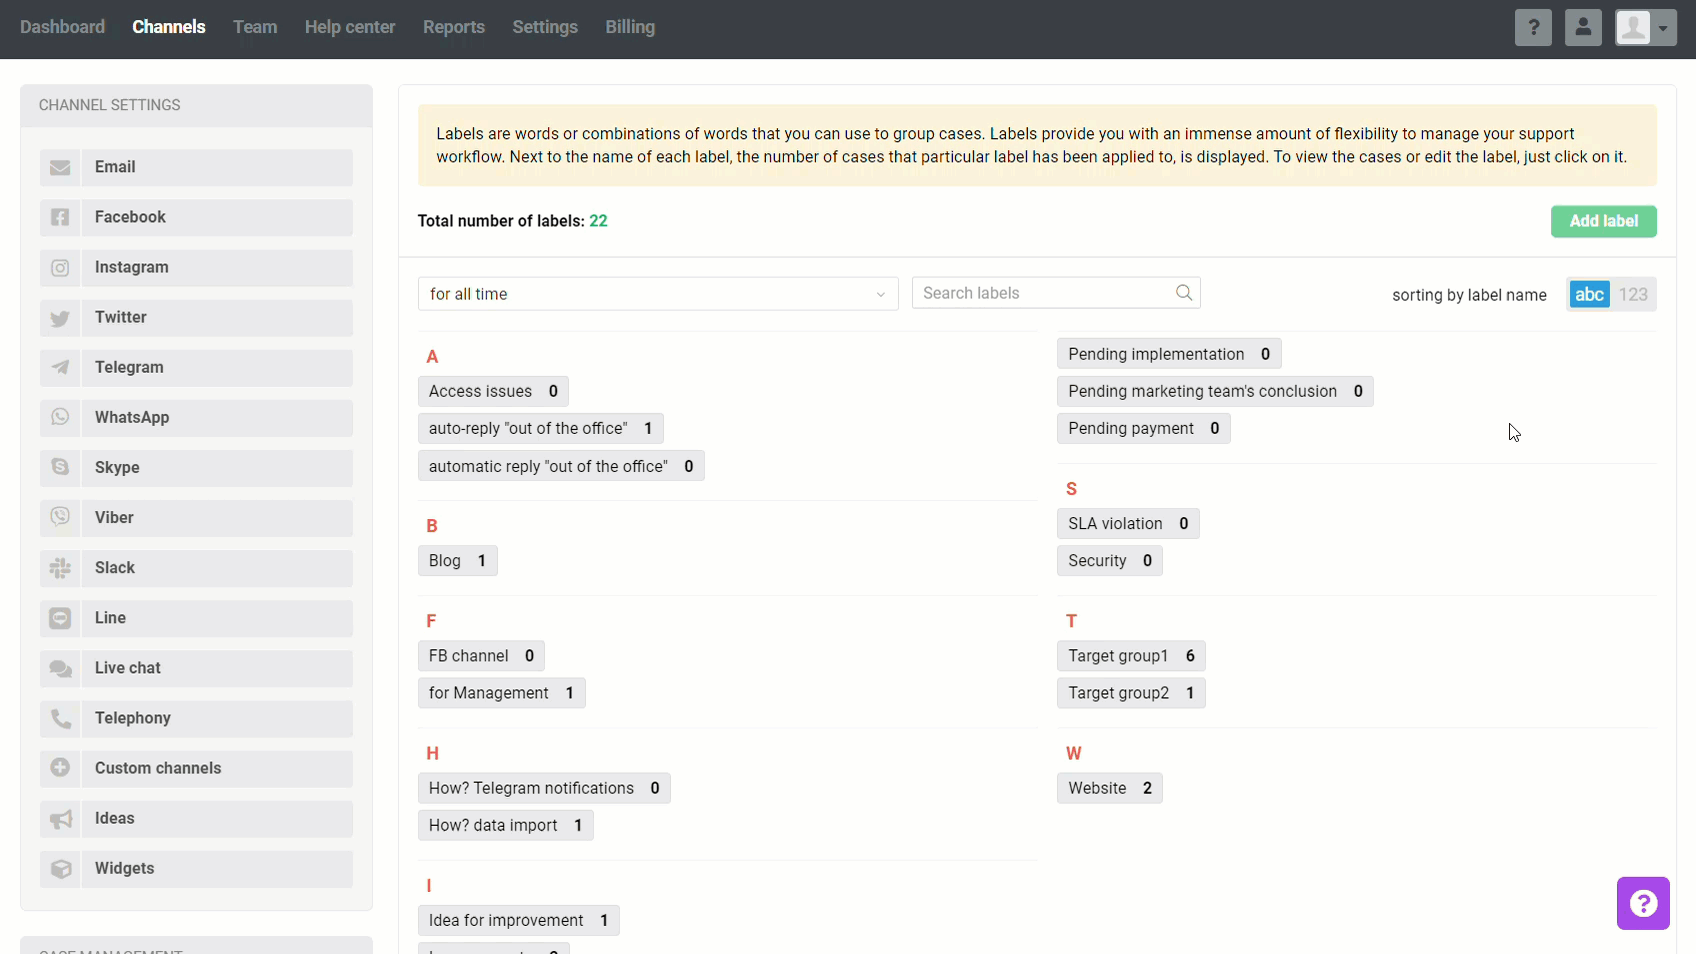
2. Agent account — case window — left sidebar "Case parameters" — field "Labels" — write the label's name — press Enter.
To save the label and make it available to others, click on the "Save" button in the lower right corner of the case:

b. How to add a label to a case
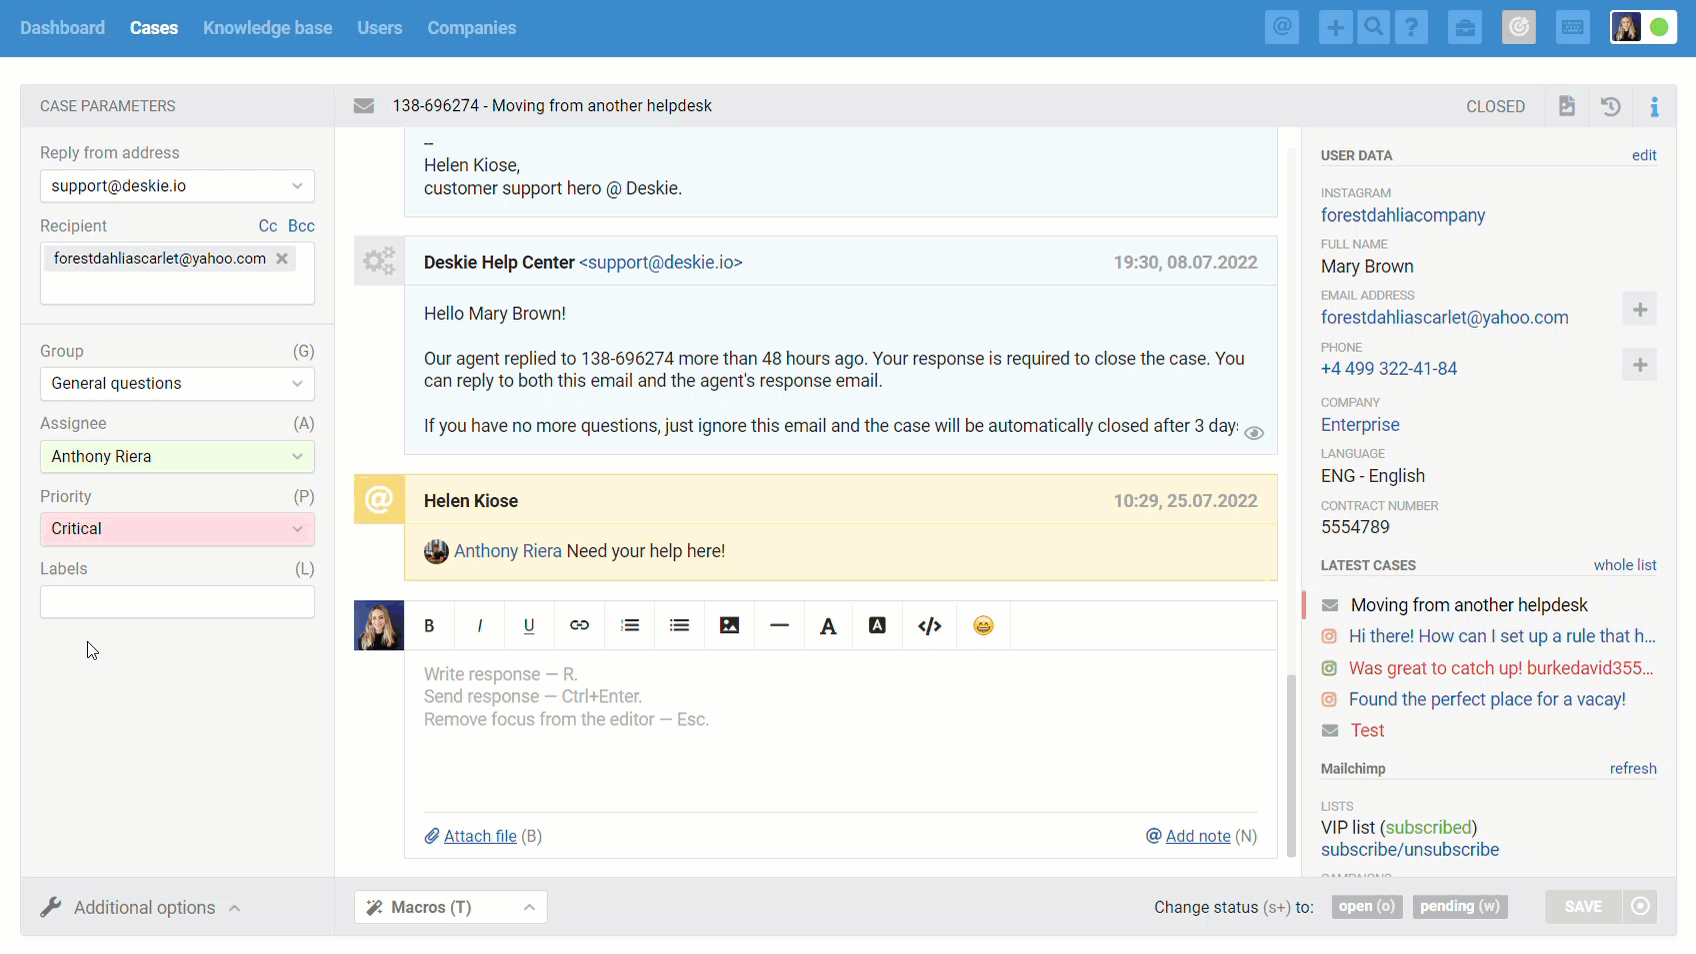
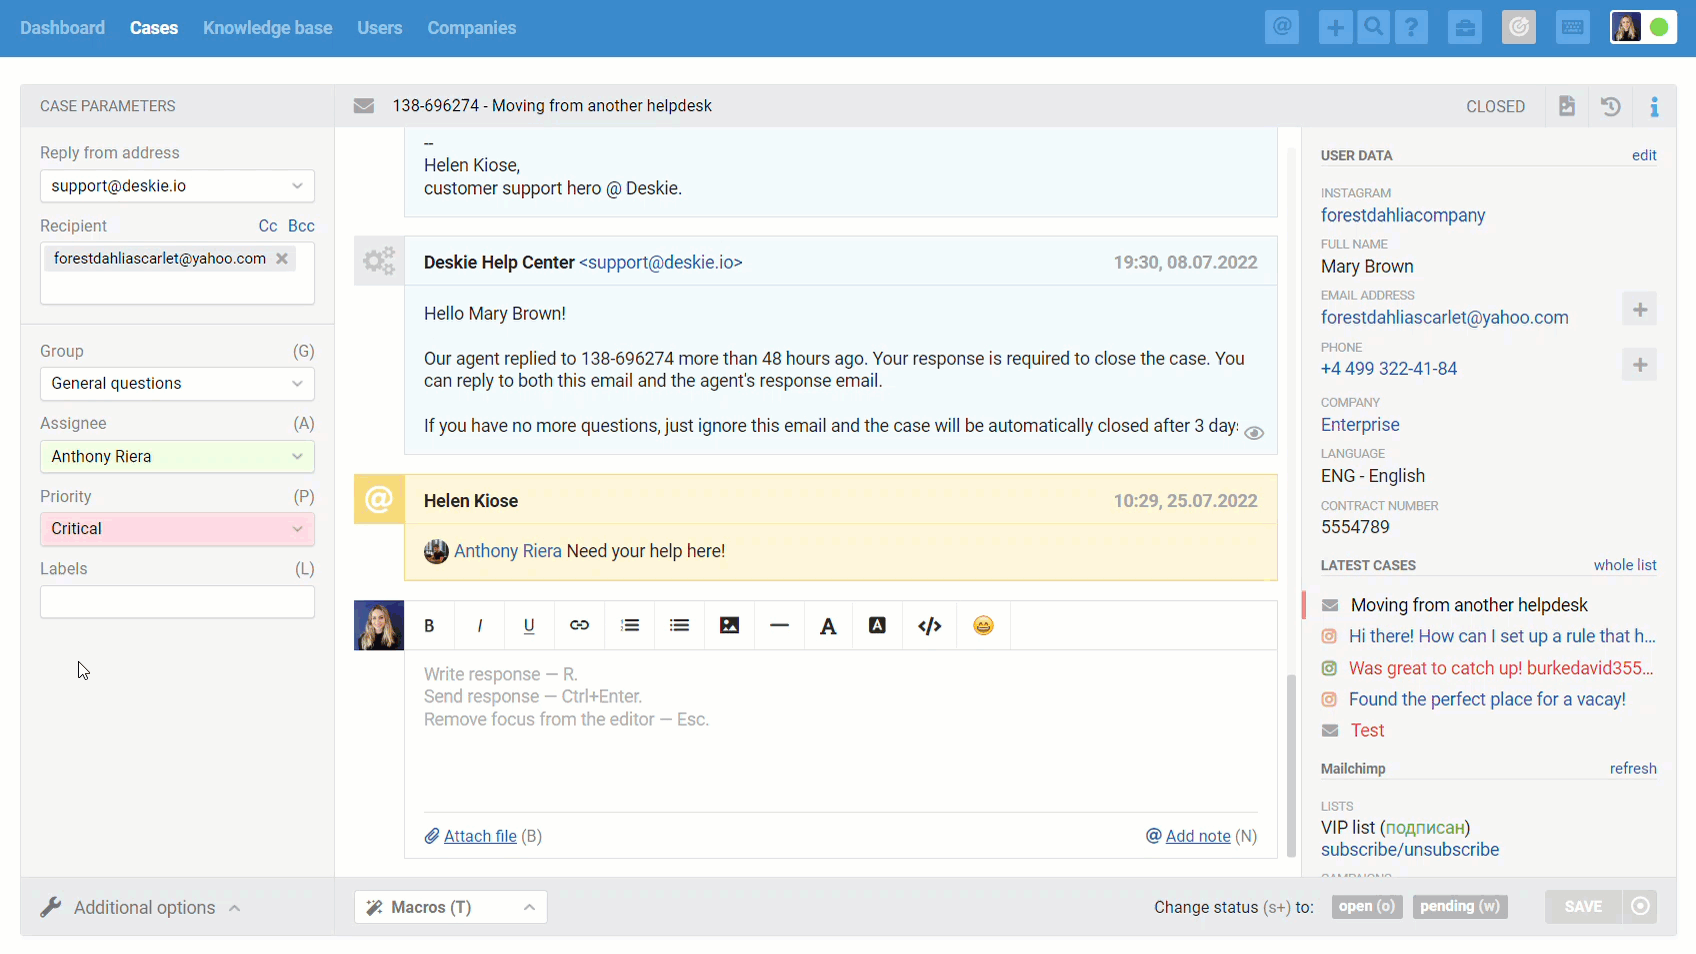
1. In the case window: left side panel "Case settings" — field "Labels" — select the desired label from the drop-down list or start typing the name.
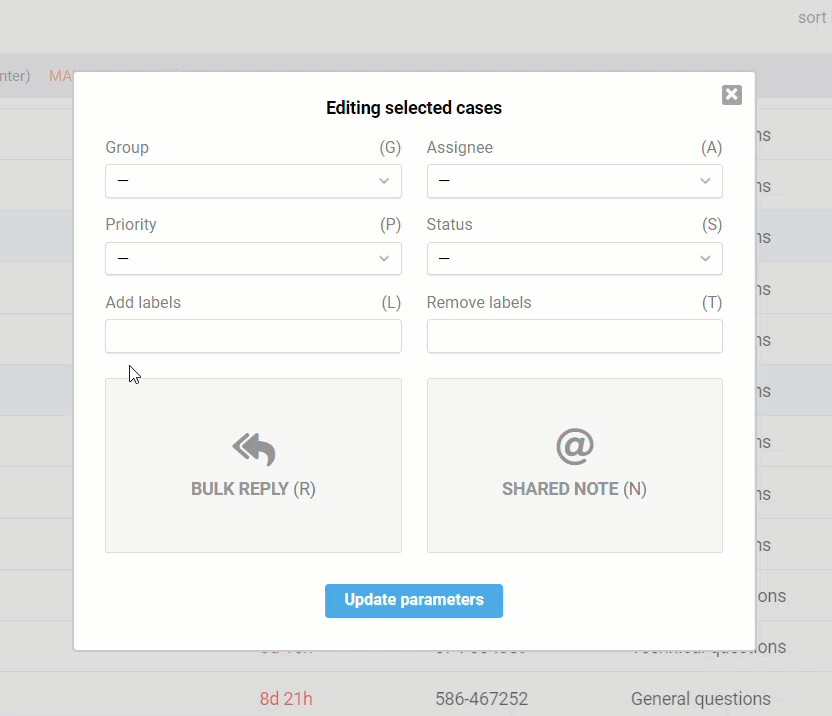
2. In the window of the case list: select one or more cases — press "Edit" (keyboard shortcut "E").
Add labels and click "Update Parameters" in the window that appears.
3. Automatically using rules
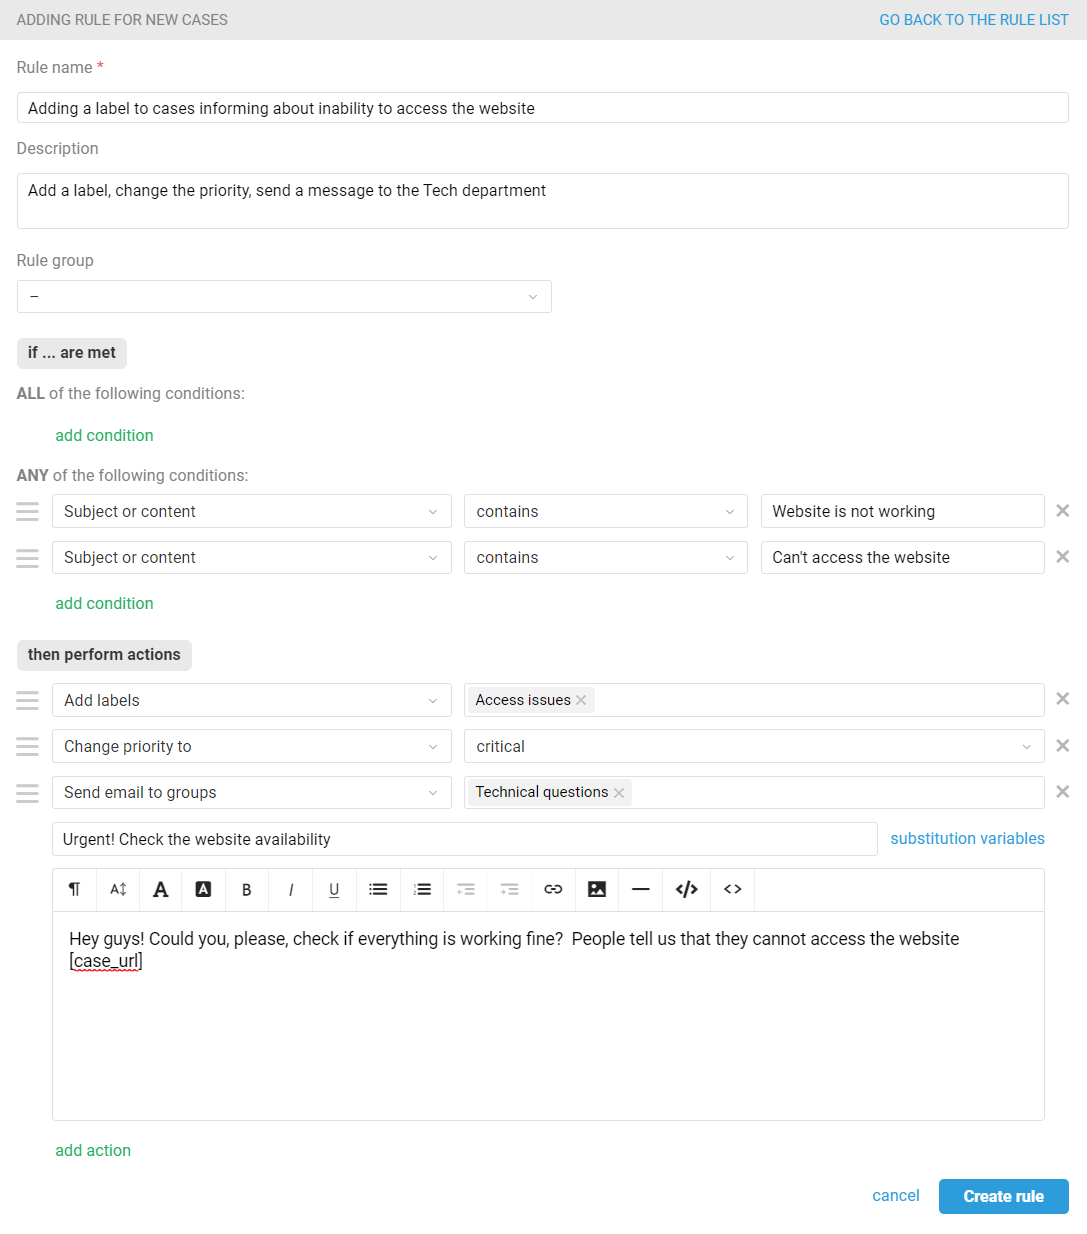
Set up adding labels to cases that match certain conditions.
For example, if the case text contains the keywords "Can't access the website", "Website is not working", or "The website does not open", then the label "Access issues" is added to the case, the priority is changed, and a notification is sent to the technical department.
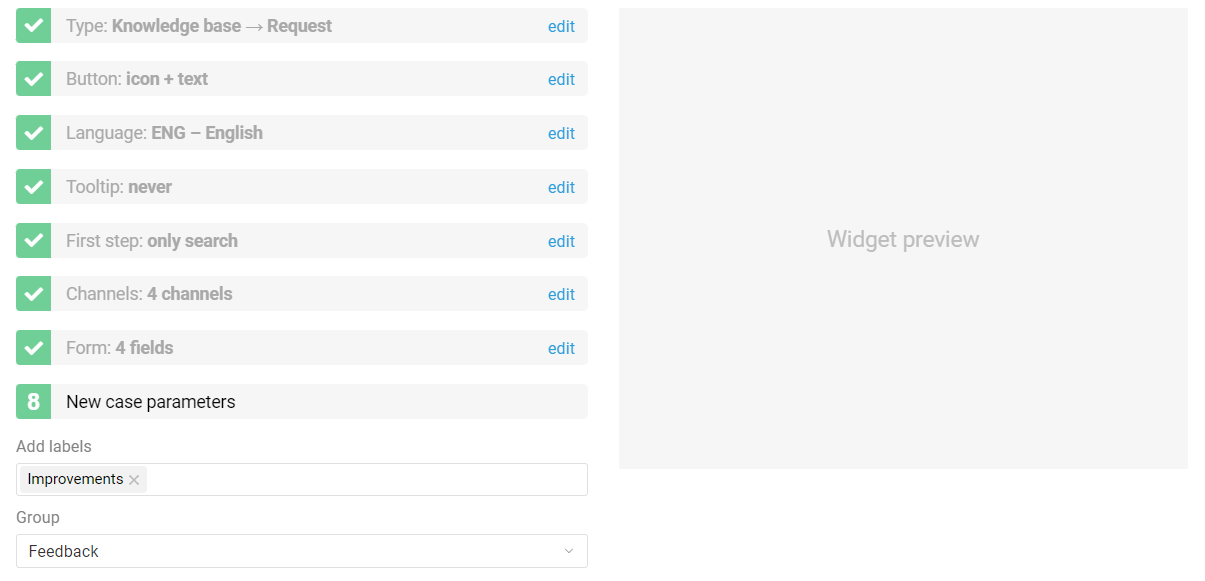
4. Through the widget's settings
Let's say that you have several pages/websites where Deskie widgets are located, and you want to distinguish cases from different sources. What you have to do:
create a separate widget for each page;
assign a unique label to each widget, such as "Improvements" or "Product Website #1", etc.
5. Using API
Add, edit, remove labels, or get a list of labels using API requests. To get more details, check our documentation.
PRO tip: if you want agents to use only specific labels and to not come up with their own names, create all necessary labels in advance and disable agents' ability to create new labels in additional permissions.
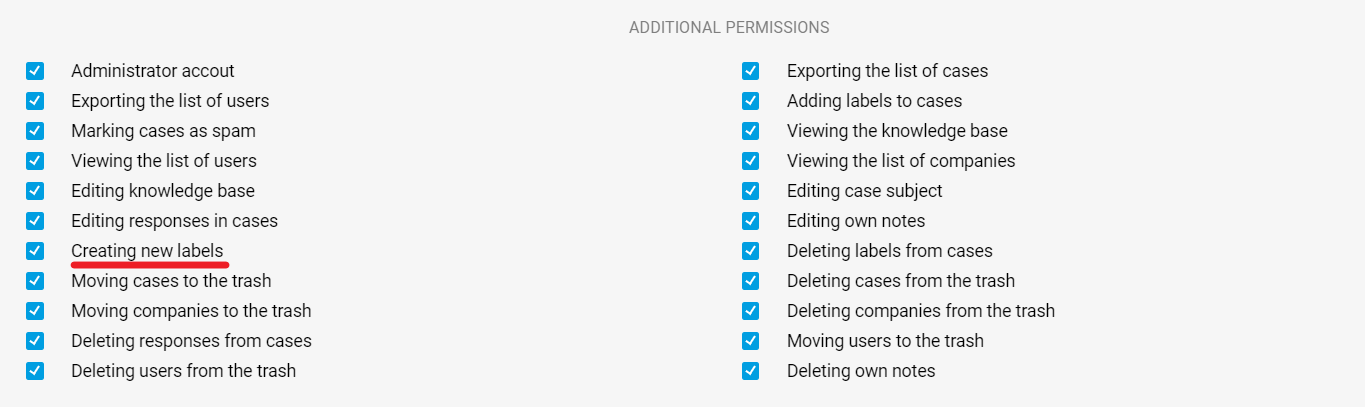
If the checkbox "Adding labels to cases" is checked, but "Creating new labels" is not checked, the agent can select only those already created but cannot create new ones.
c. How to create a custom filter by label
If you need to check a case with a specific label, you can do so by creating a filter.
In the case list: click on the filter icon in the upper left corner — open the "Labels" block — select the one you need. If necessary, add other conditions to the filter, such as status, channel, etc.
To save the filter, click on "create new one" — enter the filter's name — click "create".
PRO tip: To share the created filter with colleagues, copy the URL link from the browser's address bar and send it to another agent connected to Deskie.
d. Reporting by question type
Some customers prefer to analyze cases in Excel, as it has many settings for detailed study. For example, you can filter cases by several labels simultaneously and share the results with colleagues who are not connected to Deskie.
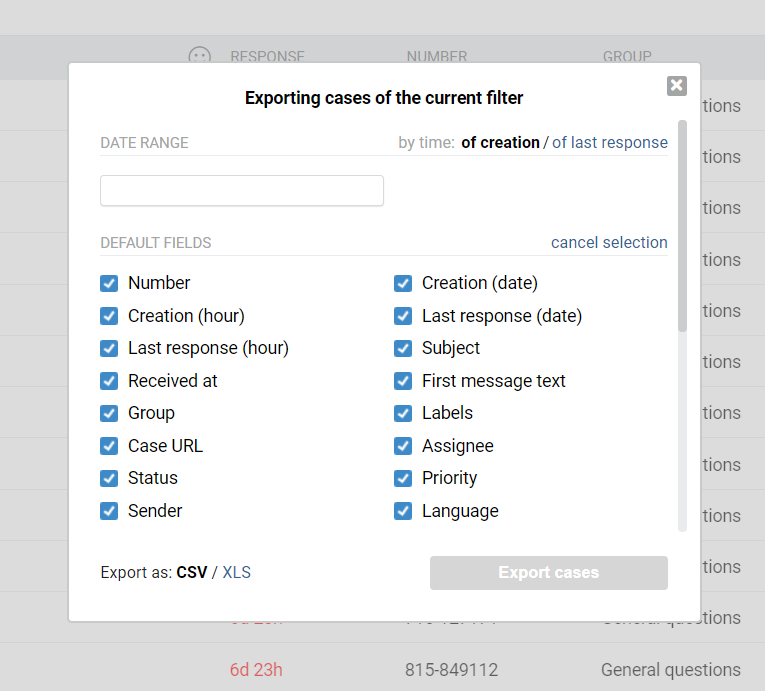
To extract the case list to Excel, use the export of cases to CSV / XLS: click on the export icon in the upper right corner of the list of cases.

Select the date range and required data fields in the window that opens and click "Export cases".
e. Labels as an alternative to additional status
If you require additional status, labels help you solve this problem. For instance, you can create an "in progress" label to gather all cases which will take you some time to process. And based on the label, a separate filter can be created in the case list.
In fact, this option is not that different from a separate status. Let's assume that you have the status "in progress". To check cases with such status, you need to create an appropriate filter in the list of cases. In other words, it's not possible without an extra filter.
So here, labels perform the same role. You mark the case with the desired label, create the appropriate filter, and then check all cases with this label. The status, in this case, can be assigned "pending".
This point is also easy to consider in the rules if you want to perform some actions with such cases.
f. Avoid looping rules using labels
Let's say you want to send an automatic reply to a chat when a customer writes past business hours. This can be implemented through the rules, but it's pretty easy to miss the fact that after receiving an automatic reply, the customer can decide to write something else (like "Ok", "What are your working hours?", etc.).
Of course, it would be much better if, after the second message from the customer, the automatic reply is not sent again:
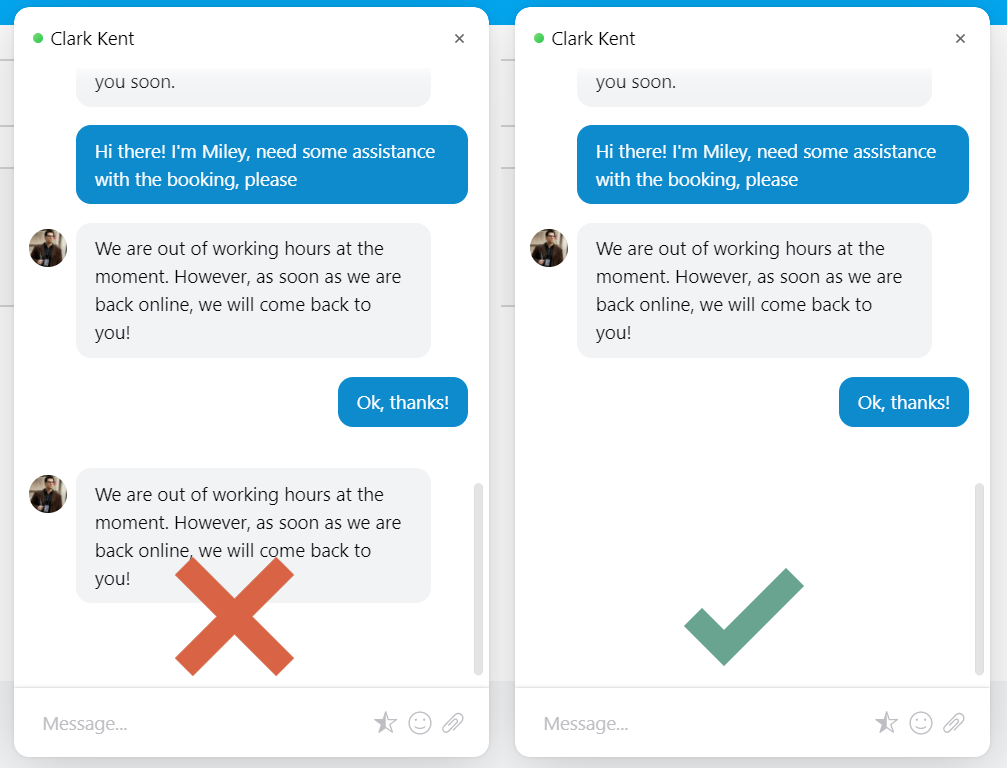
Why will the automatic reply be sent again without using labels?
If a customer sent a case to the chat, then after 10 minutes of inactivity on both sides, the chat is moved to the case list, and, according to the rule, an automatic reply is sent to the customer. If the customer writes something else after receiving an automatic reply, the chat is activated again and, after 10 minutes, is moved to the case list.
Action for adding a label and condition to check for the absence of this label allows you to avoid the resending of an automatic reply:
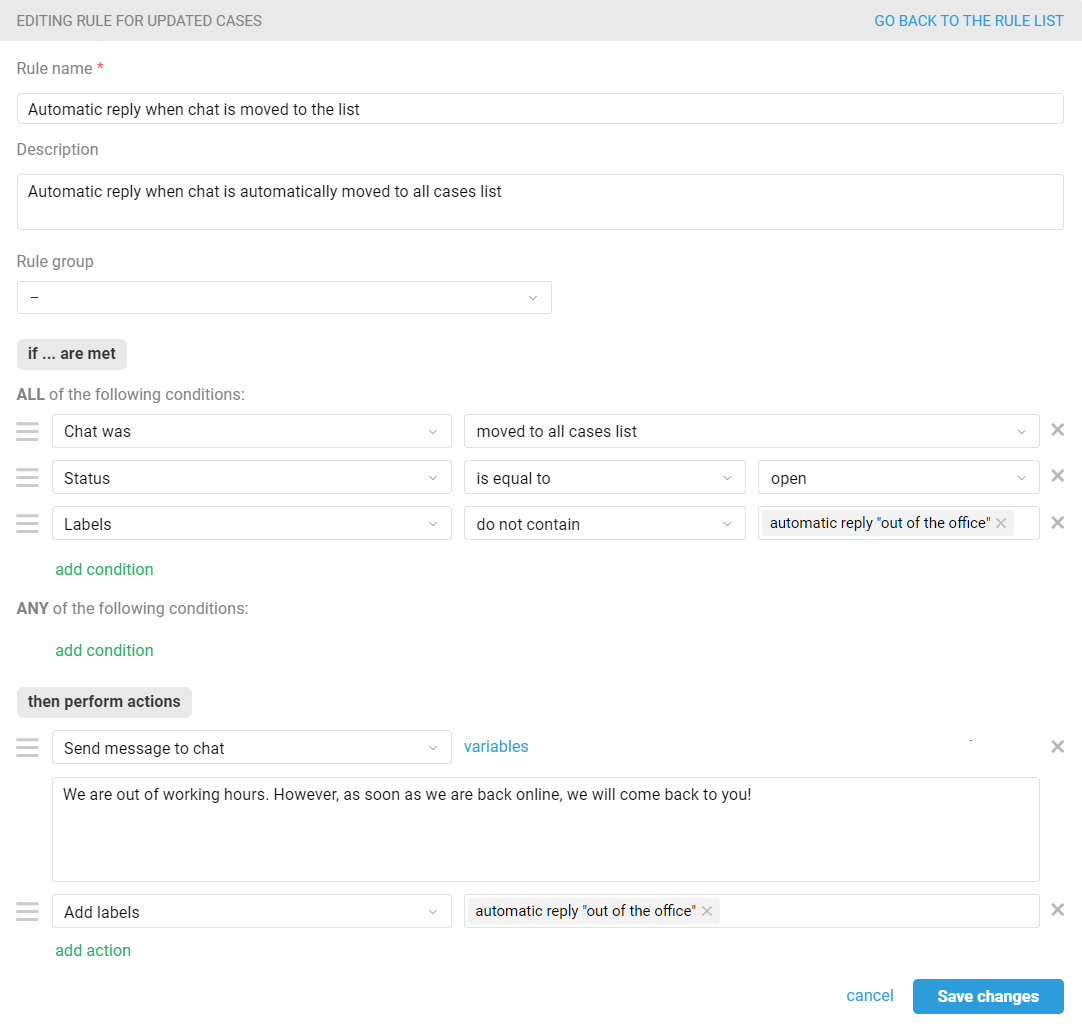
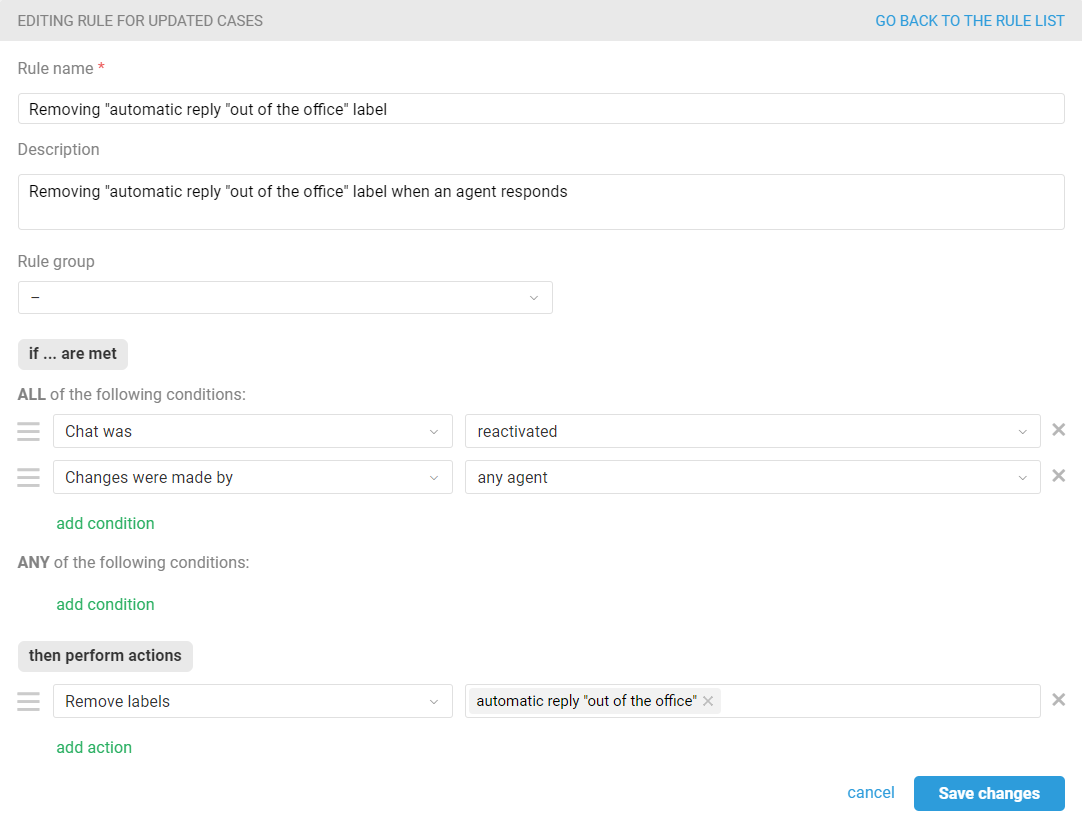
That being said, you obviously want the customer to get an automatic reply again the next time they write outside business hours. Therefore, we need to create another rule that will remove the label after the agent's response:
Use labels to organize support better and quickly spot trends in product performance or customer desires.