The main convenience of this integration is that it is two-way. With its help, support staff work with JIRA issues from Deskie, and developers have access to cases directly from JIRA.
Connection
The "Integrations" subsection is located in the "Settings" section of the administrator account. To connect, just specify your JIRA subdomain and follow a couple of steps from the brief instructions:
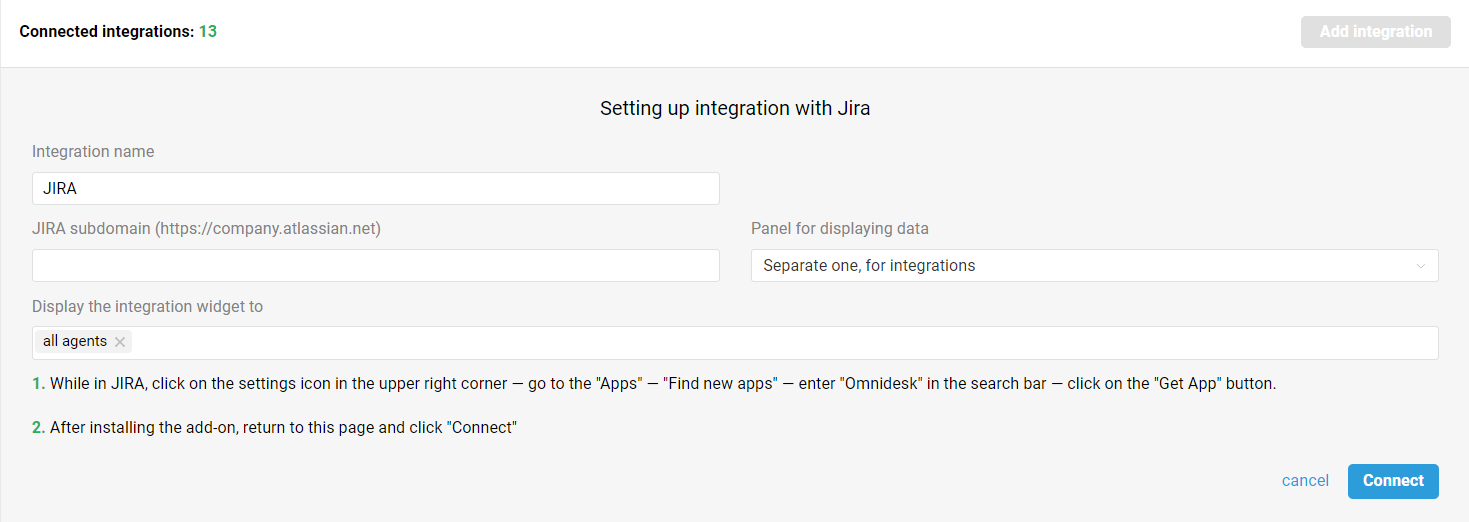
(!) Please note that this integration only works with JIRA Cloud. We used to have plans to add integration with JIRA Server in the future. However, Atlassian have announced that they are no longer developing the server solution, so we are hardly doing integration with the server version. You cannot buy the server version starting February 2, 2021, and after February 2, 2024 Atlassian will stop support completely.
Where to display the data: you can choose where to display the widget in the "Panel for displaying data" drop-down list. You can place the data at the bottom of the informational panel on the case page. But if there is a lot of information, it is more convenient to display the widget in a separate panel.
Specify who should see the widget: list specific agents or groups that need to have the widget displayed.
Jira widget in Deskie
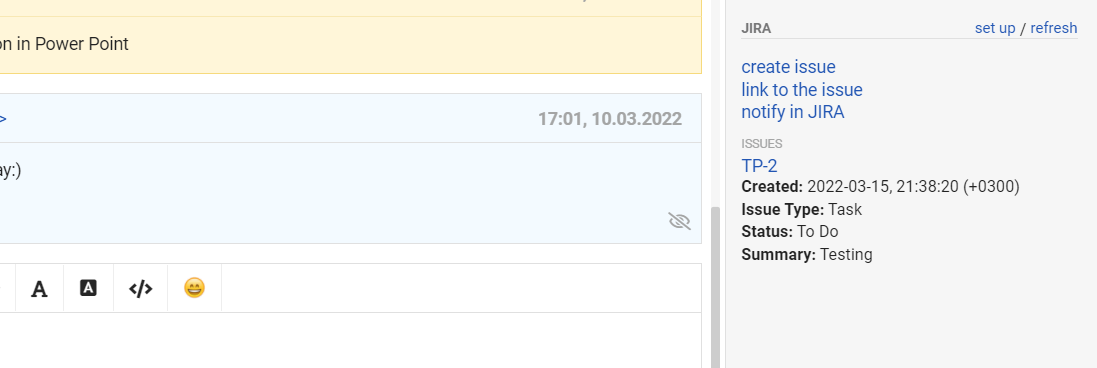
After connecting the integration, the page of a specific case in the right sidebar displays data from JIRA. Let's take a closer look at the capabilities of the widget.
1) To the right of the widget name there are links "set up" and "refresh". The "refresh" link allows you to get fresh data from JIRA without reloading the whole page. We added this link for other integrations as well.
2) When clicking on the "set up" link, a modal window appears that allows the agent to choose which data to display in the panel (short version) and which data to display in the modal window (detailed version, which will be discussed later):
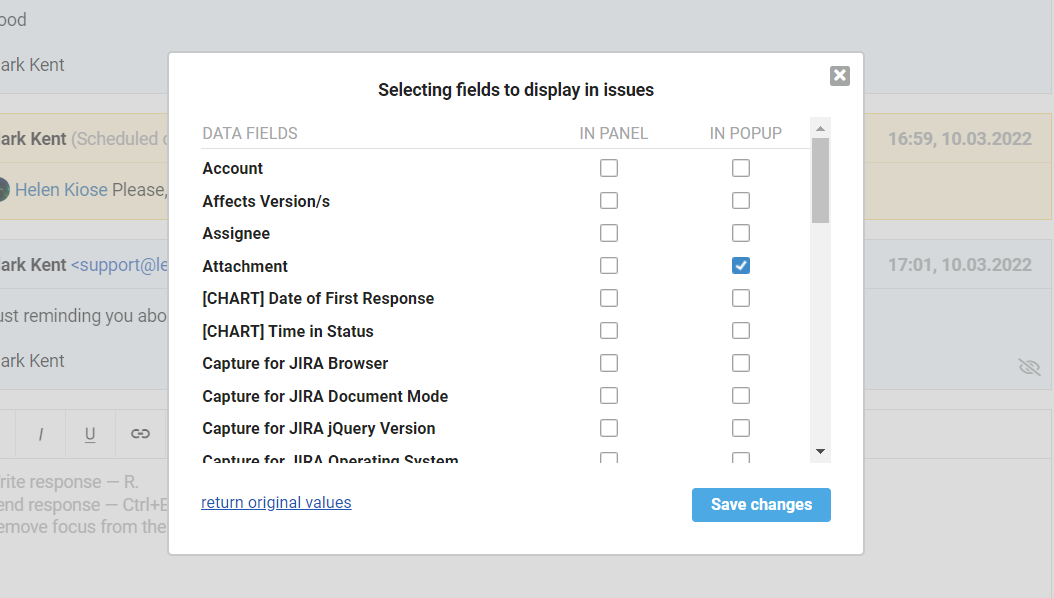
There are many data fields from JIRA, so for greater convenience, we display them in alphabetical order.
If an agent has made some changes and wants to return them, this can be done using the "revert original values" link.
Widget settings are stored separately for each agent so that everyone can customize the display of data from JIRA.
3) The name of the widget is a link, clicking on it allows you to collapse the block with integration data. This feature is useful if you have several integrations connected, but only some of them are actively used.
Block states (collapsed or expanded) are stored separately for each agent. Accordingly, if the agent reloads the page or goes to another section and returns, the state of the block is saved (until the agent changes it).
If the widget is collapsed, and the agent clicks on the "refresh" link, we do not only update the data but also open the integration block straight away, remembering this state. If the agent simply clicks on the name, then we disclose the data that was received earlier.
4) When clicking on the "create issue" link, a modal window appears to create a new issue in JIRA.
a. Initially, only the "Project" field is active in the form:
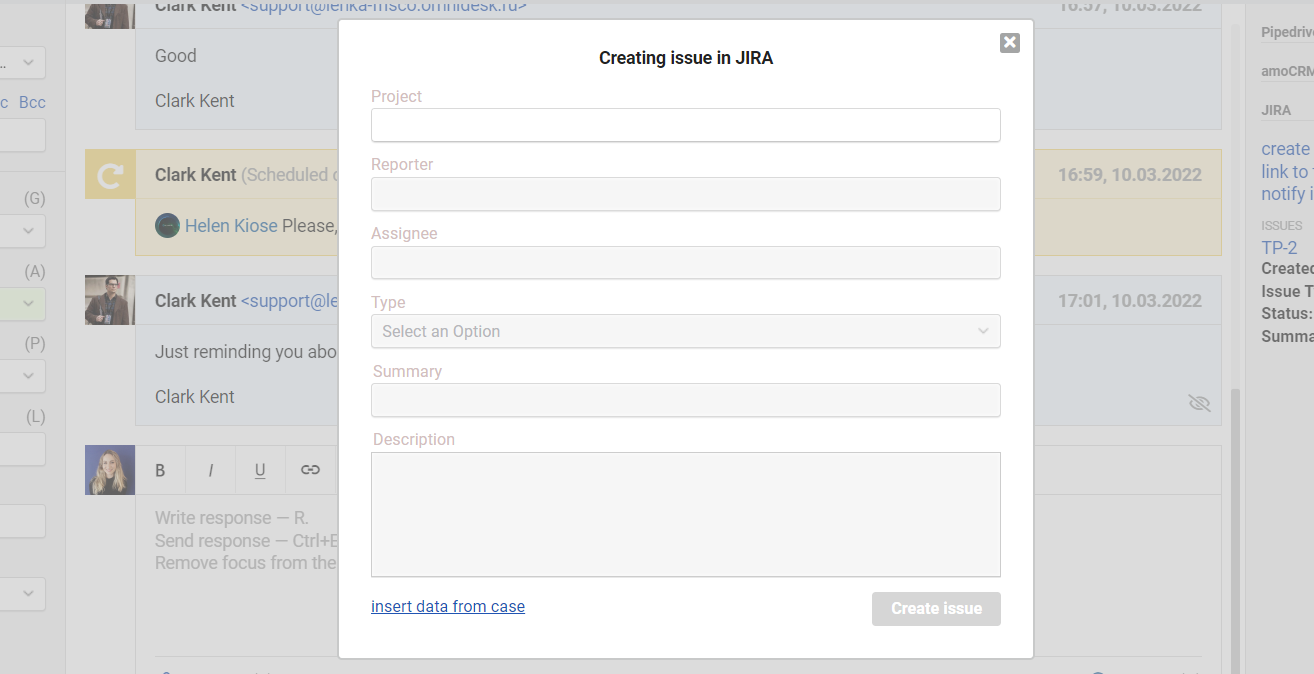
When you click in the field, a prompt appears for the agent to enter at least three characters, after which we offer project options that you have in JIRA.
b. Once a project is selected, the other fields become active.
c. When the first five fields are filled in the form, the "Create issue" button becomes active, that is, the "Summary" field is not required.
d. When you click on the "insert data from case" link, the subject of the case is inserted into the "Description" field, and the last message from the case is inserted into the "Summary" field (notes are also taken into account).
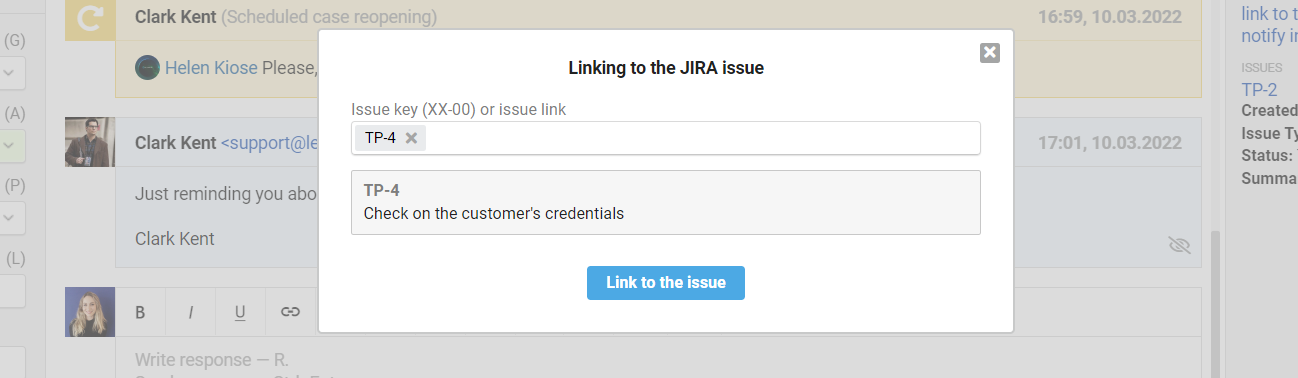
5) When clicking on the "link to the issue" link, a modal window appears for linking the current case with the issue from JIRA. After finding the issue, we display its ID and name, and the "Link to the issue" button becomes active:
6) The "notify in JIRA" link allows you to send notifications to developers on all issues related to the current case:
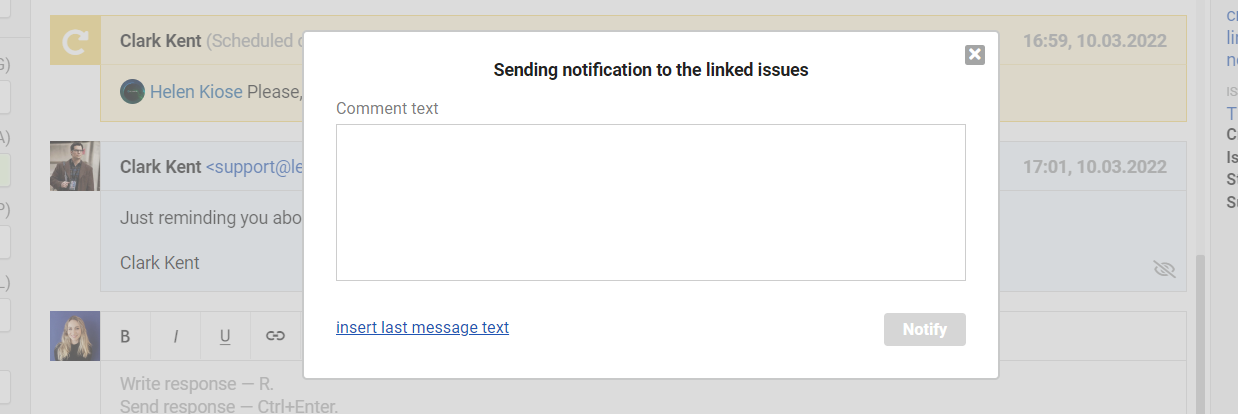
When an agent sends a notification from Deskie, it is duplicated in the case as a note:
7) When clicking on the issue ID in the list of issues, a modal window opens with the details of the issue:
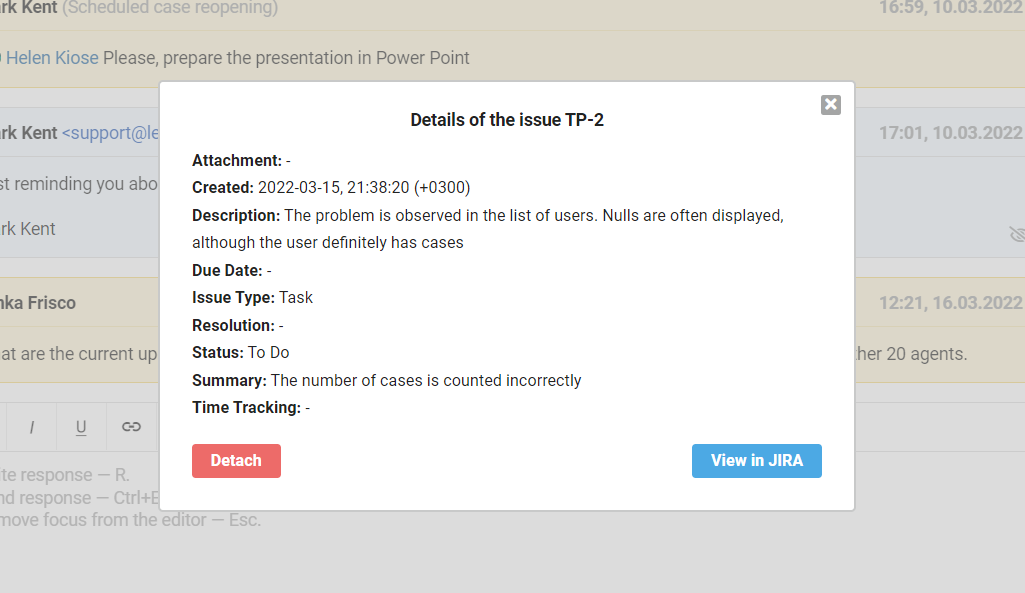
This is the detailed version of the issue that we touched upon in the first paragraph when we were reviewing the widget settings.
Clicking "View in JIRA" opens the page for the selected issue in another tab. However, you must have a JIRA account. Clicking "Detach" closes the modal window and detaches the case from the issue, which disappears from the widget.
Deskie widget in Jira
After connecting the integration the case data from Deskie is displayed in the right sidebar and in the Activity block on the issue page in JIRA.
8) The widget in the sidebar allows you to view basic data on related cases:
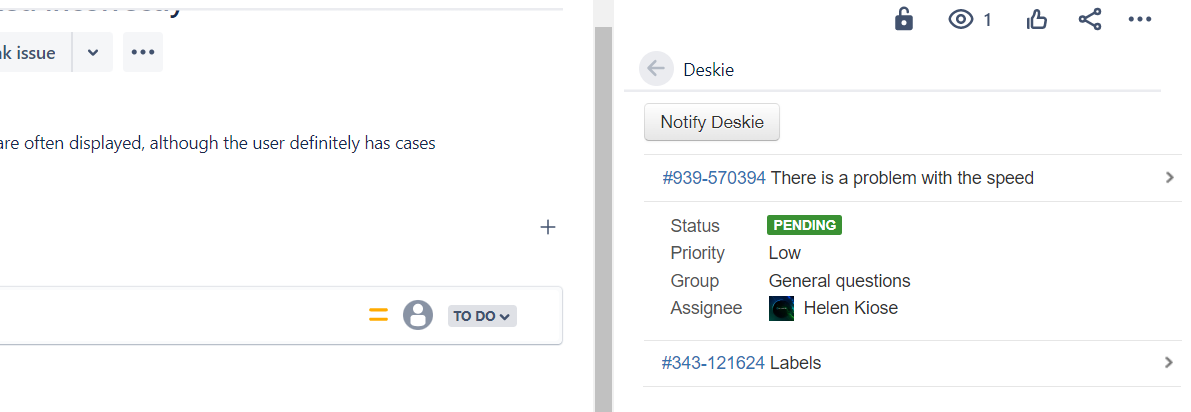
a. Initially, cases are presented as a list, and only the number and subject are visible, but it is enough to click on the subject to display additional data.
b. Case number is a link that leads to the case page in Deskie. To get to this page, the developer must have an account in Deskie.
By the way, the access level for agents — "view-only" is great for developers:)
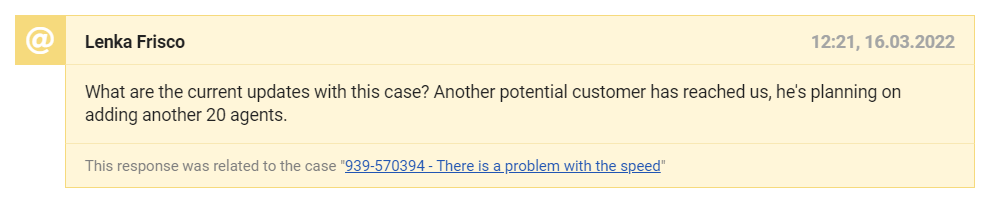
c. The "Notify Deskie" button allows the developer to send a notification to all cases related to the issue. Such notifications are added to Deskie as a note:

At the top of the note is the name of the JIRA developer who submitted the notification. The first line of the note is standard. It contains an identifier — a link to the issue in JIRA.
9) The "Deskie" tab in the "Activity" block is designed to view the history of correspondence for all cases related to the problem.
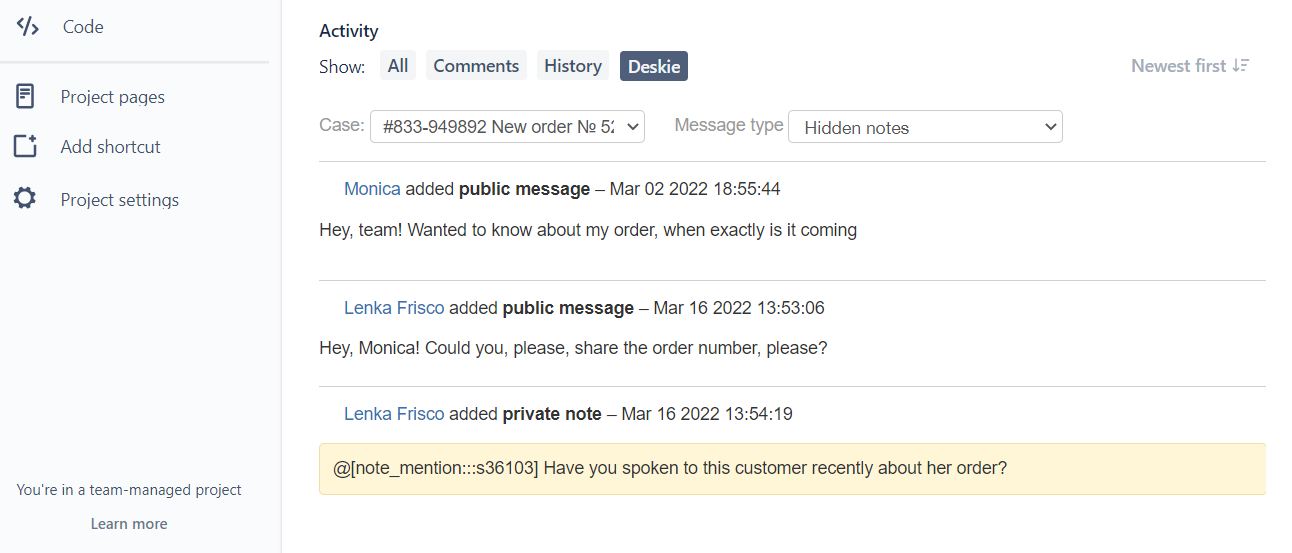
It displays customer and agent messages, case notes, and notifications that support staff send from Deskie to JIRA.
At the very top, there are two drop-down lists: the first allows you to select the case whose messages should be displayed, and the second — the type of messages to be displayed (all messages, public or private).
10) When a developer closes an issue in JIRA, a notification is automatically sent to all related cases mentioning the assignee, and their status is changed to "open". This makes it easier for support staff to know that the issue has been resolved, so they can notify the customer about it.