Teams is the successor to Skype in the Microsoft ecosystem. Adding Teams as a communication channel allows you to interact with Teams users directly from the Deskie interface.
Before you begin
The Microsoft Teams channel is connected via an app created within the Microsoft infrastructure. Make sure your subscription and Teams workspace meet the requirements for creating such an app, and review any limitations that may affect the integration’s operation.
- Creating Microsoft Teams apps is available only to users with Microsoft 365 commercial or government licenses.
- To begin, you need a Microsoft Teams subscription or any Microsoft 365 plan that includes Teams.
List of available plans here.
Manage current subscriptions here.
- Users of the free version of Teams cannot install or interact with apps, but they can be added as guest users to a workspace and either message the bot directly or participate in group chat conversations.
- If an external workspace wants to connect your app, you will need to share the manifest and grant the required Microsoft Graph API permissions. Learn more
Microsoft is modernizing the Bot Framework architecture as part of its enhanced security strategy. Starting July 31, 2025, the creation of new multitenant bots will be discontinued. However, existing multitenant bots will continue to operate.
Our integration supports both types of bots — multitenant and single-tenant — ensuring full compatibility with current and future platform changes.
Comparison Table:
| Features | Period | Bot Type | |
|---|---|---|---|
| Multitenant | Single-tenant | ||
| Where you can create the bot | before 07/30/2025 | — Teams Portal — Azure |
Azure |
after 07/30/2025
|
no information | Azure | |
| What messages are received from channels and group chats |
before 07/30/2025 | only when the bot is mentioned | depends on the configuration on the Deskie side |
after 07/30/2025
|
no information | no information | |
Step 1: creating a Microsoft bot
Message exchange between Teams and Deskie is carried out via a bot that must be created during the app setup process. You can choose one of two methods to create the bot:
Option 1 — via the Teams developer portal
Suitable for quick and simple setup.
Note that after 07/31/2025, the ability to create multitenant bots will be completely unavailable. Single-tenant bots can only be created via Azure.
Option 2 — via Microsoft Azure
Suitable if you're creating a single-tenant bot, or if, regardless of the bot type, centralized access and data management via Azure or flexible security configuration is important.
Option 1 — creating a bot via the Teams developer portal
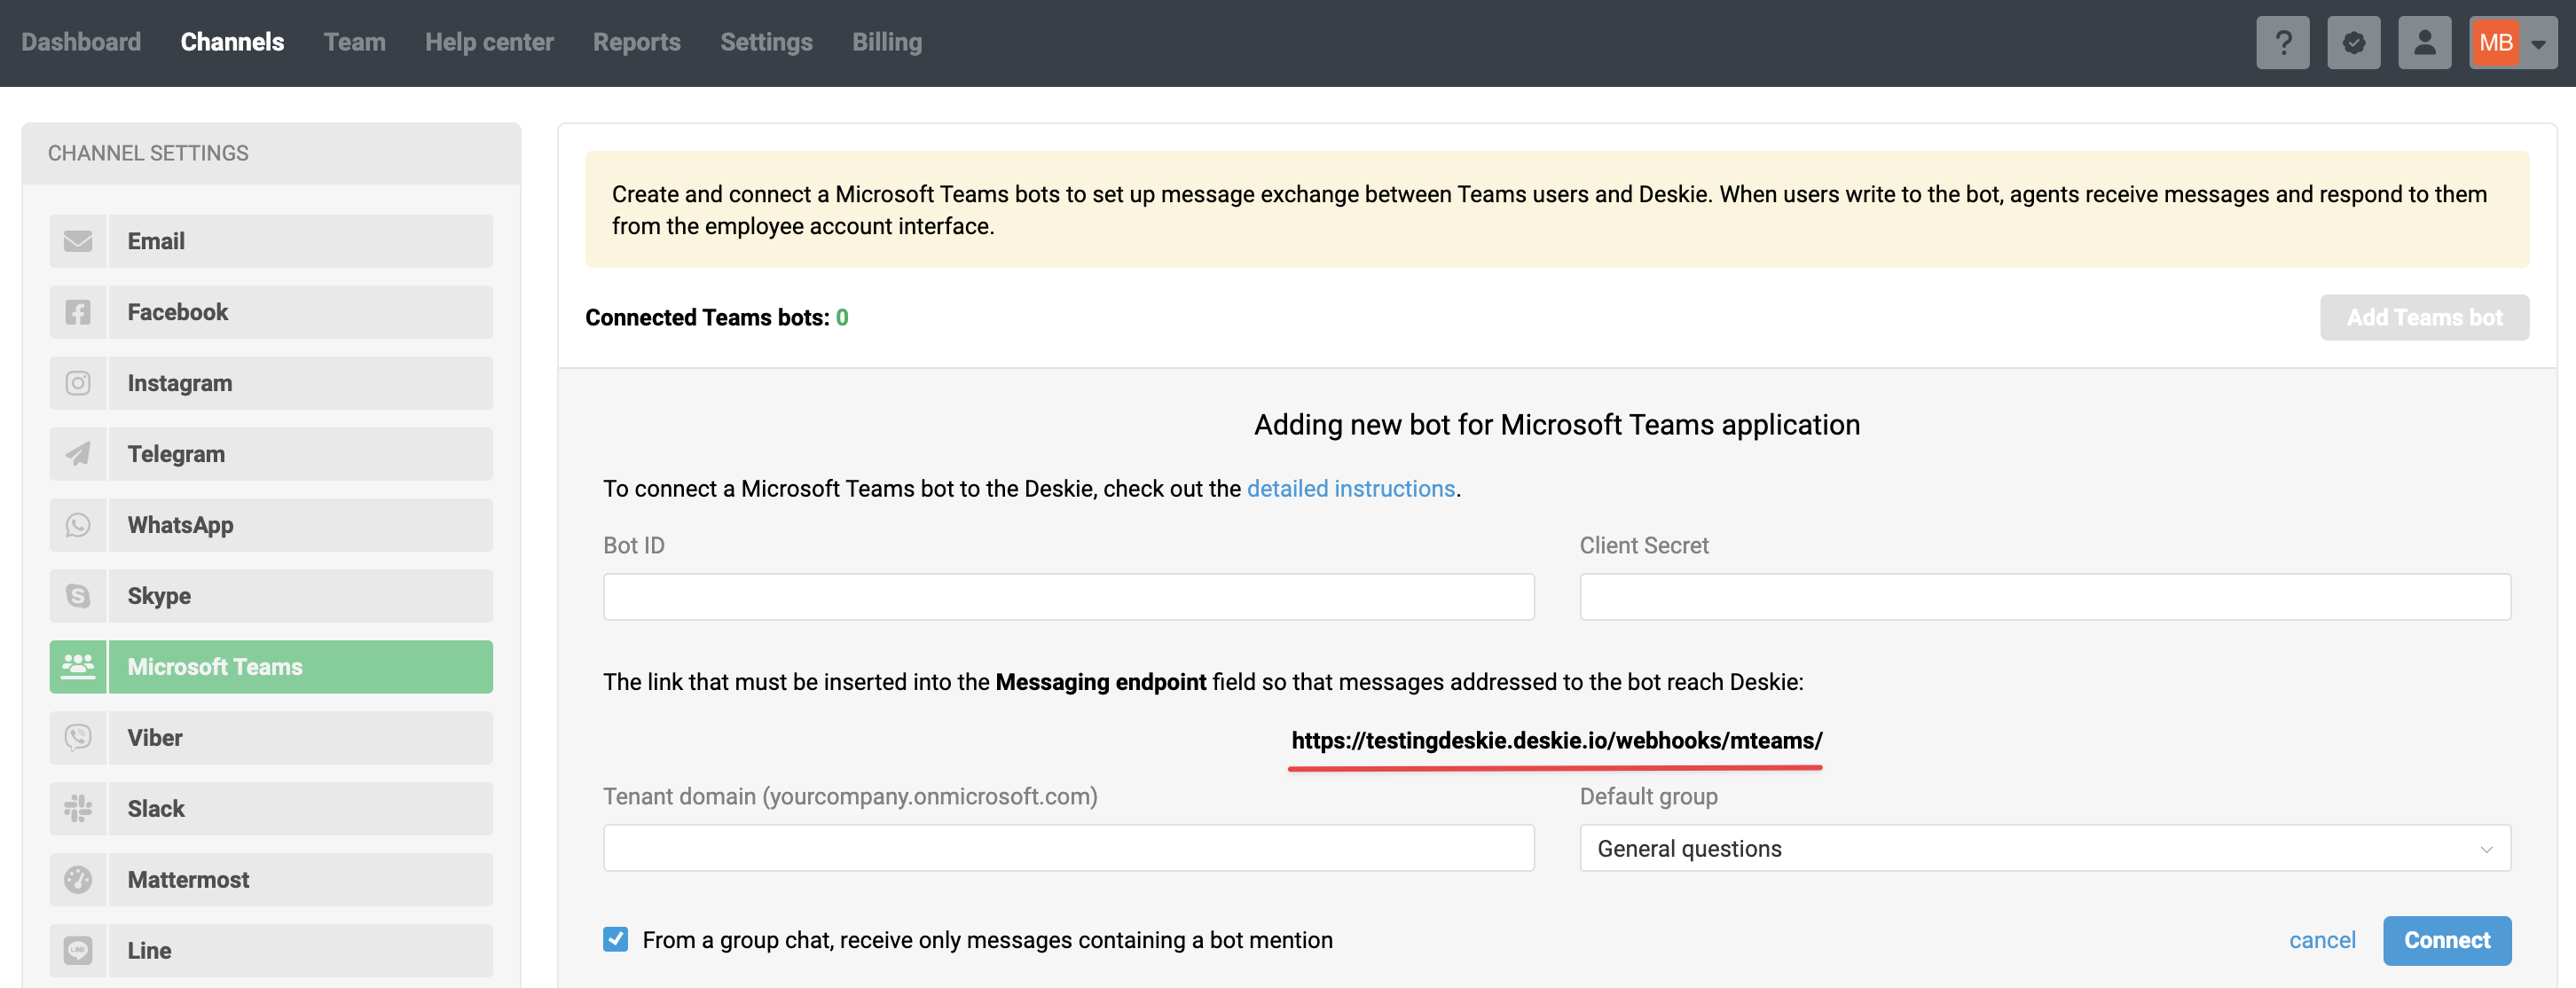
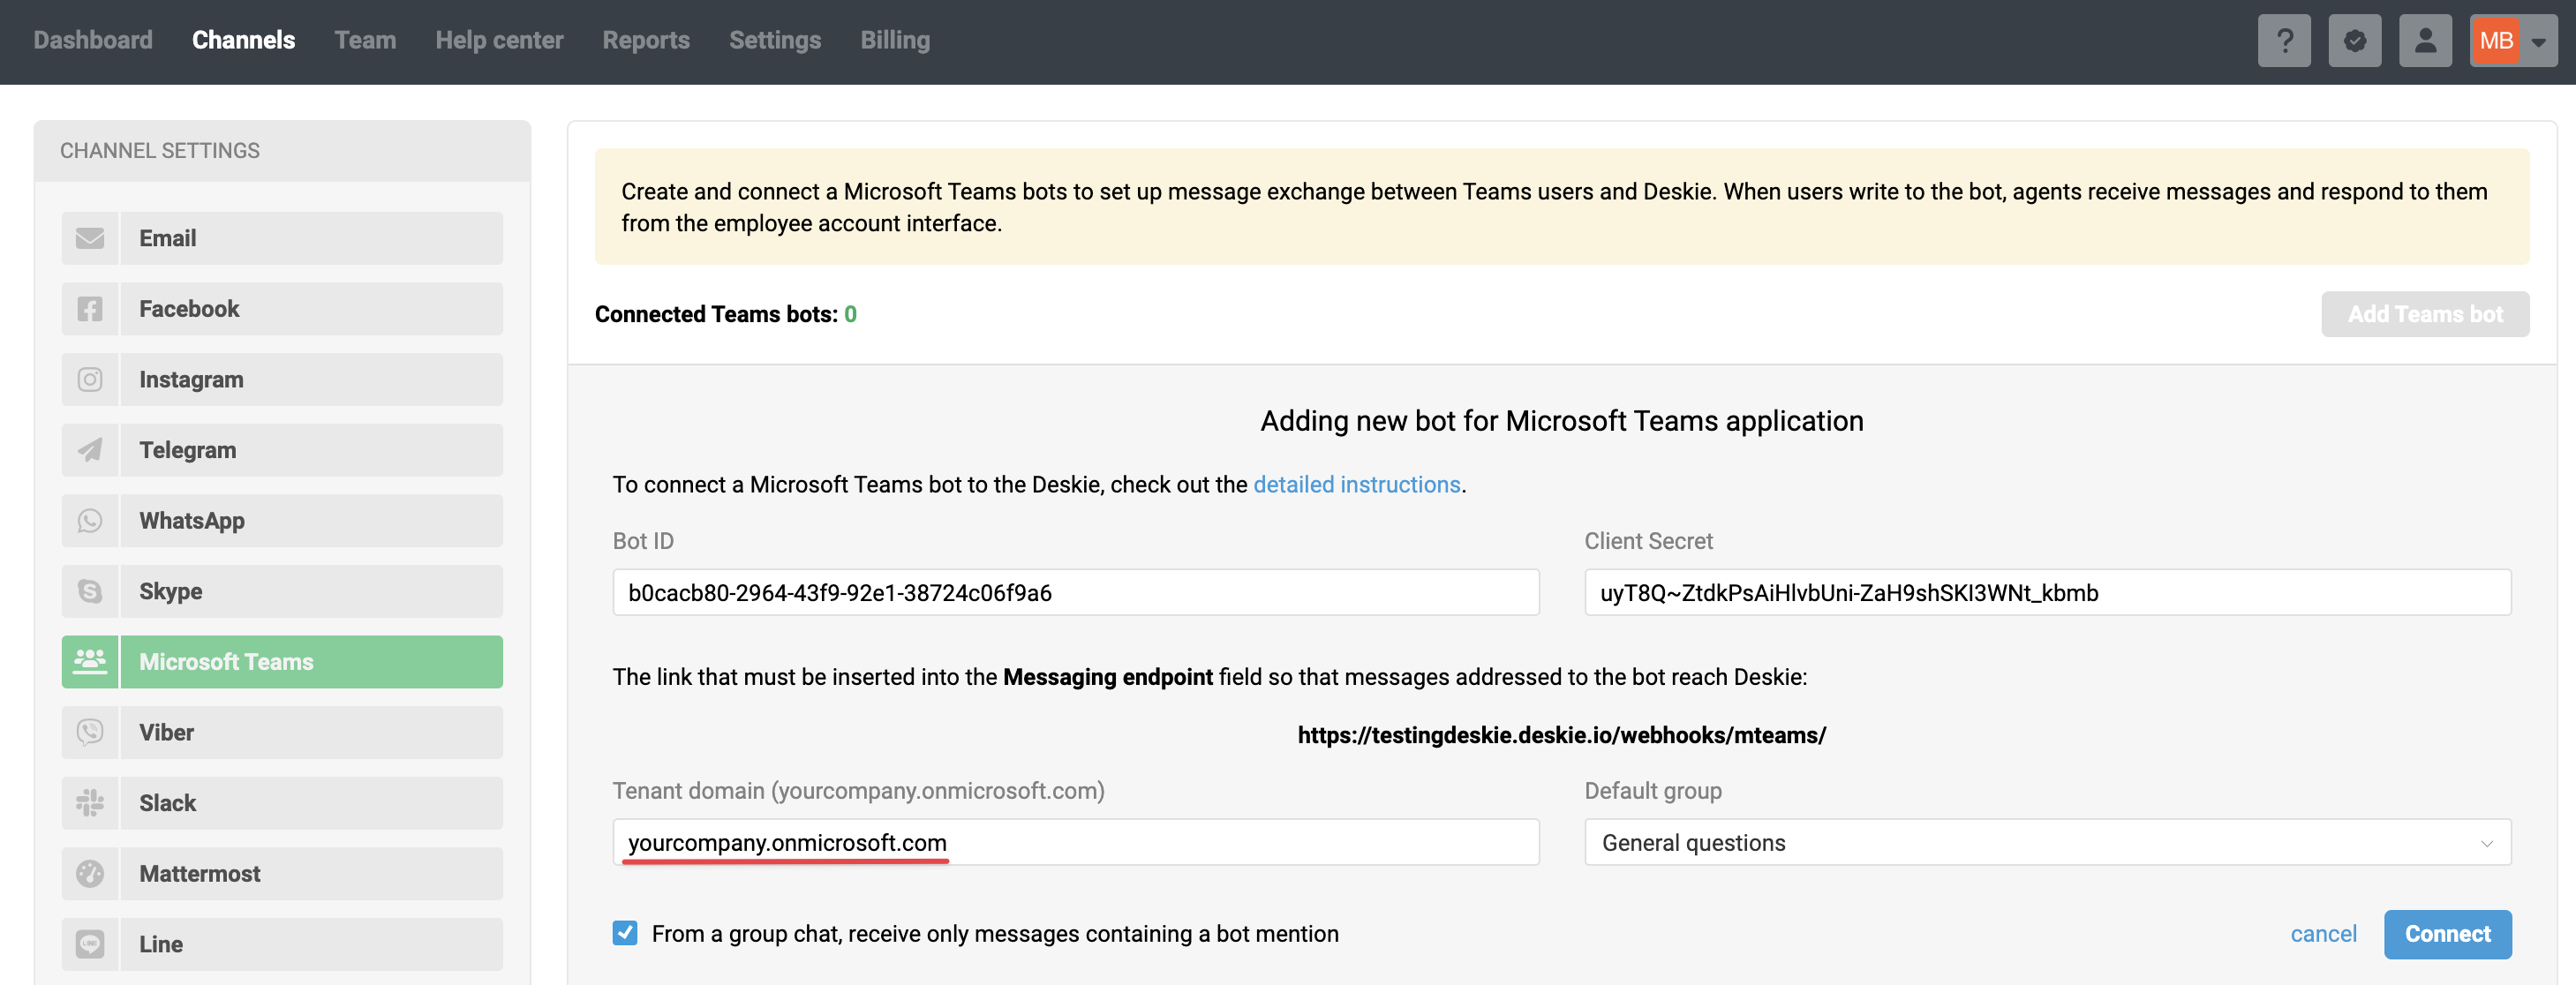
1. In the Deskie interface, go to Channels — Microsoft Teams and copy the message endpoint URL:
2. On the Teams Developer Portal, go to the bot management page, click the "New bot" button, enter the bot name, and click the "Create bot" button:


3. After deployment, the created bot’s page will open. Specify the bot’s endpoint URL obtained from Deskie interface in the first step, and save the changes:

The endpoint URL looks like this: https://[domain].deskie.io/webhooks/mteams/. Replace [domain] with your Deskie subdomain. Using a custom domain for the endpoint URL is not supported.
4. Go to the "Client secrets" section and create a new one by clicking the "Create your first client secret" button:

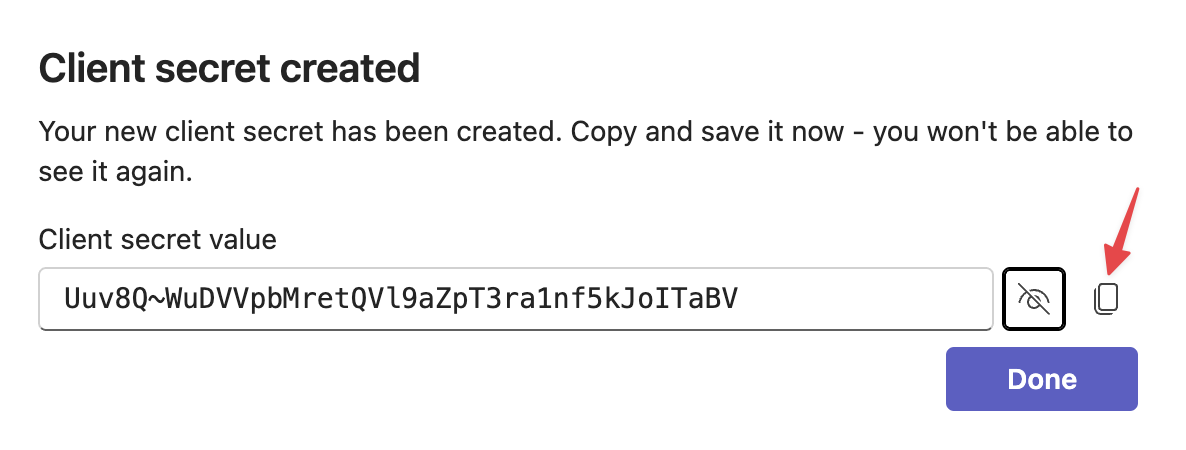
The client secret is displayed only once — immediately after creation. Make sure to save it in a safe place. If you close this window, you won’t be able to recover the secret and will need to create a new one.
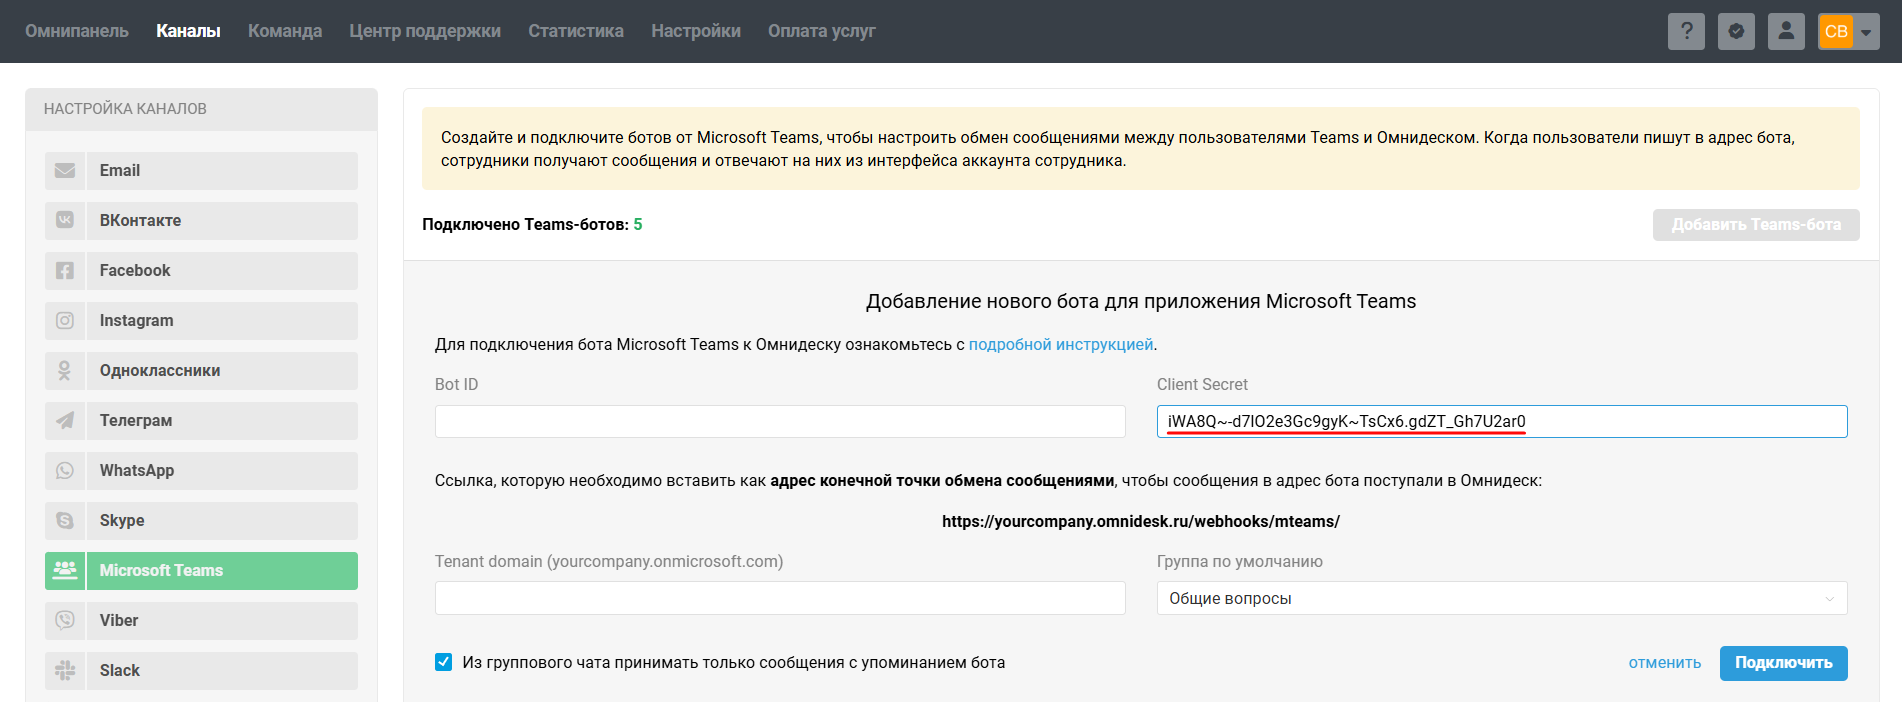
Copy the client secret and paste it into the Client Secret field in the channel connection form in Deskie:
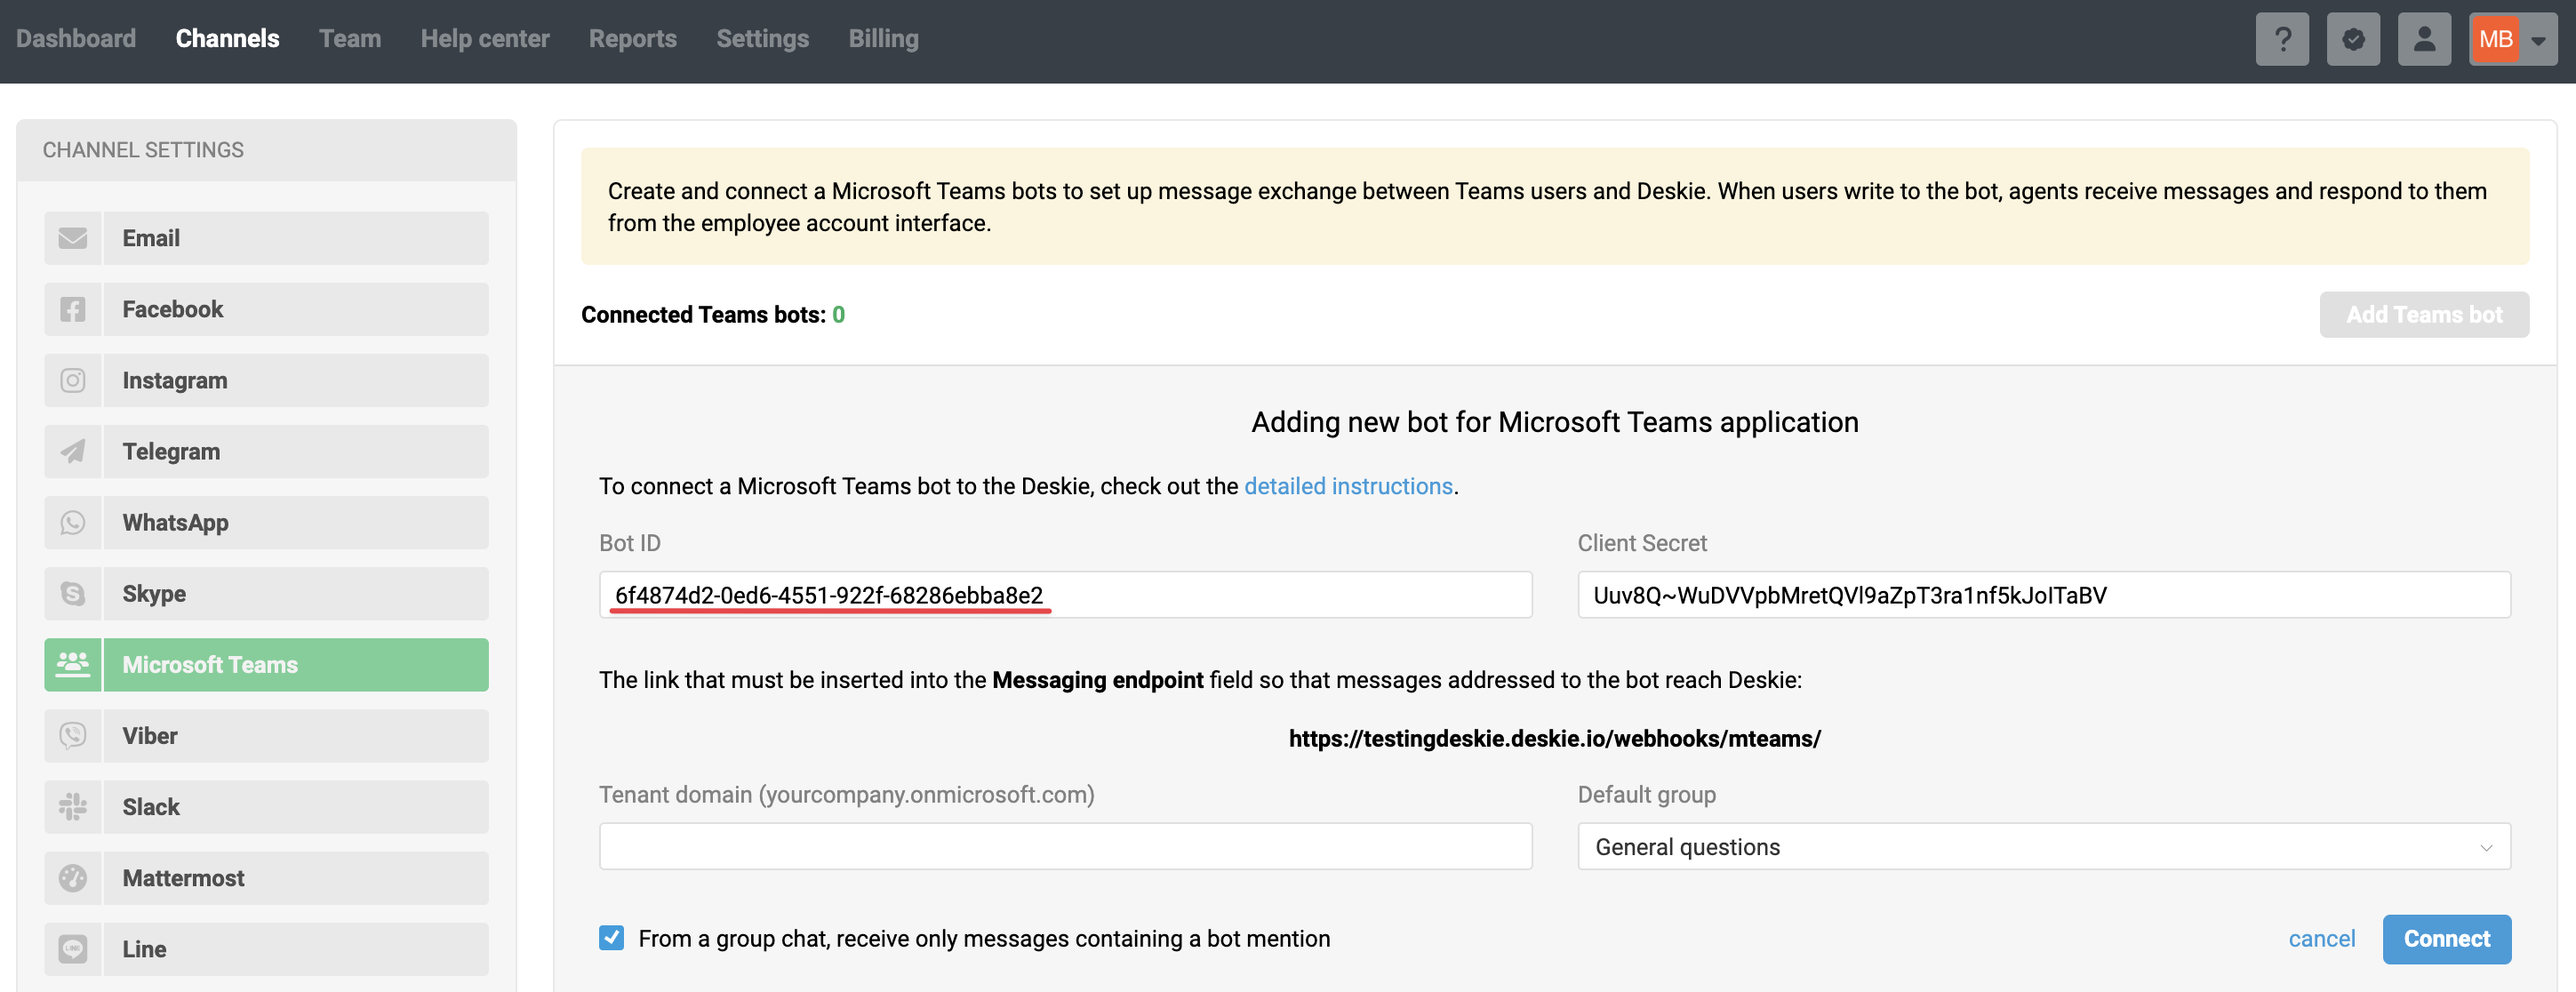
5. On the Teams developer portal, go to the bot list by clicking the "Tools" link, then copy the bot’s ID:

Paste the bot’s ID into the "Bot ID" field in Deskie:
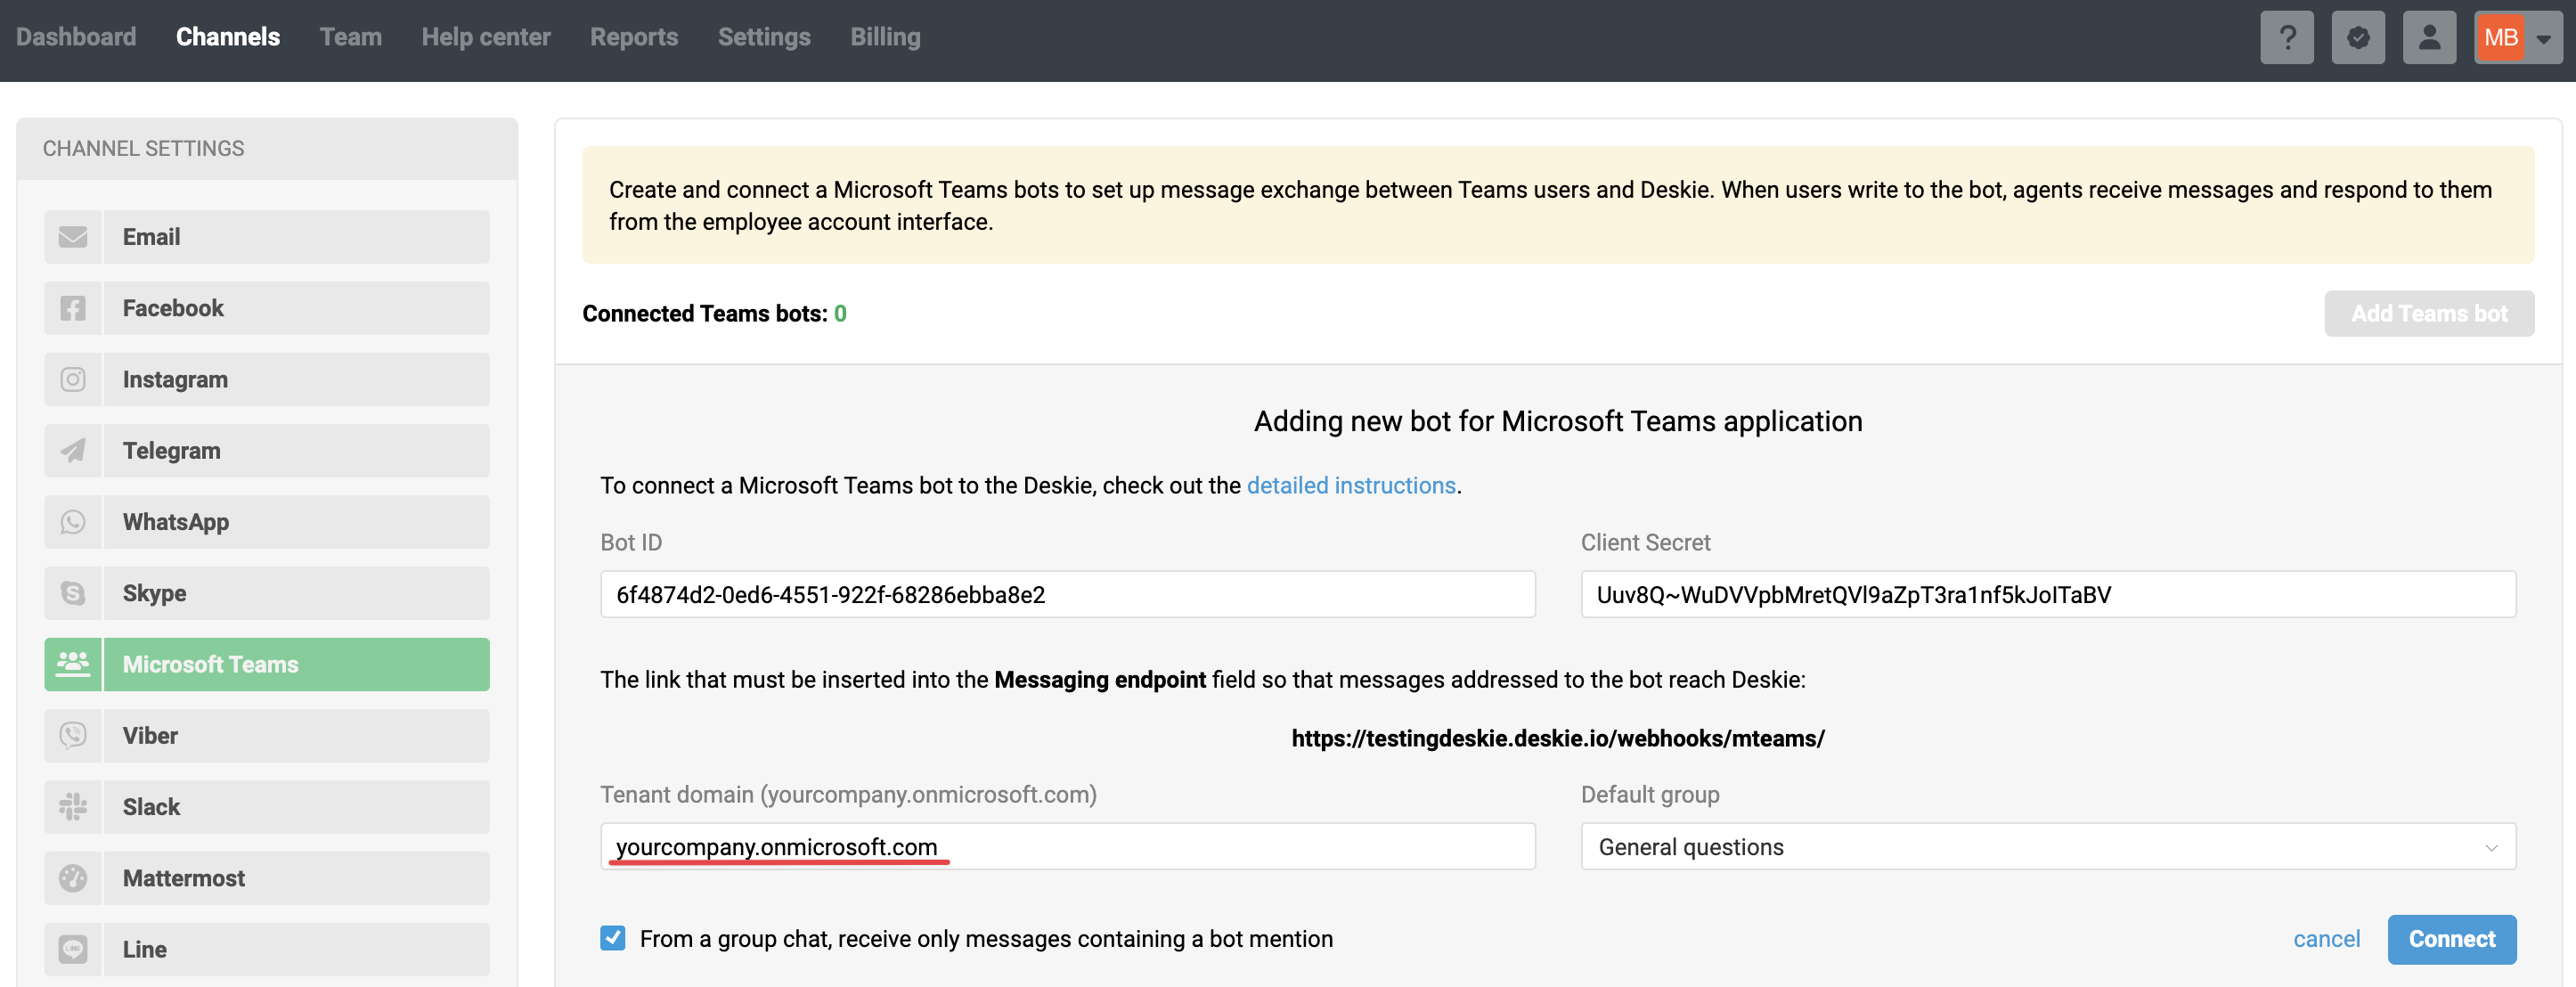
6. Enter your tenant domain or tenant ID – the one where you’ll use the app in – into the appropriate field in Deskie:
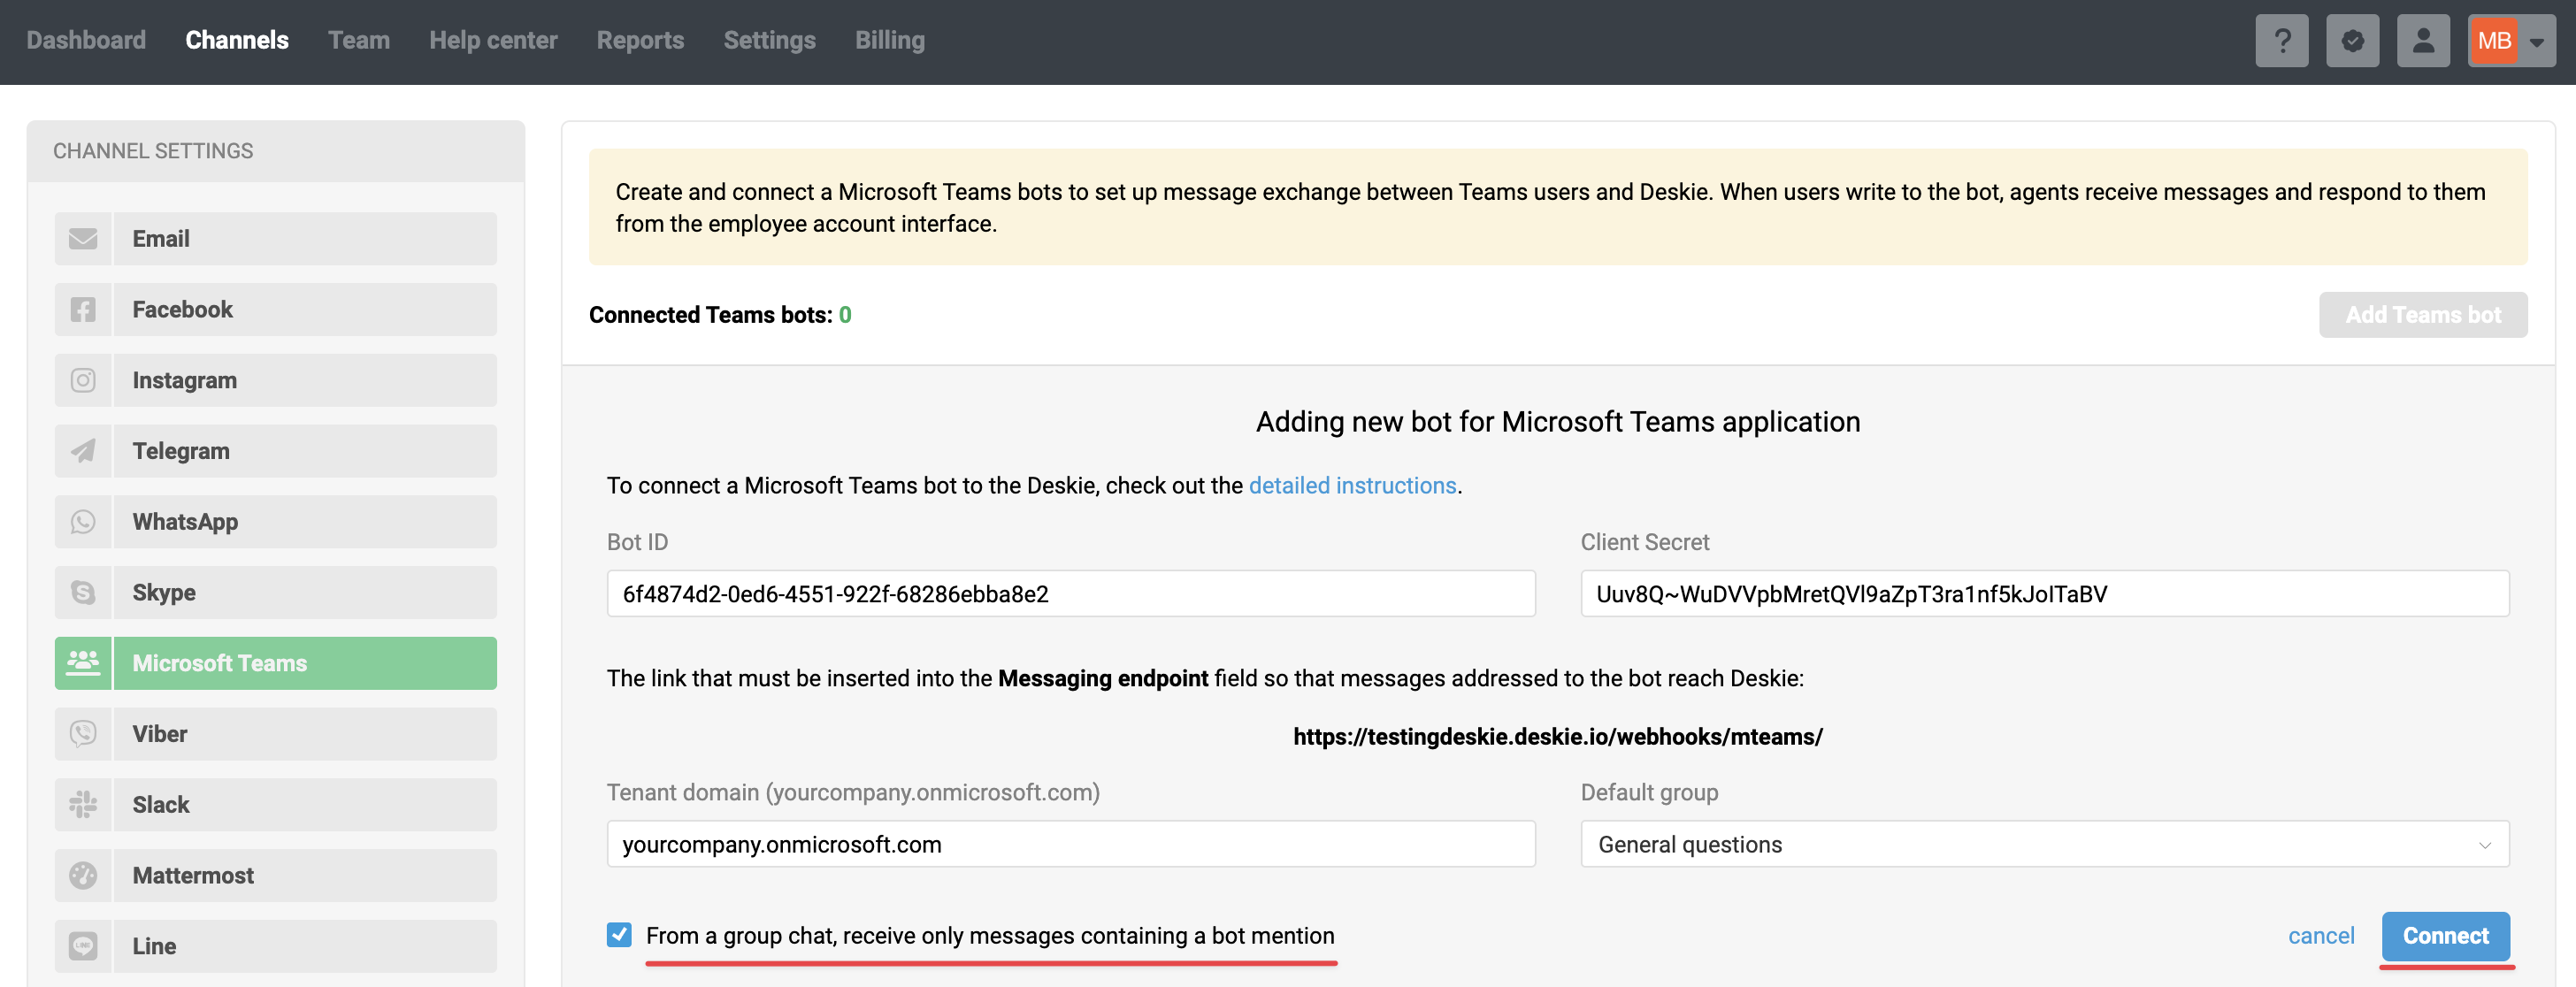
7. The checkbox "From a group chat, receive only messages containing a bot mention" doesn’t really affect multitenant bots, since Teams currently only delivers messages from channels and group chats where the bot is added if it’s mentioned. After filling in all the options, click the Connect button:
If you chose to connect the bot through the Teams Developer Portal and completed all the steps described above to add the bot, proceed to the next setup step — creating the Teams app.
Option 2 — creating a bot via Microsoft Azure
1. Go to Azure and sign in with an account that has Microsoft Teams admin access. Then, open the page to create a new Azure Bot.
2. Fill out all the fields on the bot creation page.
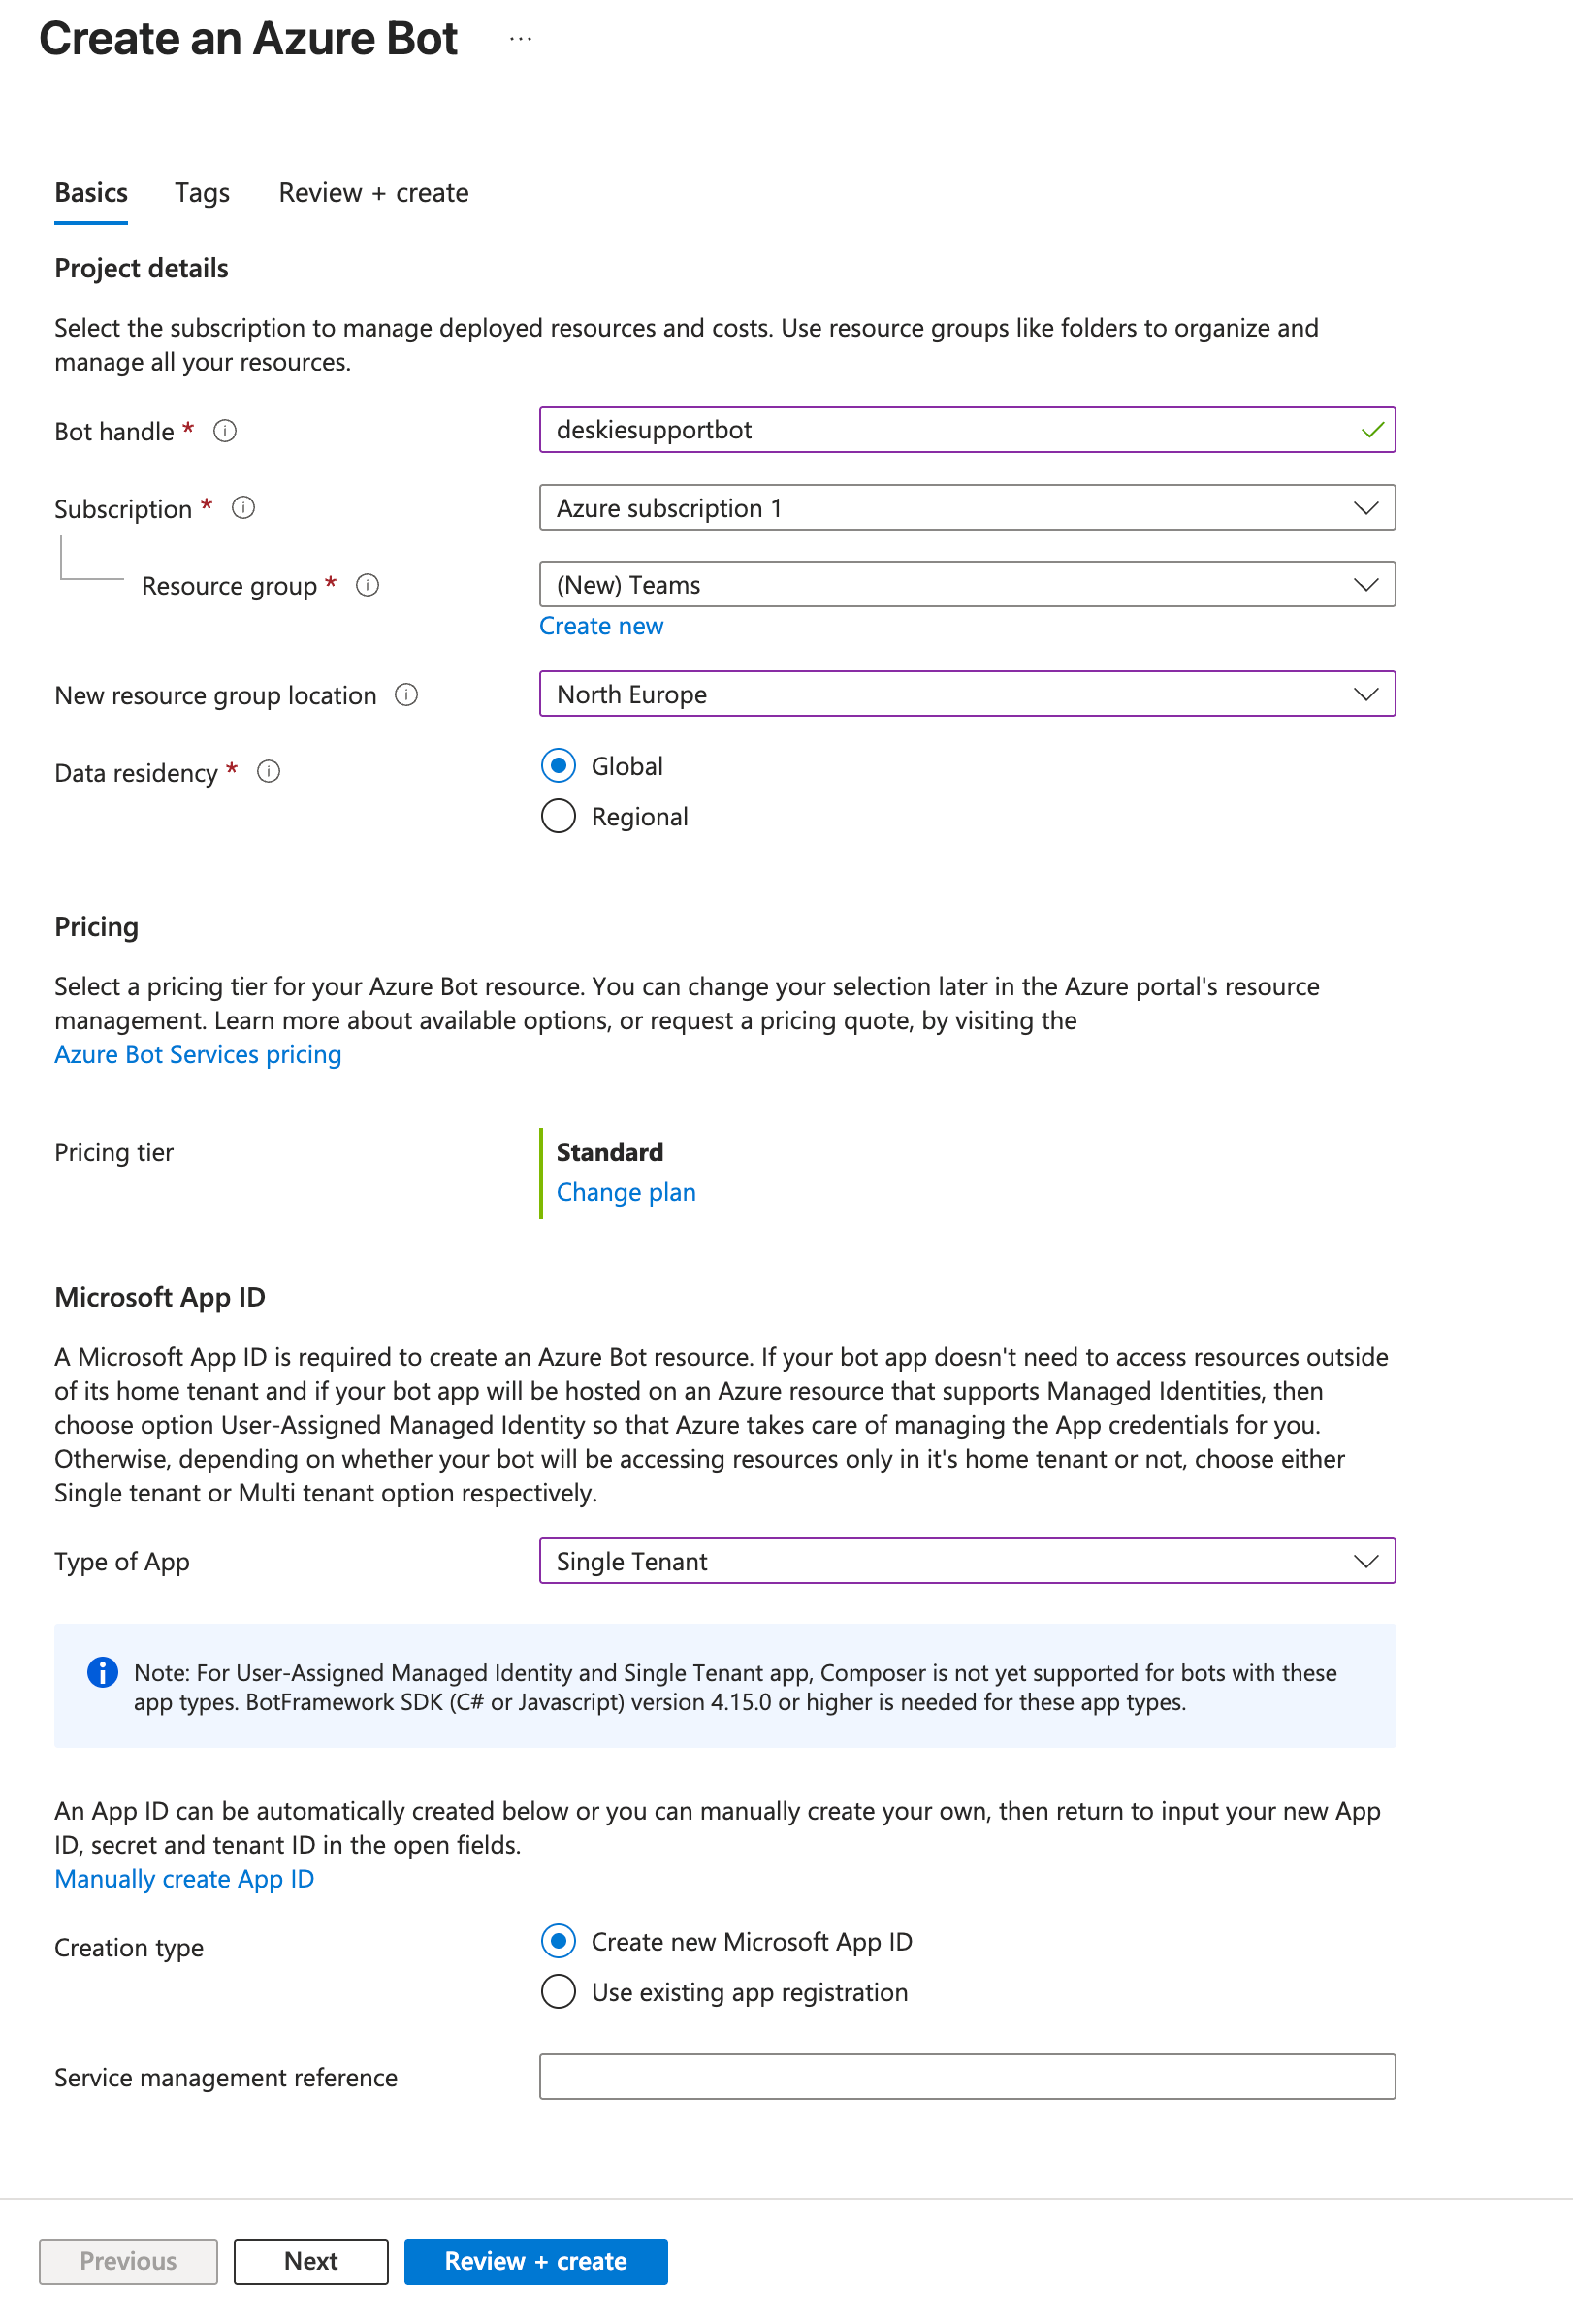
In the "Project details" section:
Bot handle – enter a short, memorable name for your bot, like deskiesupport.
Subscription – if you have multiple paid Azure subscriptions, pick the one where you want to host the bot. Make sure you have admin access and permission to create resources in the selected Azure subscription.
Resource group – select an existing resource group, or click "Create new" to add a new one (for example, you might name it Teams).
An Azure resource group is a logical unit that brings together all the components related to your bot. We recommend creating a separate resource group – for example, named Teams.
Location — specify the region where the bot will be hosted.
The "Location" field refers to the physical region of the Azure data center where the Azure Bot resource will be deployed. Choosing North Europe means the data will be hosted in Ireland, which is an optimal choice for European countries. The West Europe option points to the Netherlands, which you can also choose, but keep in mind that this is one of the busiest Azure regions in Europe.
Data residency – leave the default value: Global. If you choose any other option, the bot won’t be able to work with Teams resources.
In the "Pricing" section: under "Pricing tier" subsection, select the Free plan.
Bot integration with Teams is not billed and has no message limits on the free plan.
In the Microsoft App ID section: in "Type of app" field, choose "Single Tenant". This will create a single-tenant bot that also supports cross-platform functionality. Learn more
Starting July 31, 2025, Microsoft will no longer allow the creation of multitenant applications (the "Multi Tenant" option). However, multitenant bots that have already been created will continue to work and can still be used for integration.
In App ID, select the option "Create new Microsoft App ID". In this case, Azure will create the basic structure and automatically fill in the required values for you.
If you already have an App ID, select "Use existing app registration" and provide the Client ID (also known as Application ID) and, if required, the Client Secret.
Note that when you use an existing App ID, Azure does not automatically create or configure the following:
- client secret,
- API permissions,
- Microsoft Teams channel binding,
- bot authentication.
Additionally, you will need to manually enter your App ID in the settings for Bot Channels Registration or your Azure Bot resource if these are separate.
When all fields are filled in, click the "Review + create" button at the bottom of the page.
3. After receiving the notification that the validation has passed, click the "Create" button.
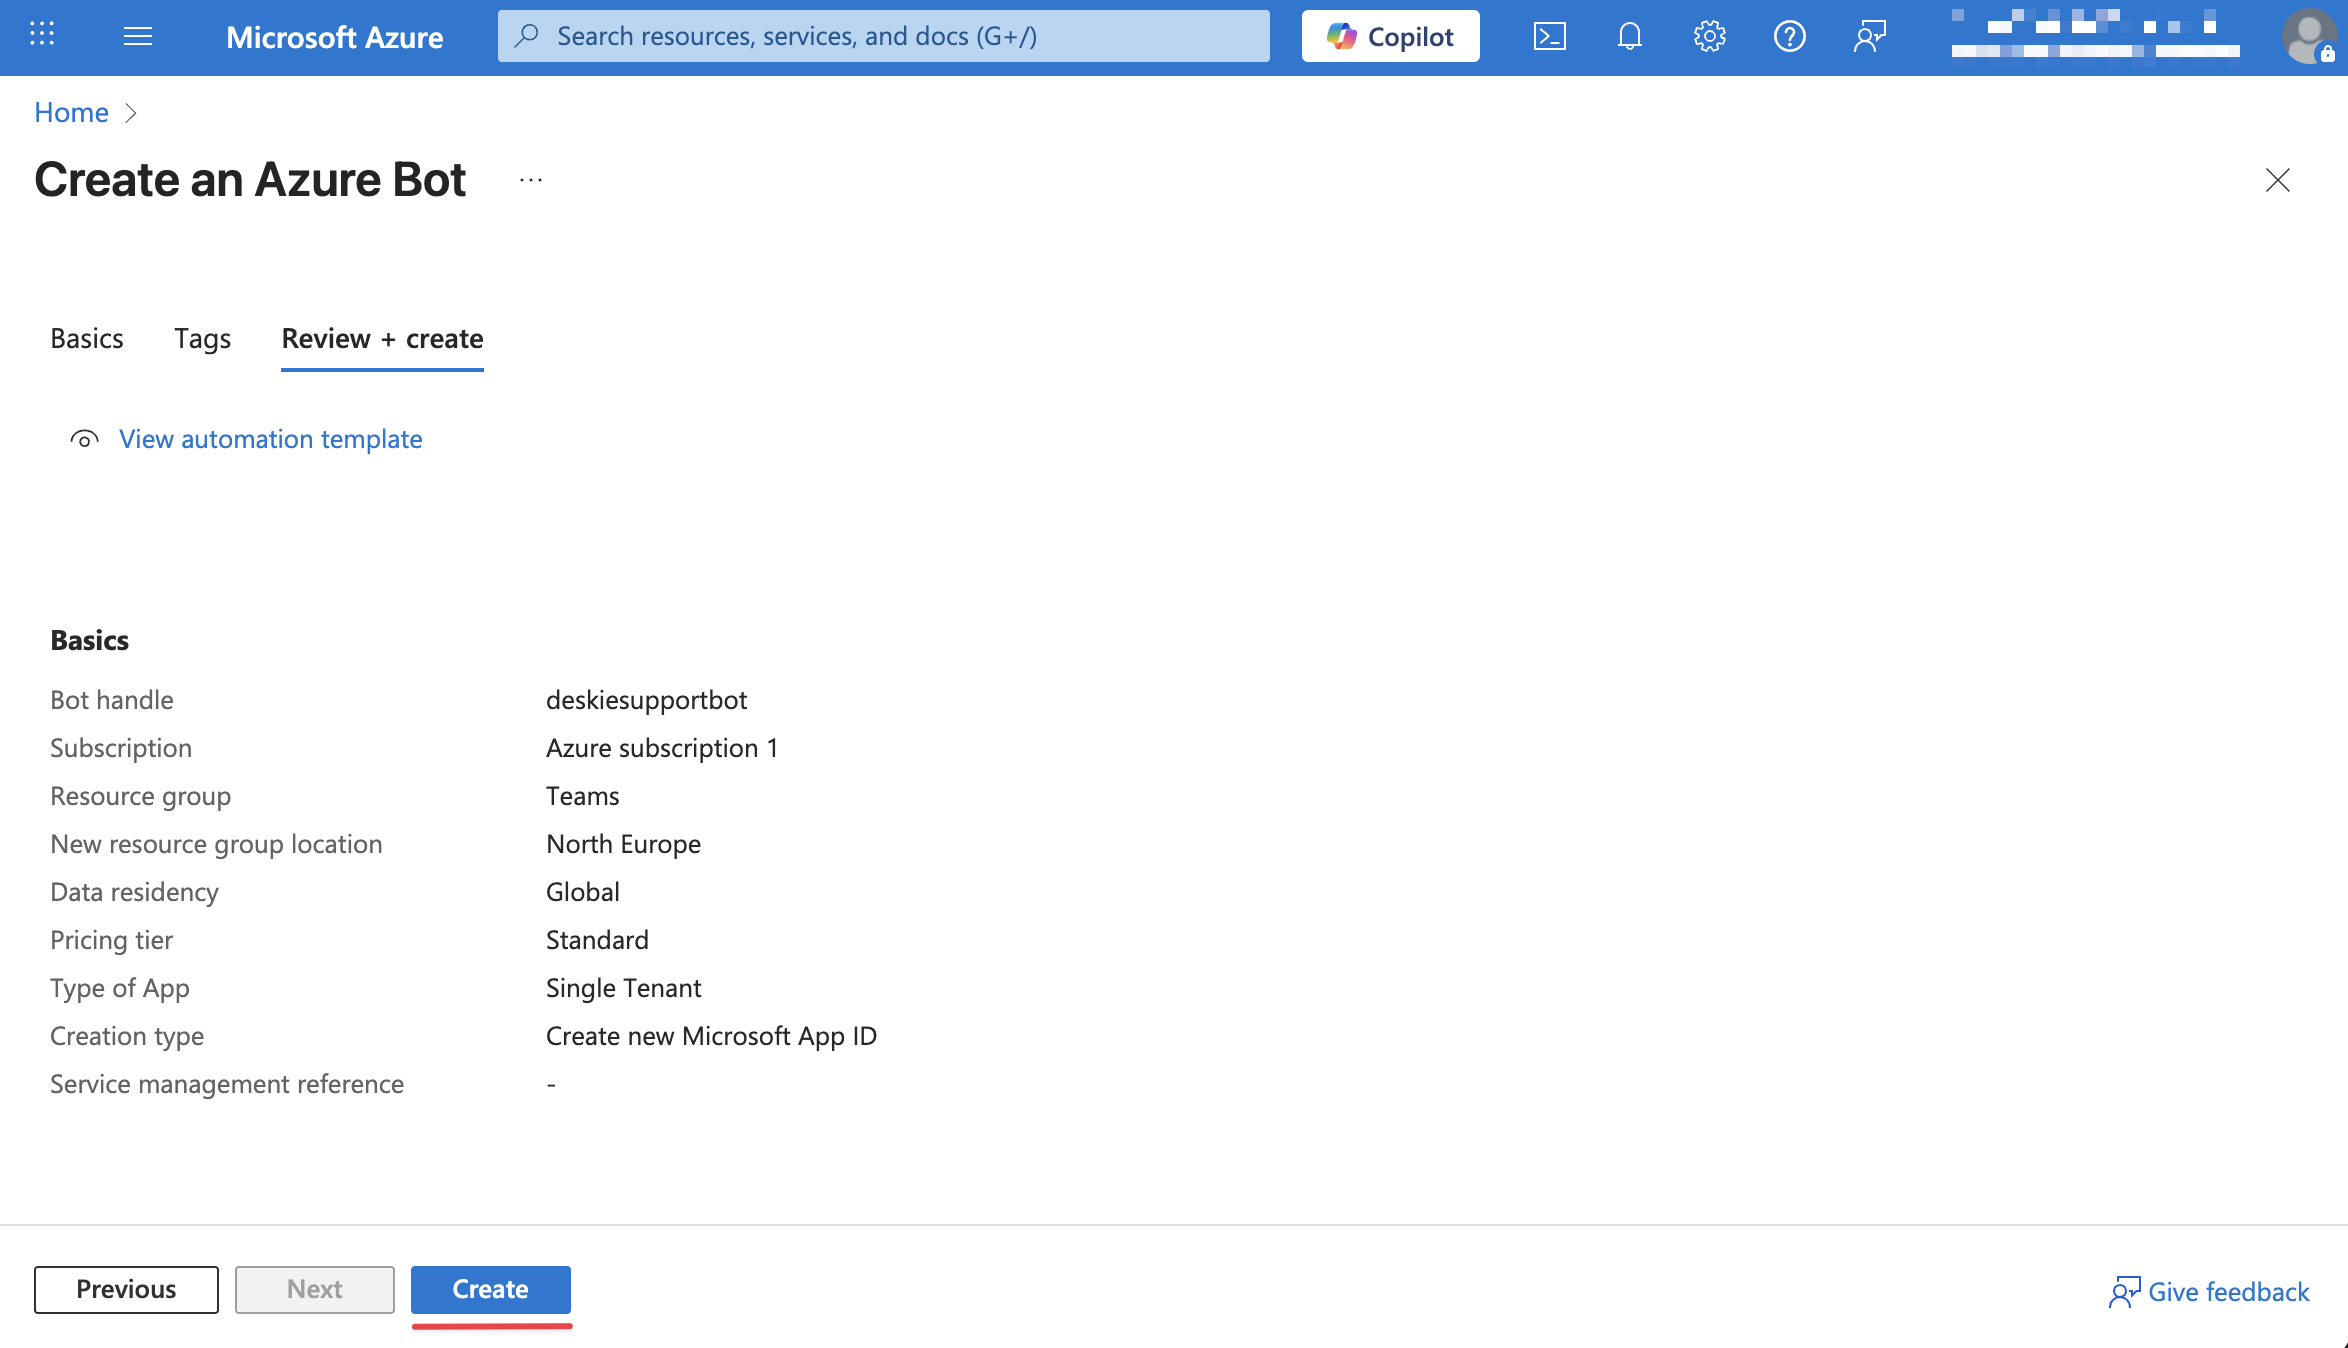
4. Wait for the resource deployment to complete, then click "Go to resource".
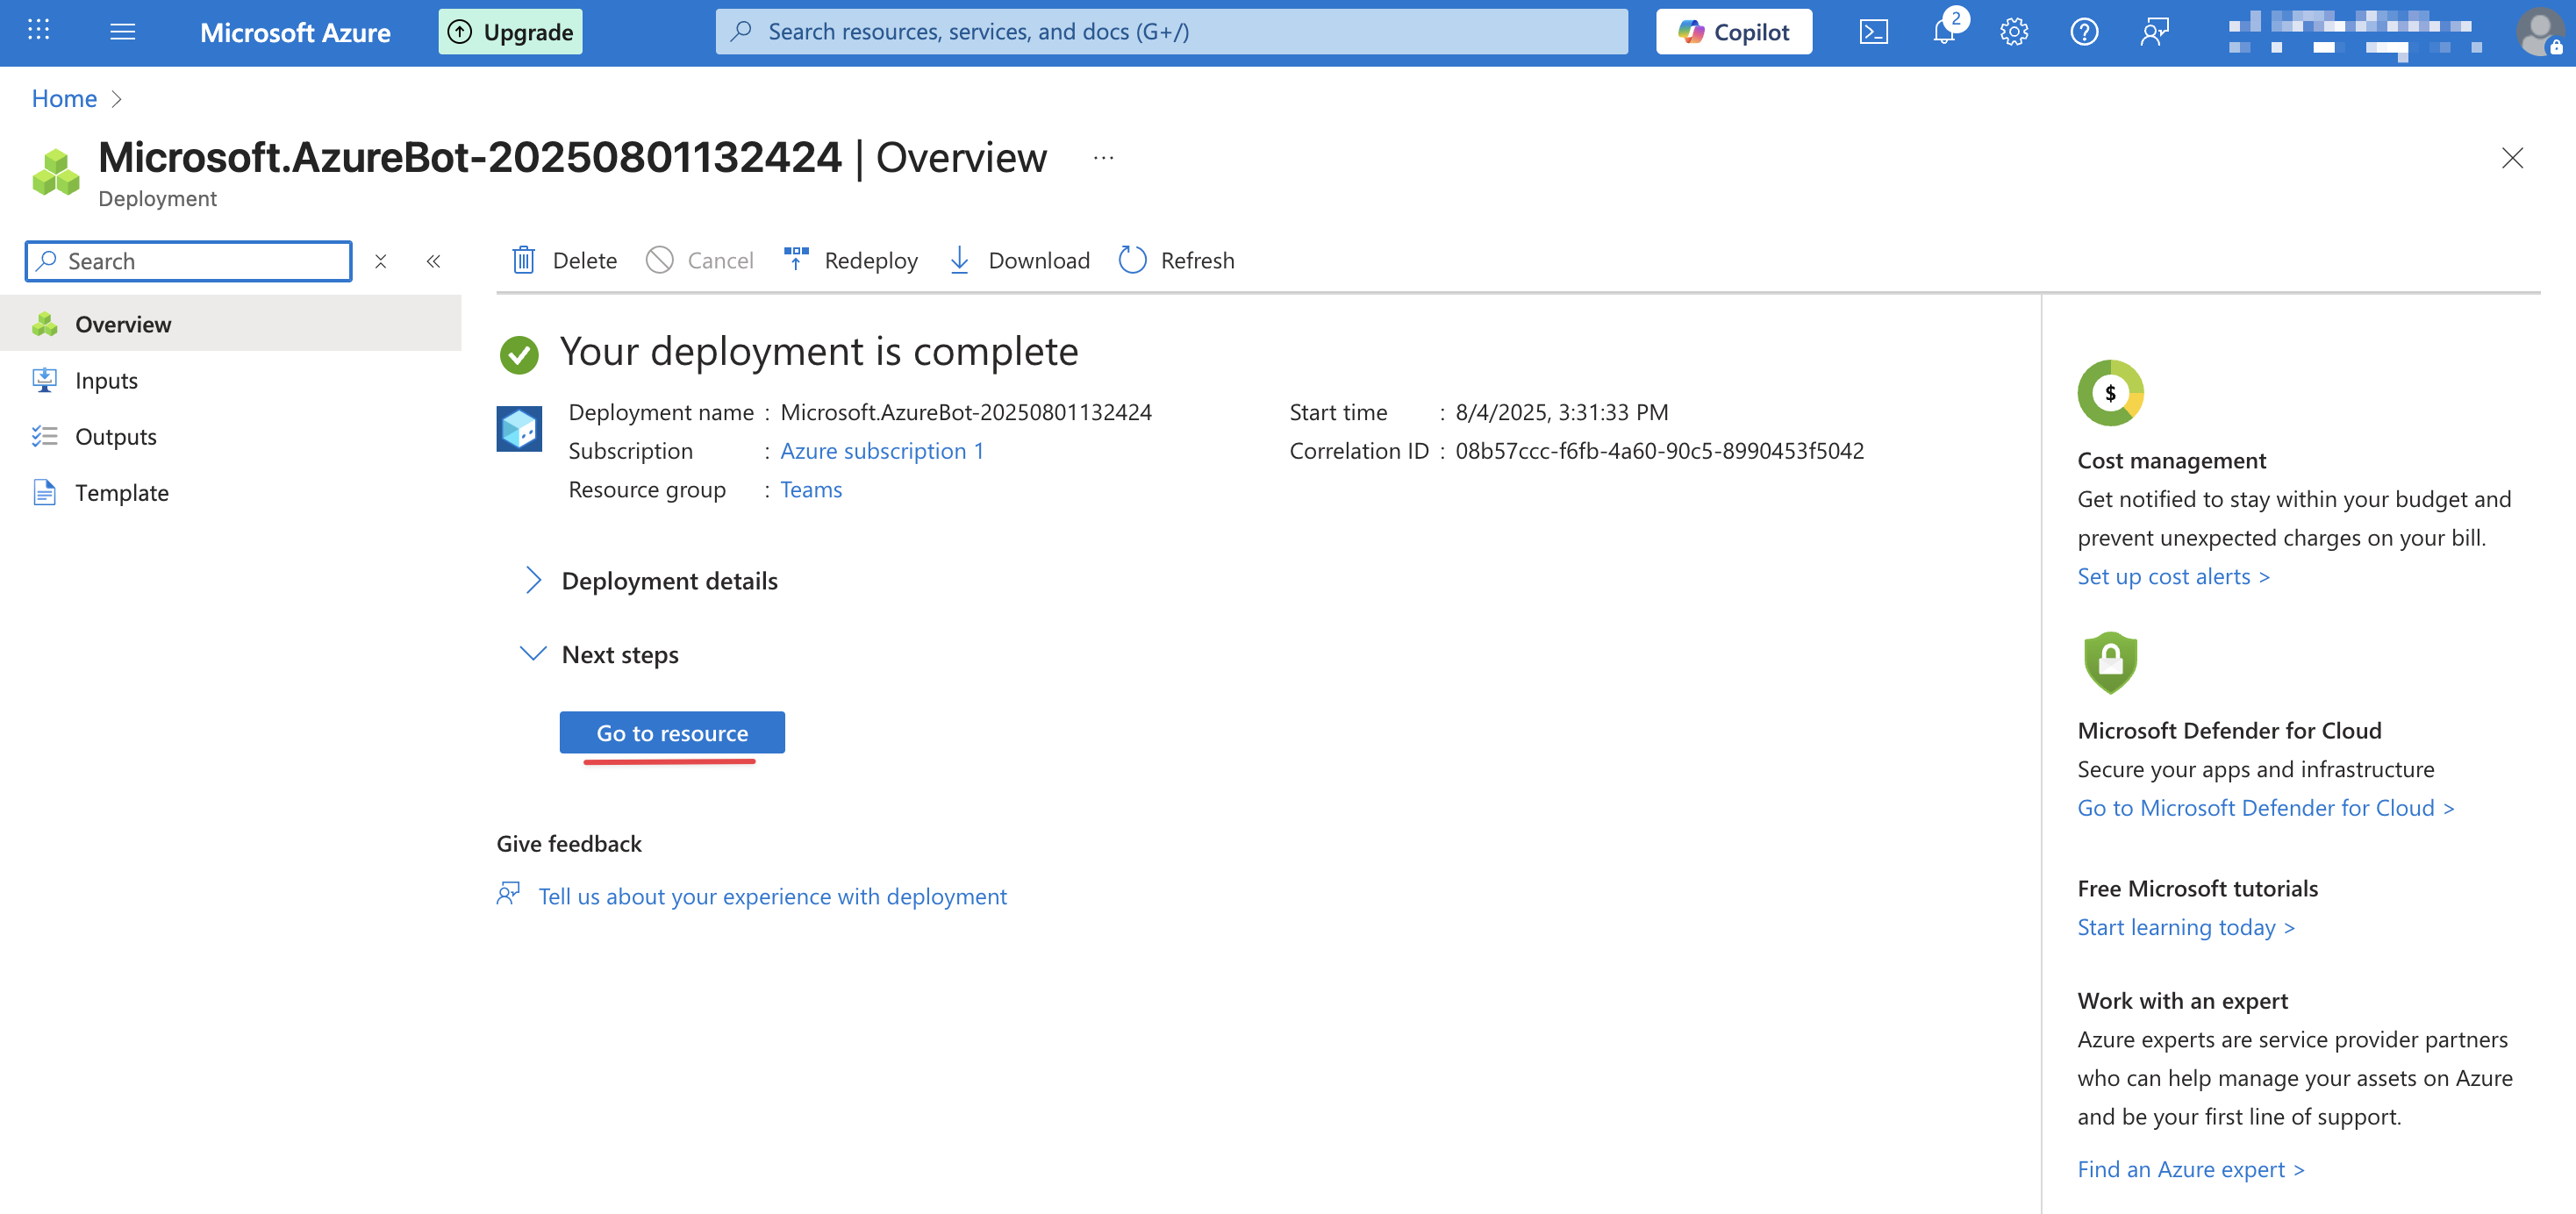
5. In the "Settings" section, go to "Channels" and select the Microsoft Teams channel.
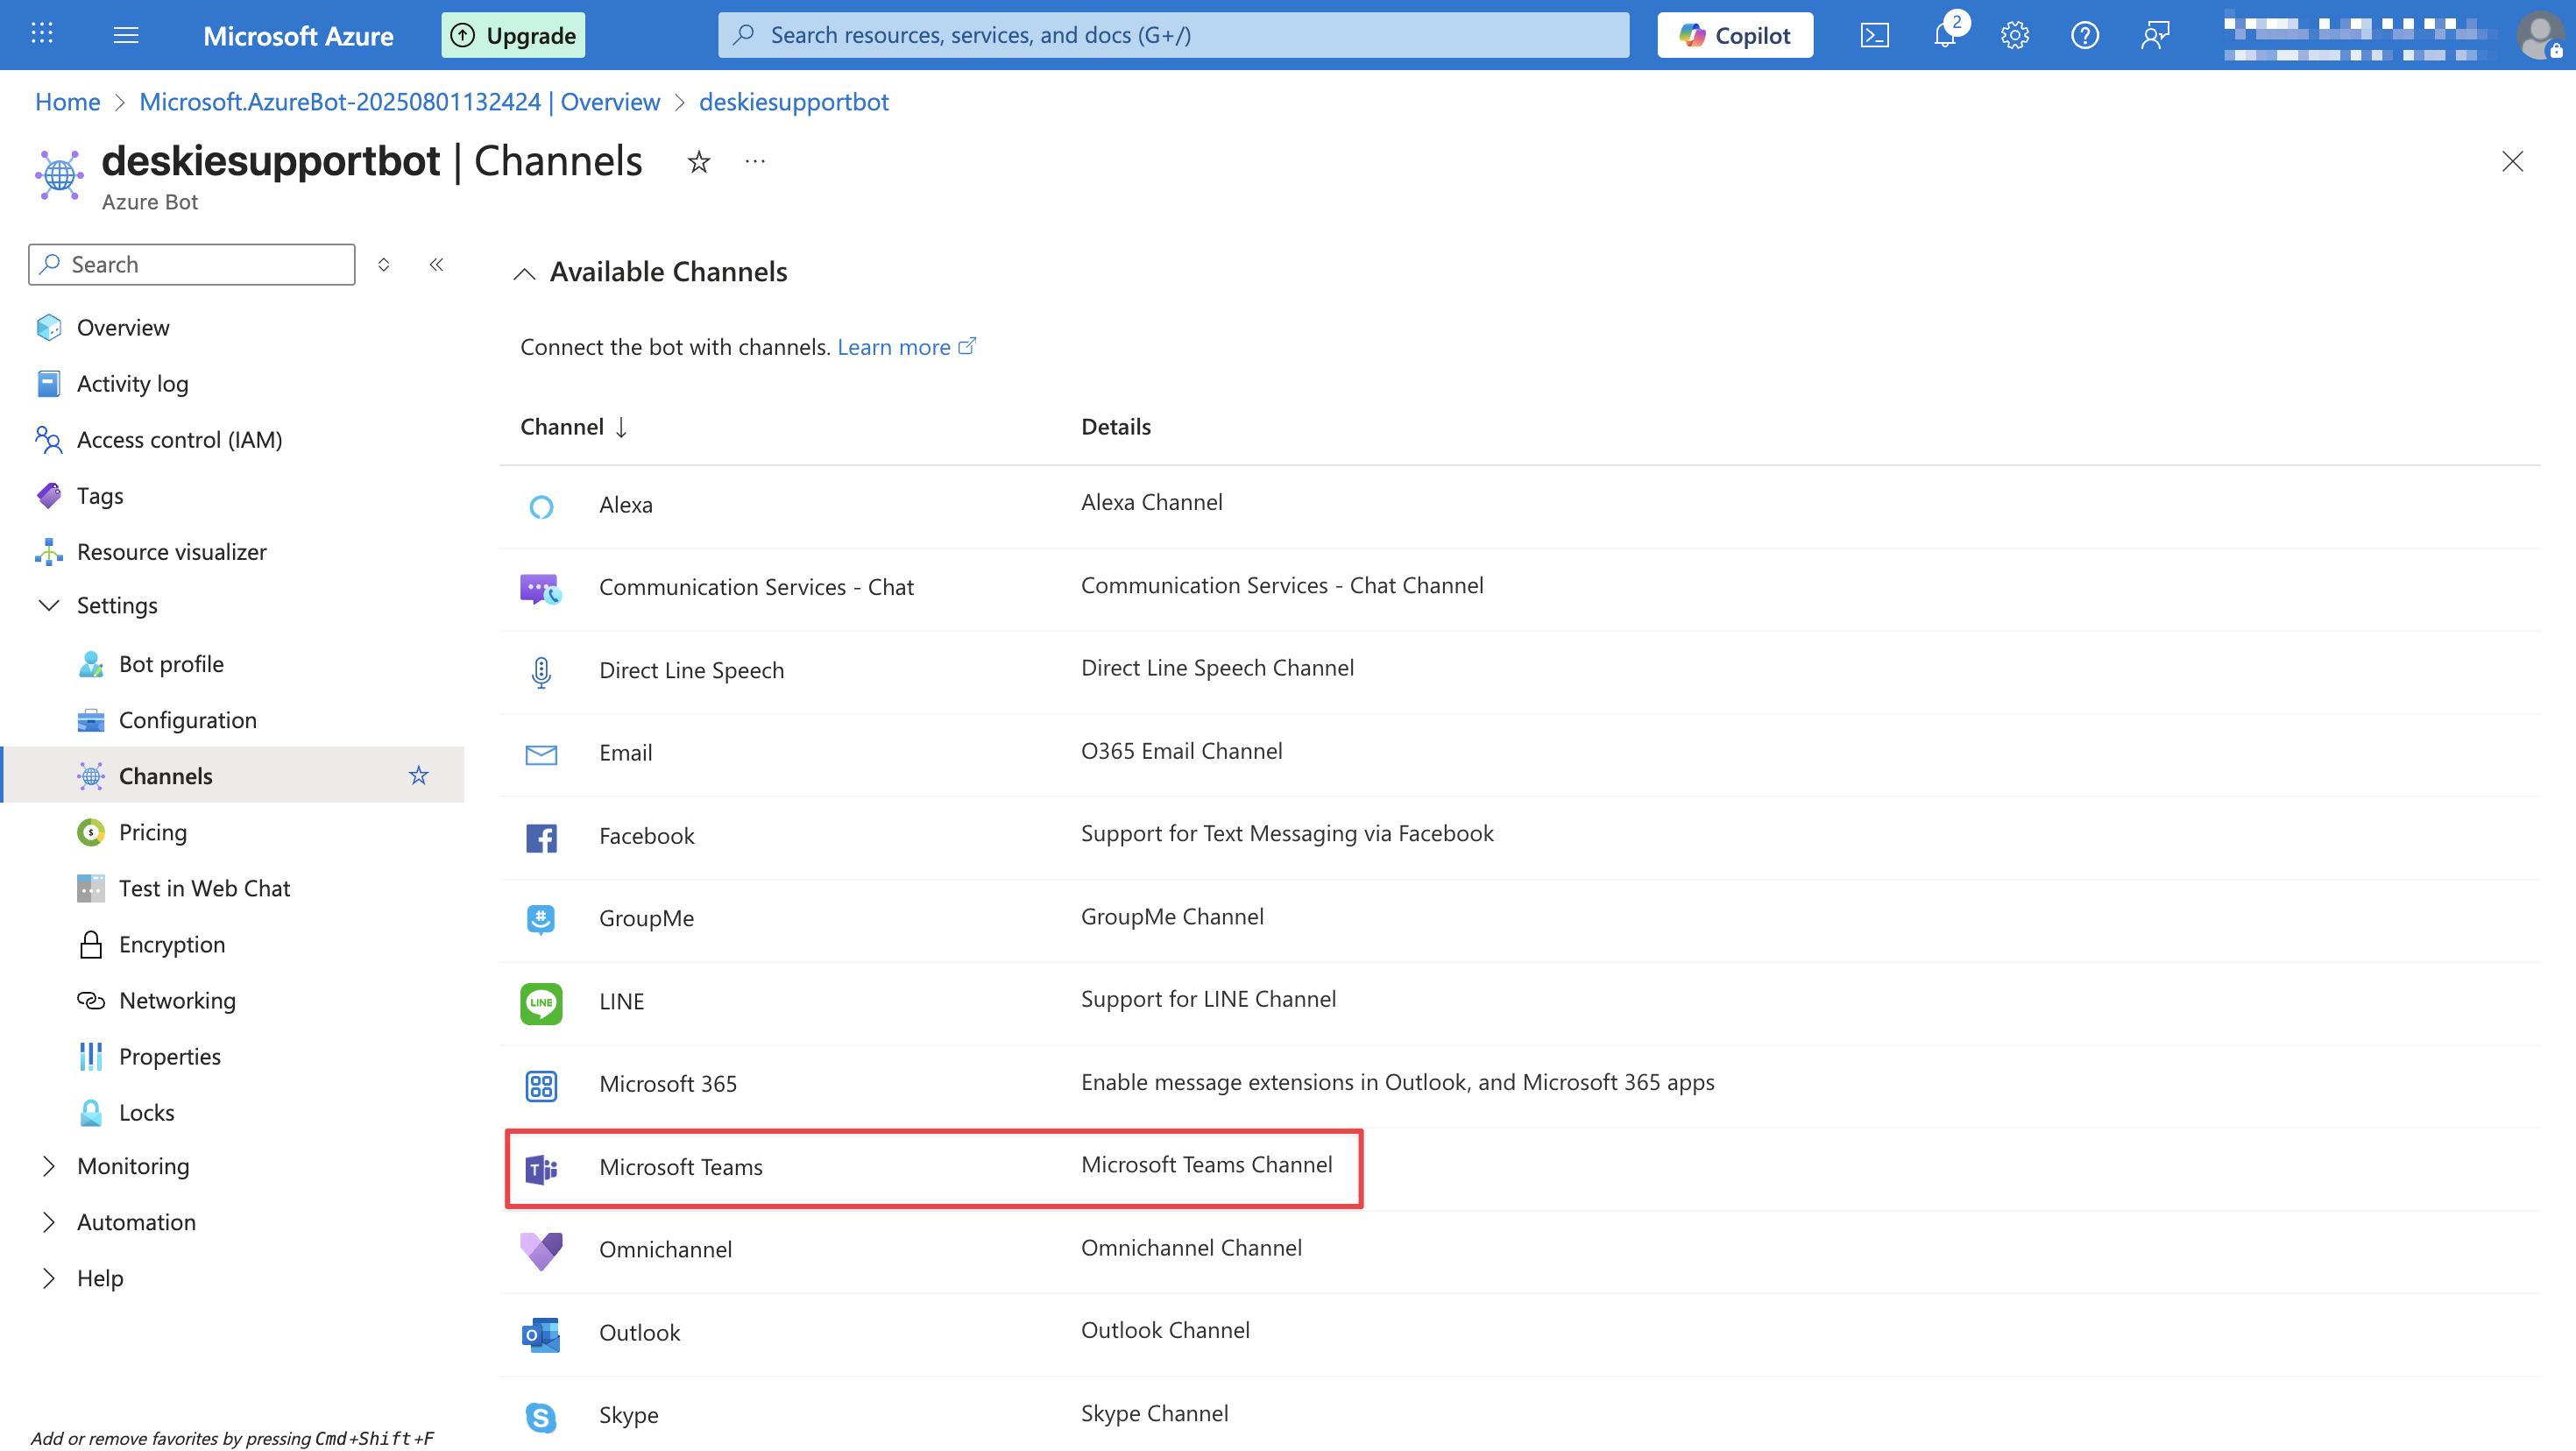
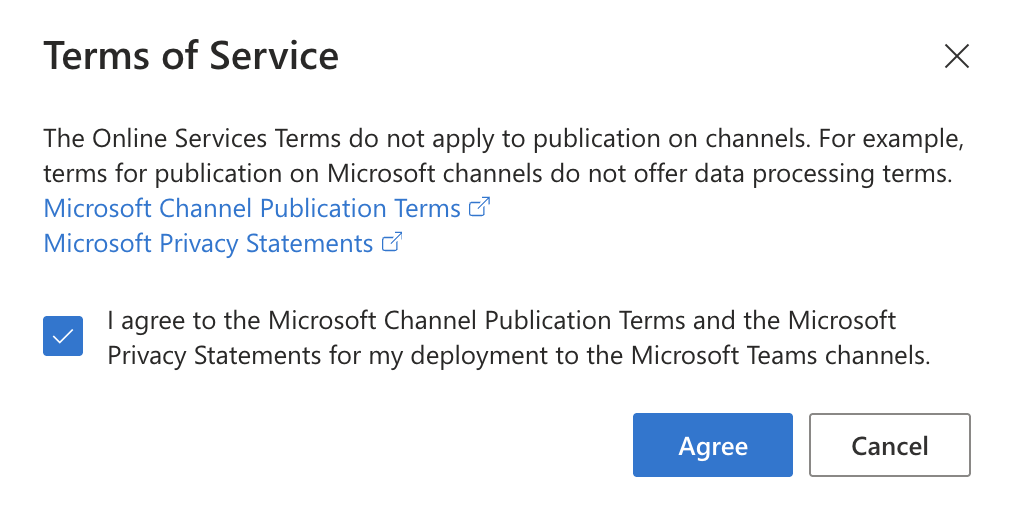
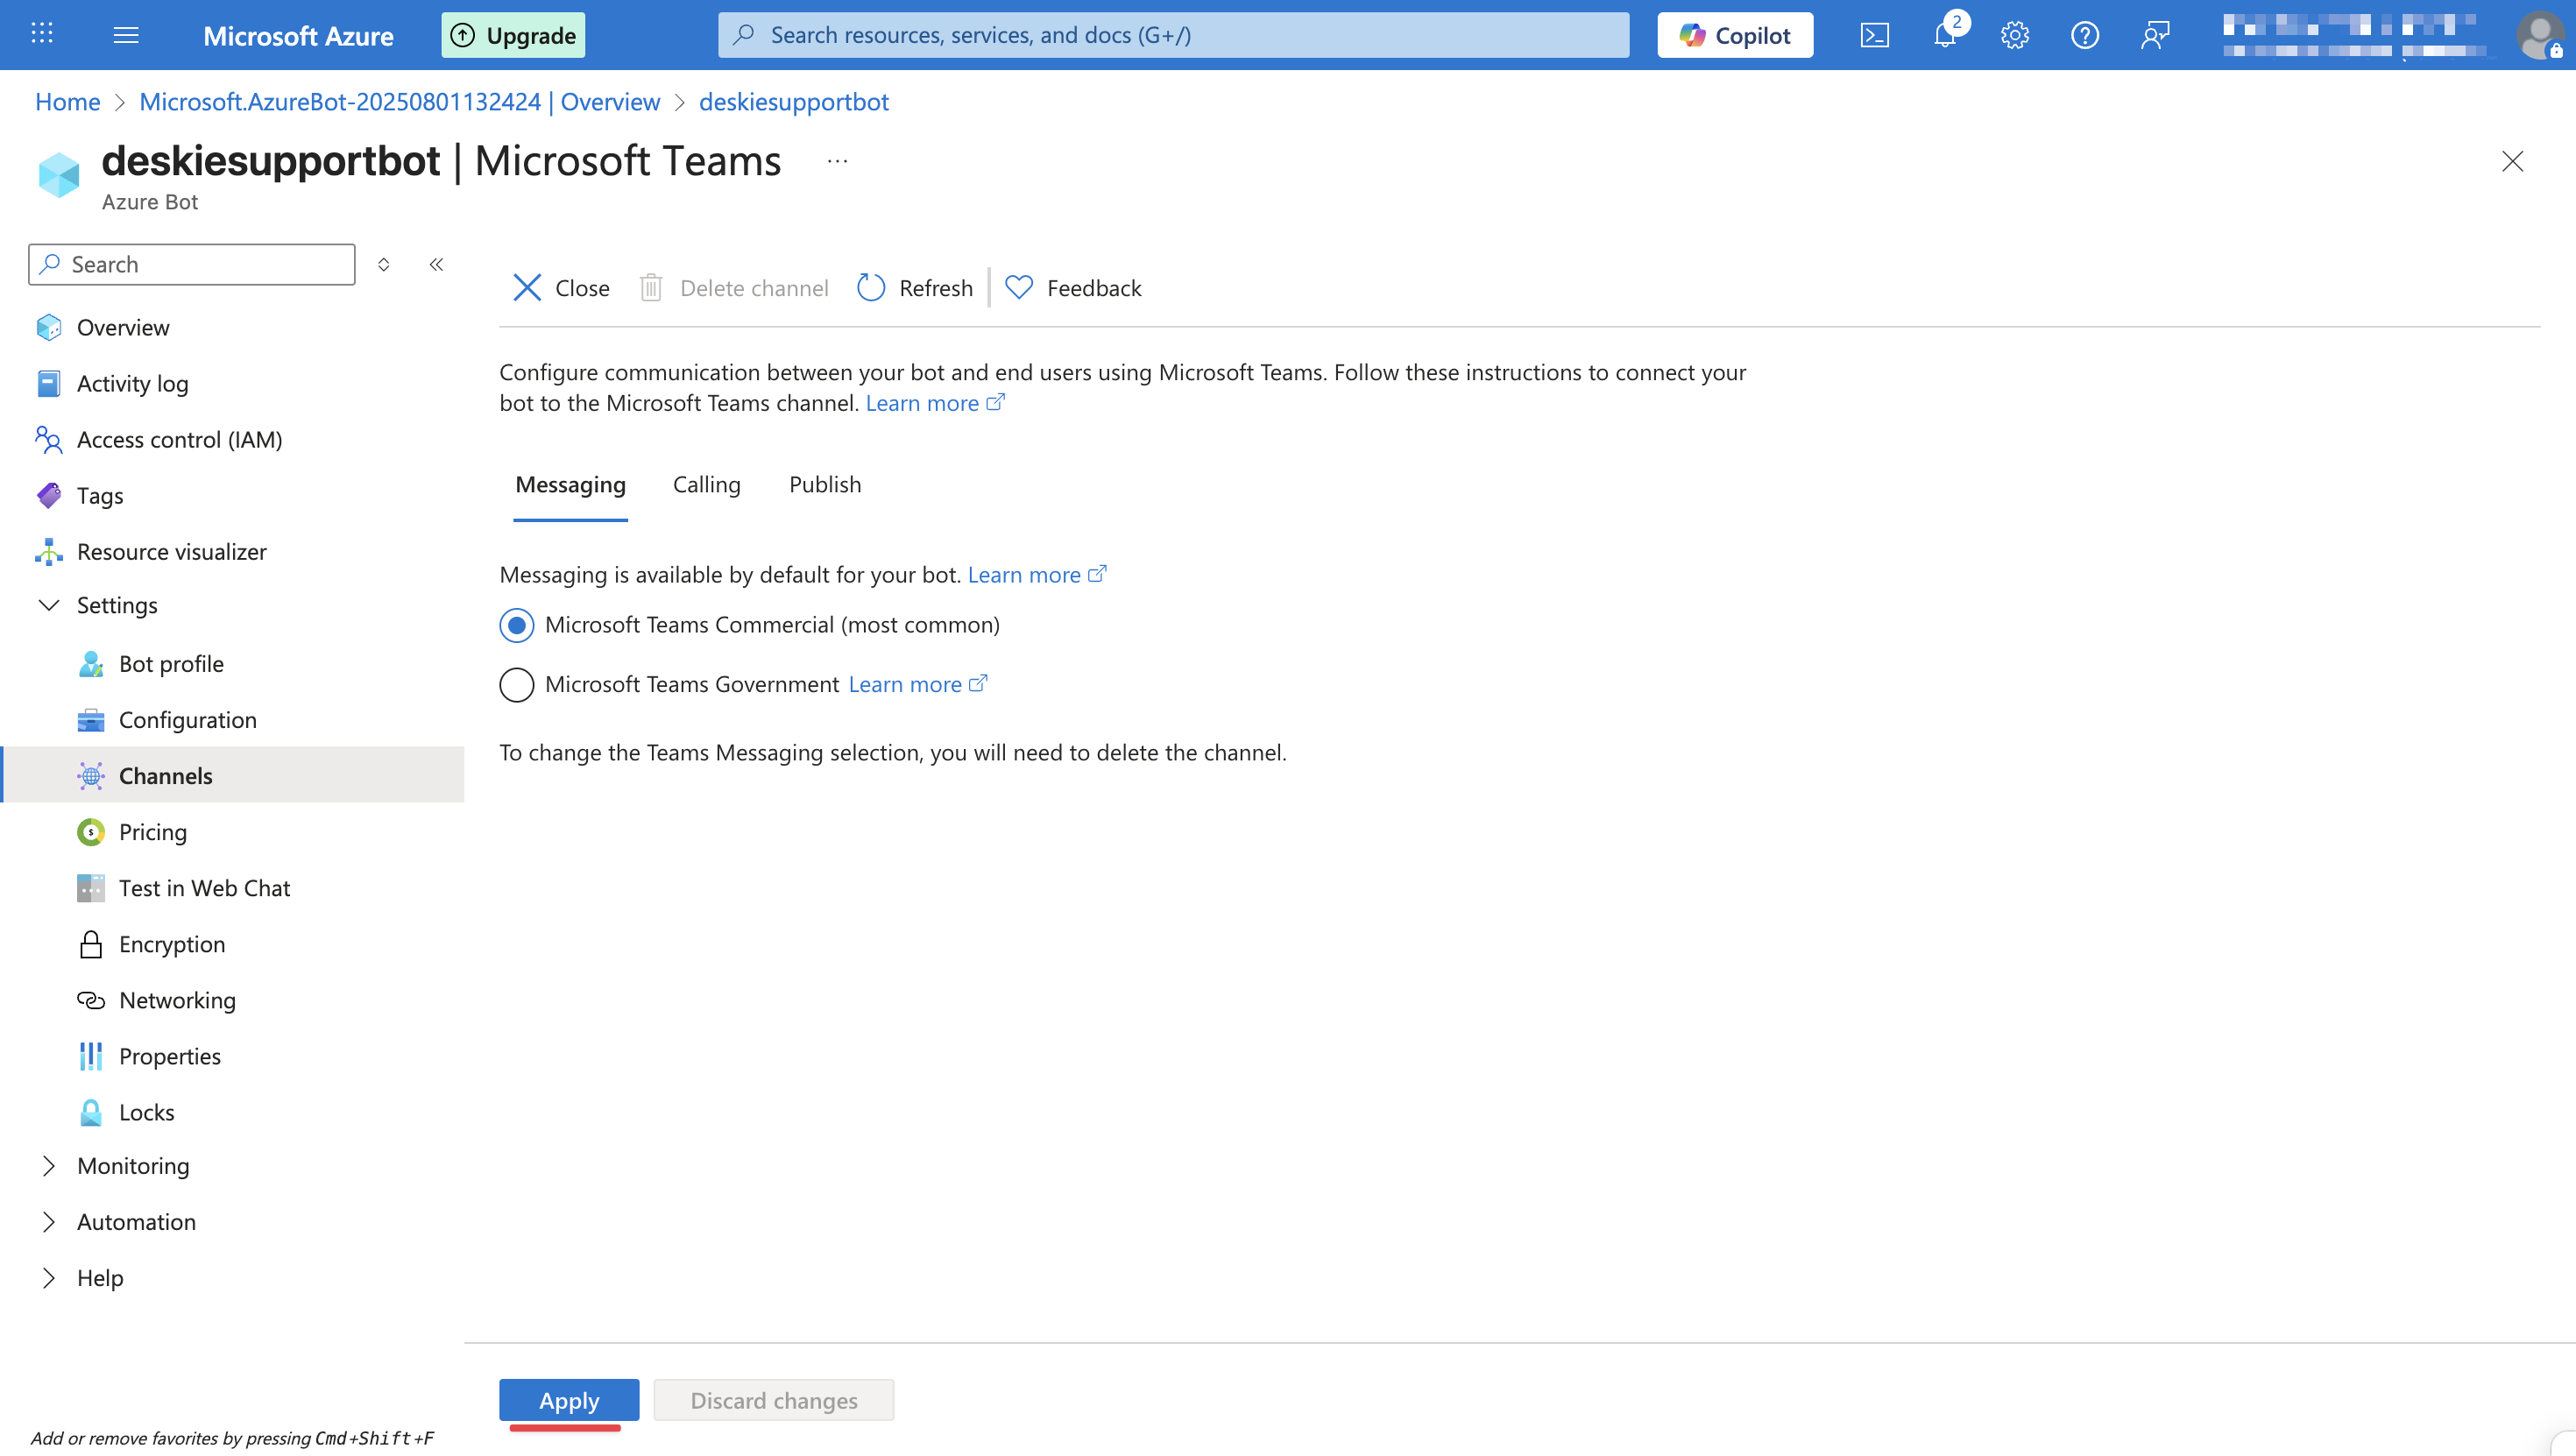
6. In the popup window, you need to agree to the terms of use. After that, select either the commercial or government version and click the "Apply" button.
7. In the Deskie interface, navigate to Channels — Microsoft Teams and copy the messaging endpoint URL:
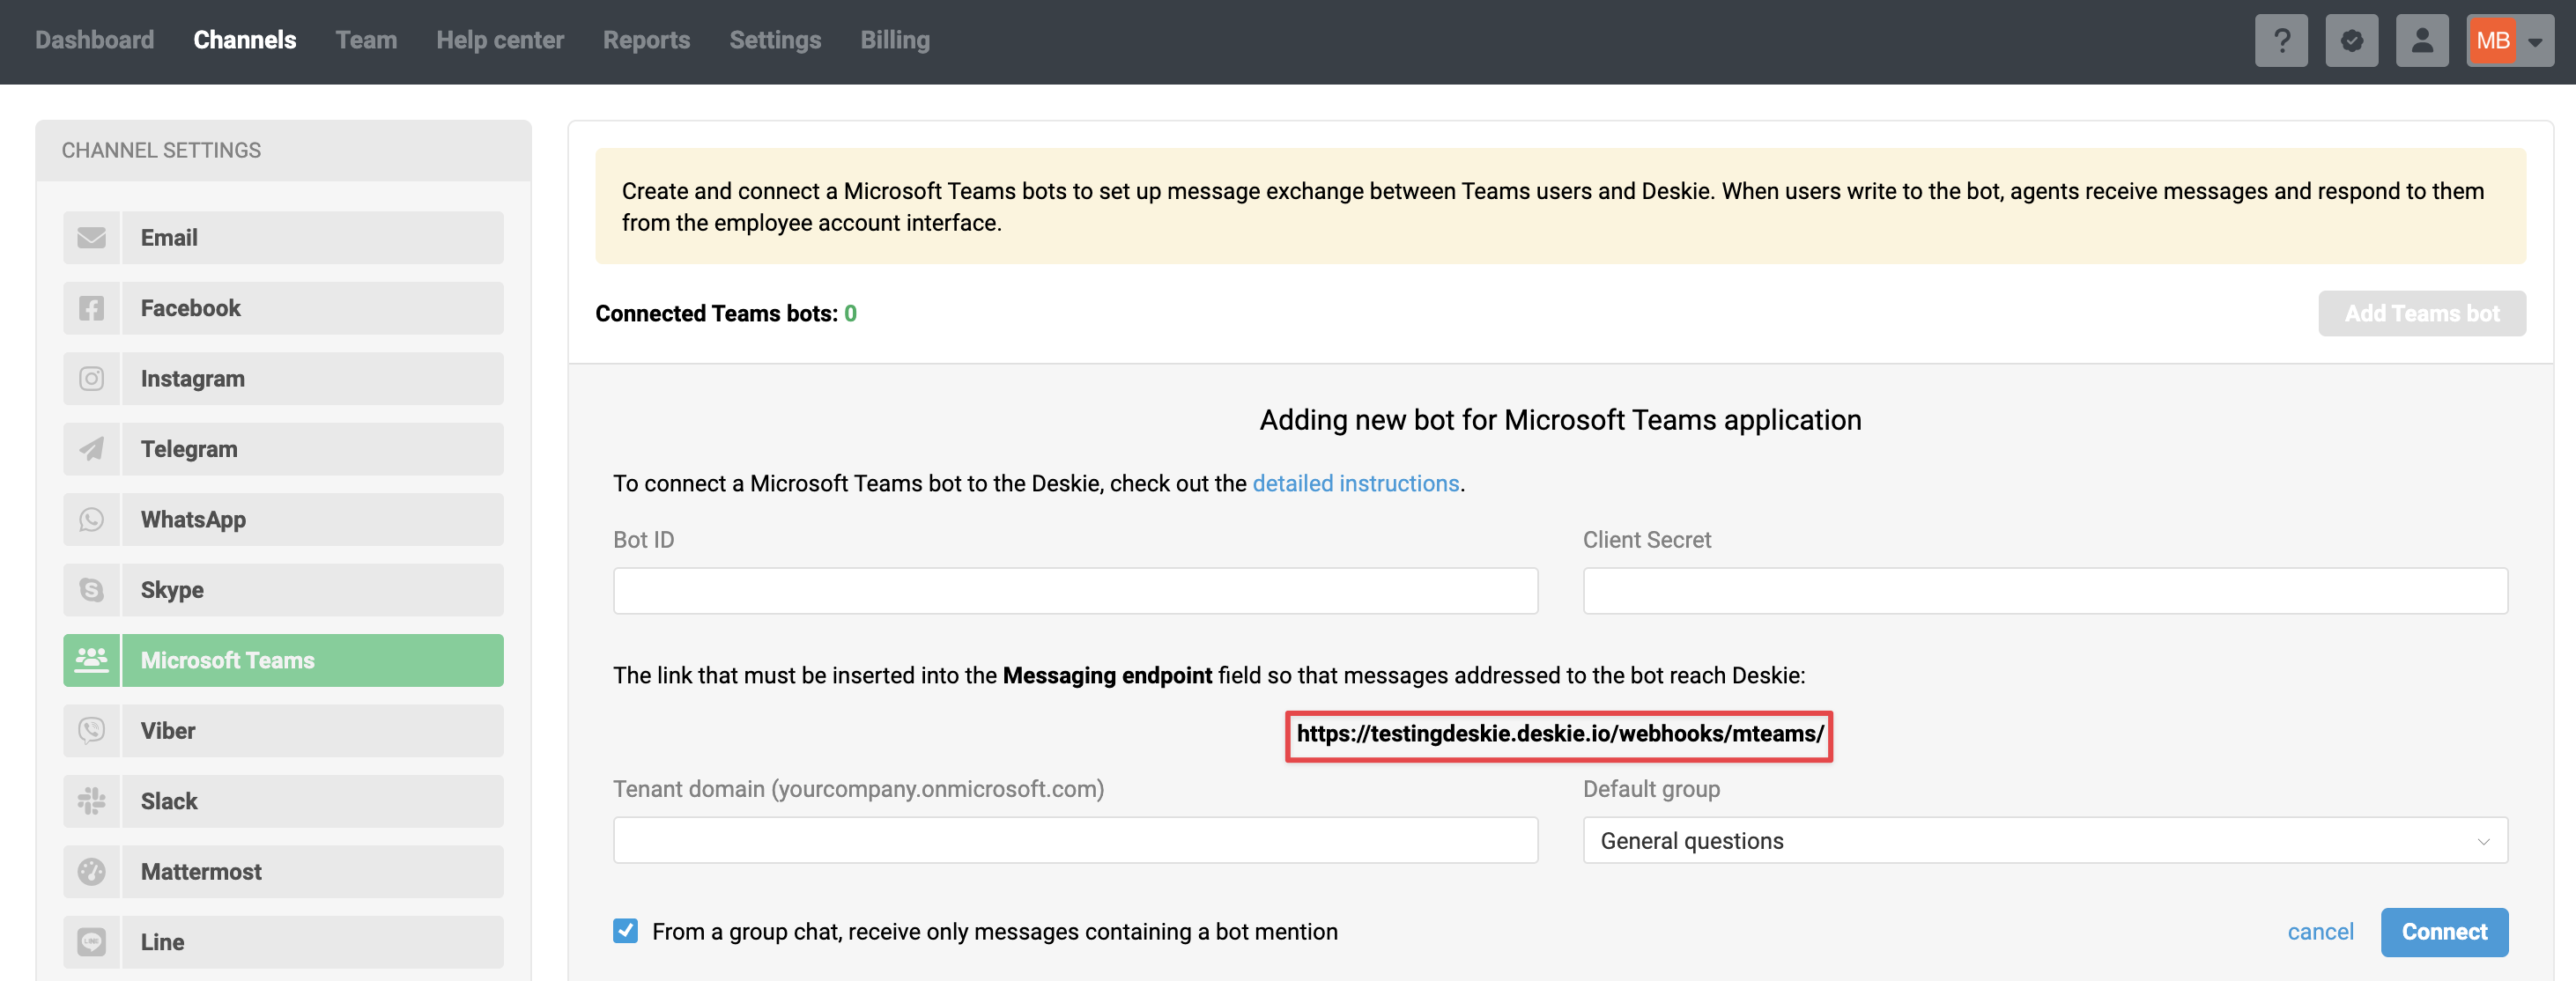
The messaging endpoint URL looks like this: https://[domain].deskie.io/webhooks/mteams/. Replace [domain] with your subdomain in Deskie. You cannot use a custom domain for the endpoint address.
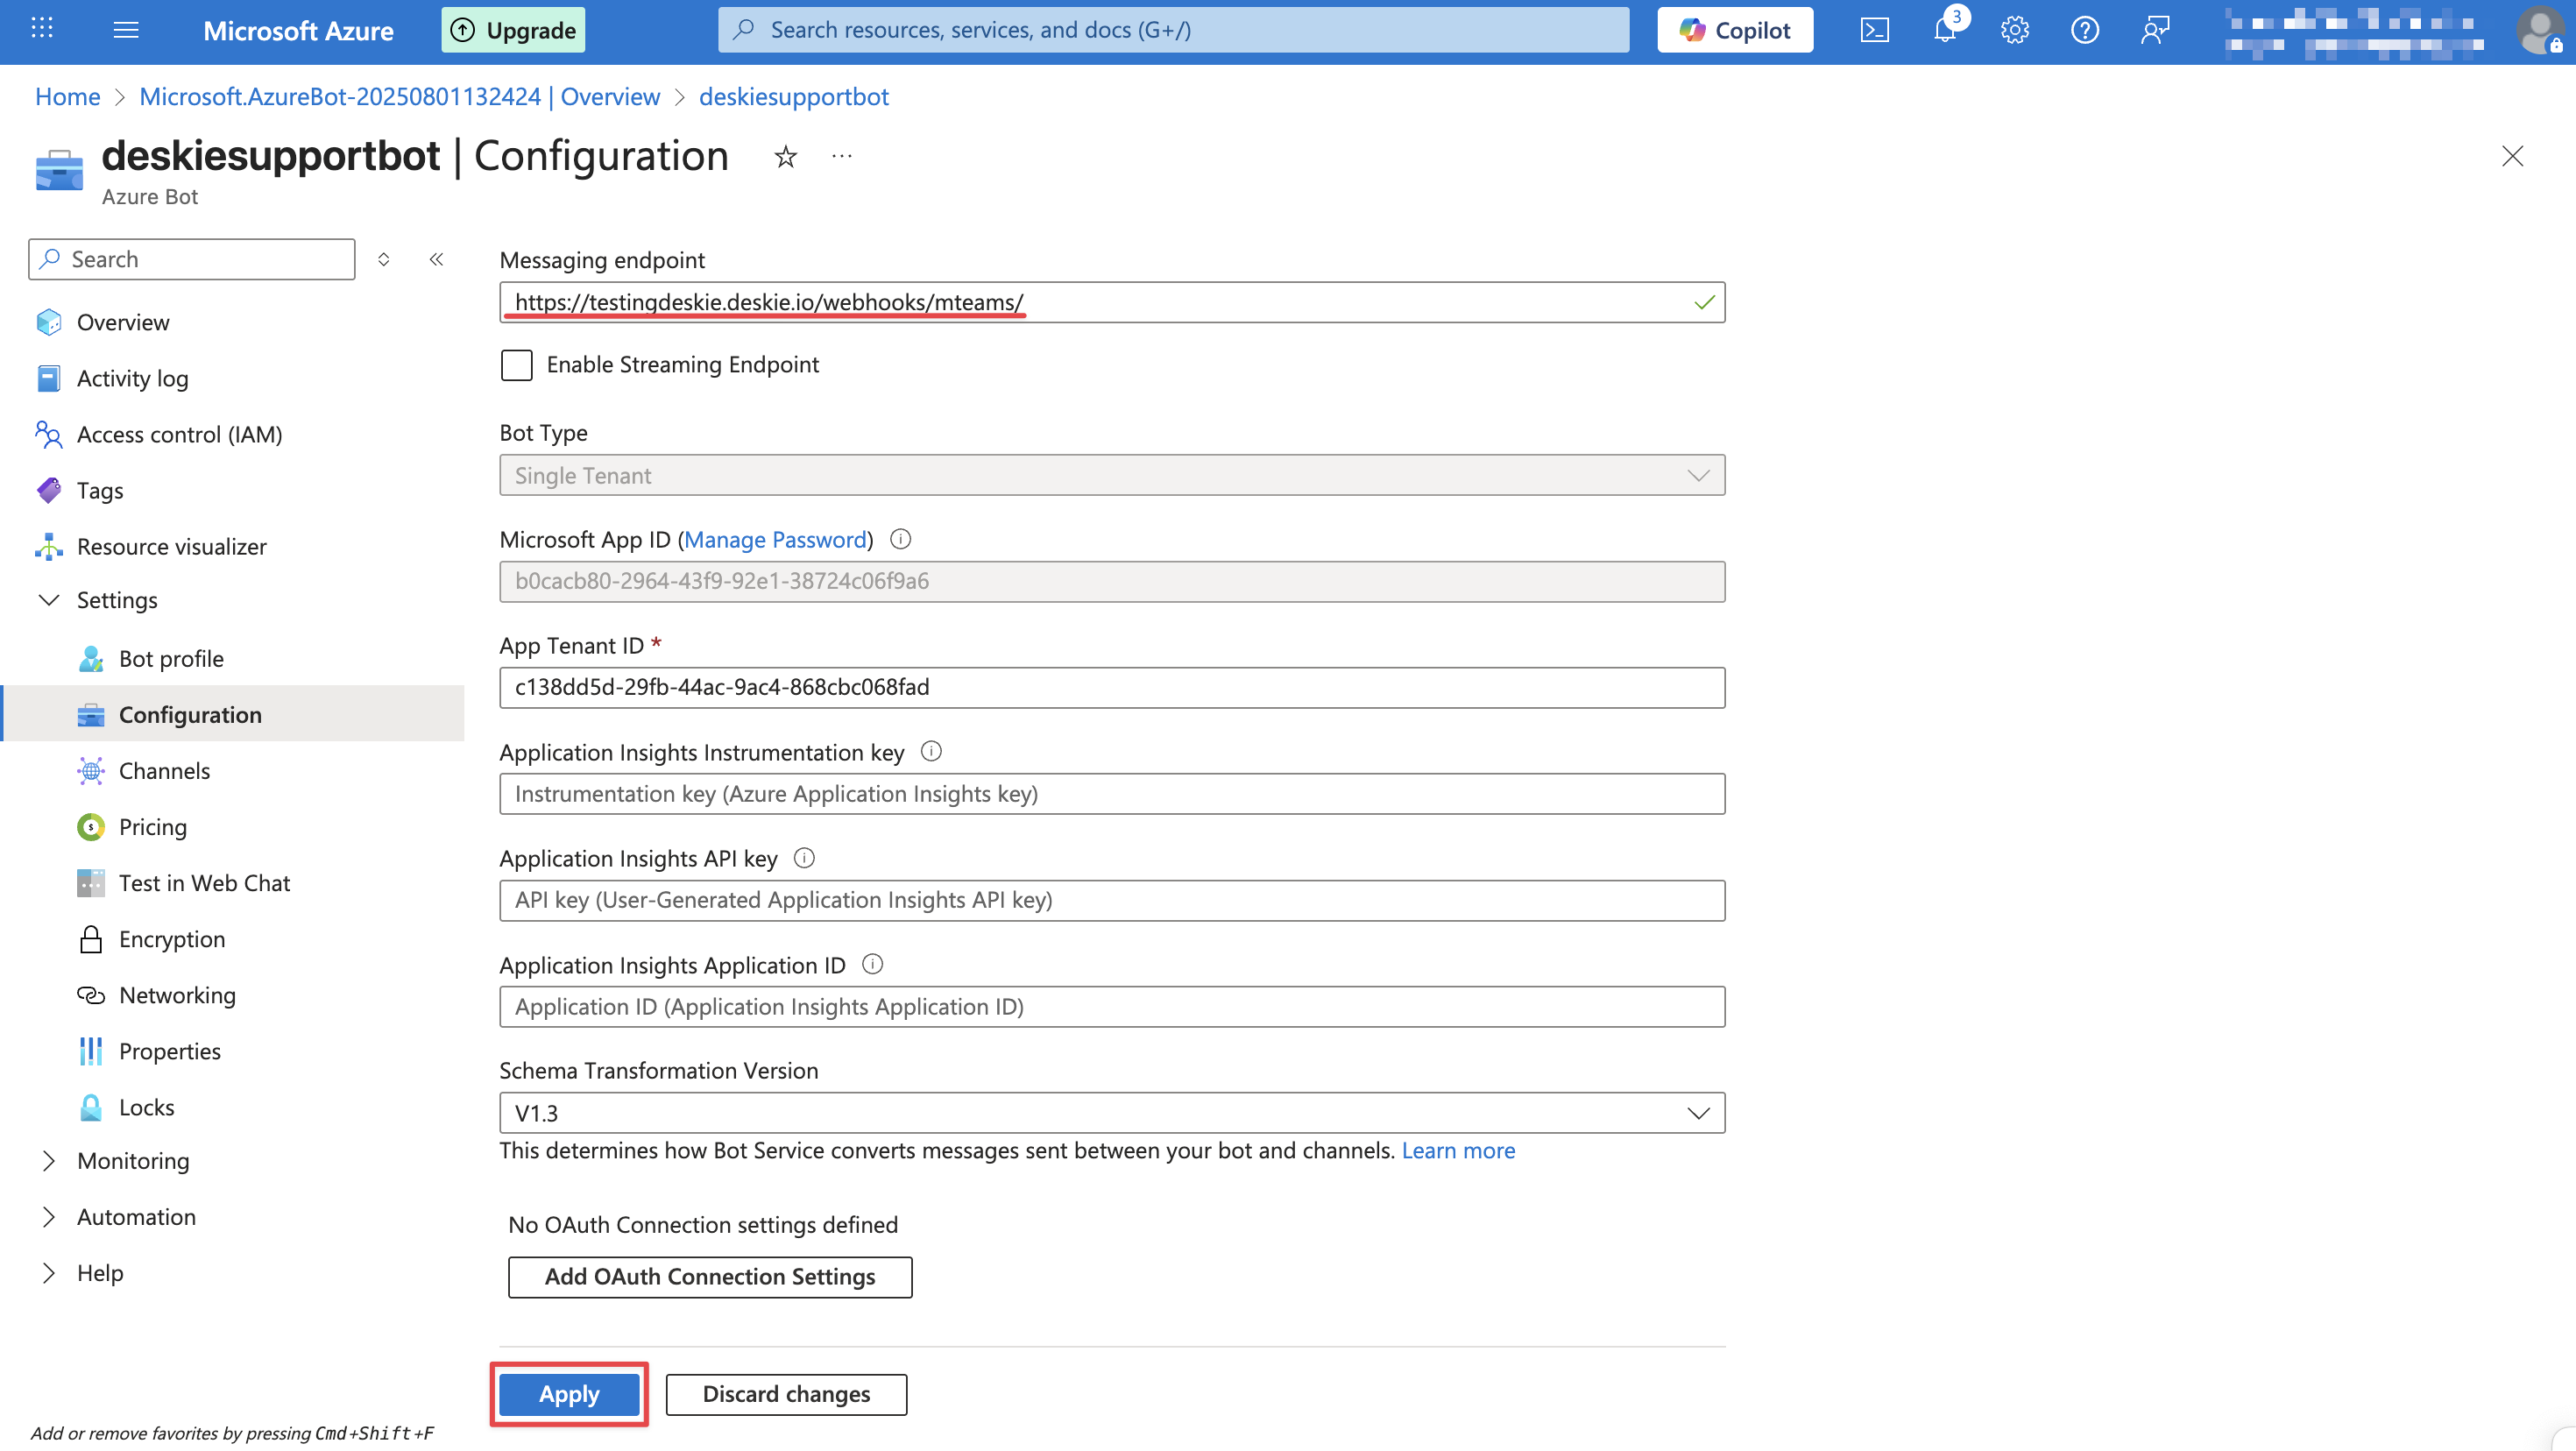
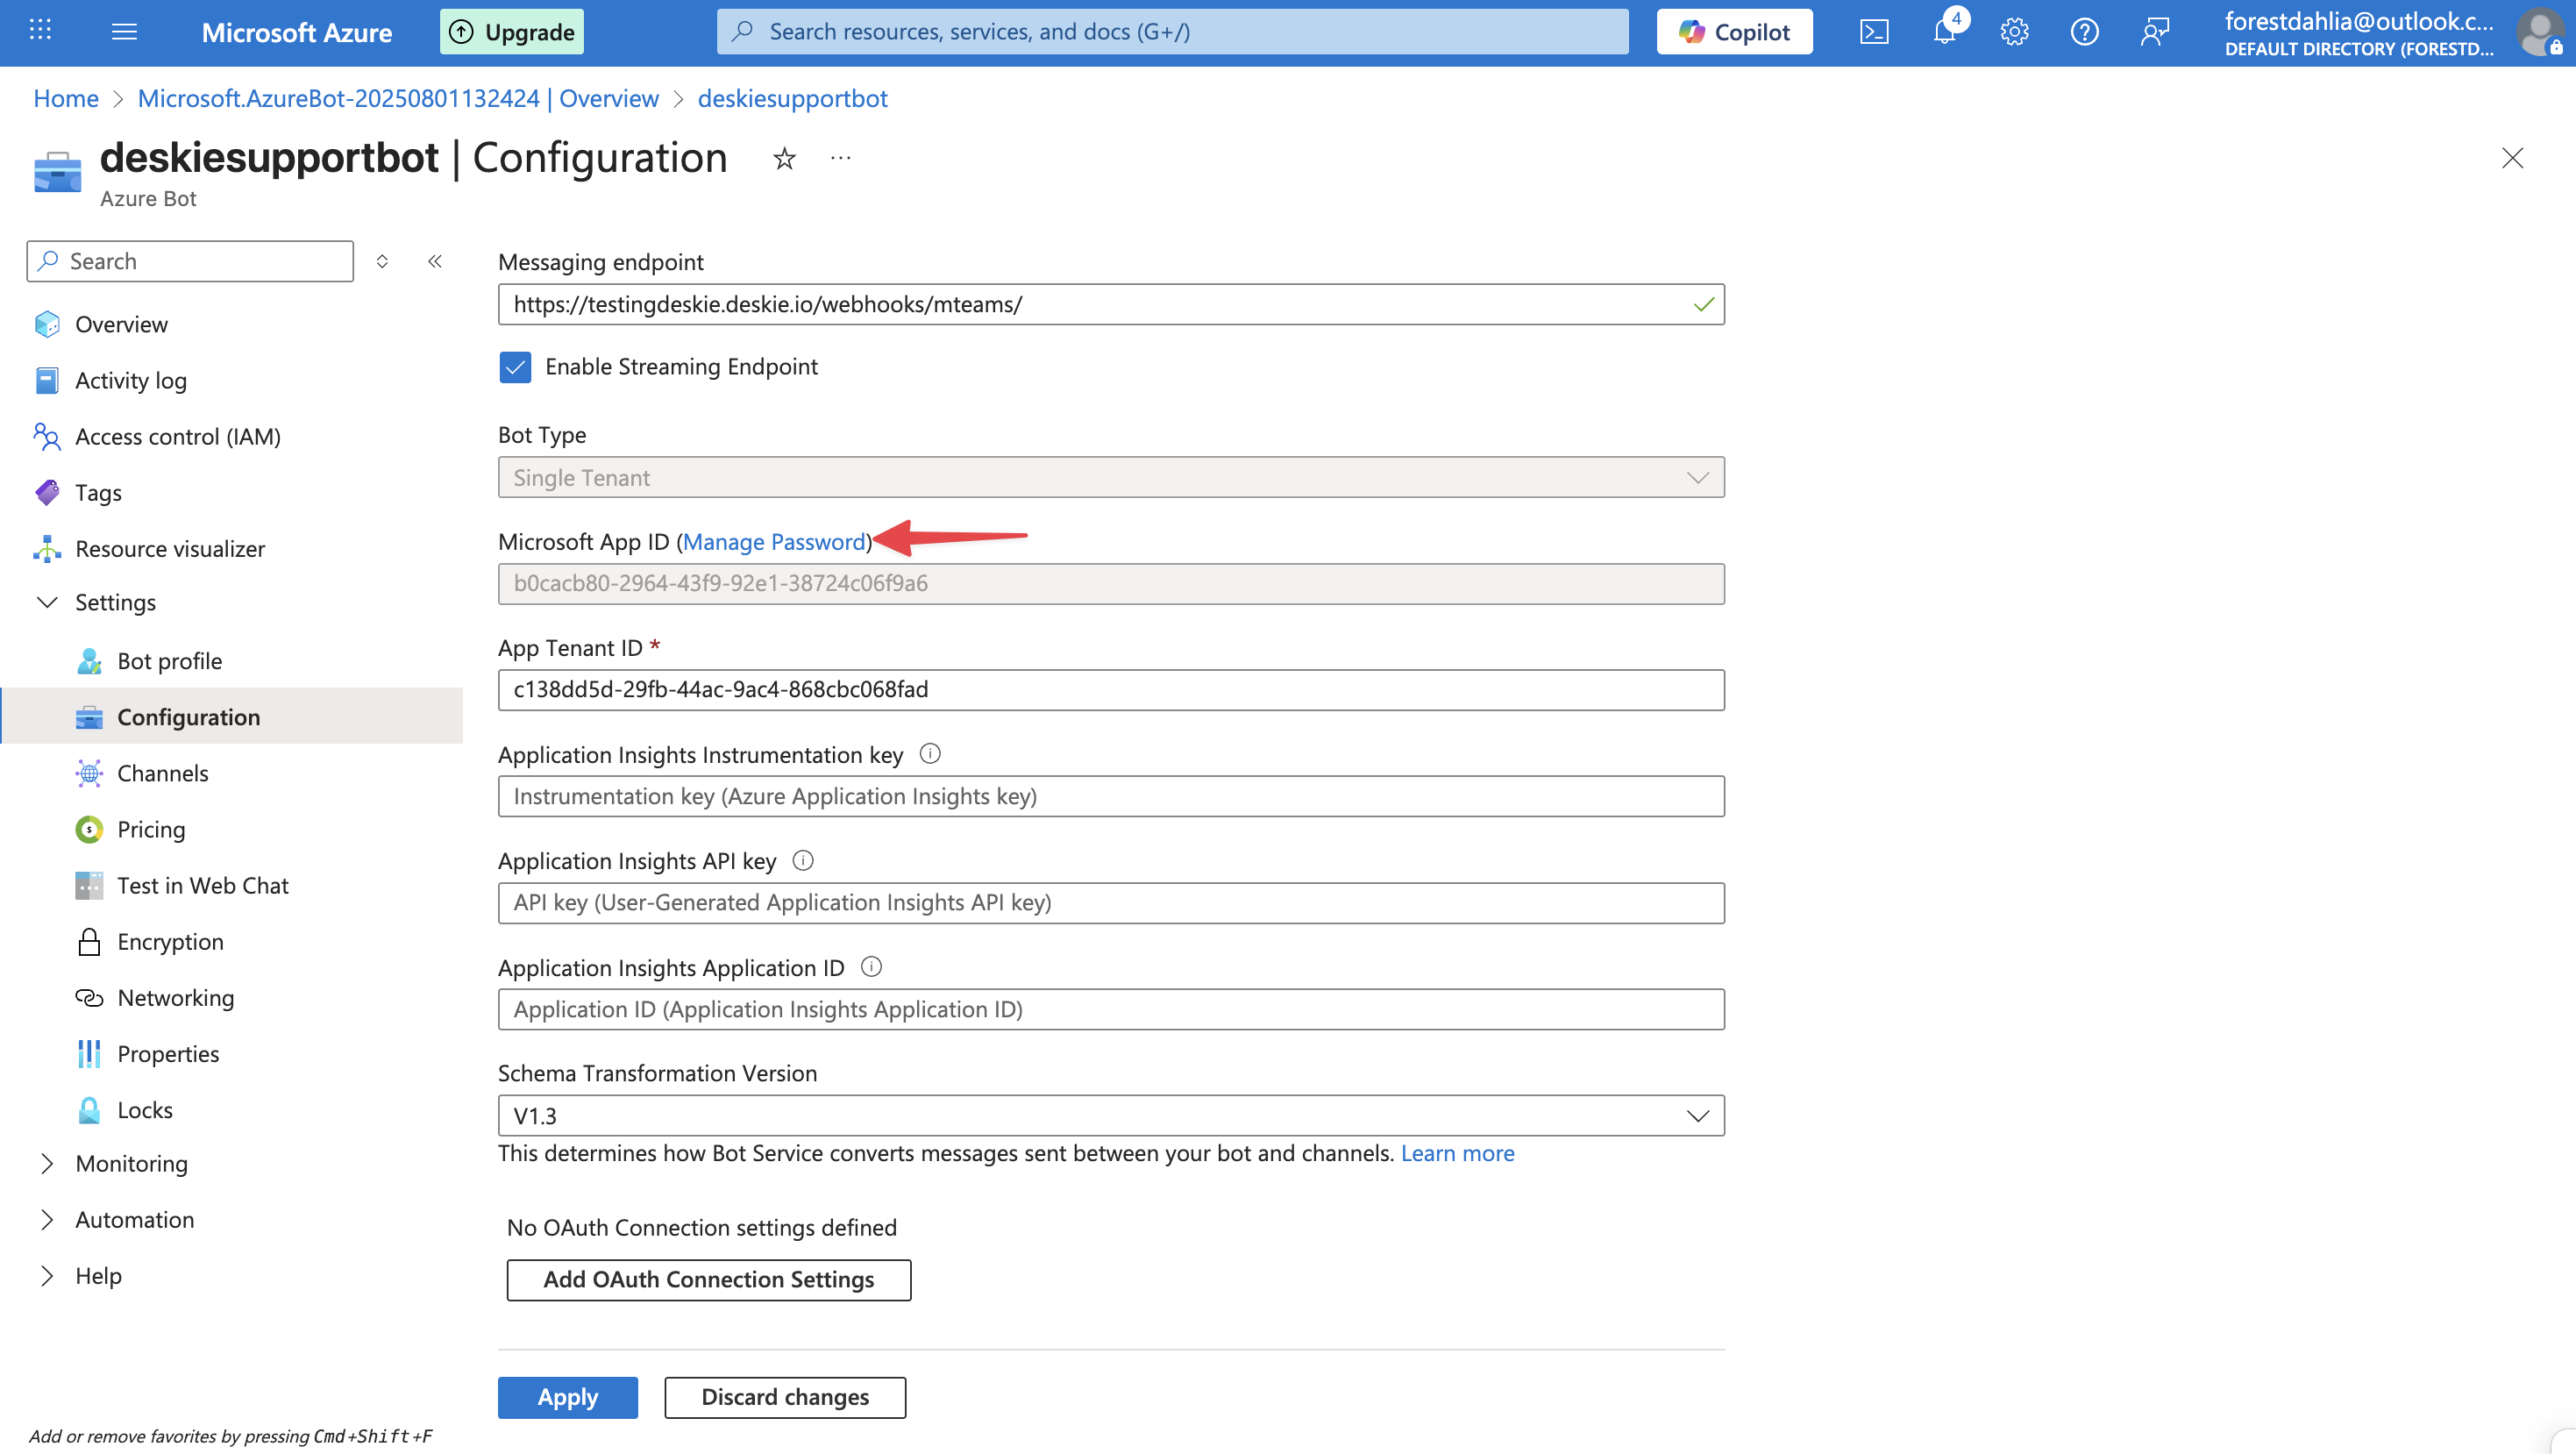
8. In the left-hand menu, go to "Settings" section→ "Configuration" subsection. Paste the link you got from Deskie into the "Messaging endpoint" field, then click "Apply".
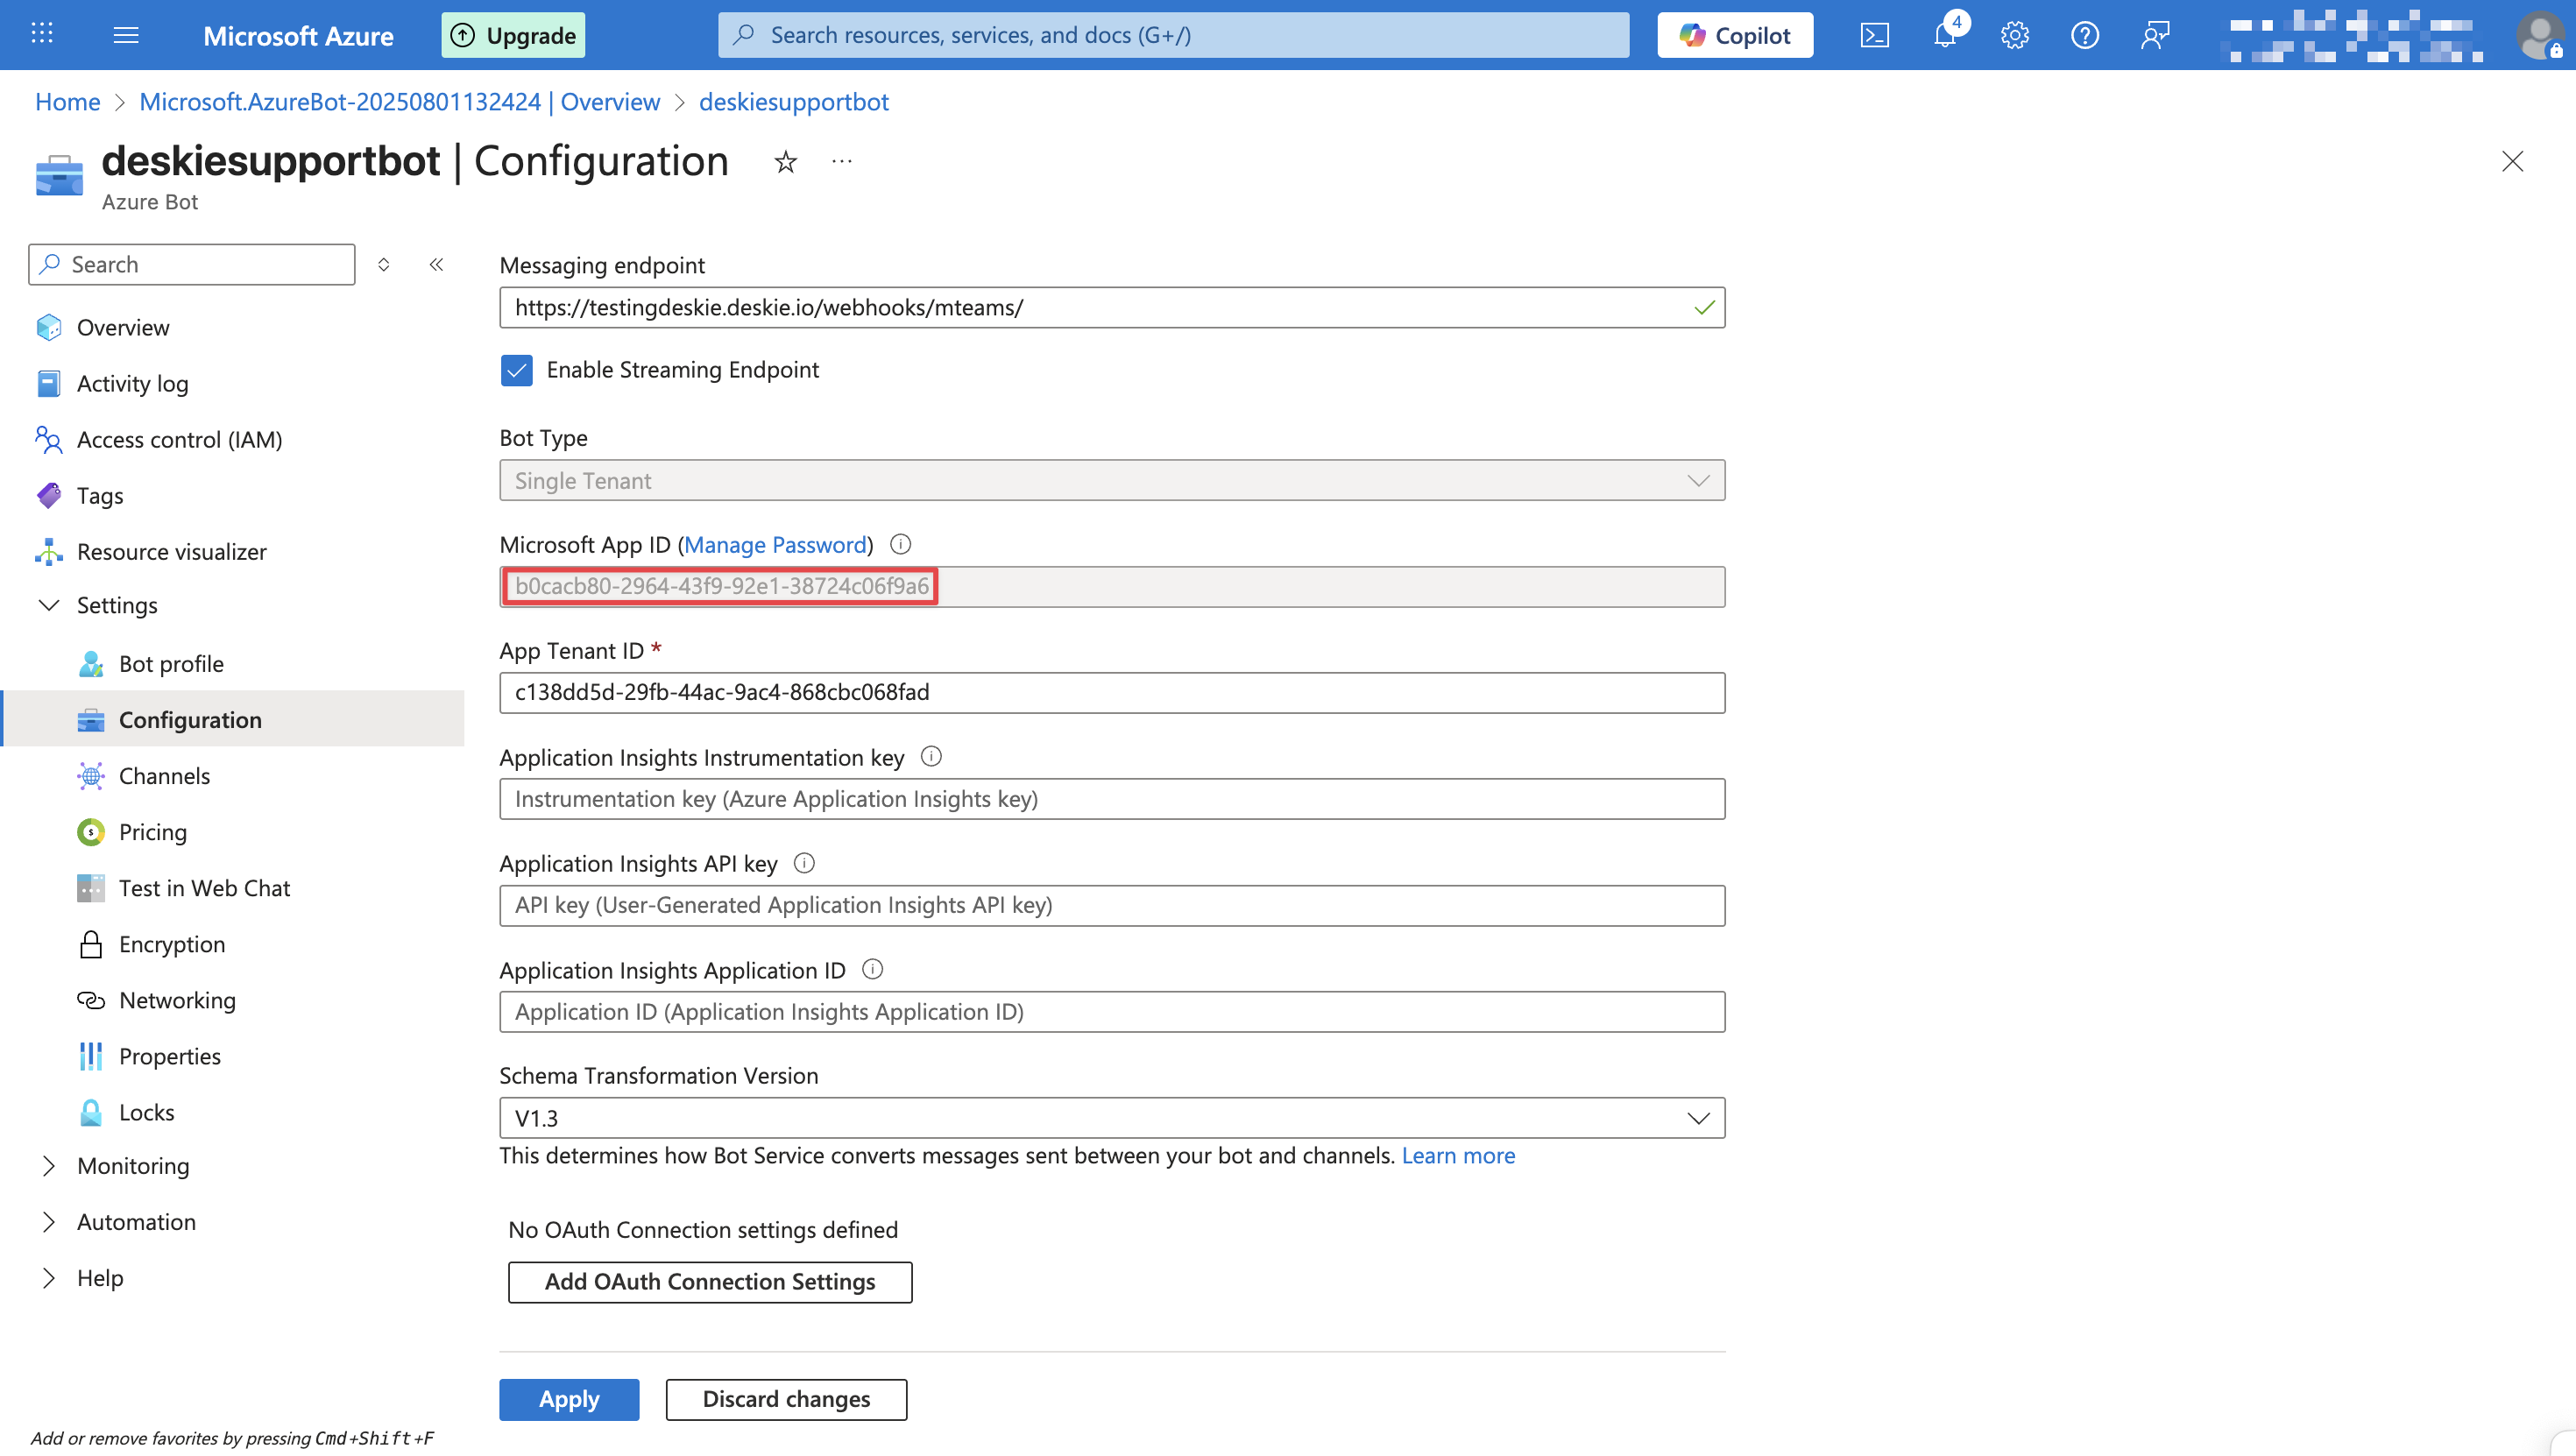
9. On the configuration page, copy the Microsoft App ID:
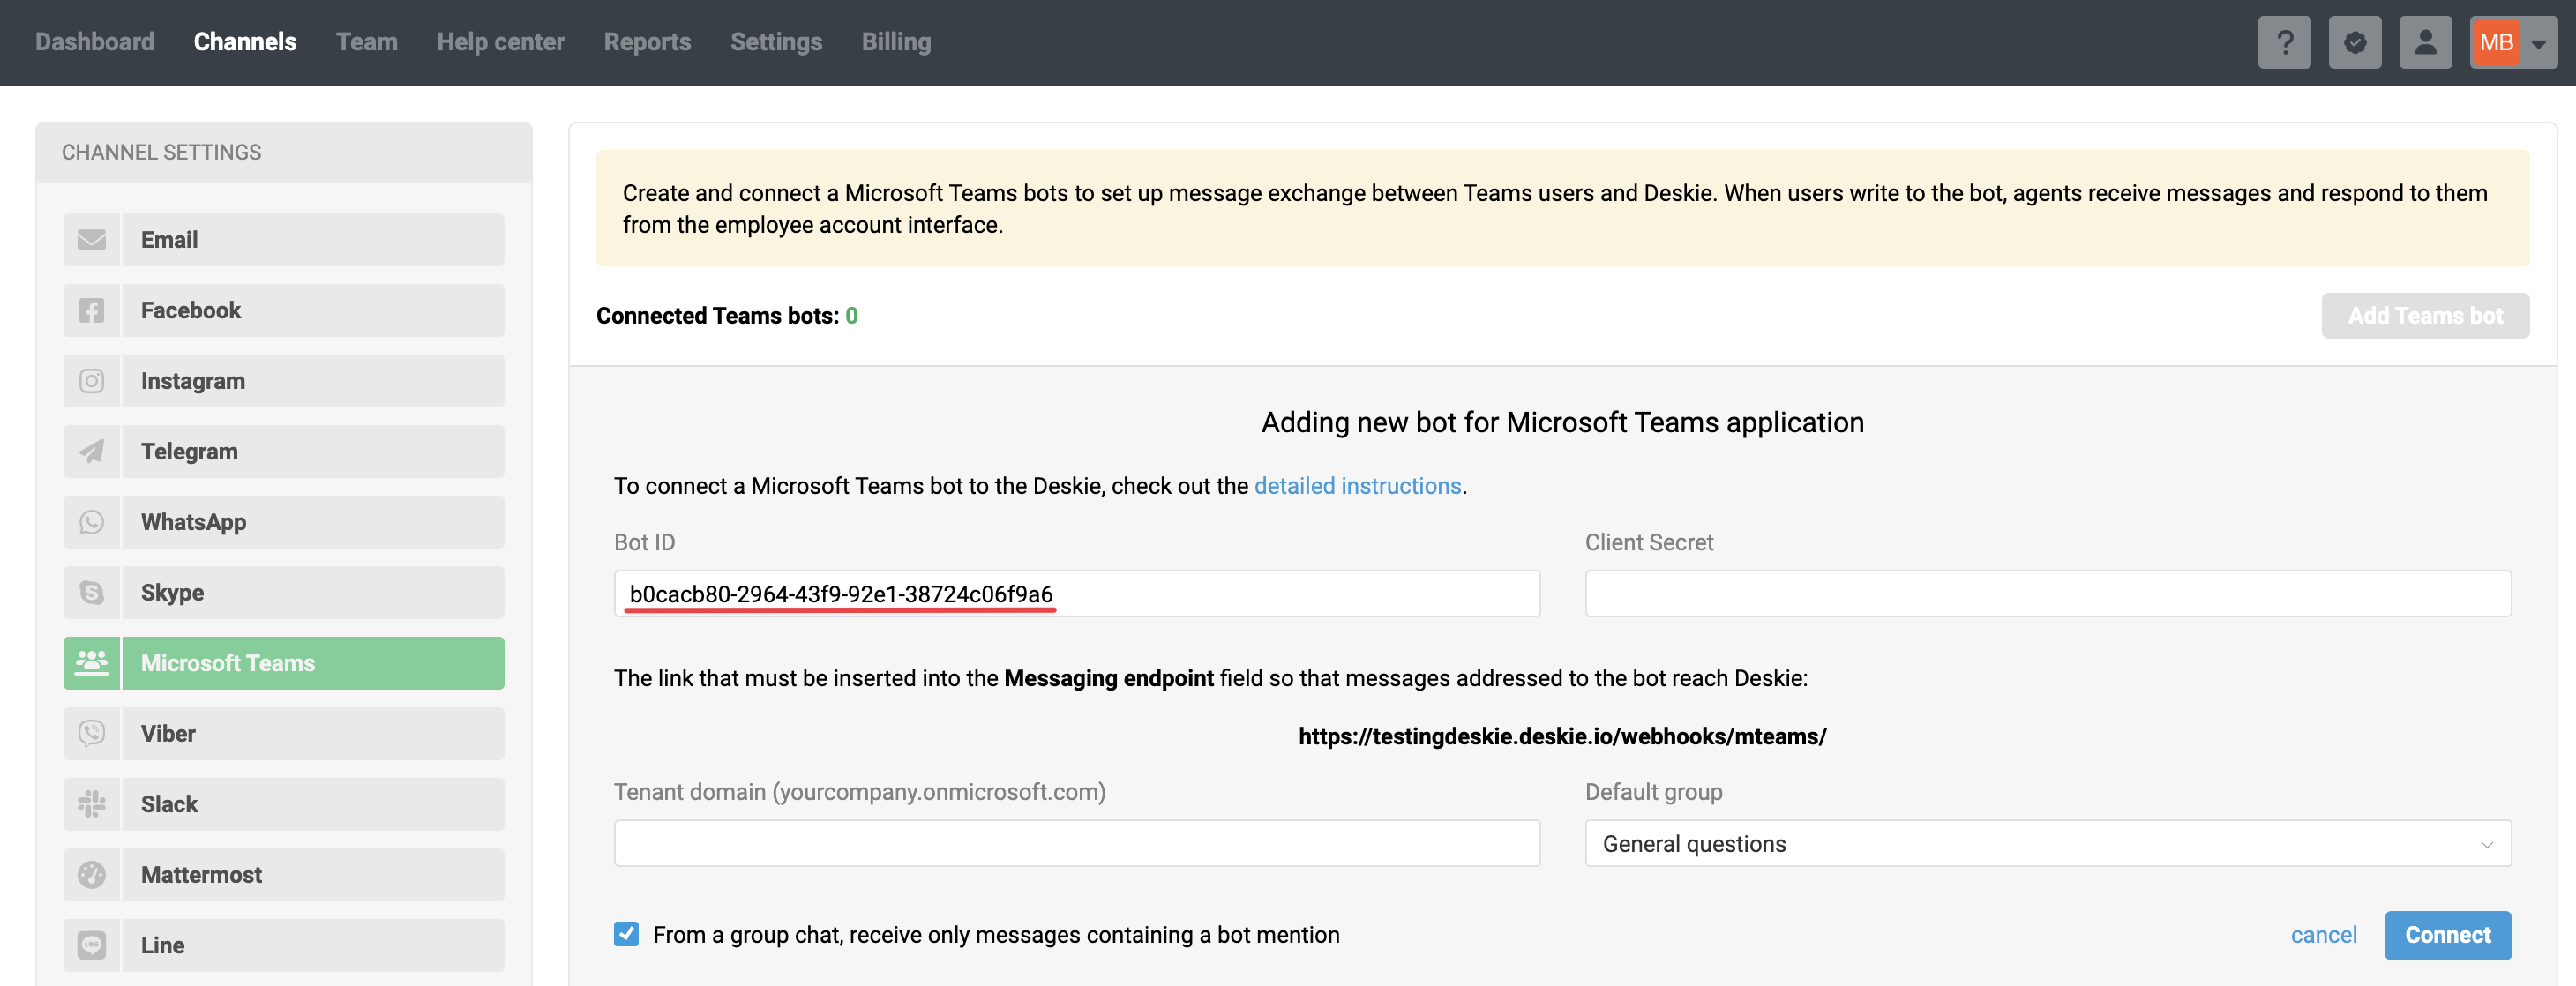
In the channel connection form in Deskie, paste the copied Microsoft App ID into the respective field.
10. Return to the Azure interface and click the "Manage Password" link to the right of the Microsoft App ID heading.
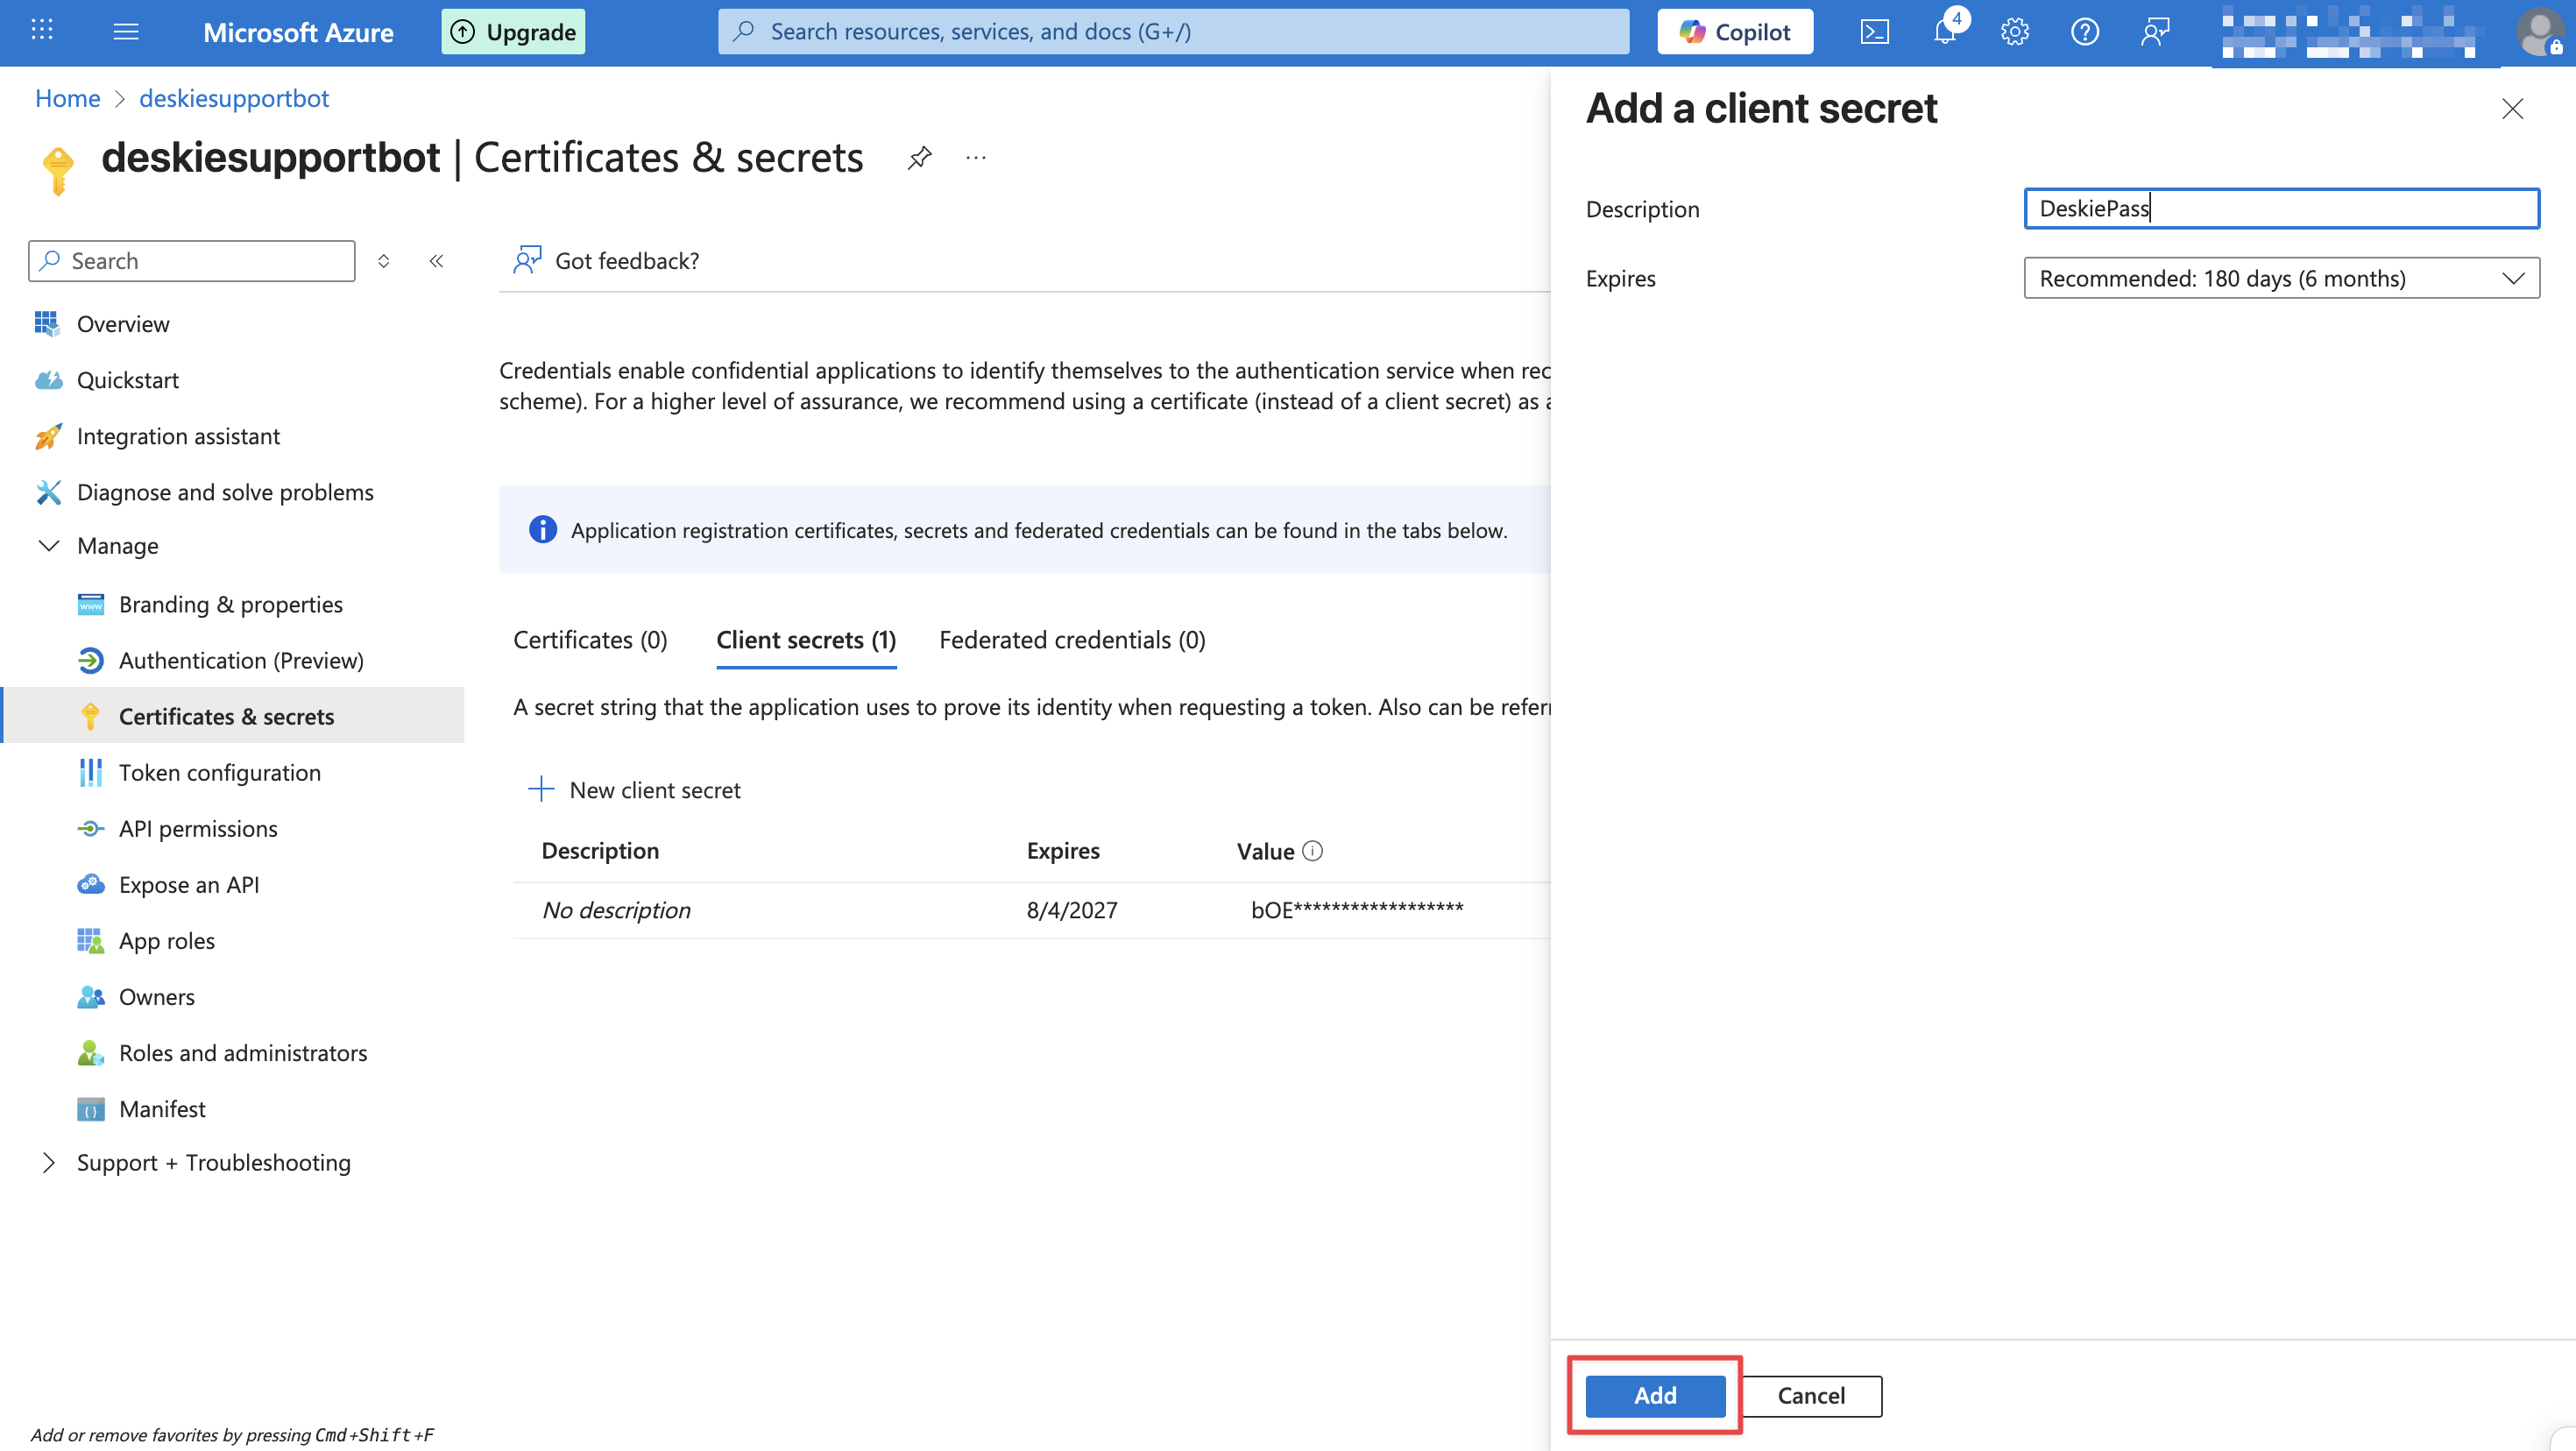
11 In the window that opens, click the "New client secret" button and create a new secret.
12. Copy the secret value:
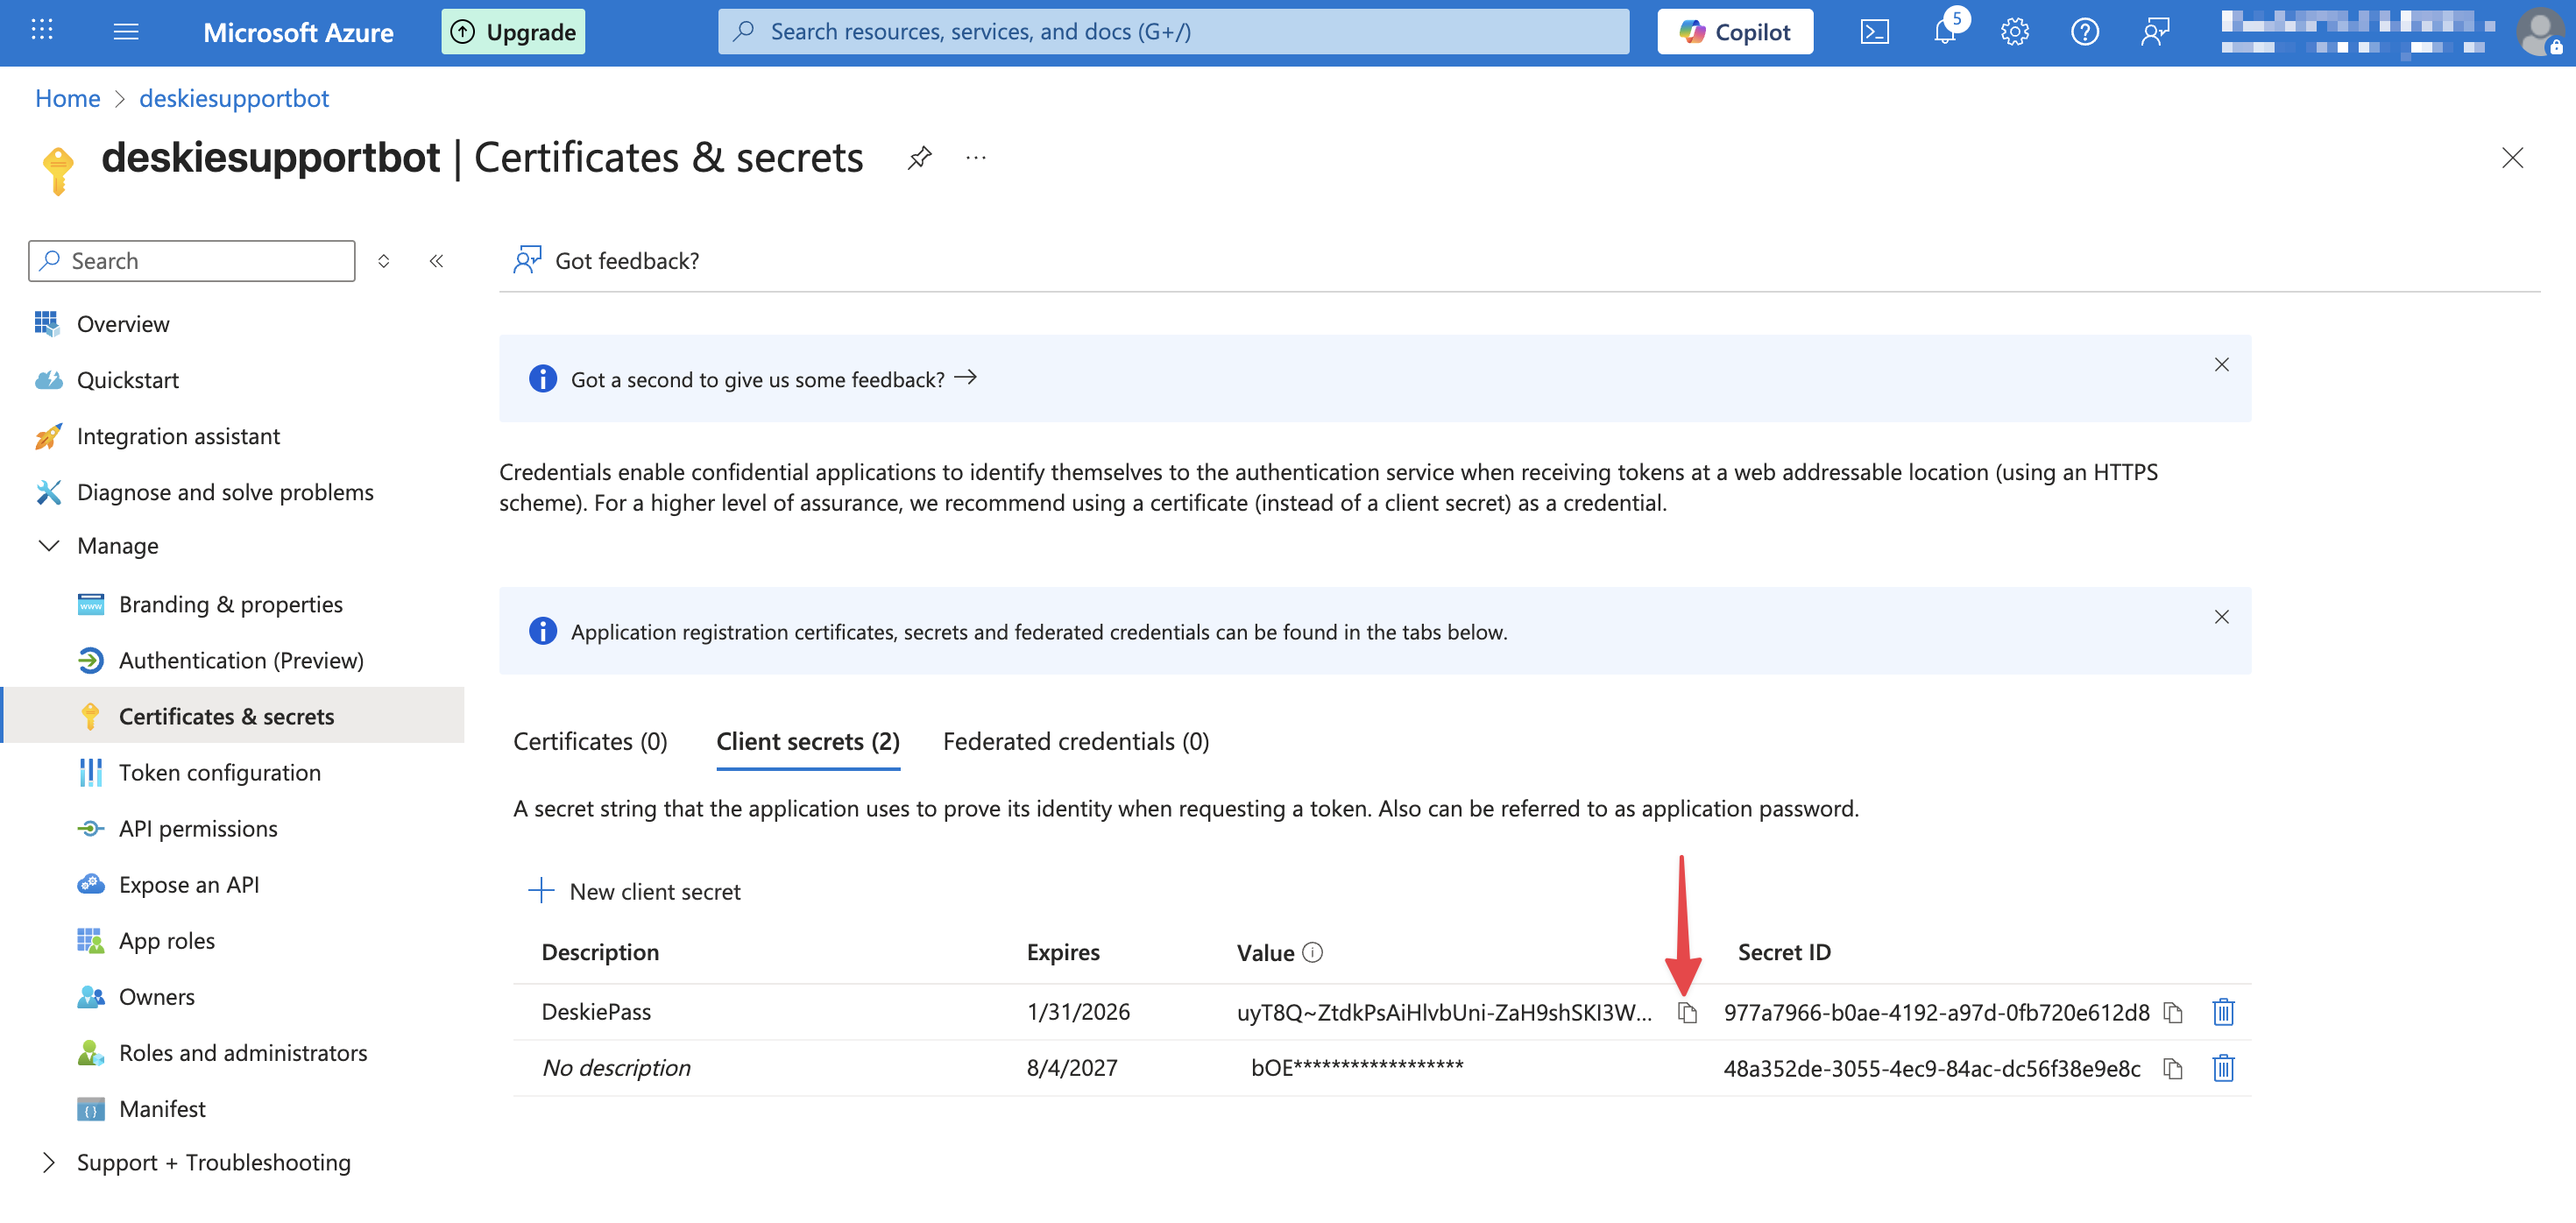
The secret value is not displayed in the interface permanently. For security reasons, Azure Bot Service hides the bot's secret after it is created.
In the Microsoft Teams bot setup form in Deskie, paste the secret you copied into the "Client Secret" field.
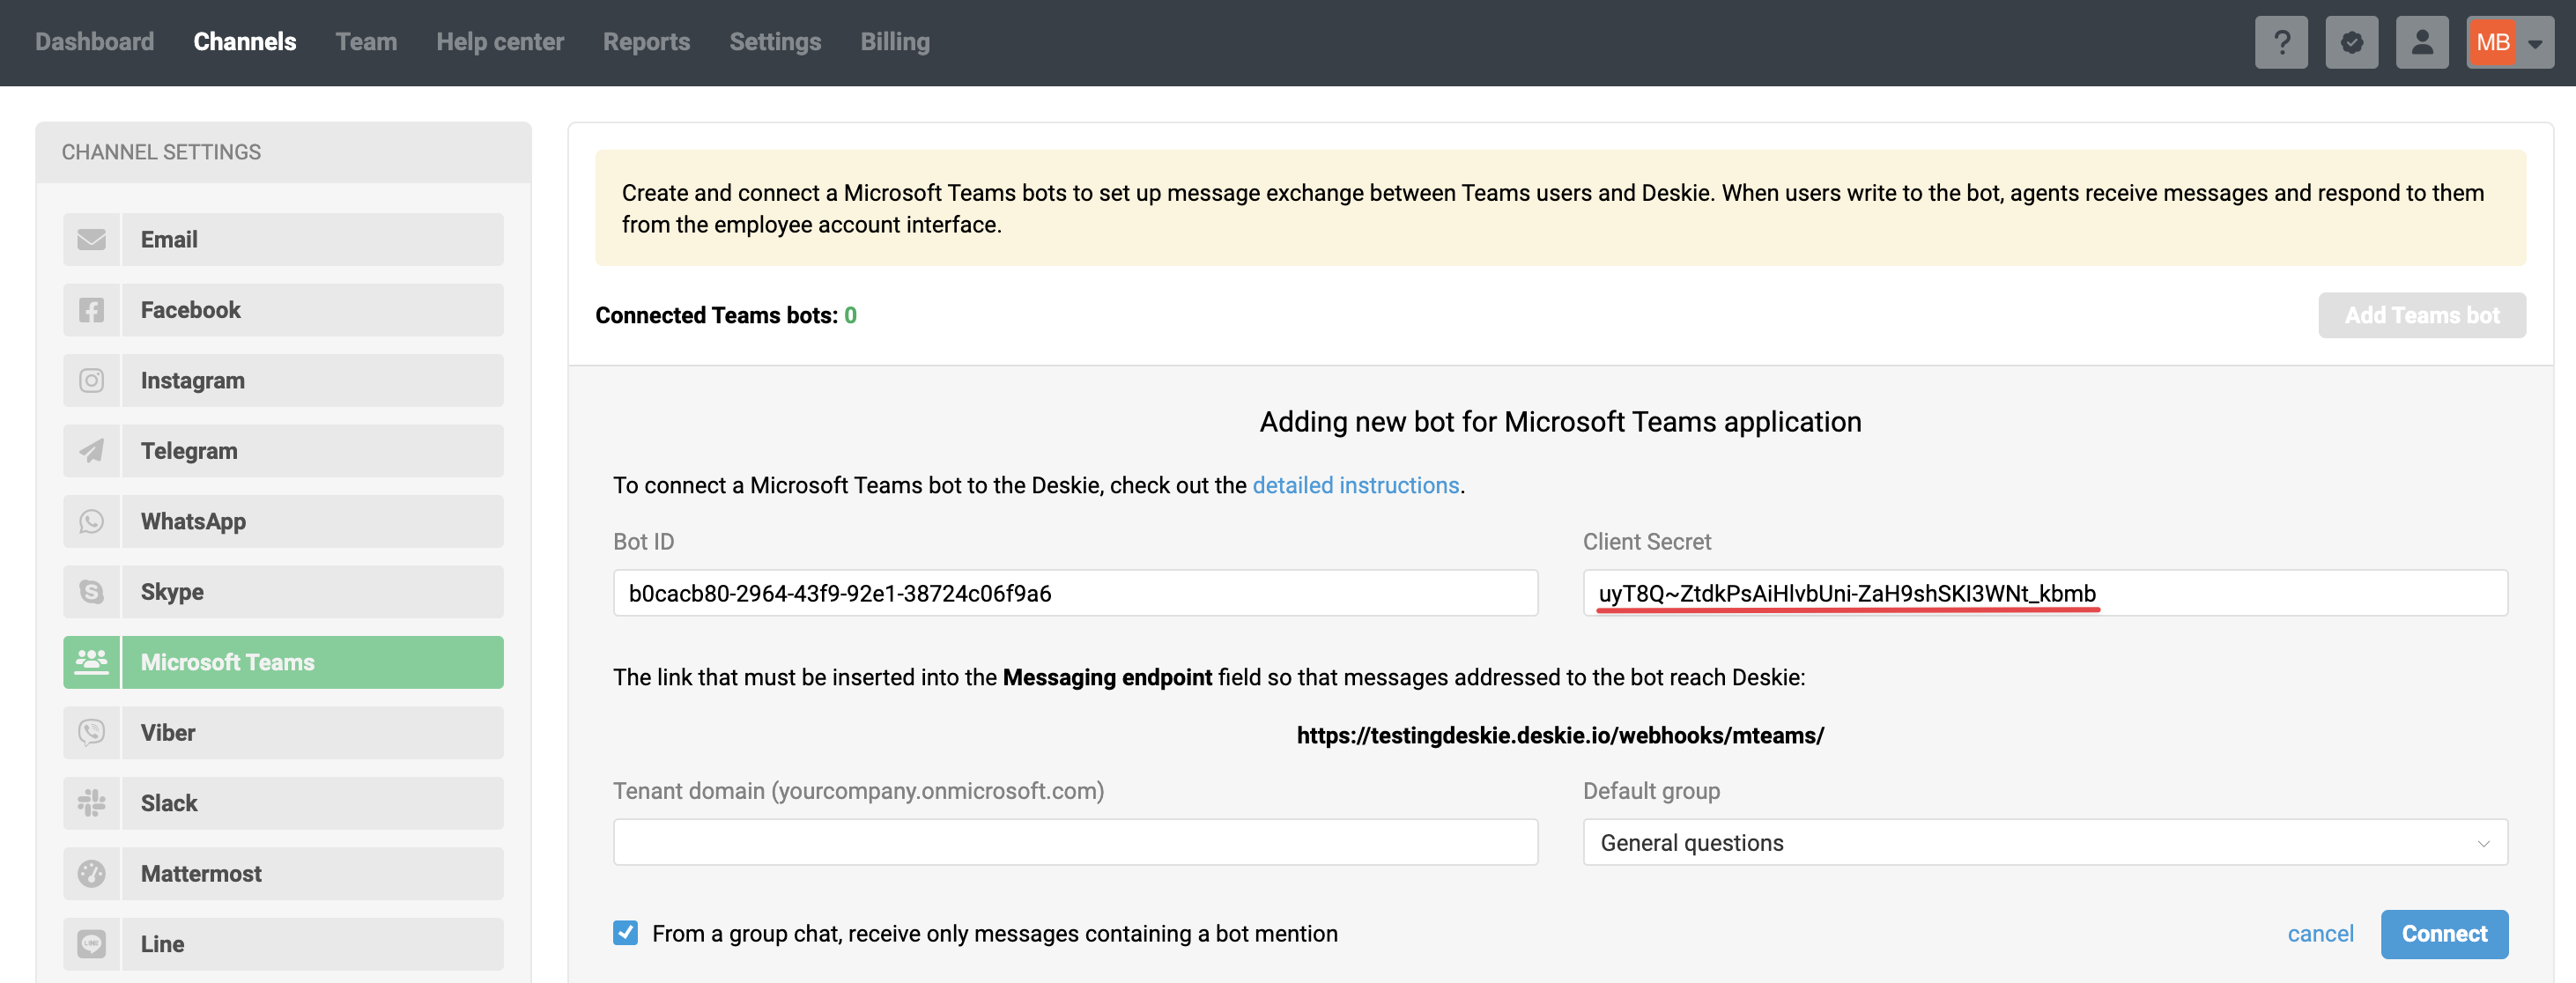
13. Enter your tenant domain – the one where you'll be using the app – into the relevant field in Deskie. Then, click "Connect".
Step 2: creating a Teams app
You need a Teams app so your bot can show up in Microsoft Teams and users can actually chat with it. Think of it as a wrapper – it tells Teams where to find your bot and how to communicate with it. Without this step, users won’t see the bot at all.
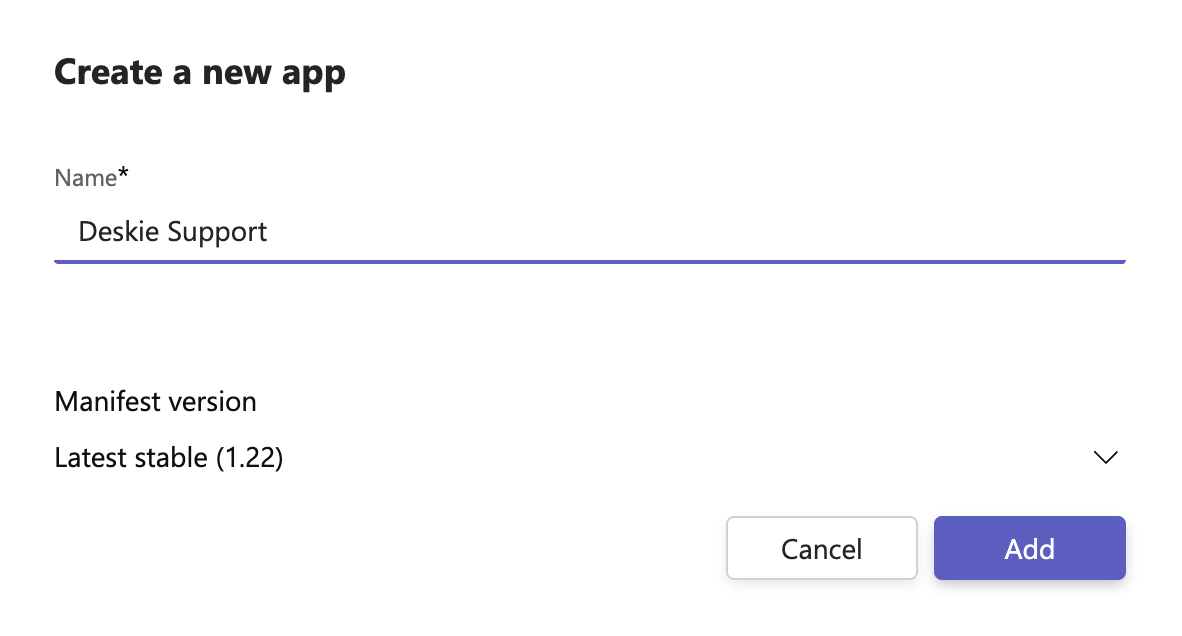
1. Go to the Microsoft Teams Developer Portal apps page. Click the "New app" button, enter the app name, and then click "Add".

2. On the page that opens, fill in the required fields:
- Short description (up to 80 characters)
- Full description (up to 4,000 characters)
- Developer name or company name
- Website (a valid HTTPS URL)
- Privacy policy (link)
- Terms of use (link)
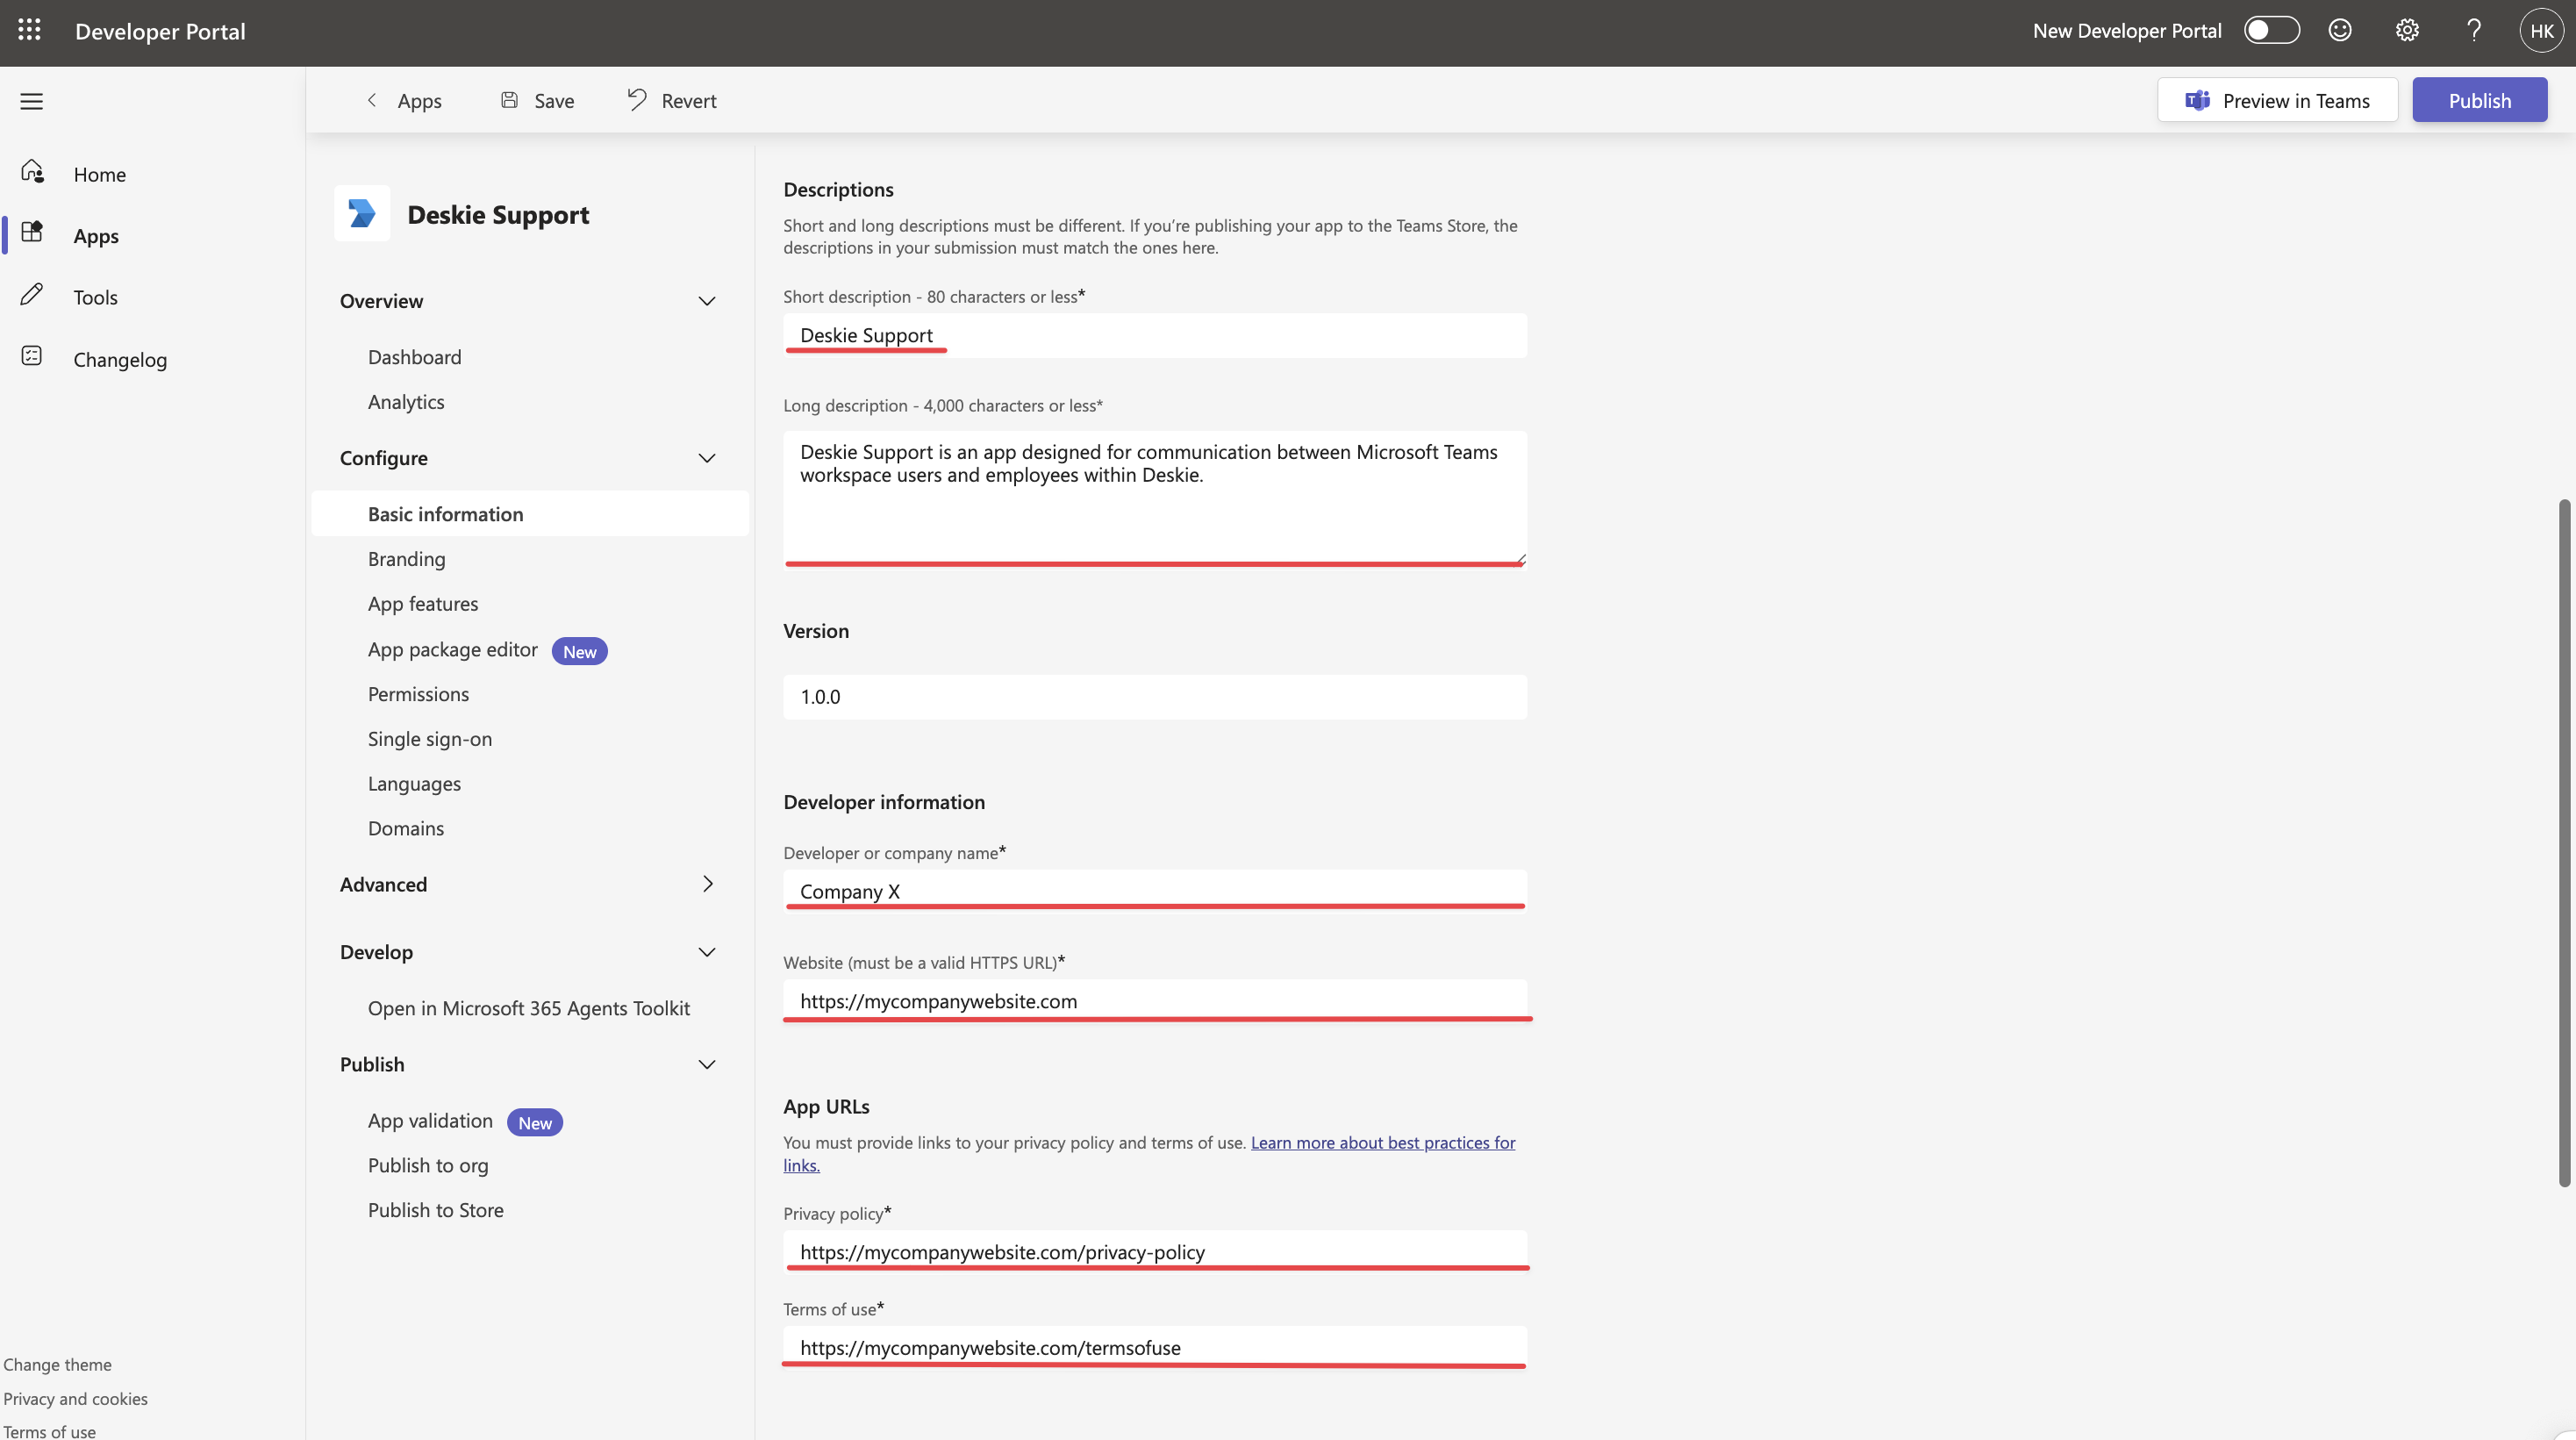
The data must be completed to allow Teams to publish the app in the workspace.
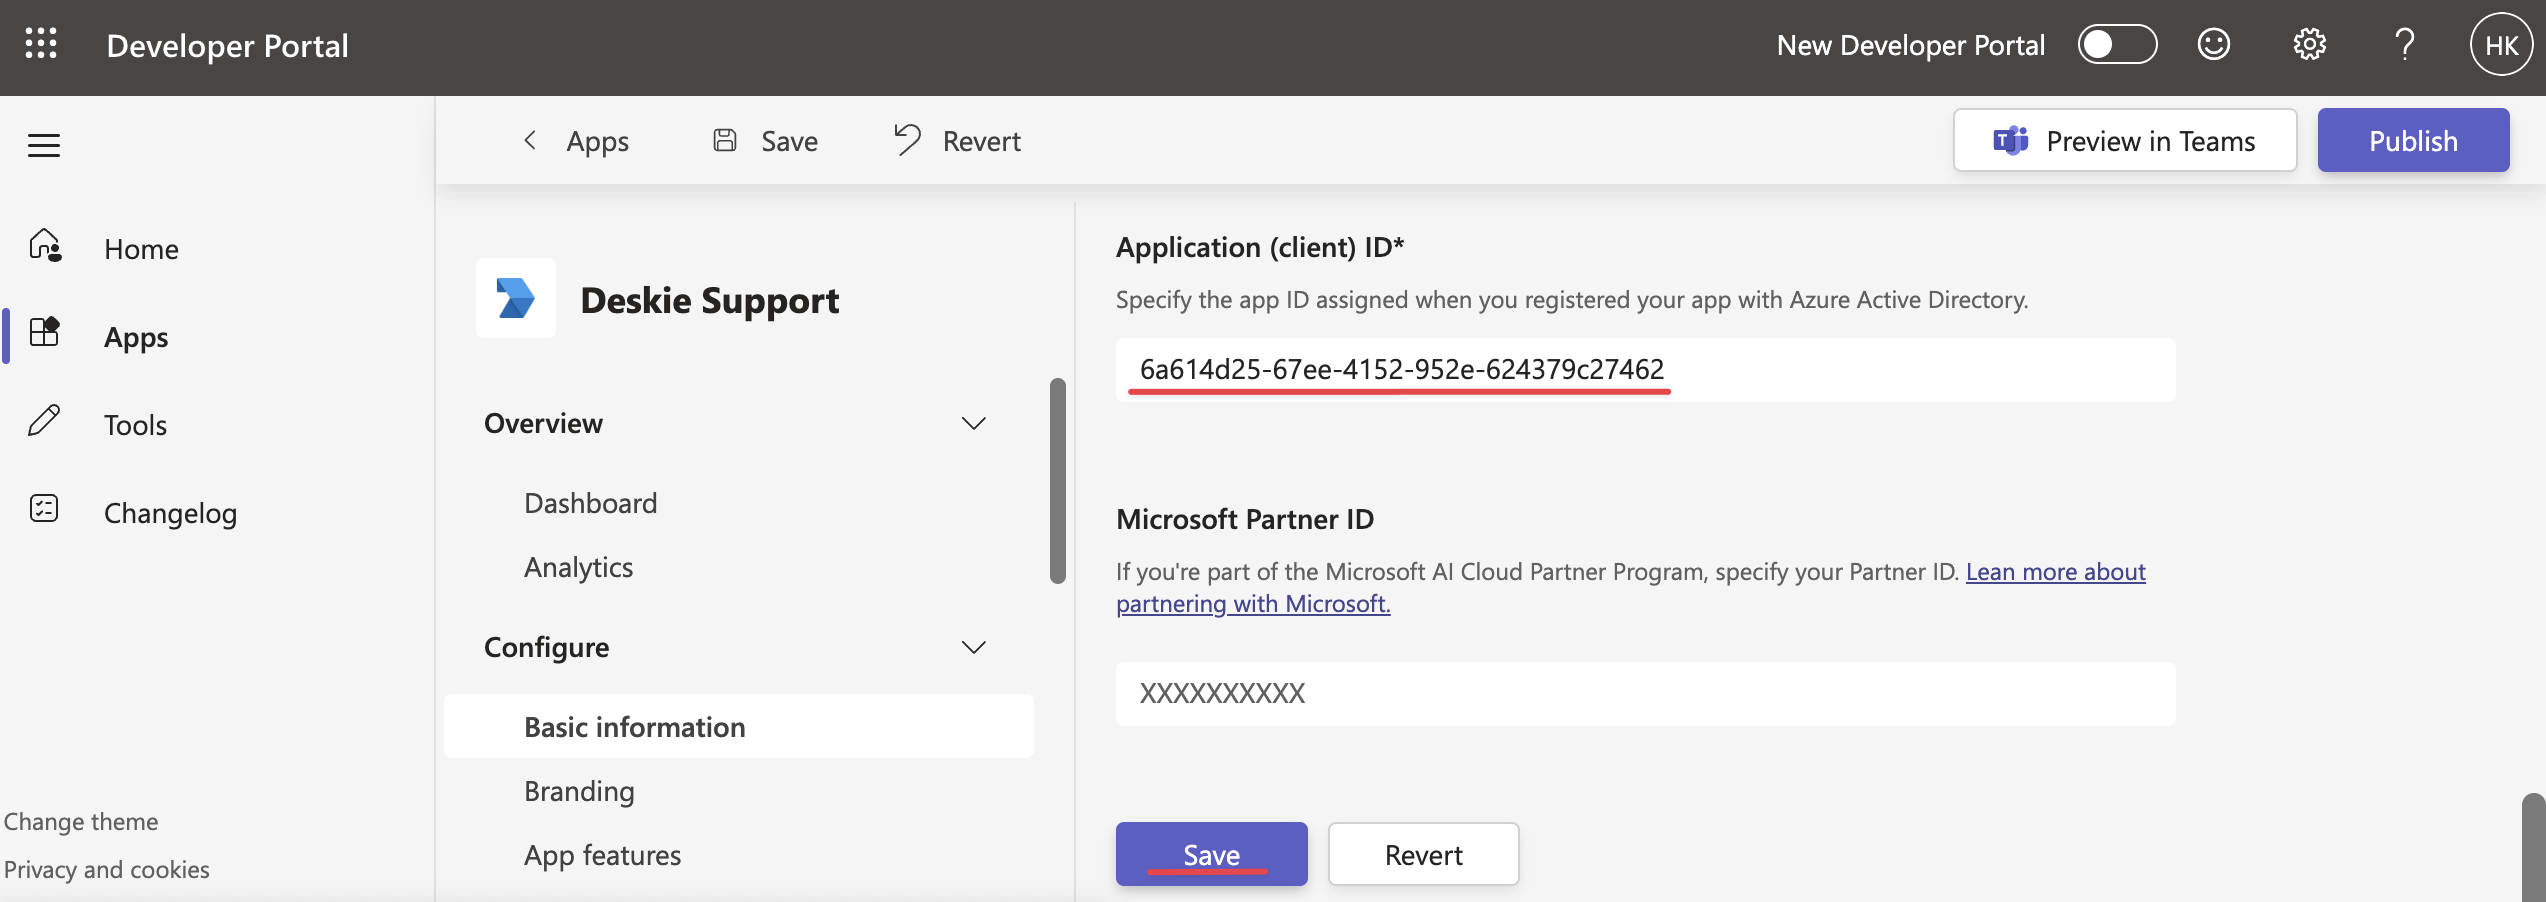
3. If you created the bot through Azure, scroll to the bottom of the page and enter the previously saved Microsoft App ID of your bot (from Azure or Teams Developer Portal) in the "Application (client) ID" field. Then click "Save":
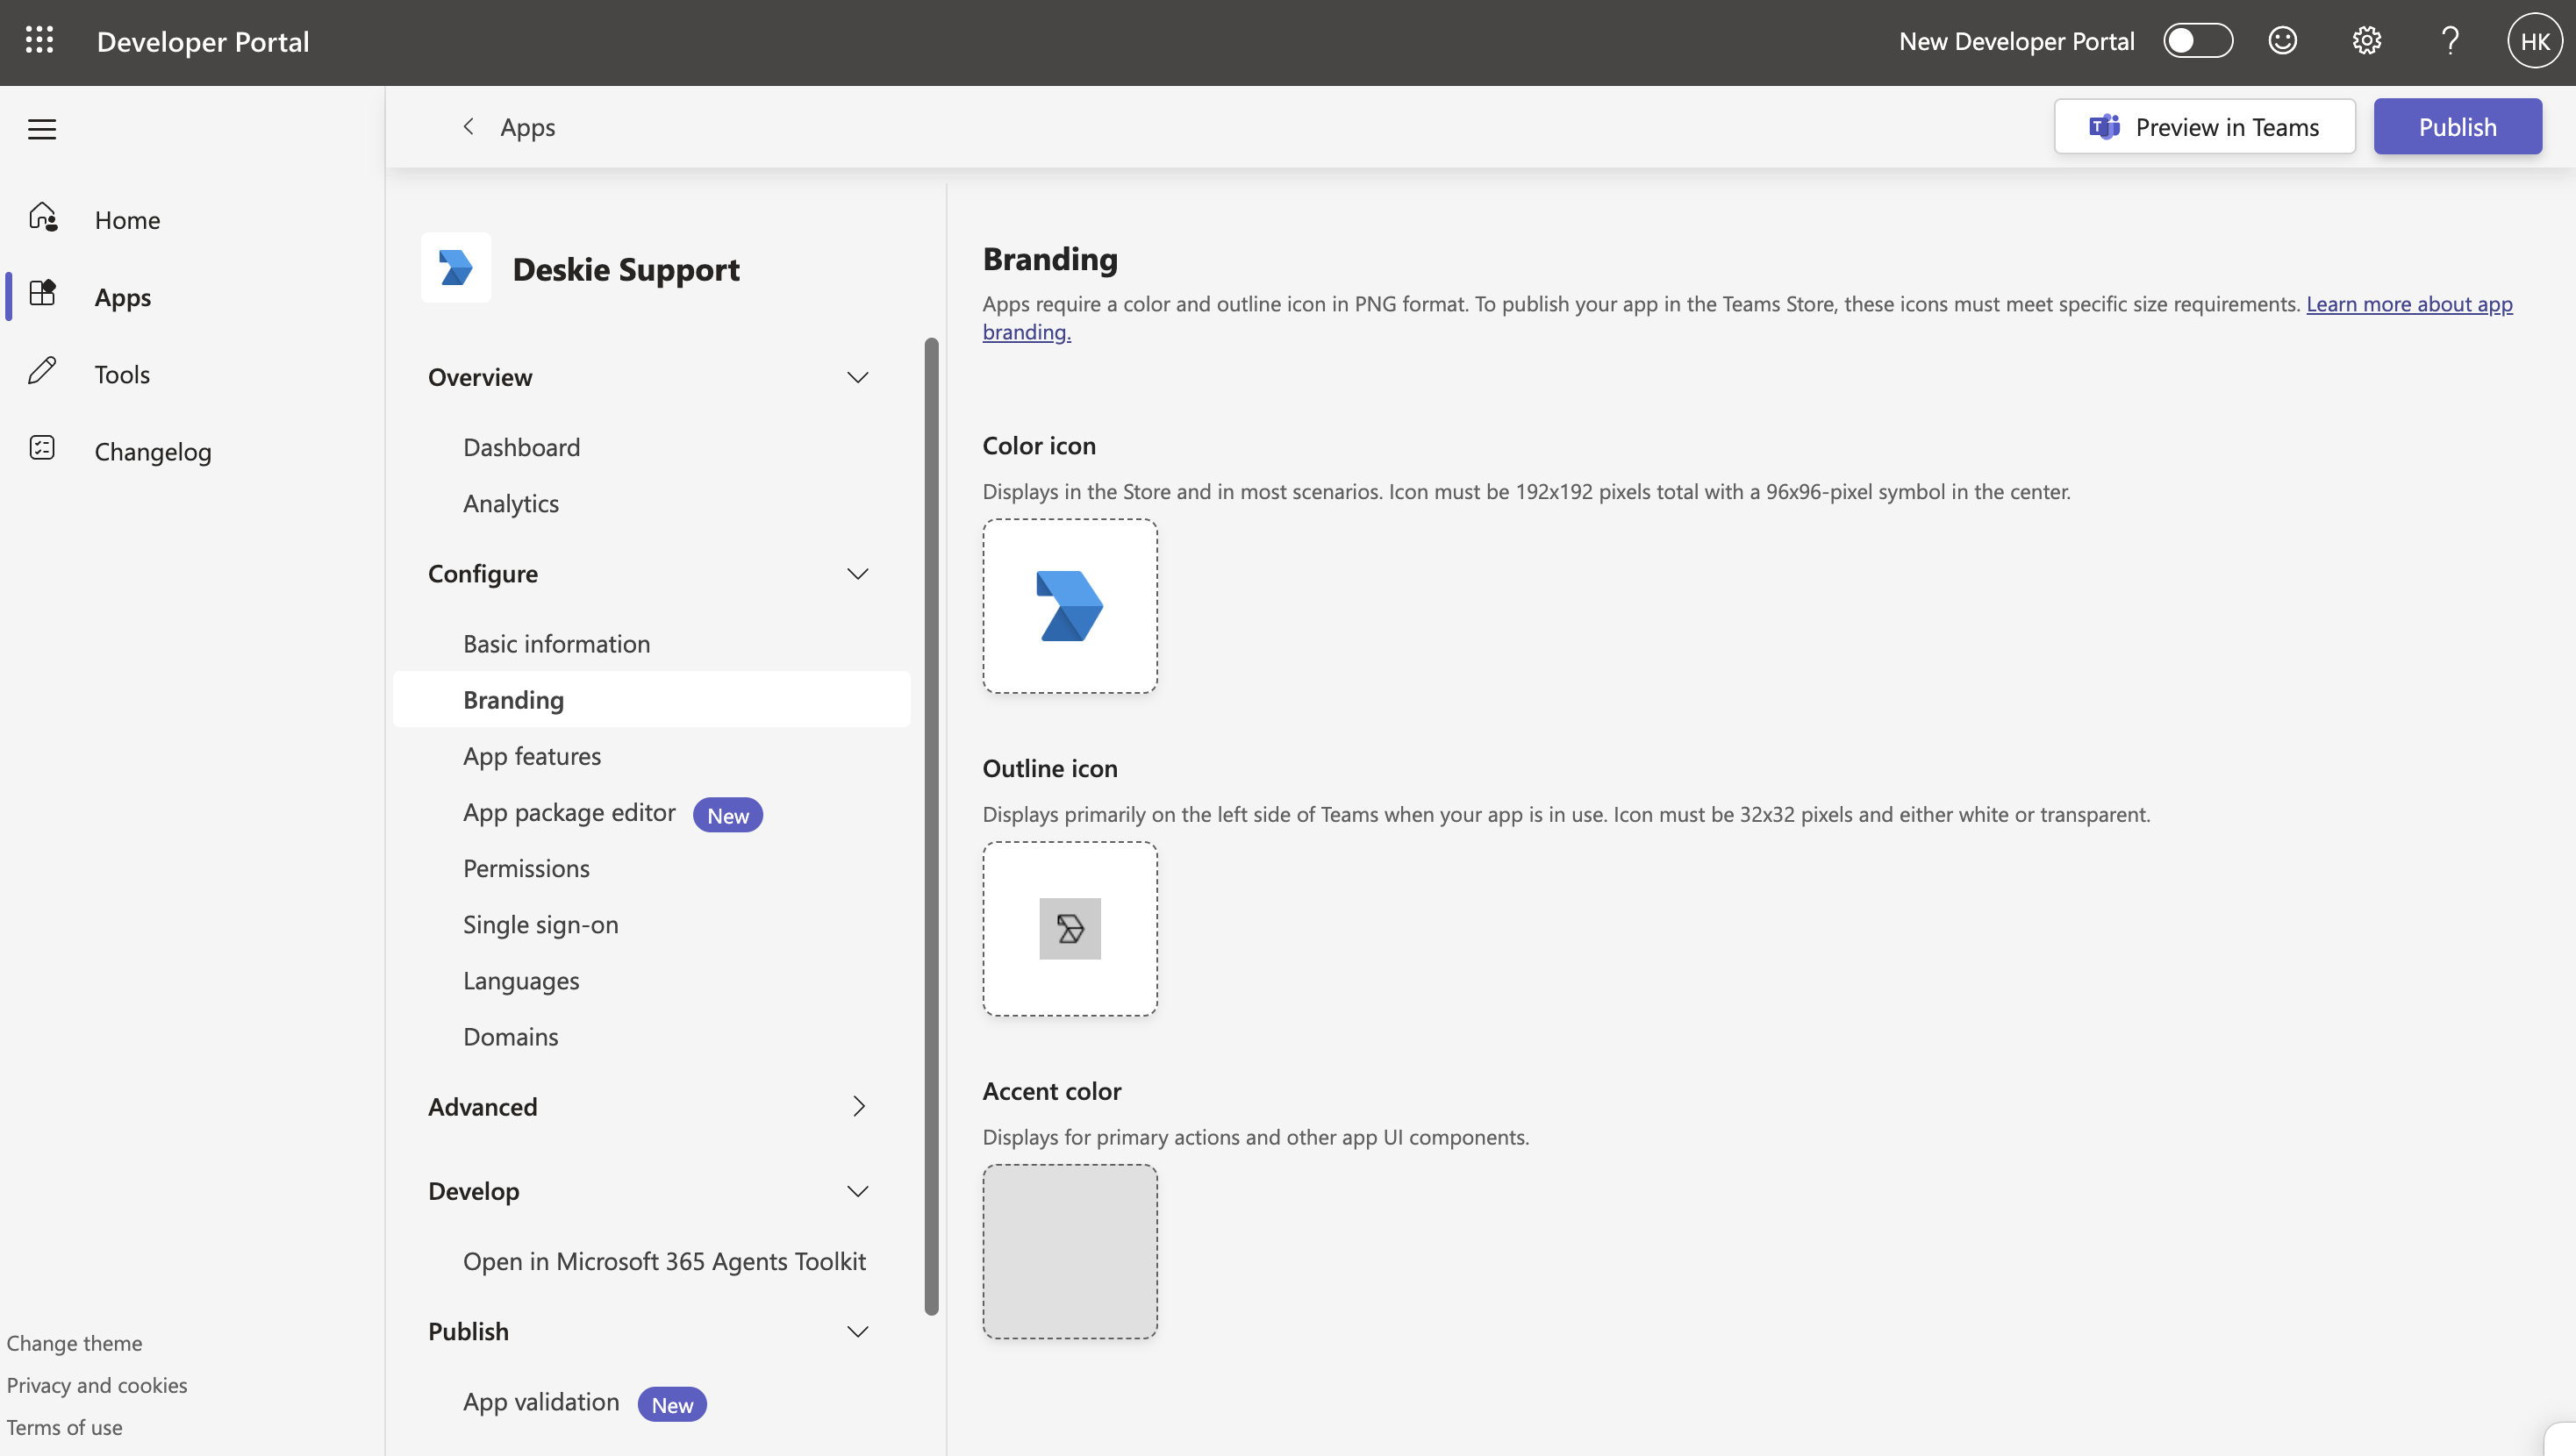
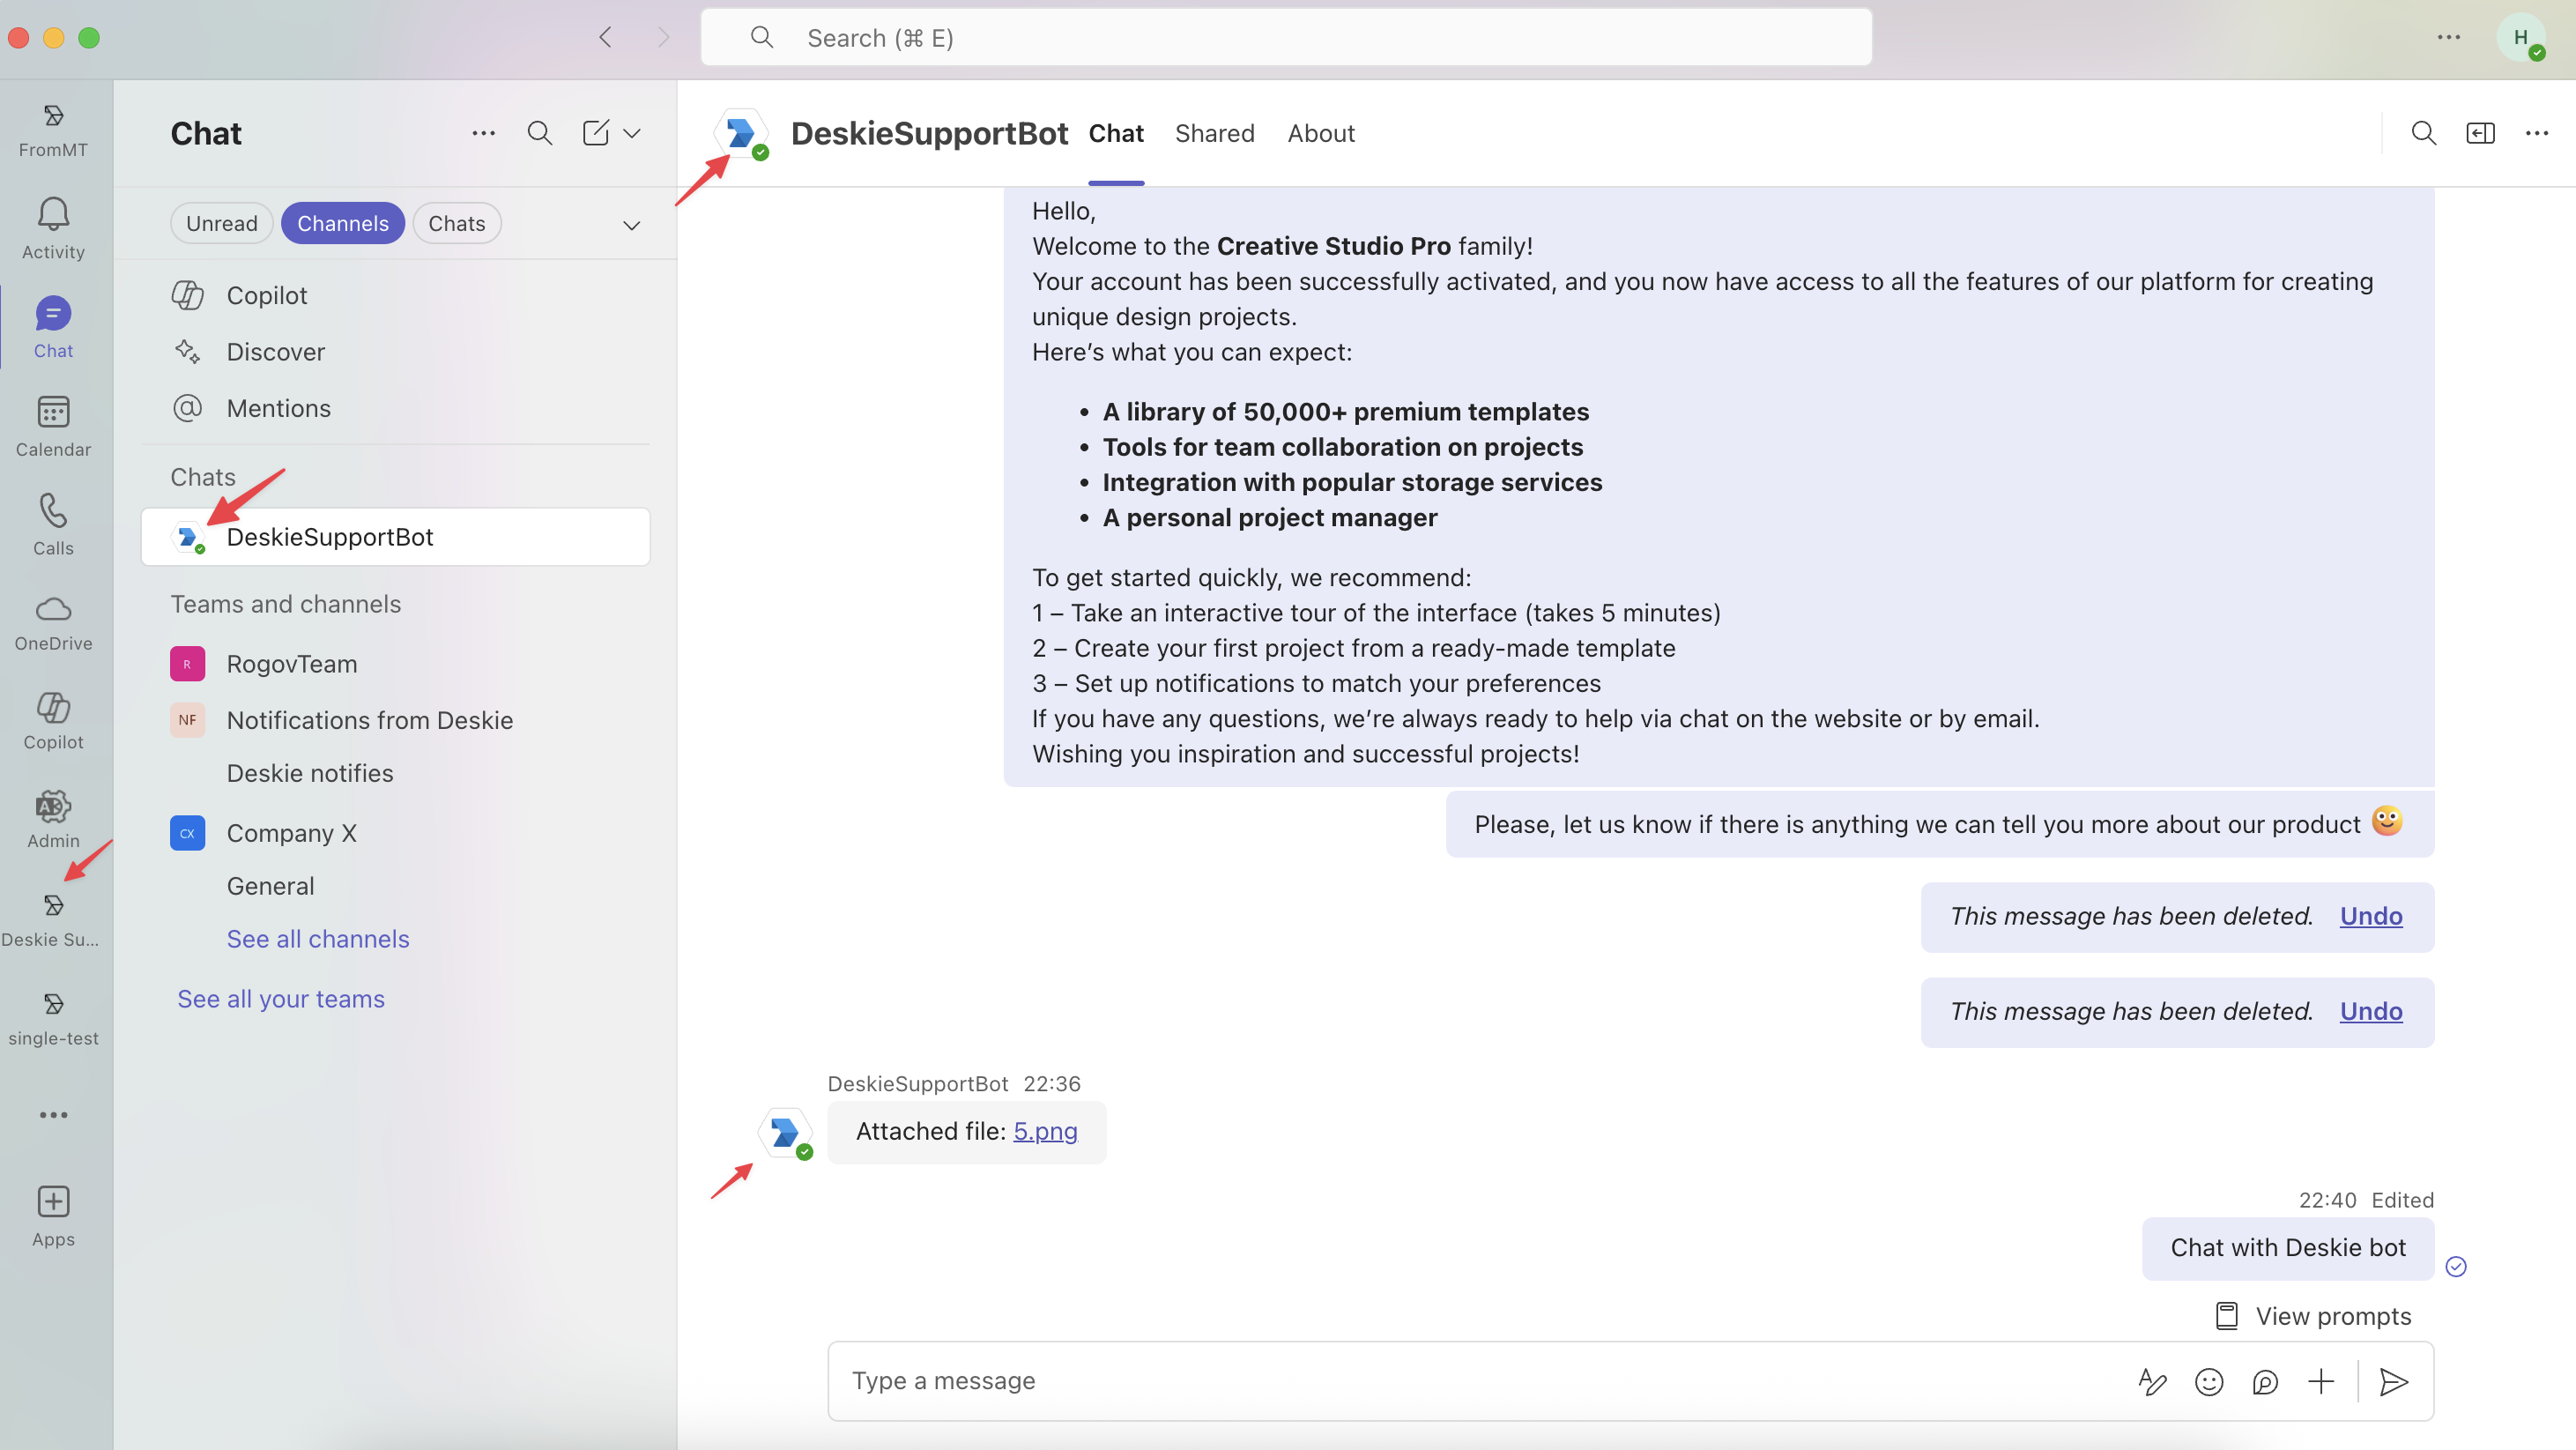
4. Go to the "Branding" section to add your logo and specify the color scheme that will appear in the app interface.
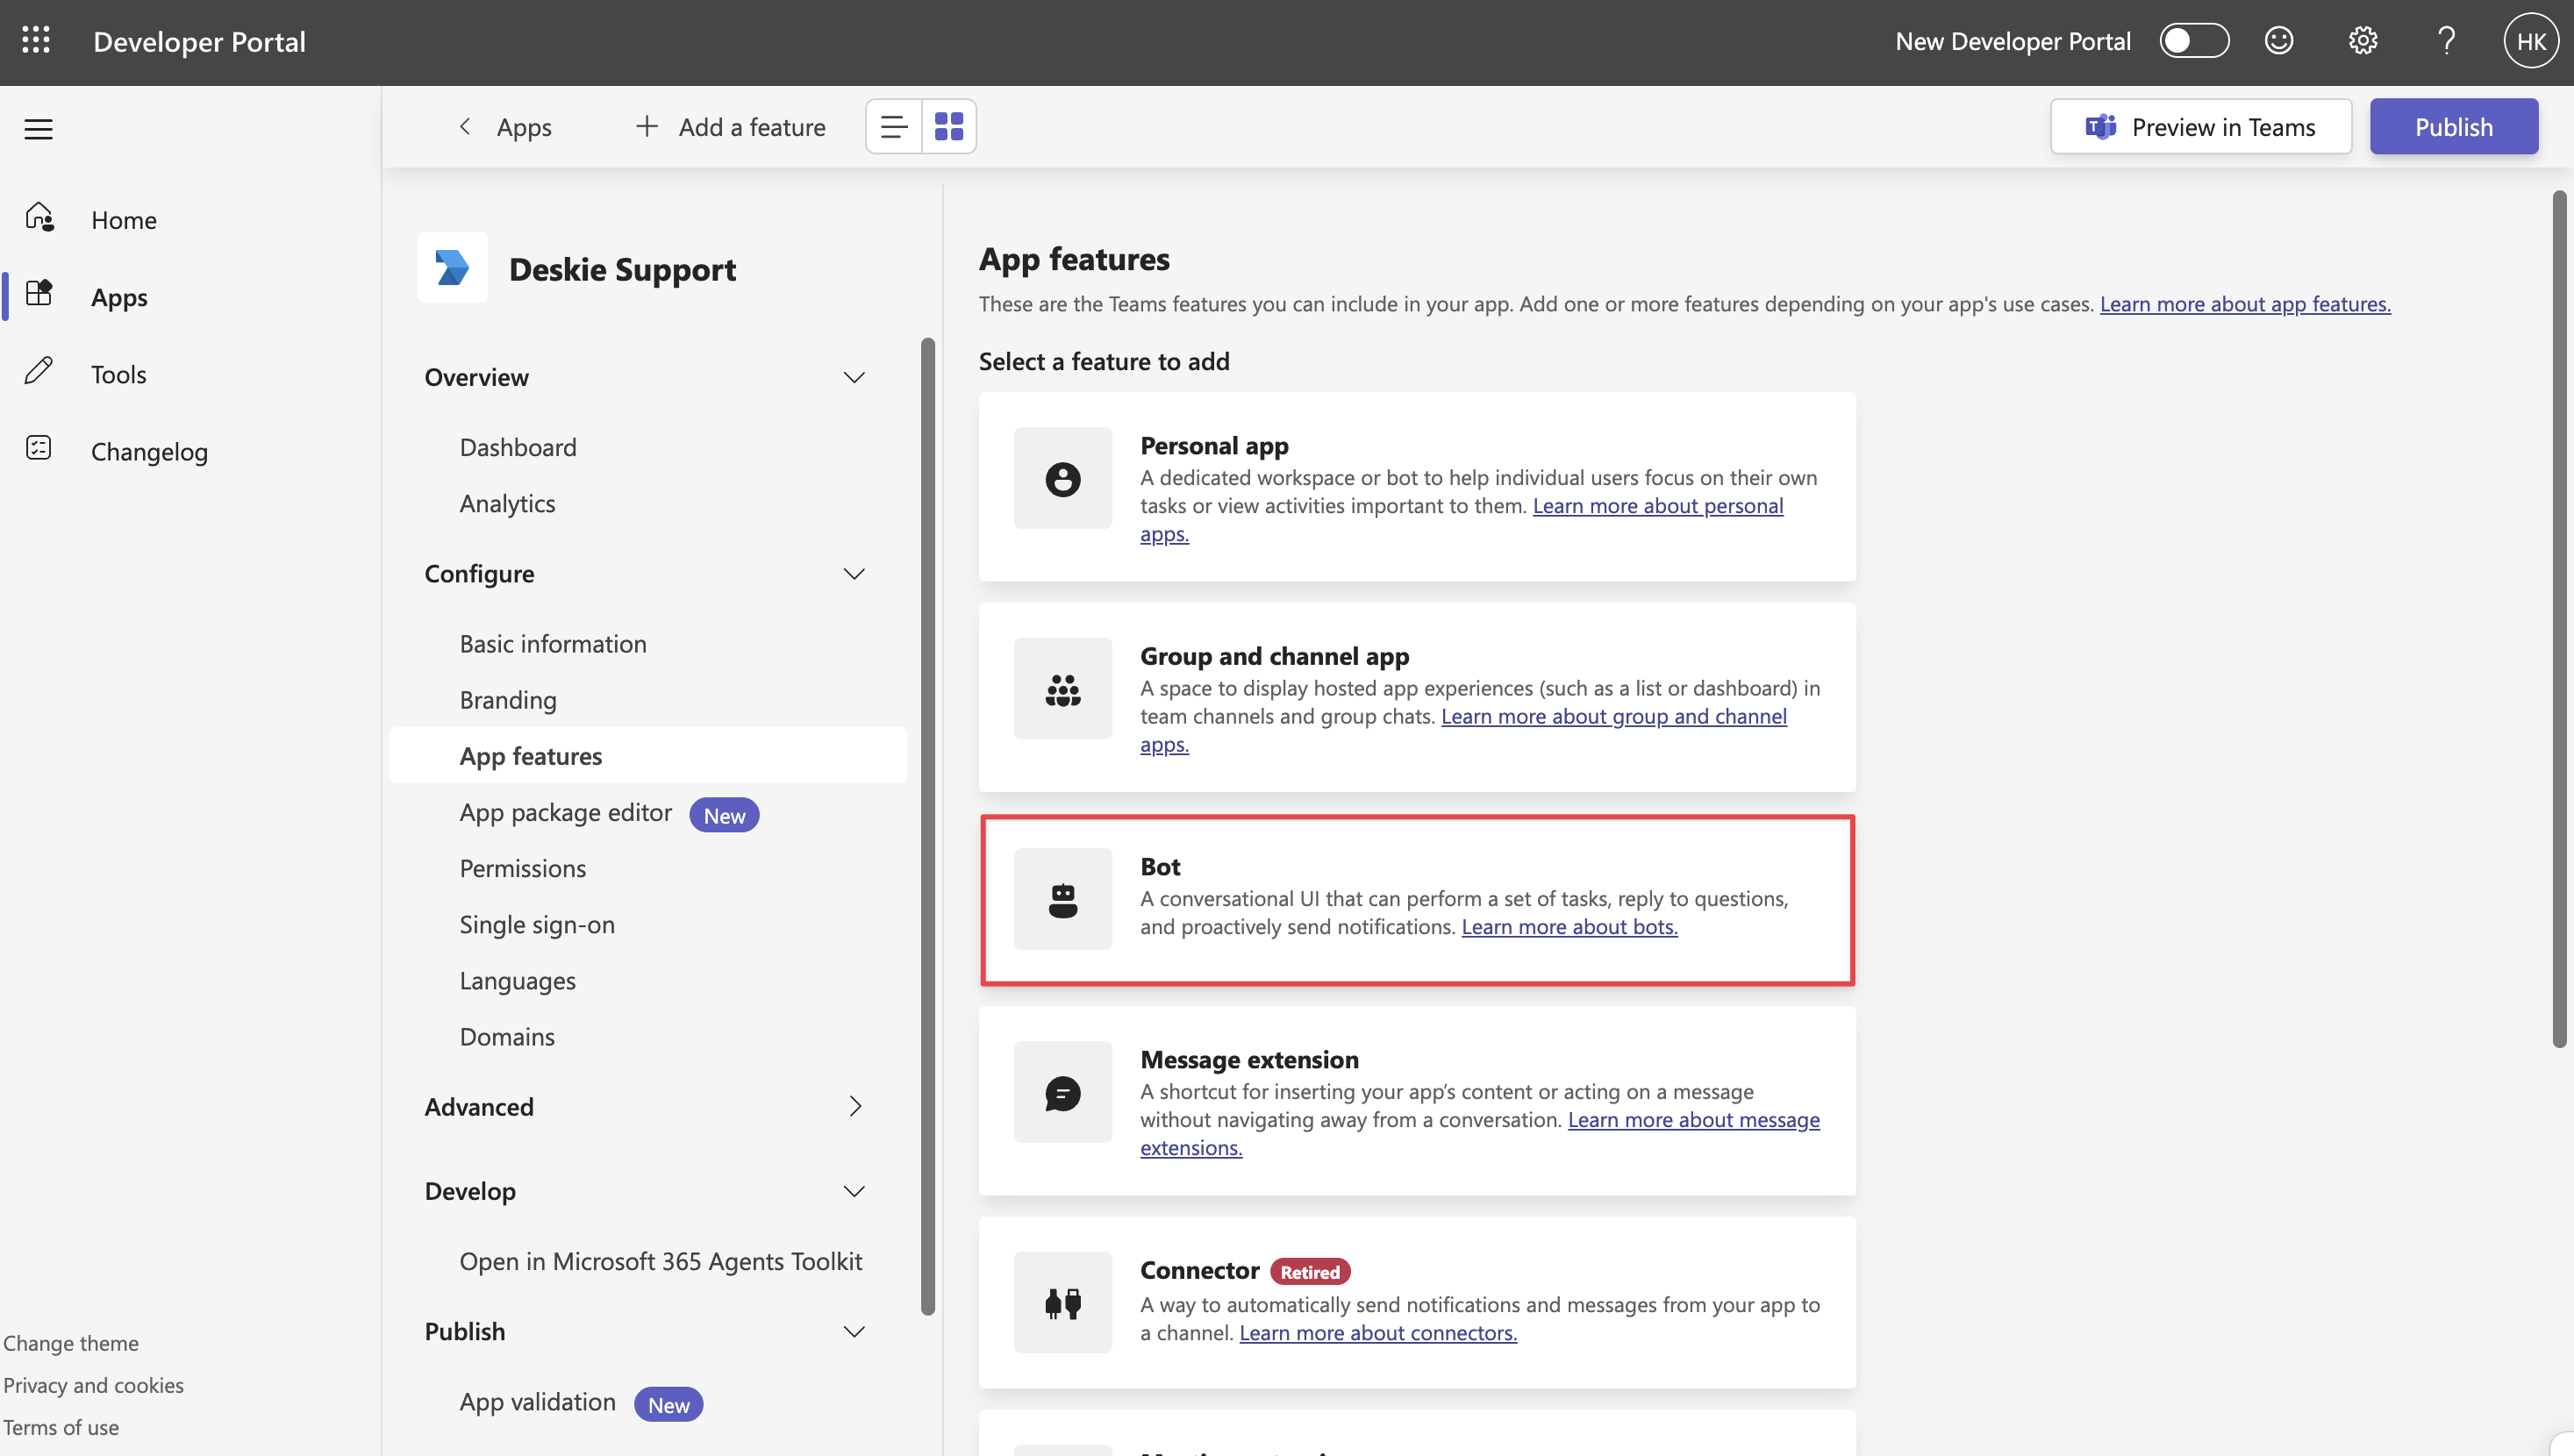
5. Go to the "App features" section and add the "Bot" feature.
6. On the page that opens, select:
- if you created the bot through the Teams Developer Portal — choose the bot you need from the list;
- If you created the bot through Azure, enter its ID.
The bot identifier in Azure can be found down the following path: bot's name → "Settings" section → "Configuration" subsection → field named "Microsoft App ID".

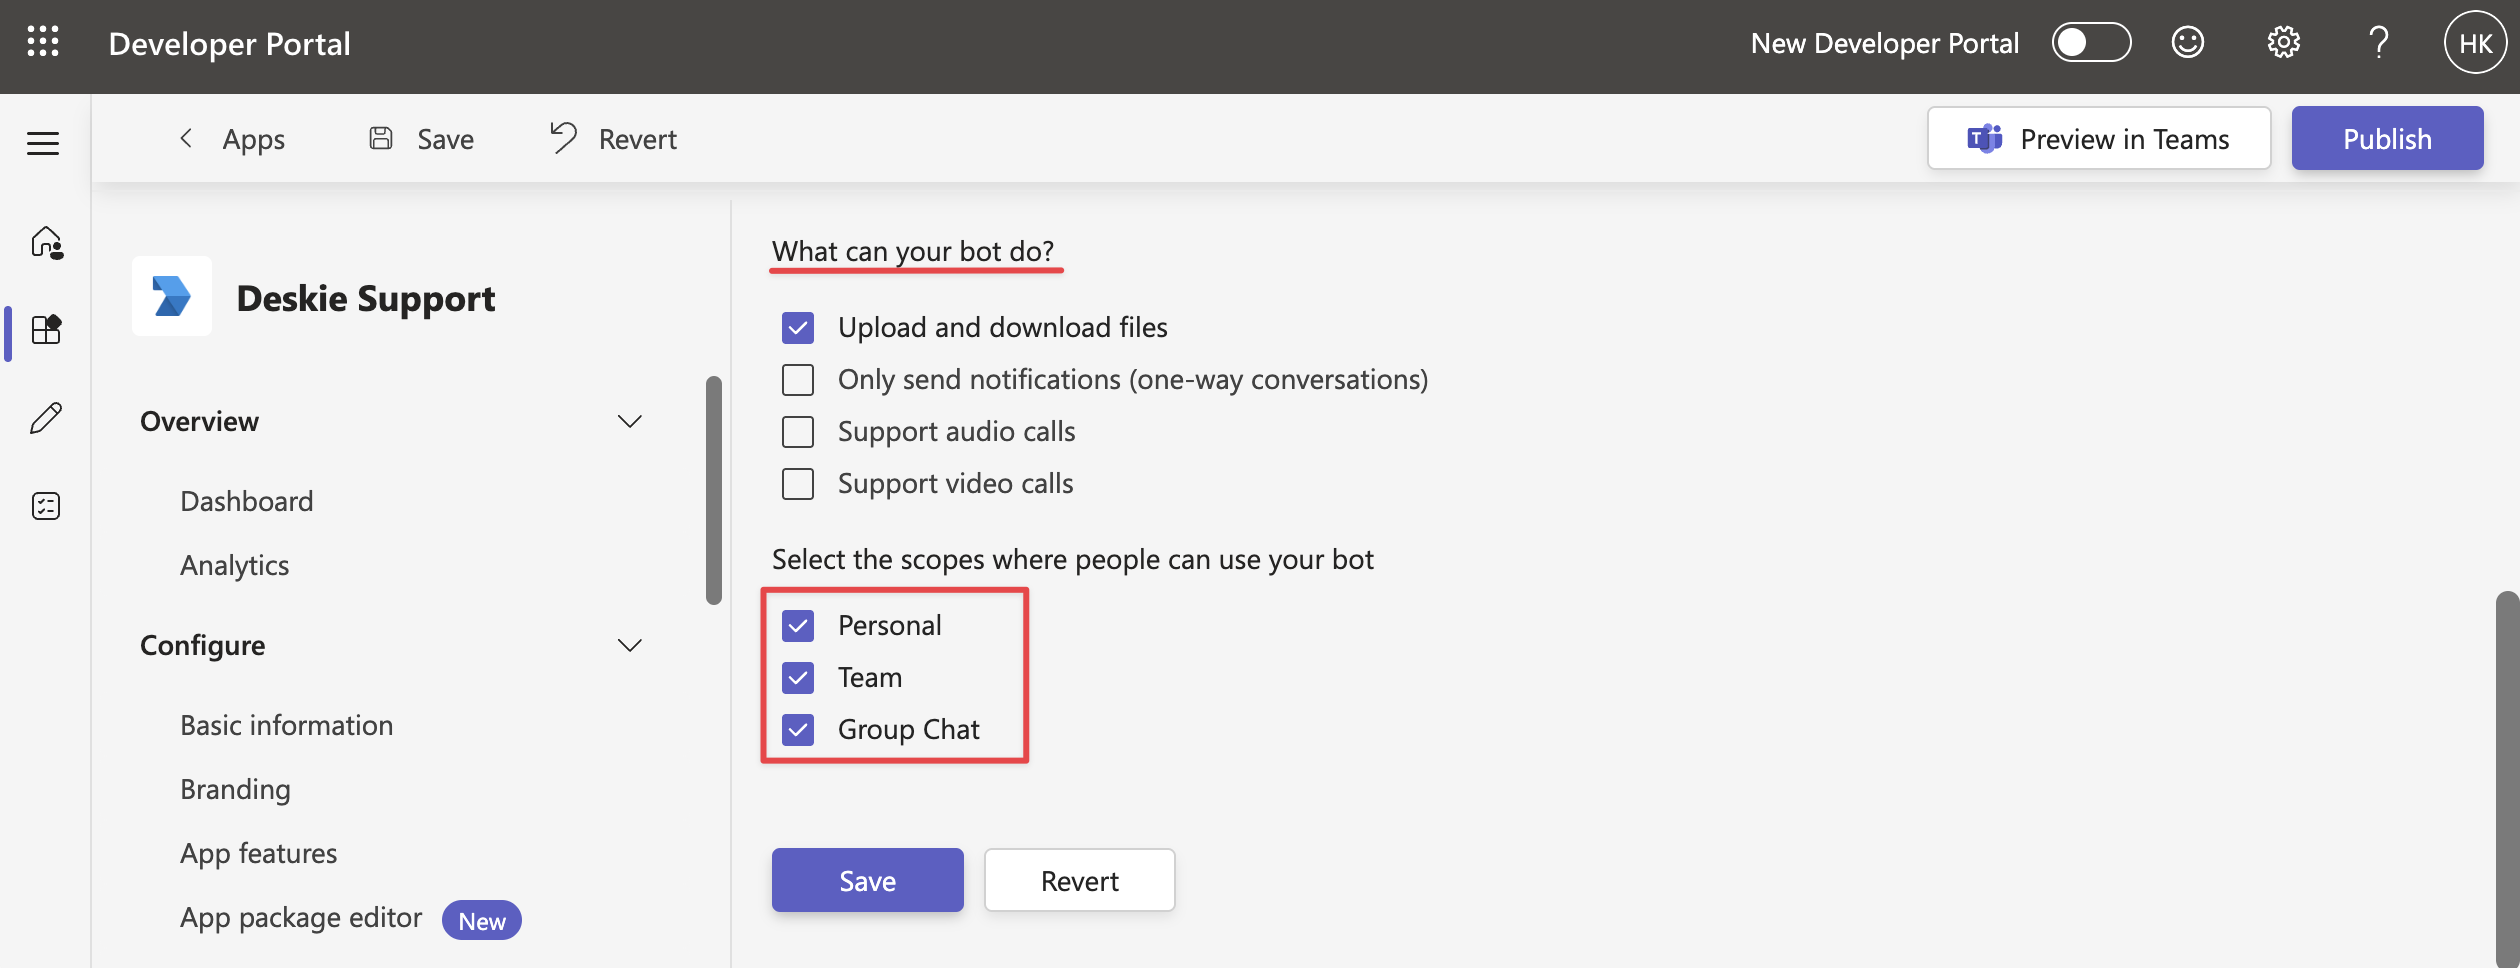
Below, on the same page, in the "What can your bot do?" list, check the box for "Upload and download files", and also select the scopes where users will be able to use the bot.
Files sent to the bot in group chats do not reach Deskie – this is a Microsoft Teams limitation. We recommend asking users to share links to files stored in cloud storage instead.
You can add commands for the bot at the bottom of the page – these will appear in the dropdown menu when a user types "/" in the message input field in Teams.

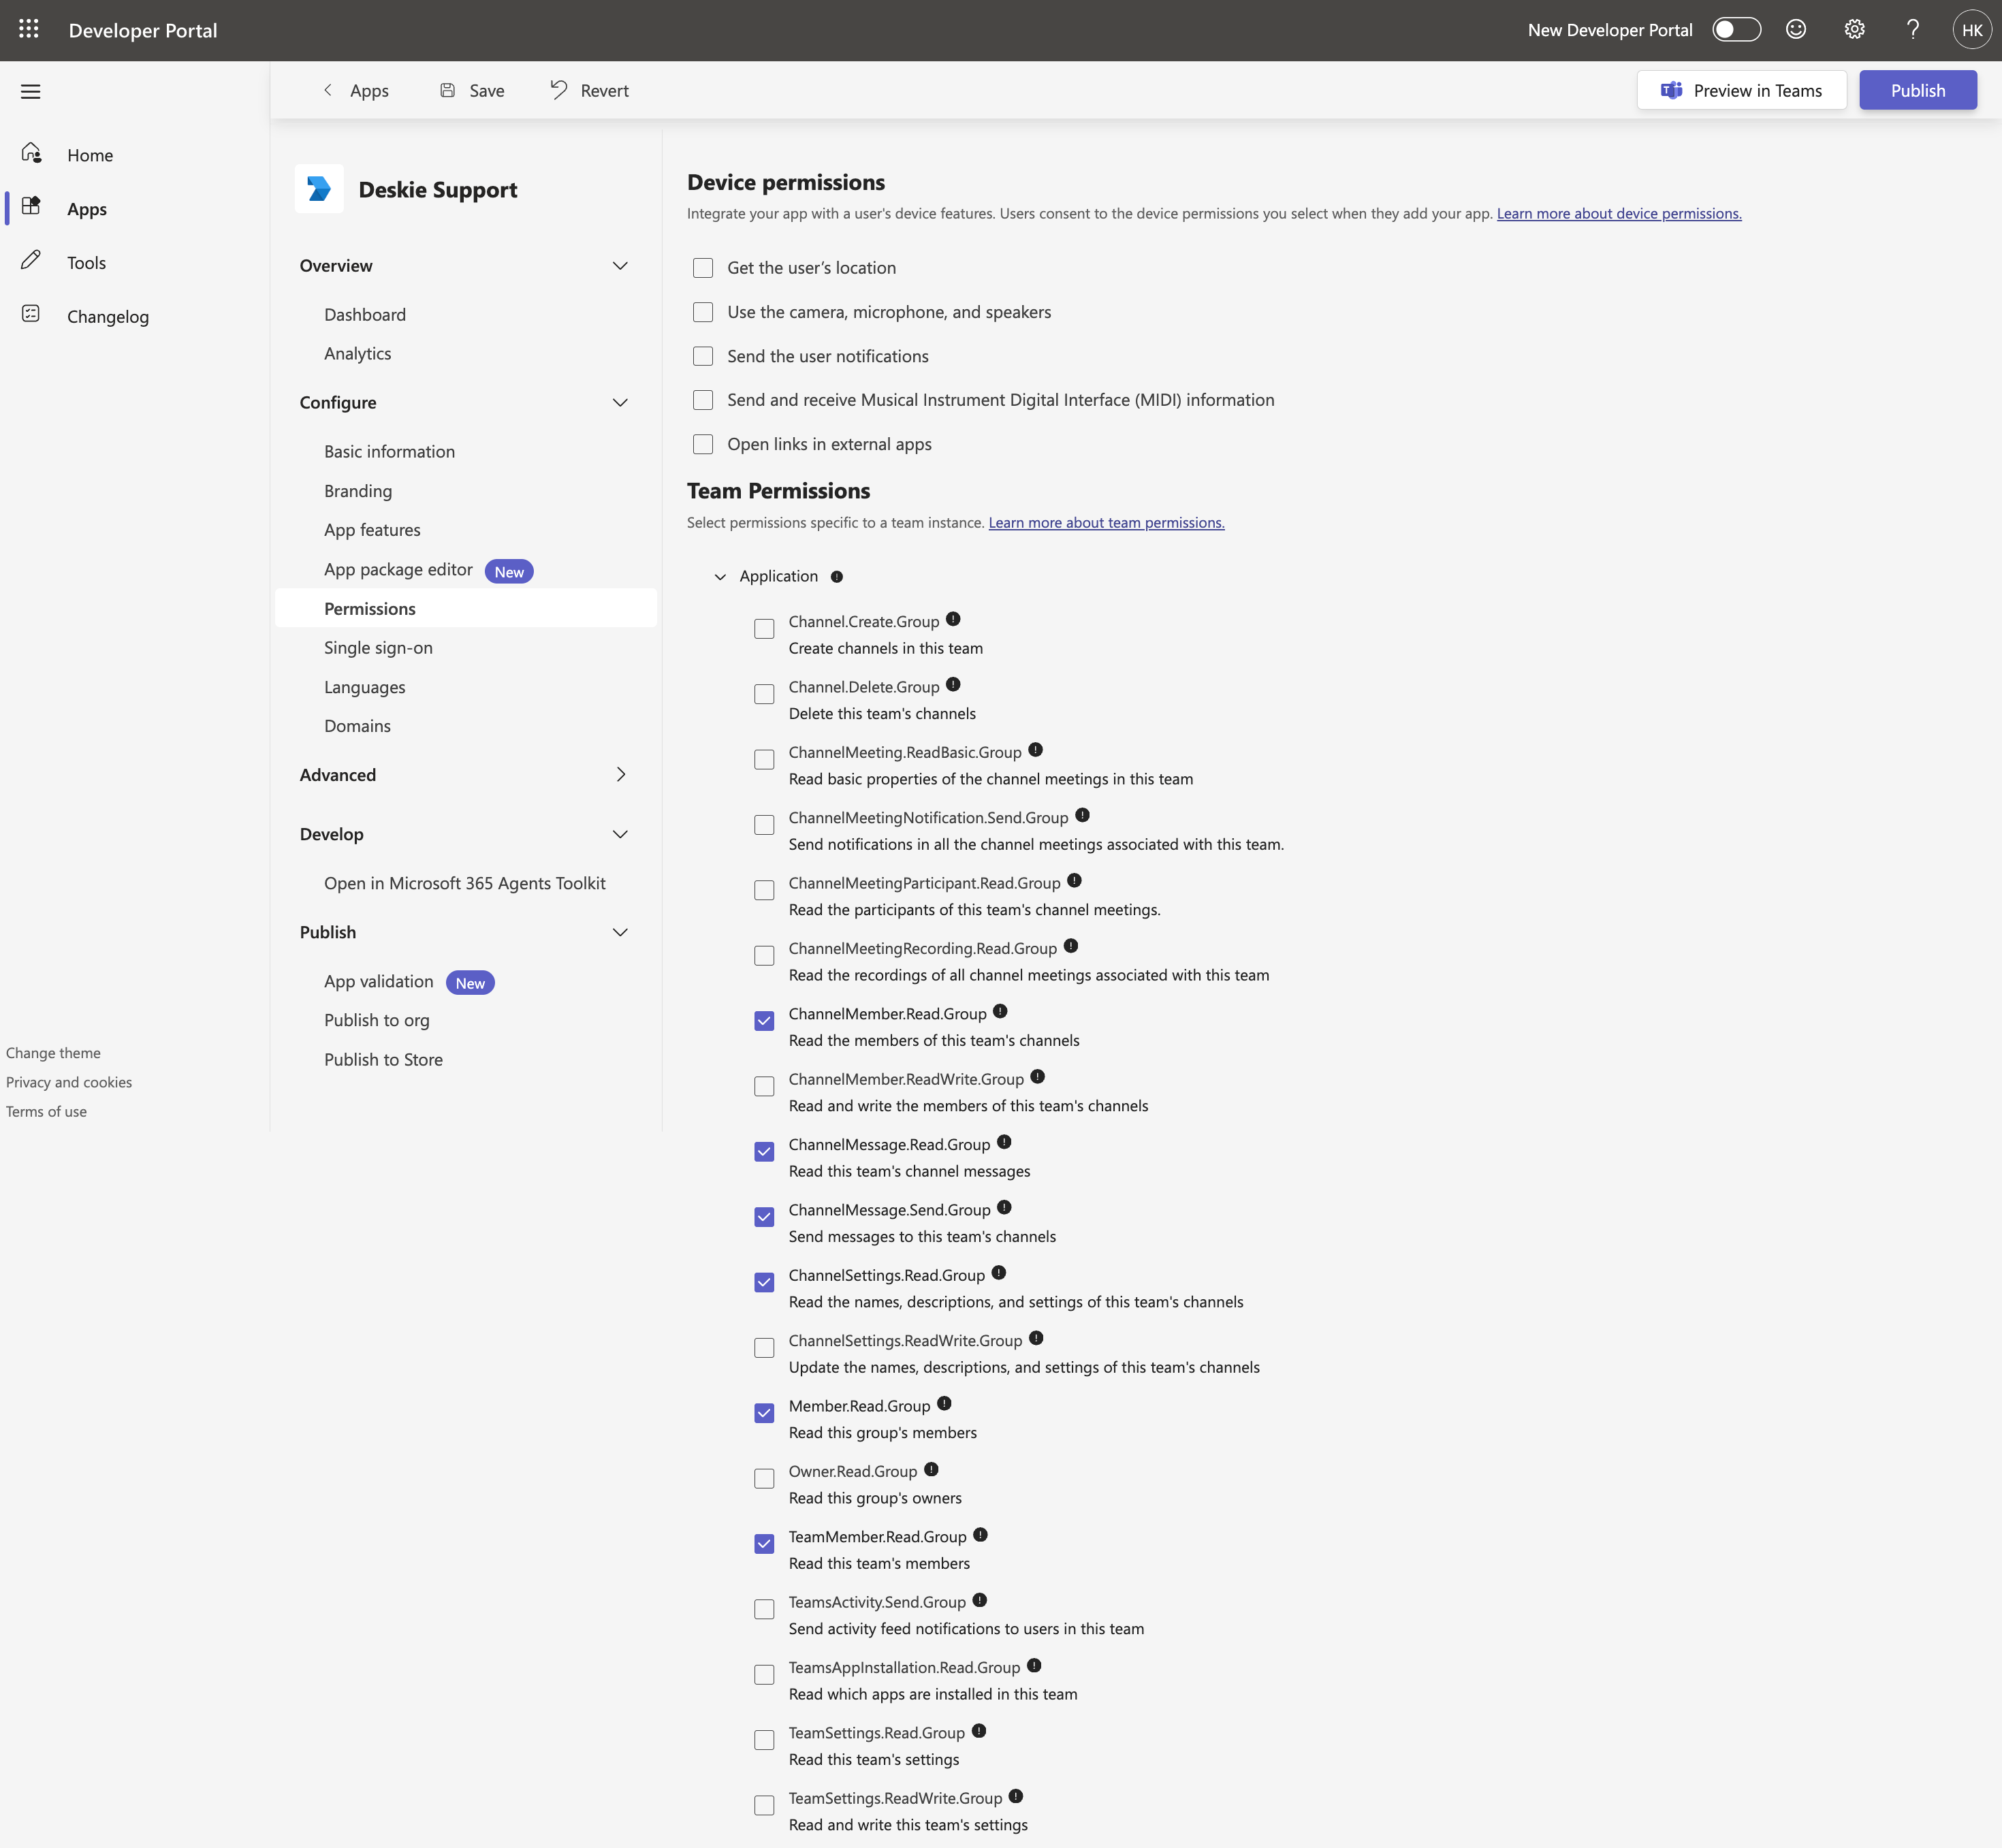
7. Go to the "Permissions" subsection and add the required permissions.
а) In the "Team Permissions" section, tick the following boxes:
- ChannelMember.Read.Group
- ChannelMessage.Read.Group
- ChannelMessage.Send.Group
- ChannelSettings.Read.Group
- Member.Read.Group
- TeamMember.Read.Group
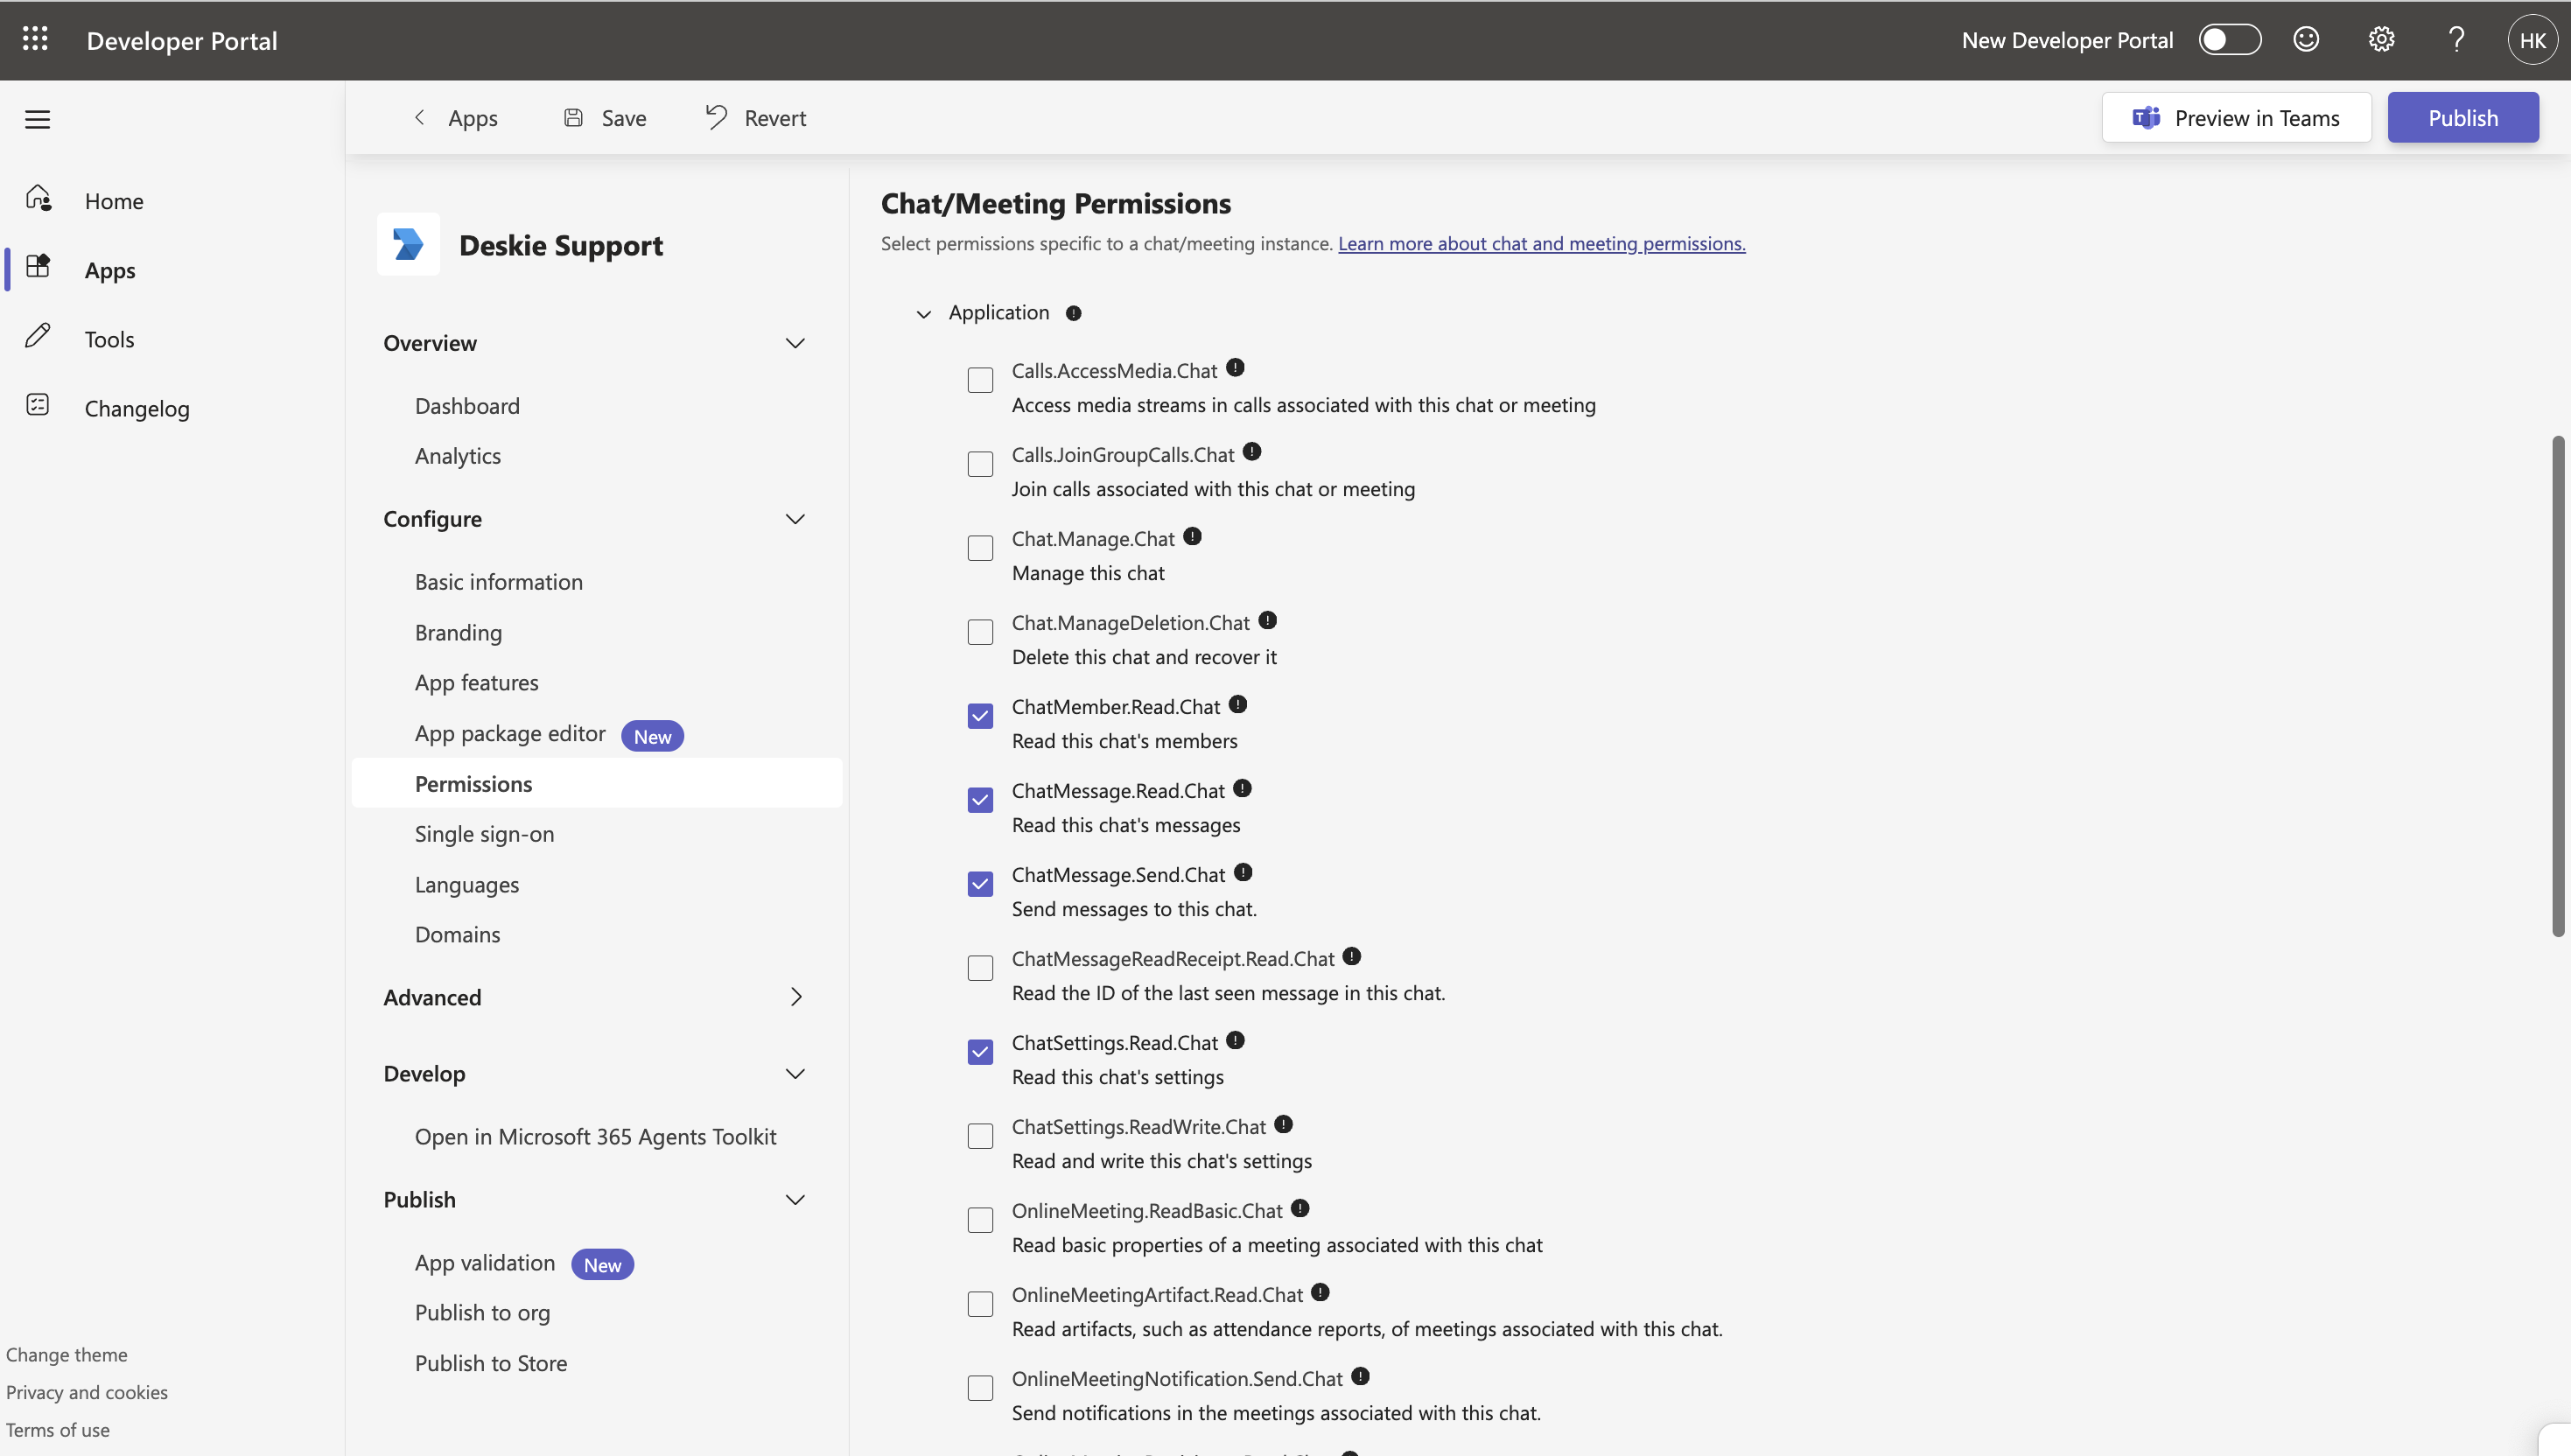
b) In the "Chat/Meeting Permisions" section, tick the following boxes:
- ChatMember.Read.Chat
- ChatMessage.Read.Chat
- ChatMessage.Send.Chat
- ChatSettings.Read.Chat
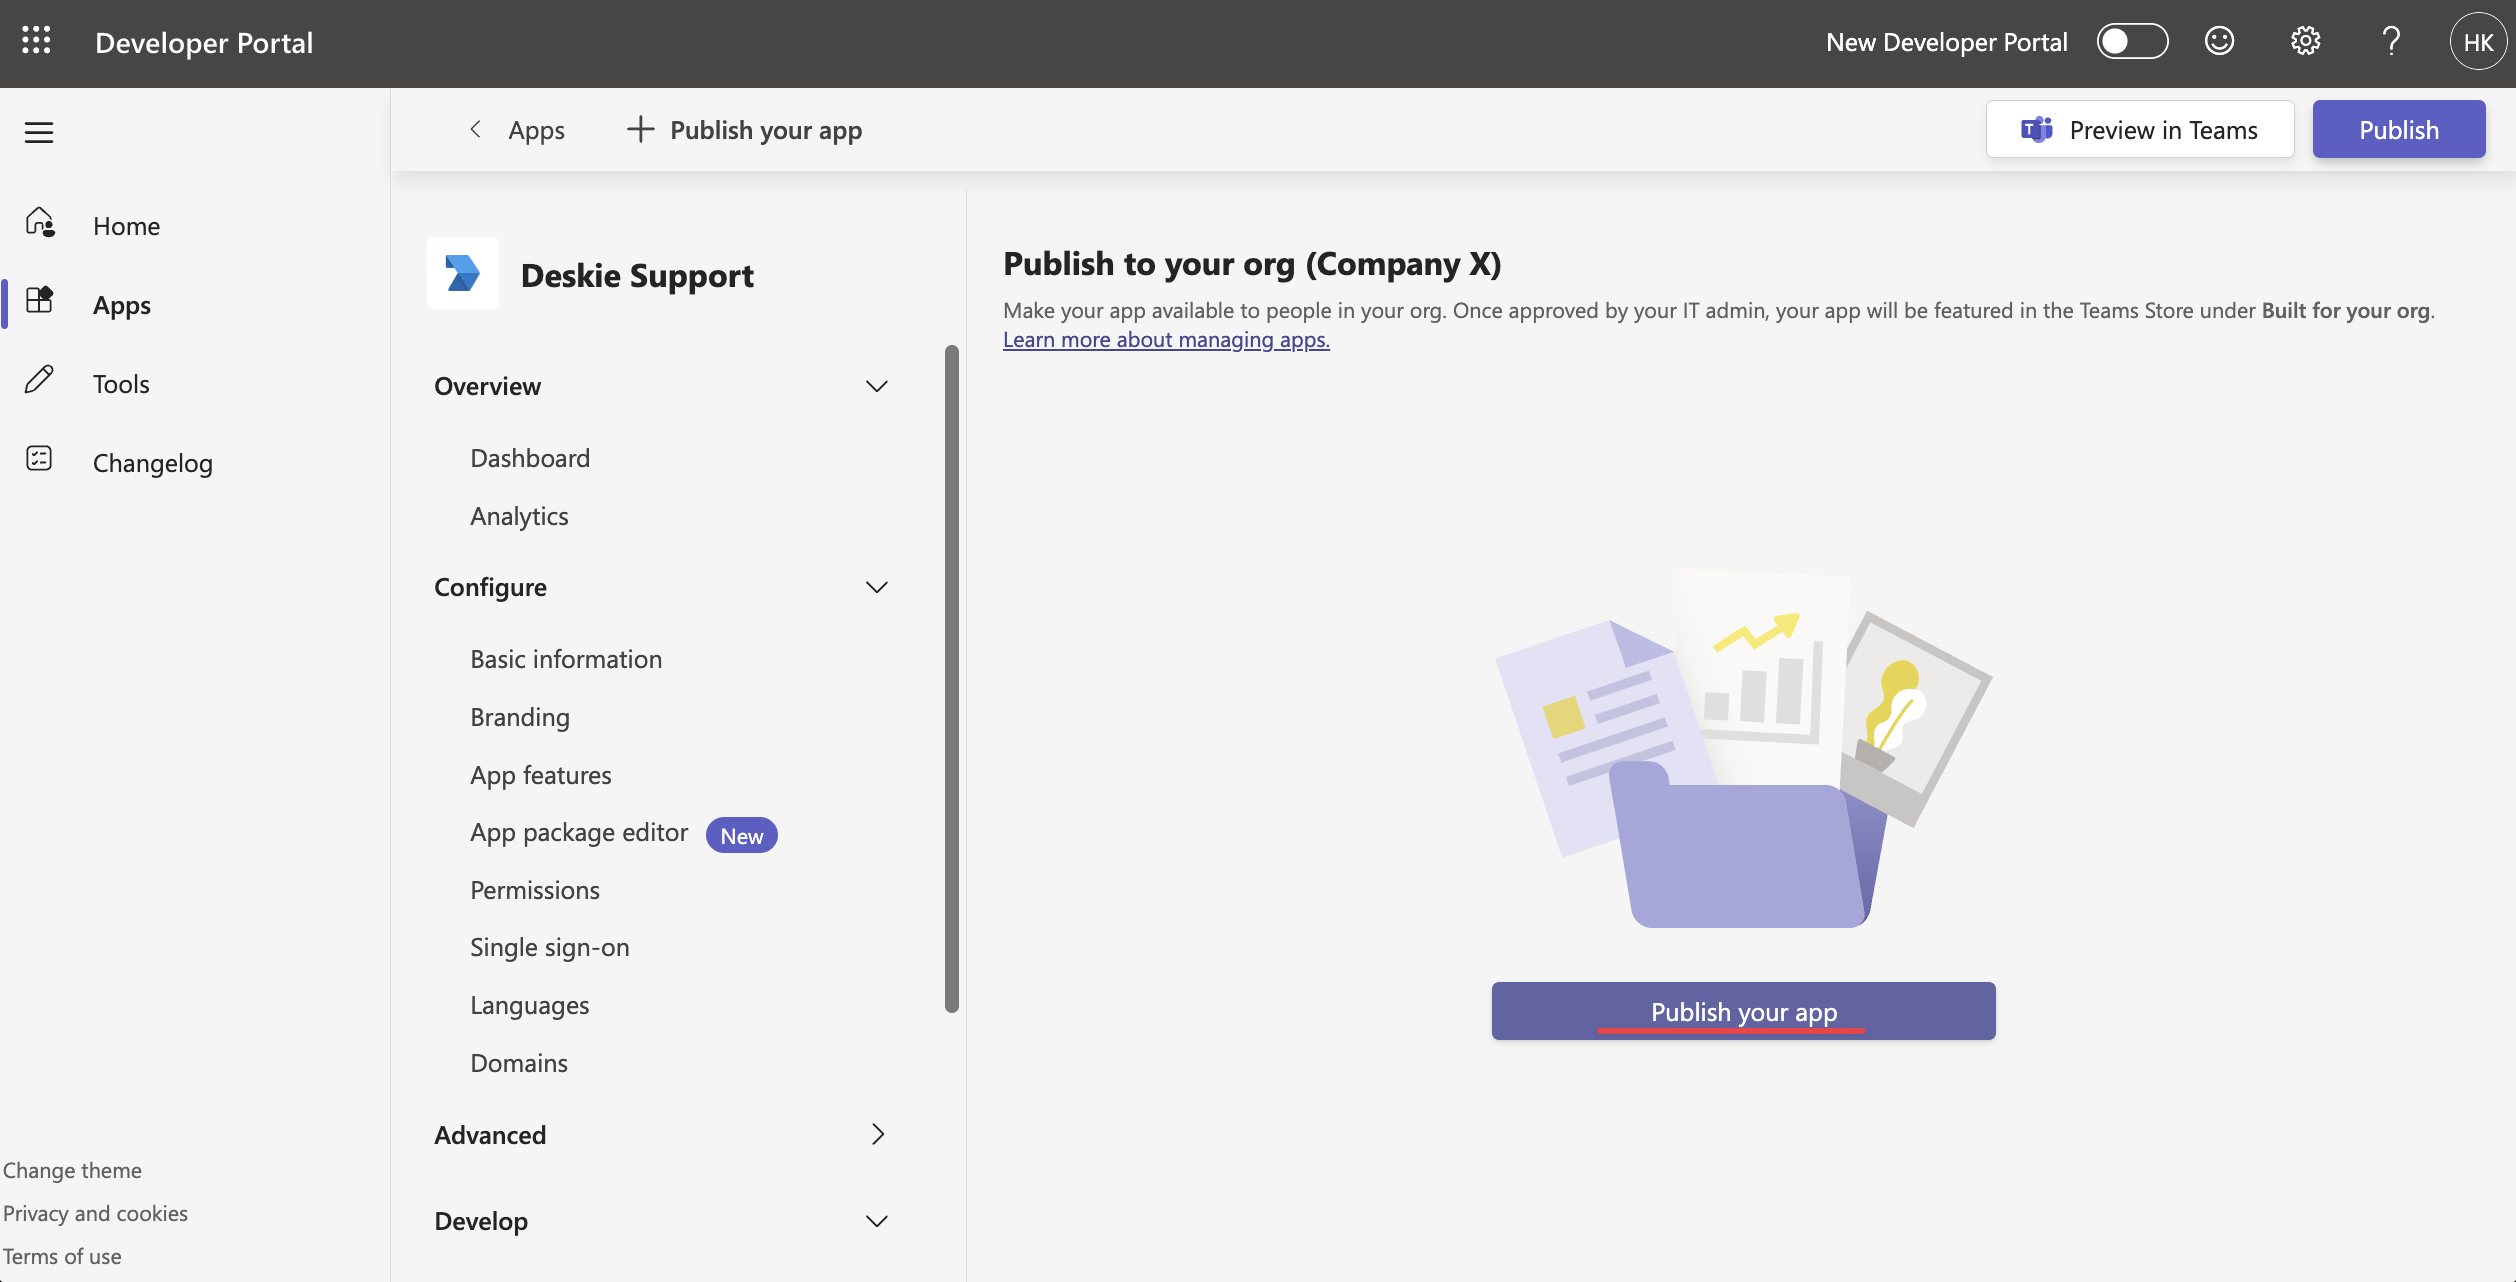
8. Go to the "Publish in org" section and click the "Publish your app" button:
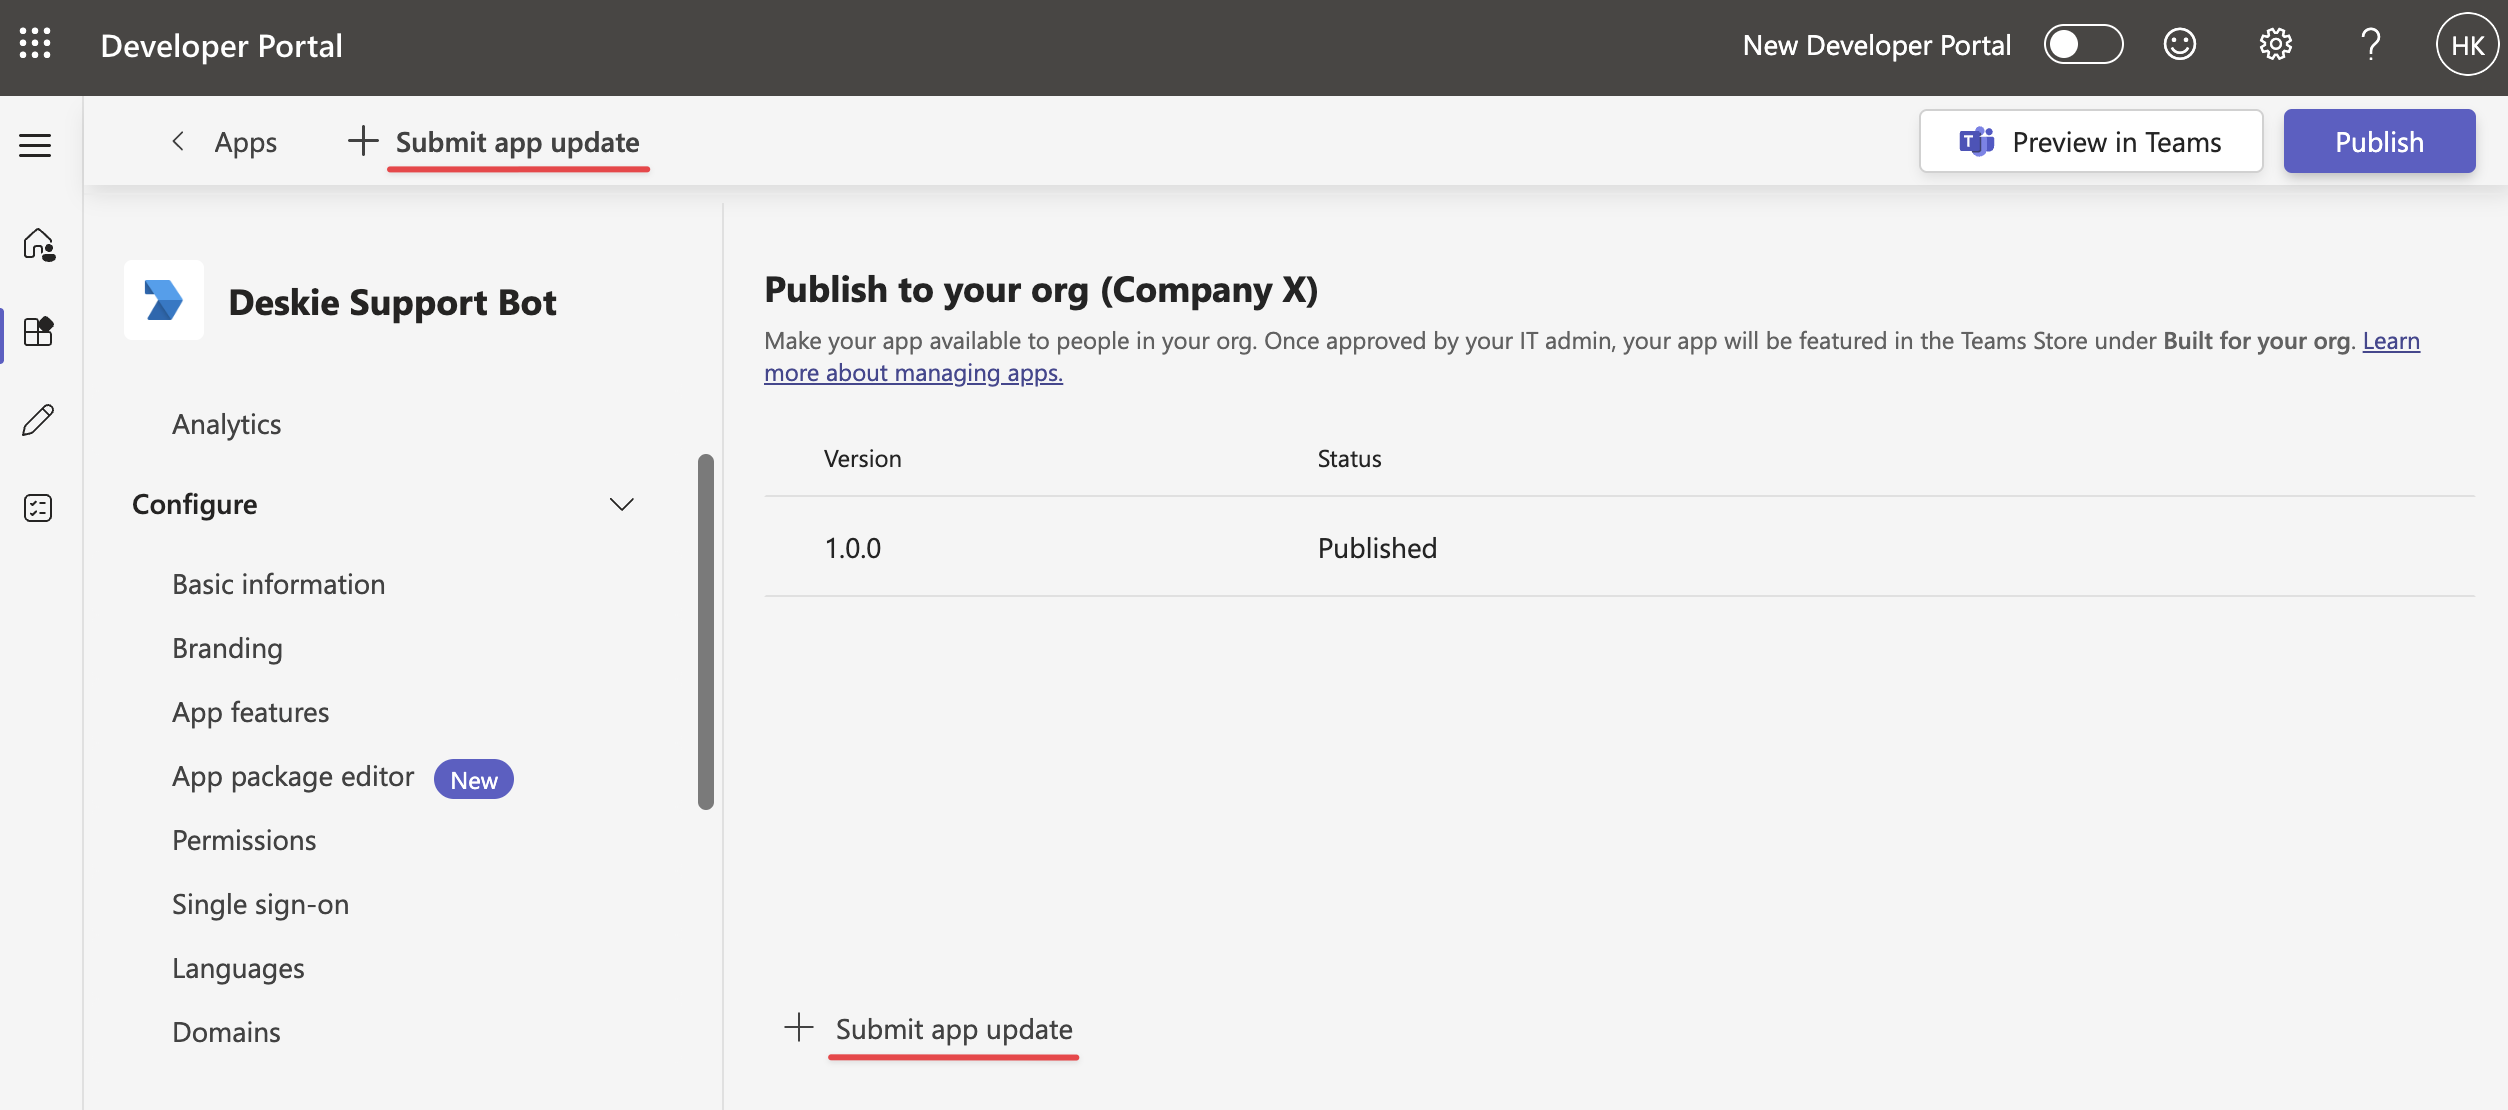
If everything was done correctly, the publication status will change to "Submitted":

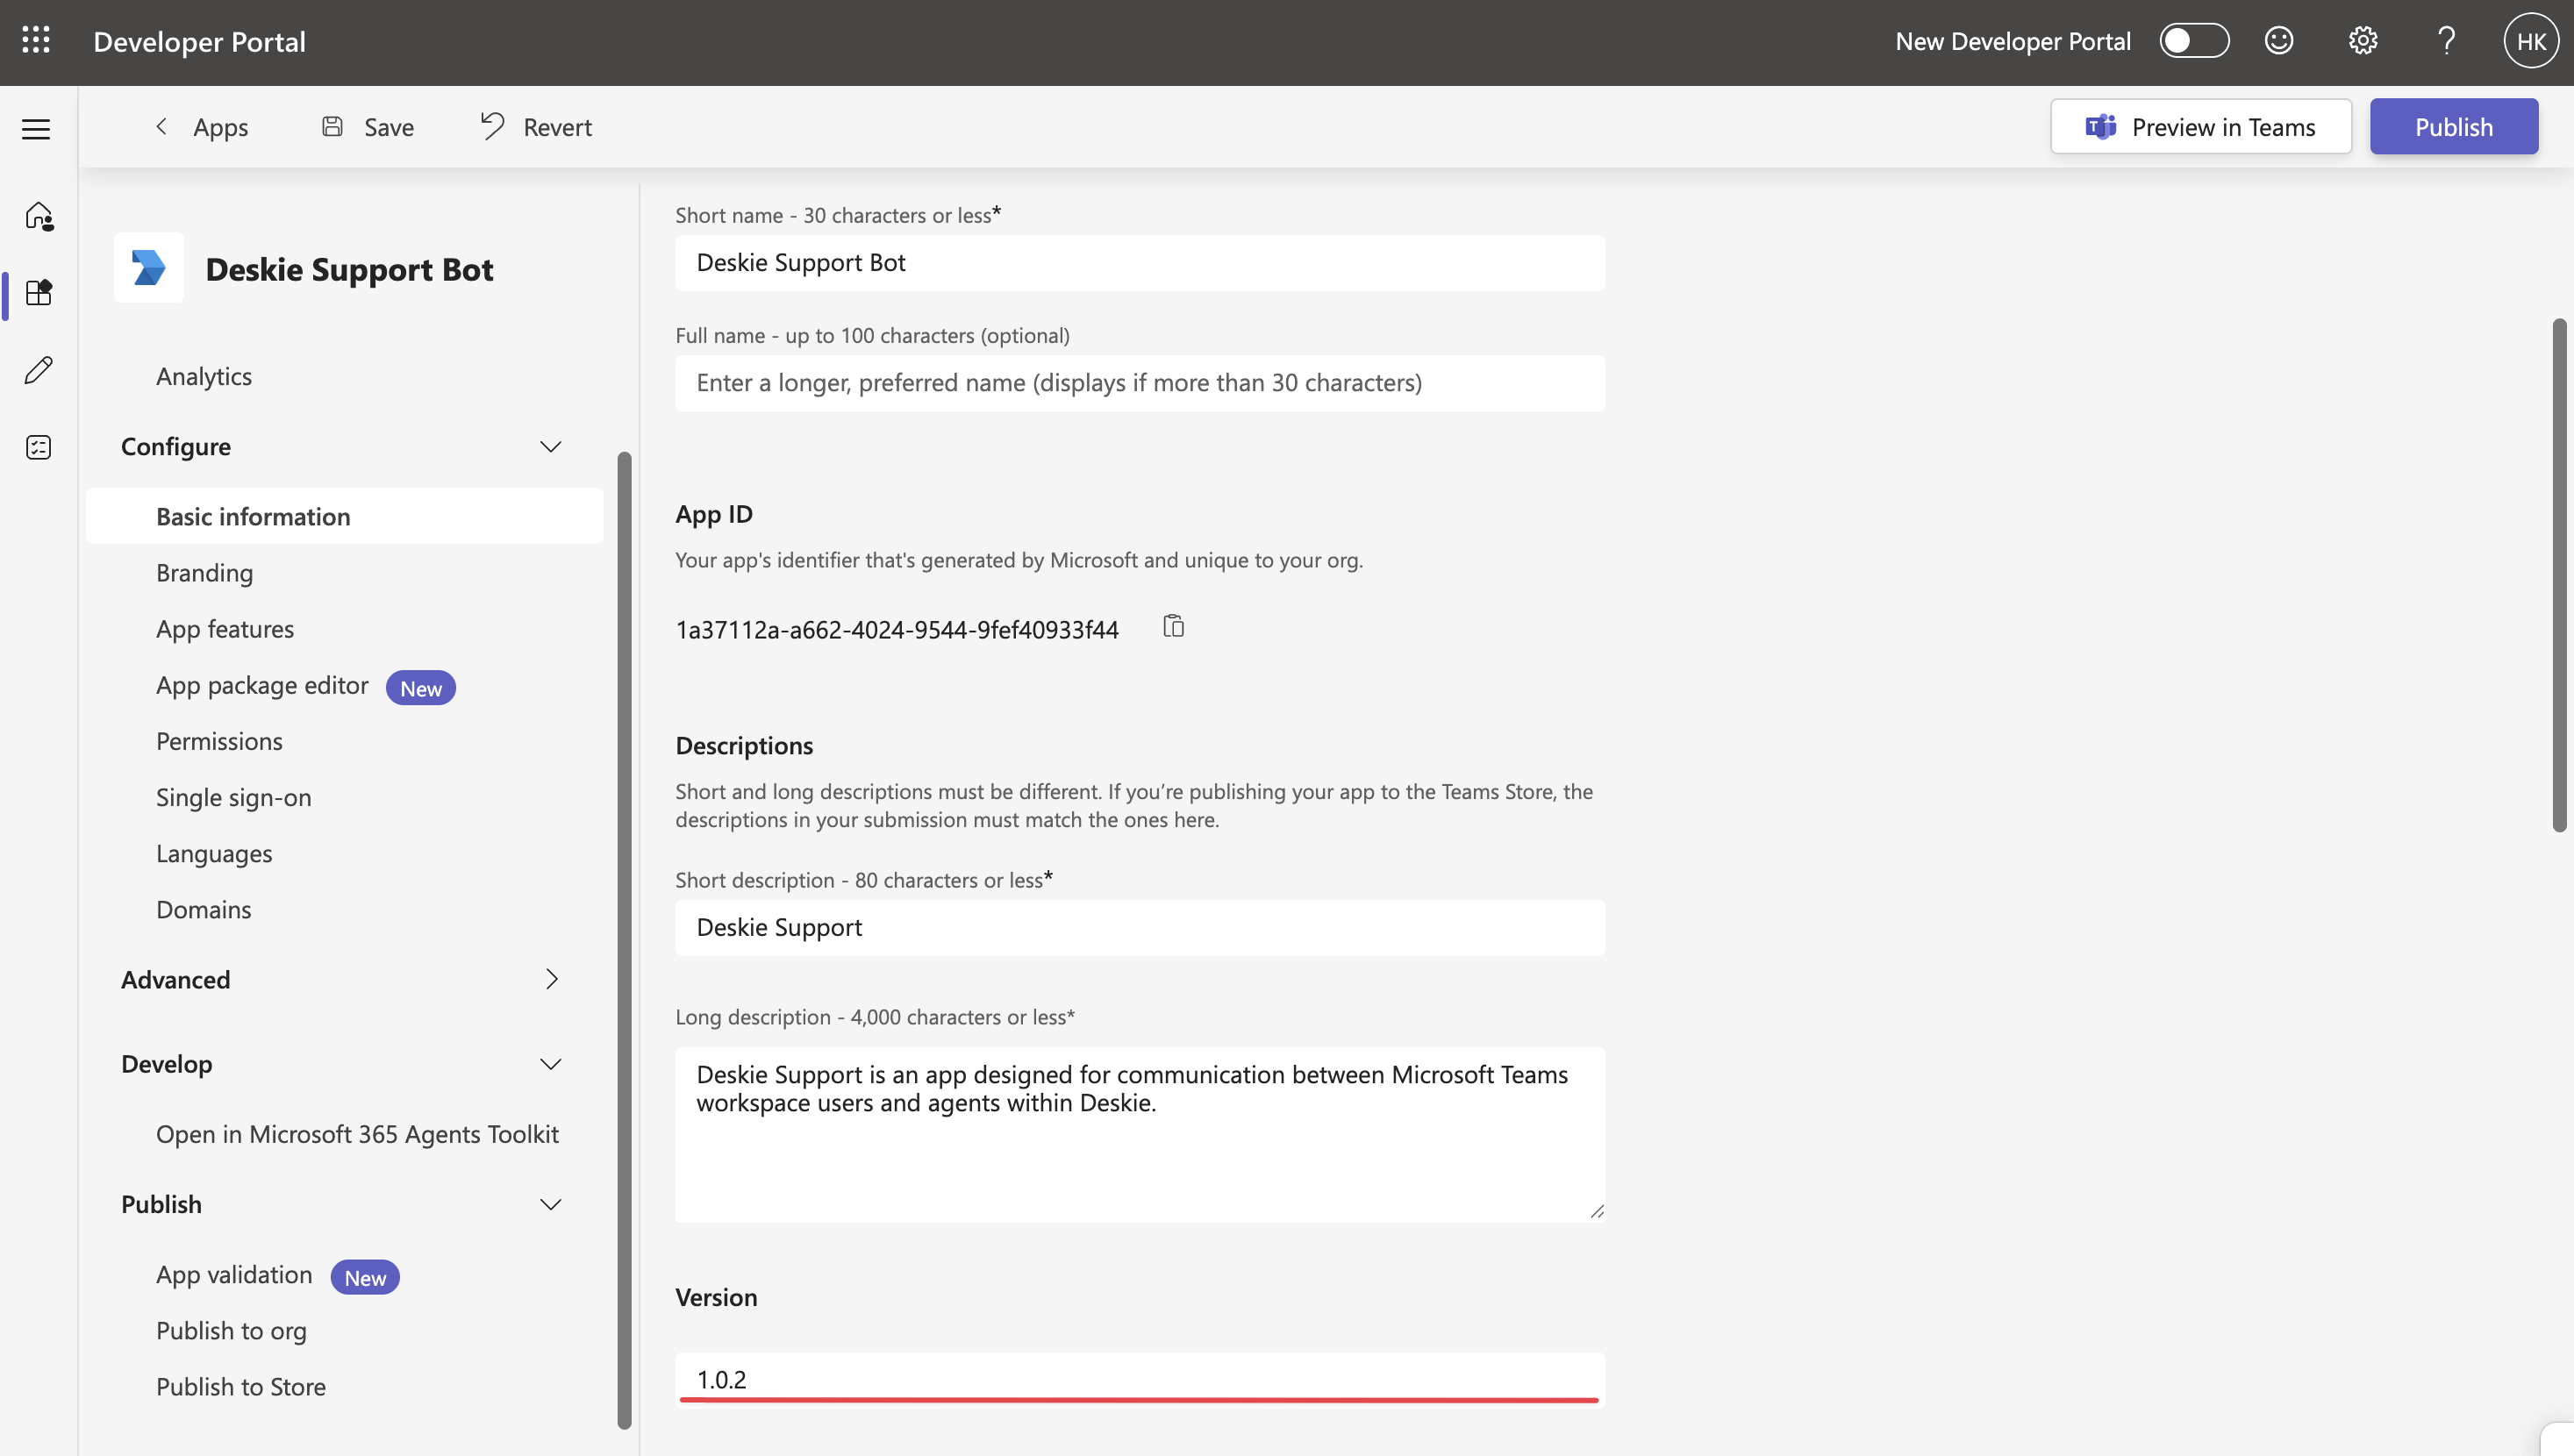
When making changes to the app, you need to update its version in the "Configure" → "Basic information" section, and then resubmit the updated version for publication. Teams does not allow uploading updates with the same version number — without this step, the system will not accept the changes.
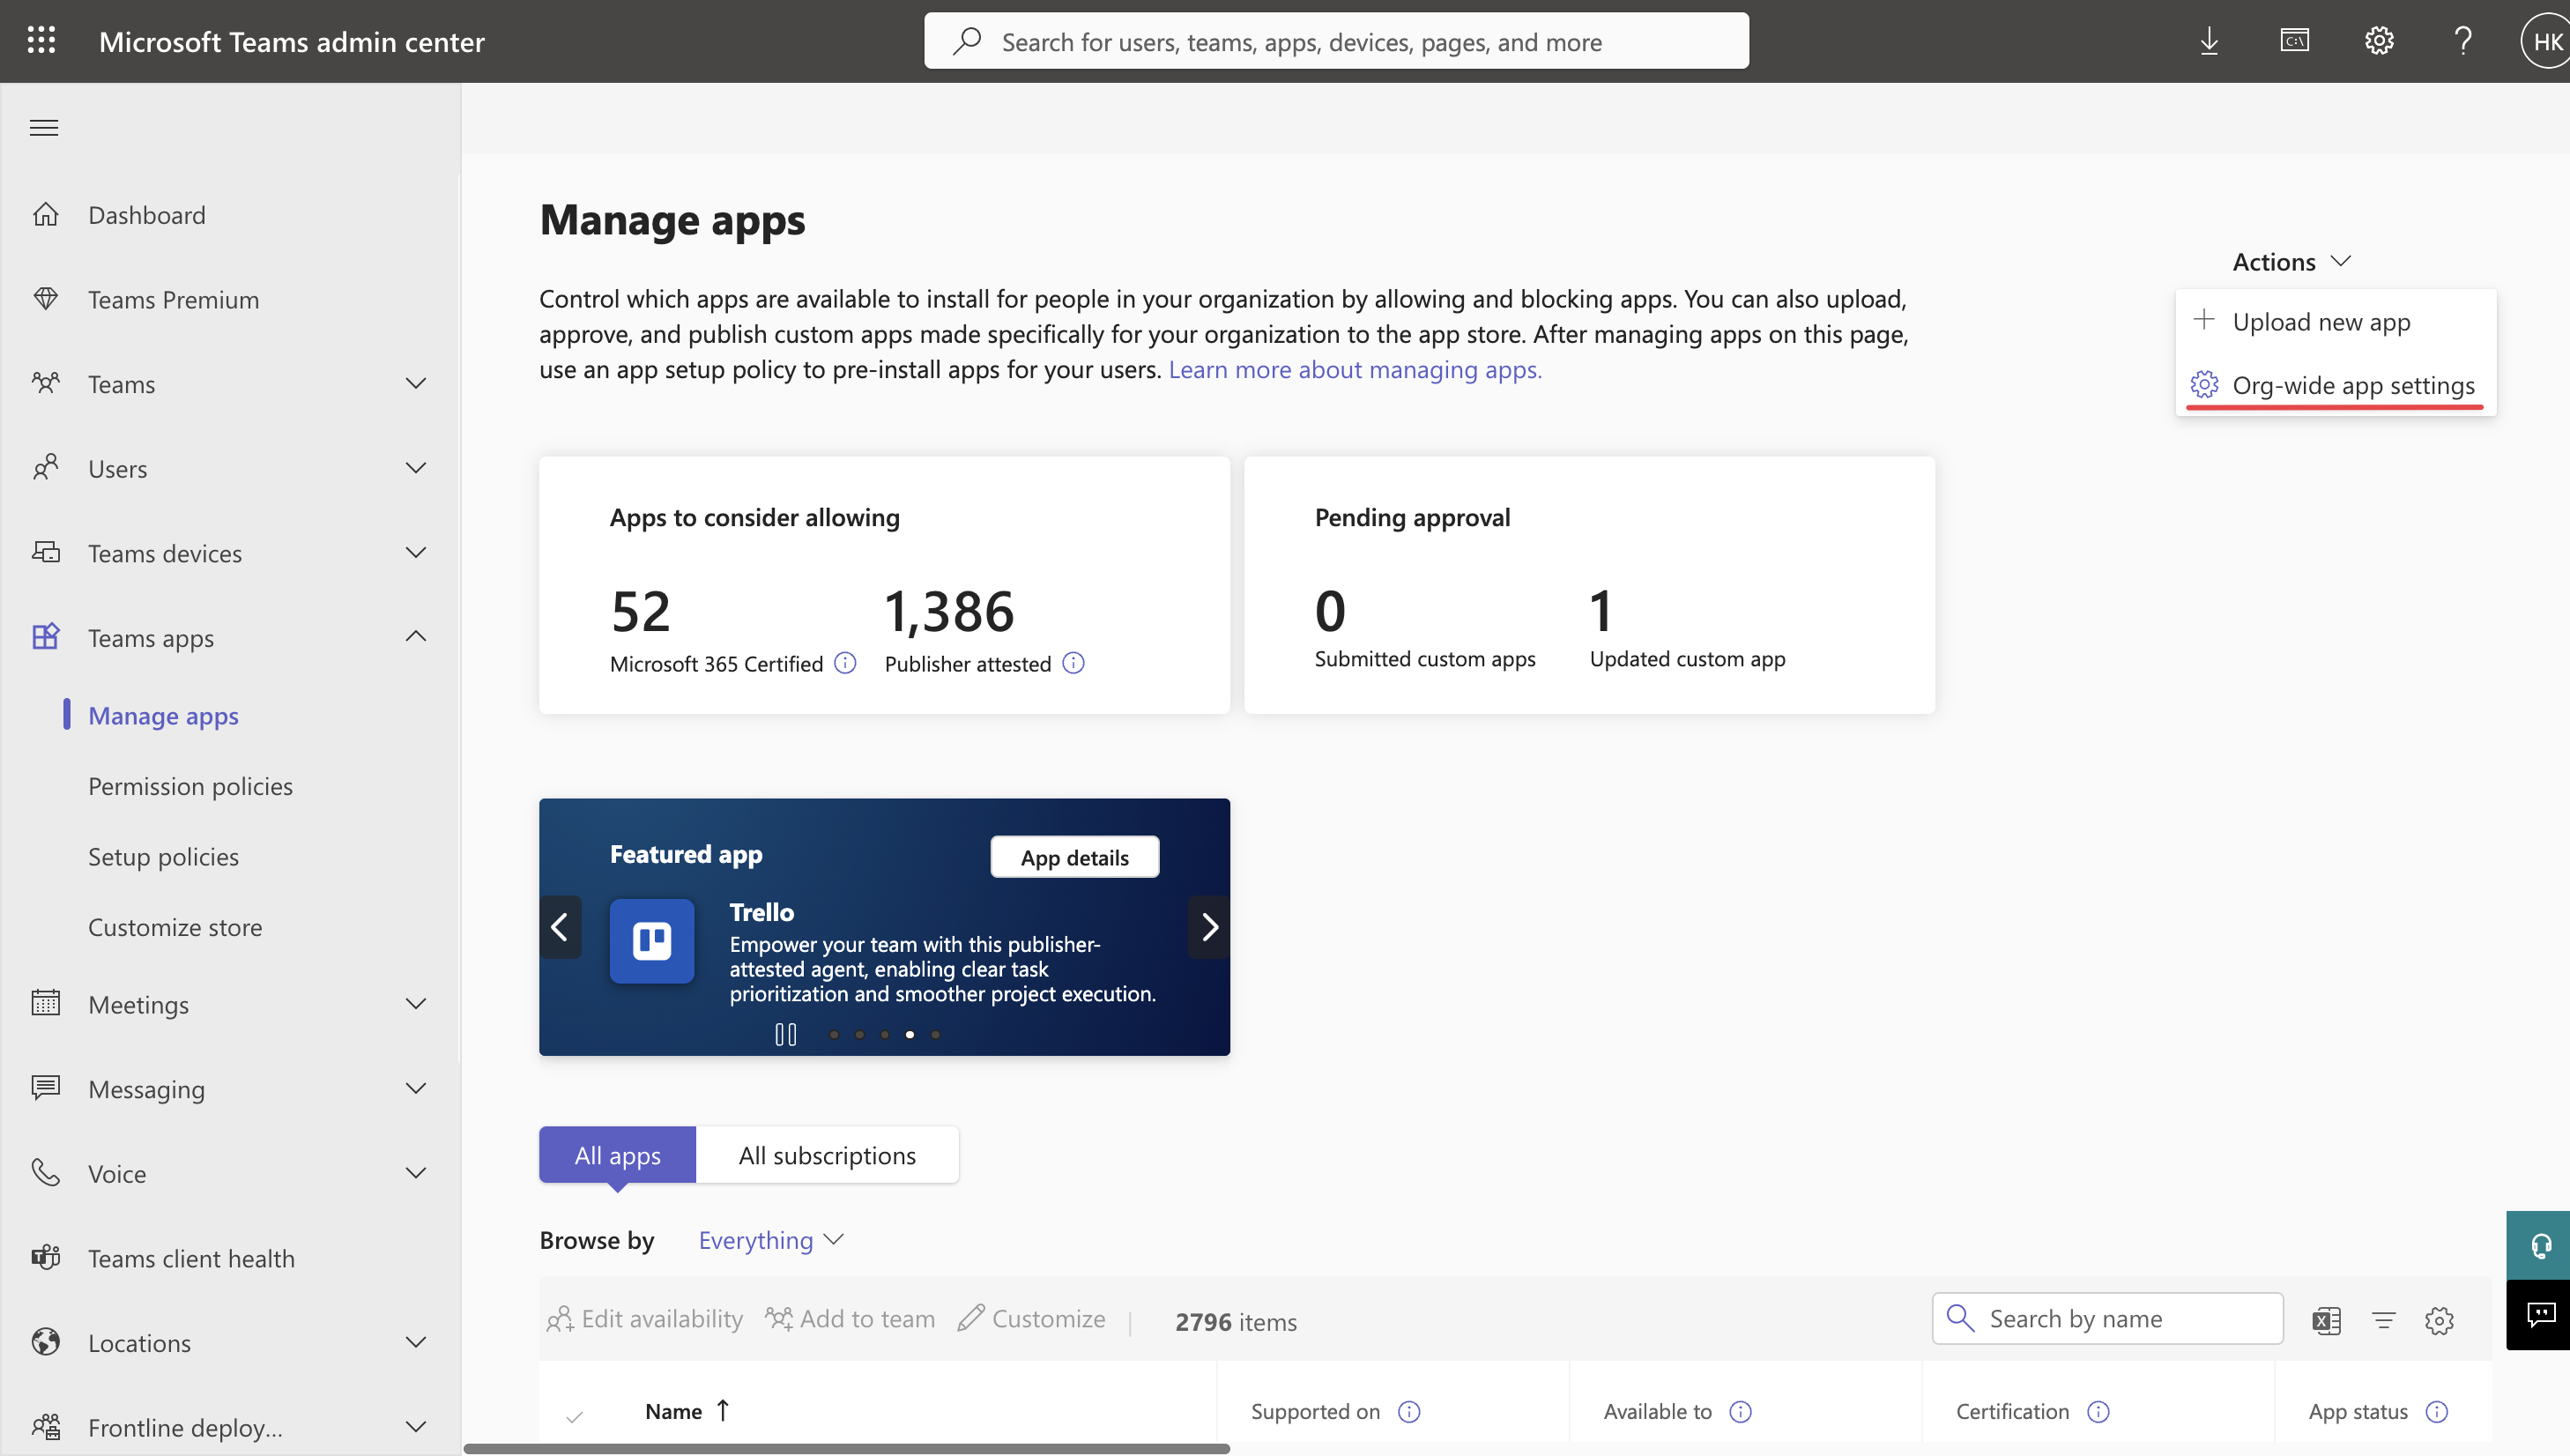
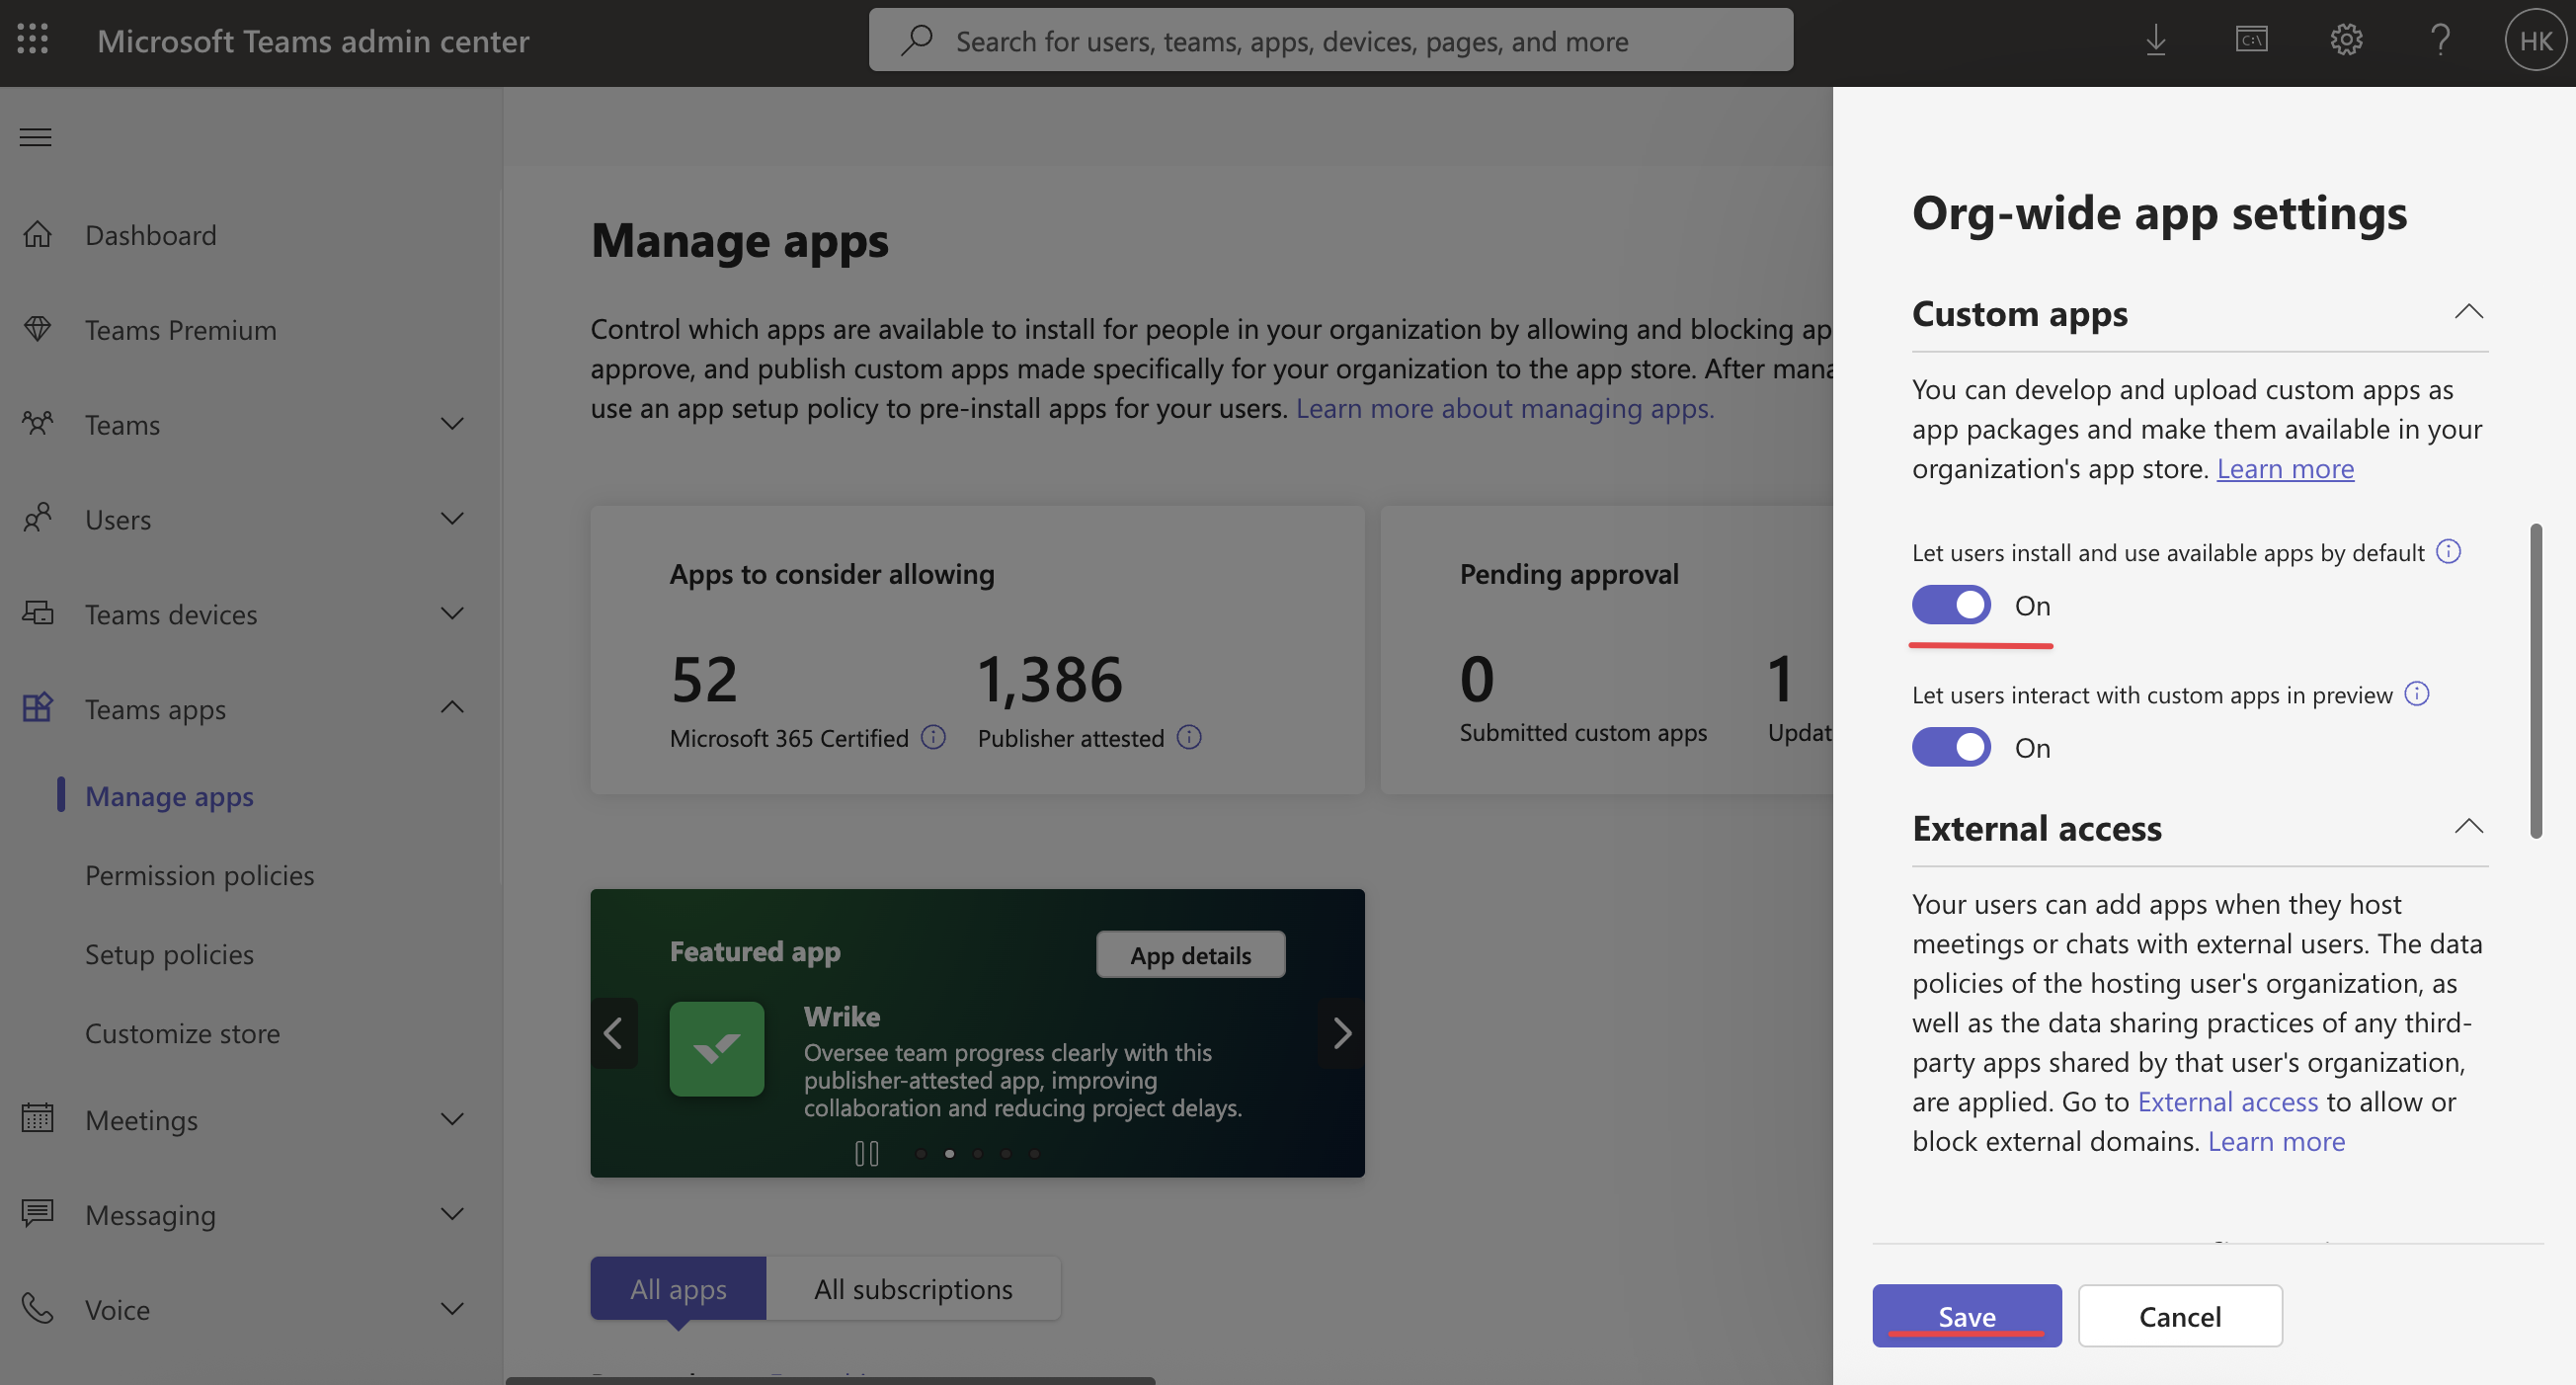
Step 3: adding the app to Teams
By default, Microsoft Teams only allows installing apps from the official store. To make a custom app (for example, a bot for customer communication) appear in Teams and be available for installation, enable the appropriate setting as described in this step.
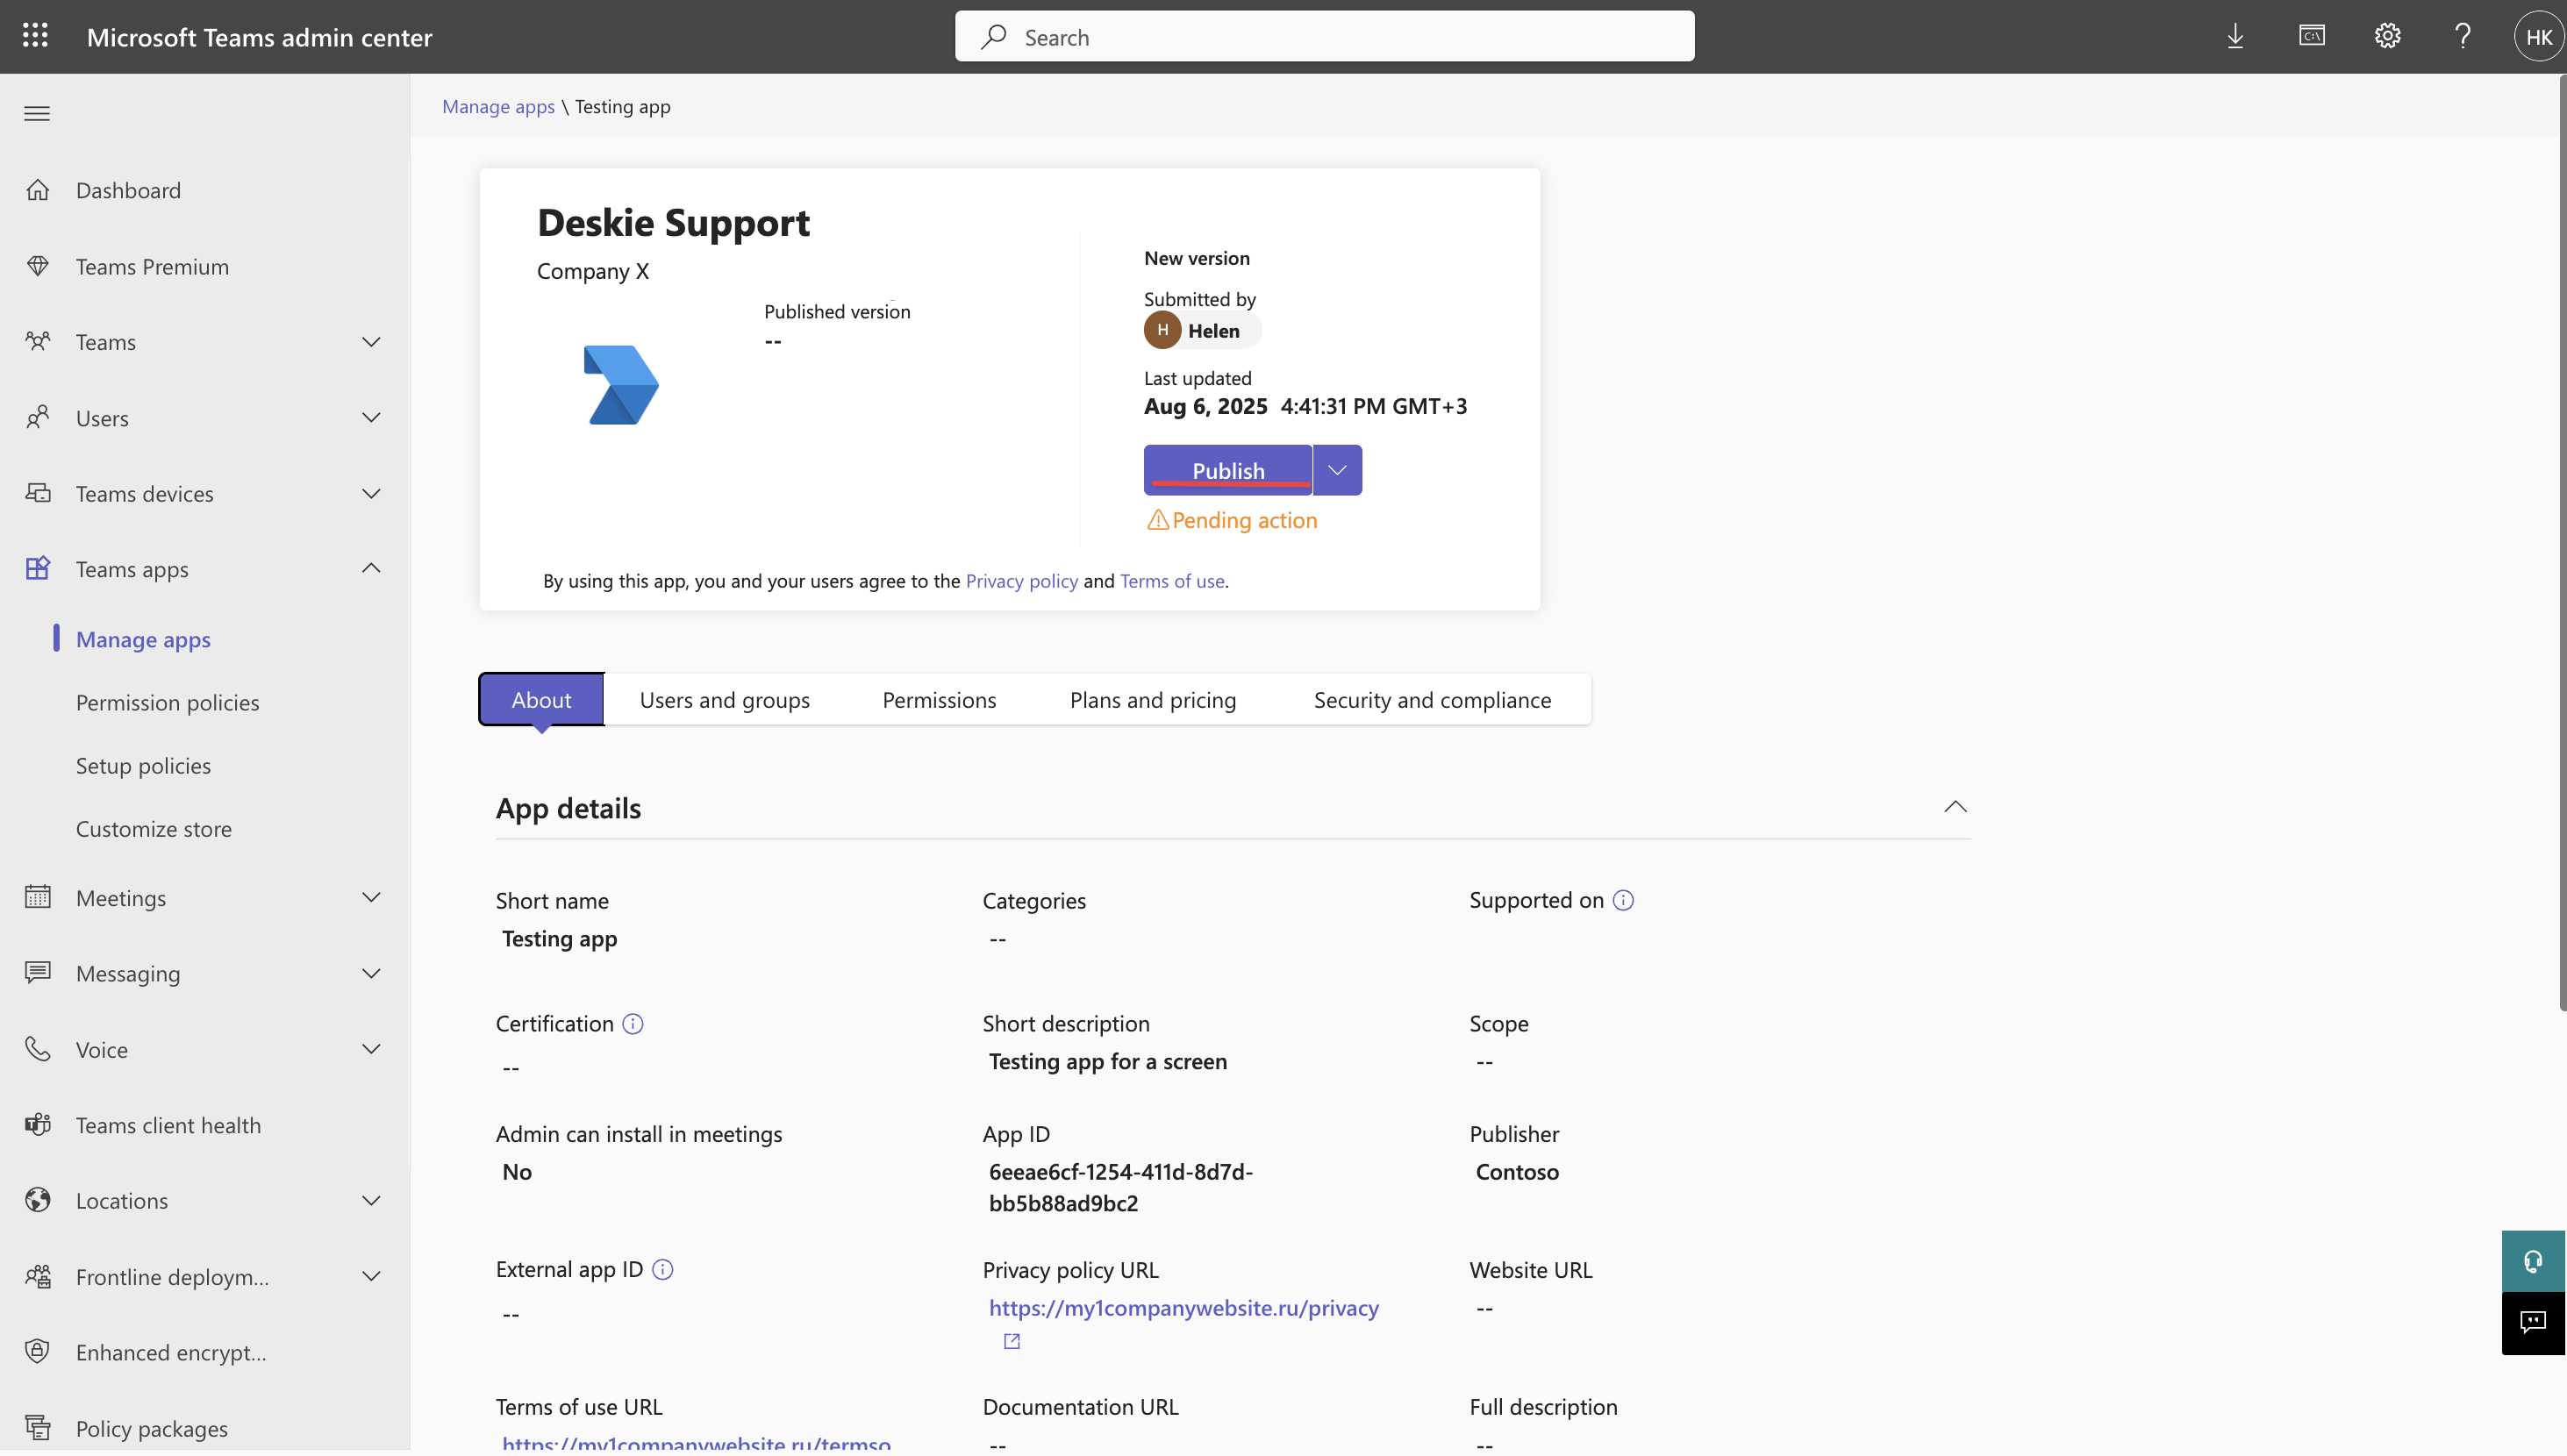
2. Before adding the app to the workspace, you need to unblock the app. To do this, go to the "Manage apps" subsection, enter the app name in the search box → in the search results, click on the app name:
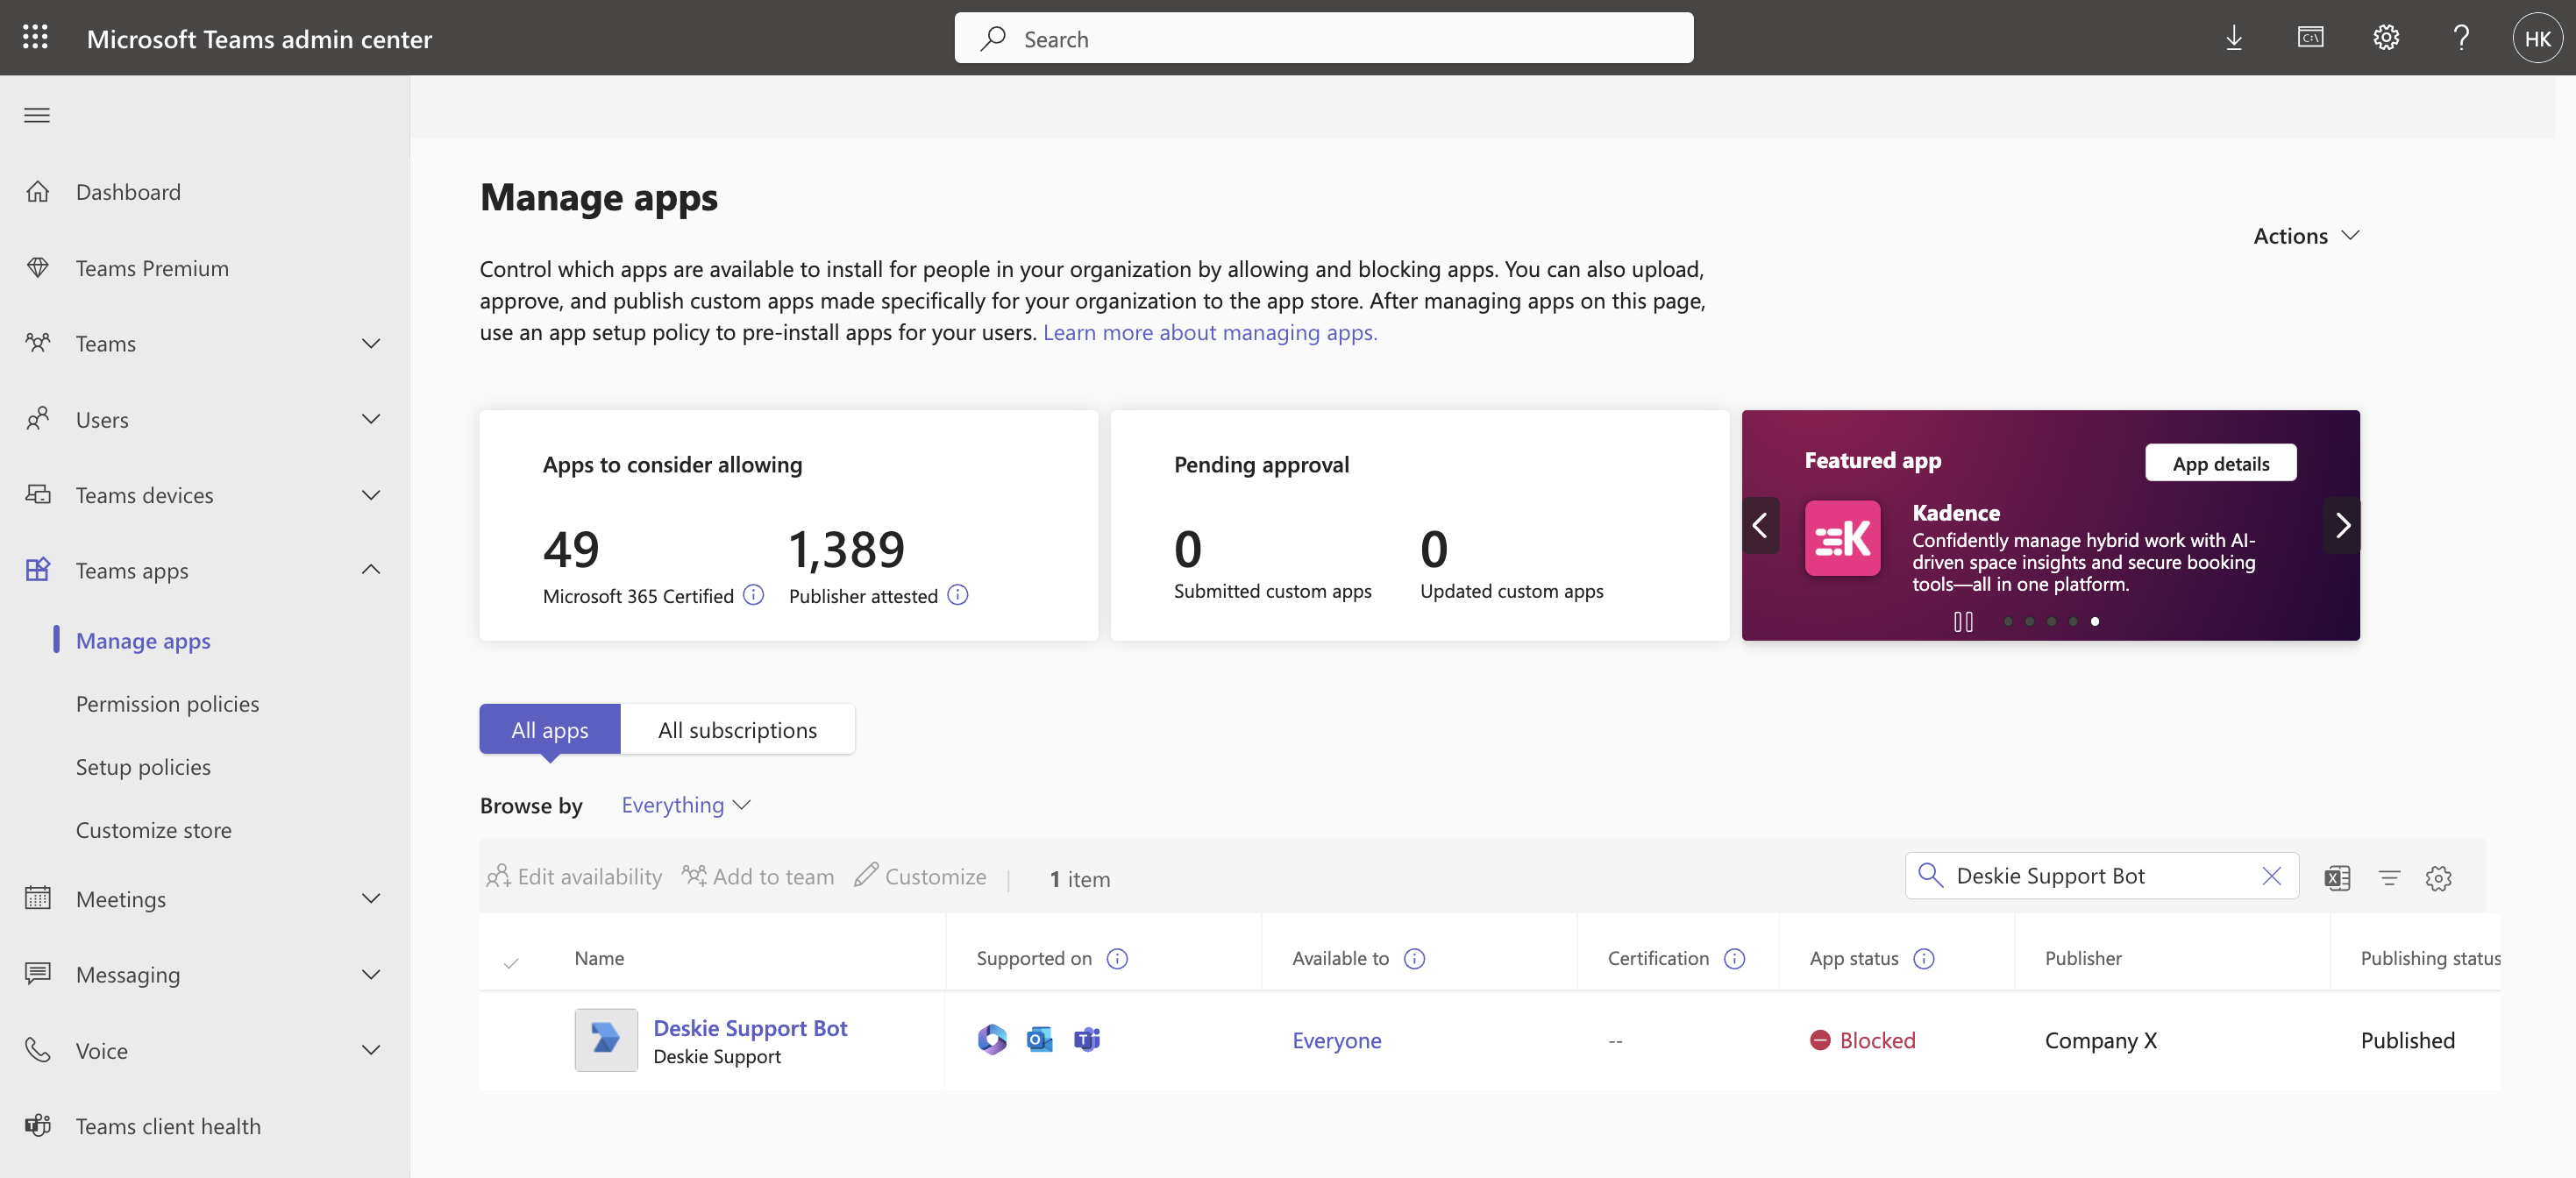
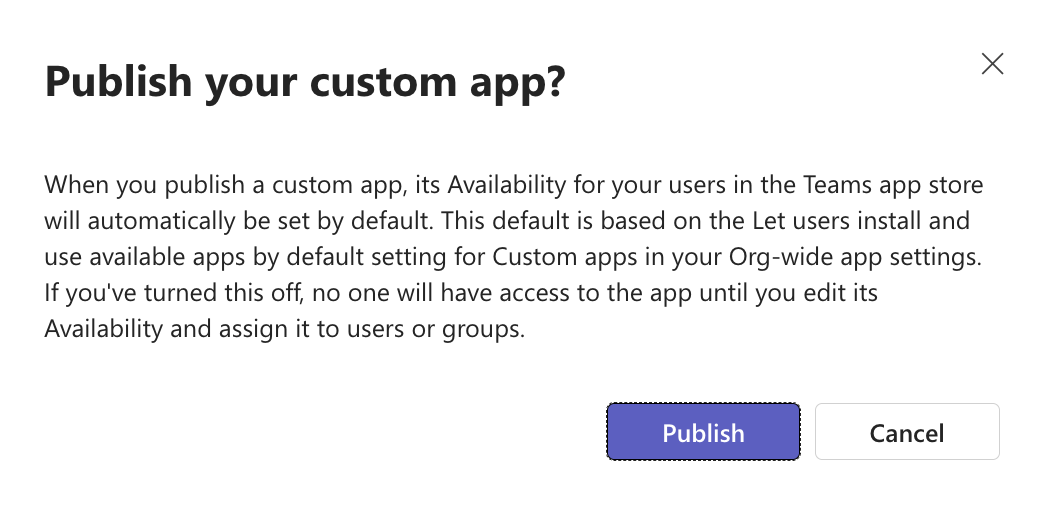
3. Click the "Publish" button and confirm the action in the modal window.
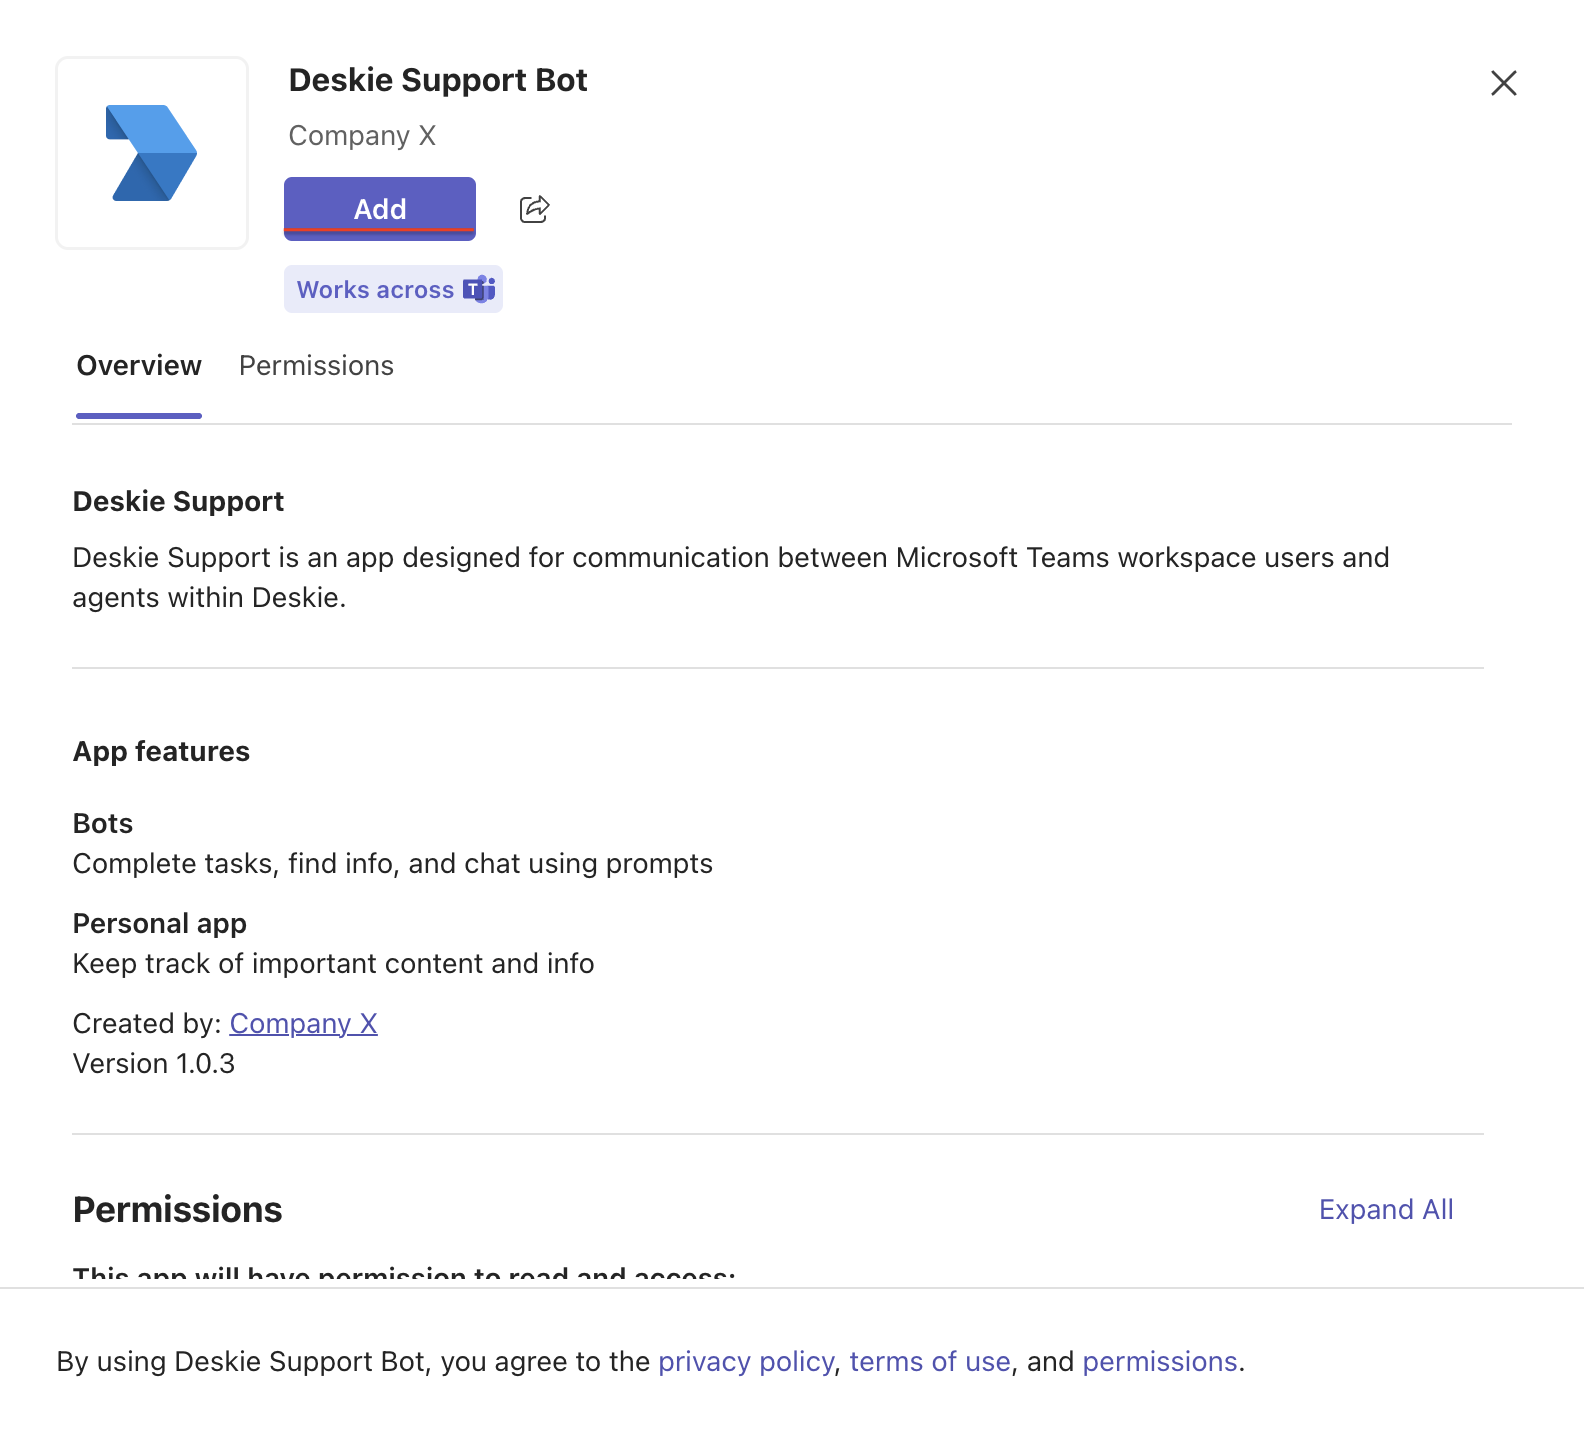
4. Open your Microsoft Teams workspace in a browser or desktop app (a restart may be required). Go to the "Apps" tab, find the required app in the list of apps created for your organization, and click "Add". In the window that opens, click "Add" again to confirm.
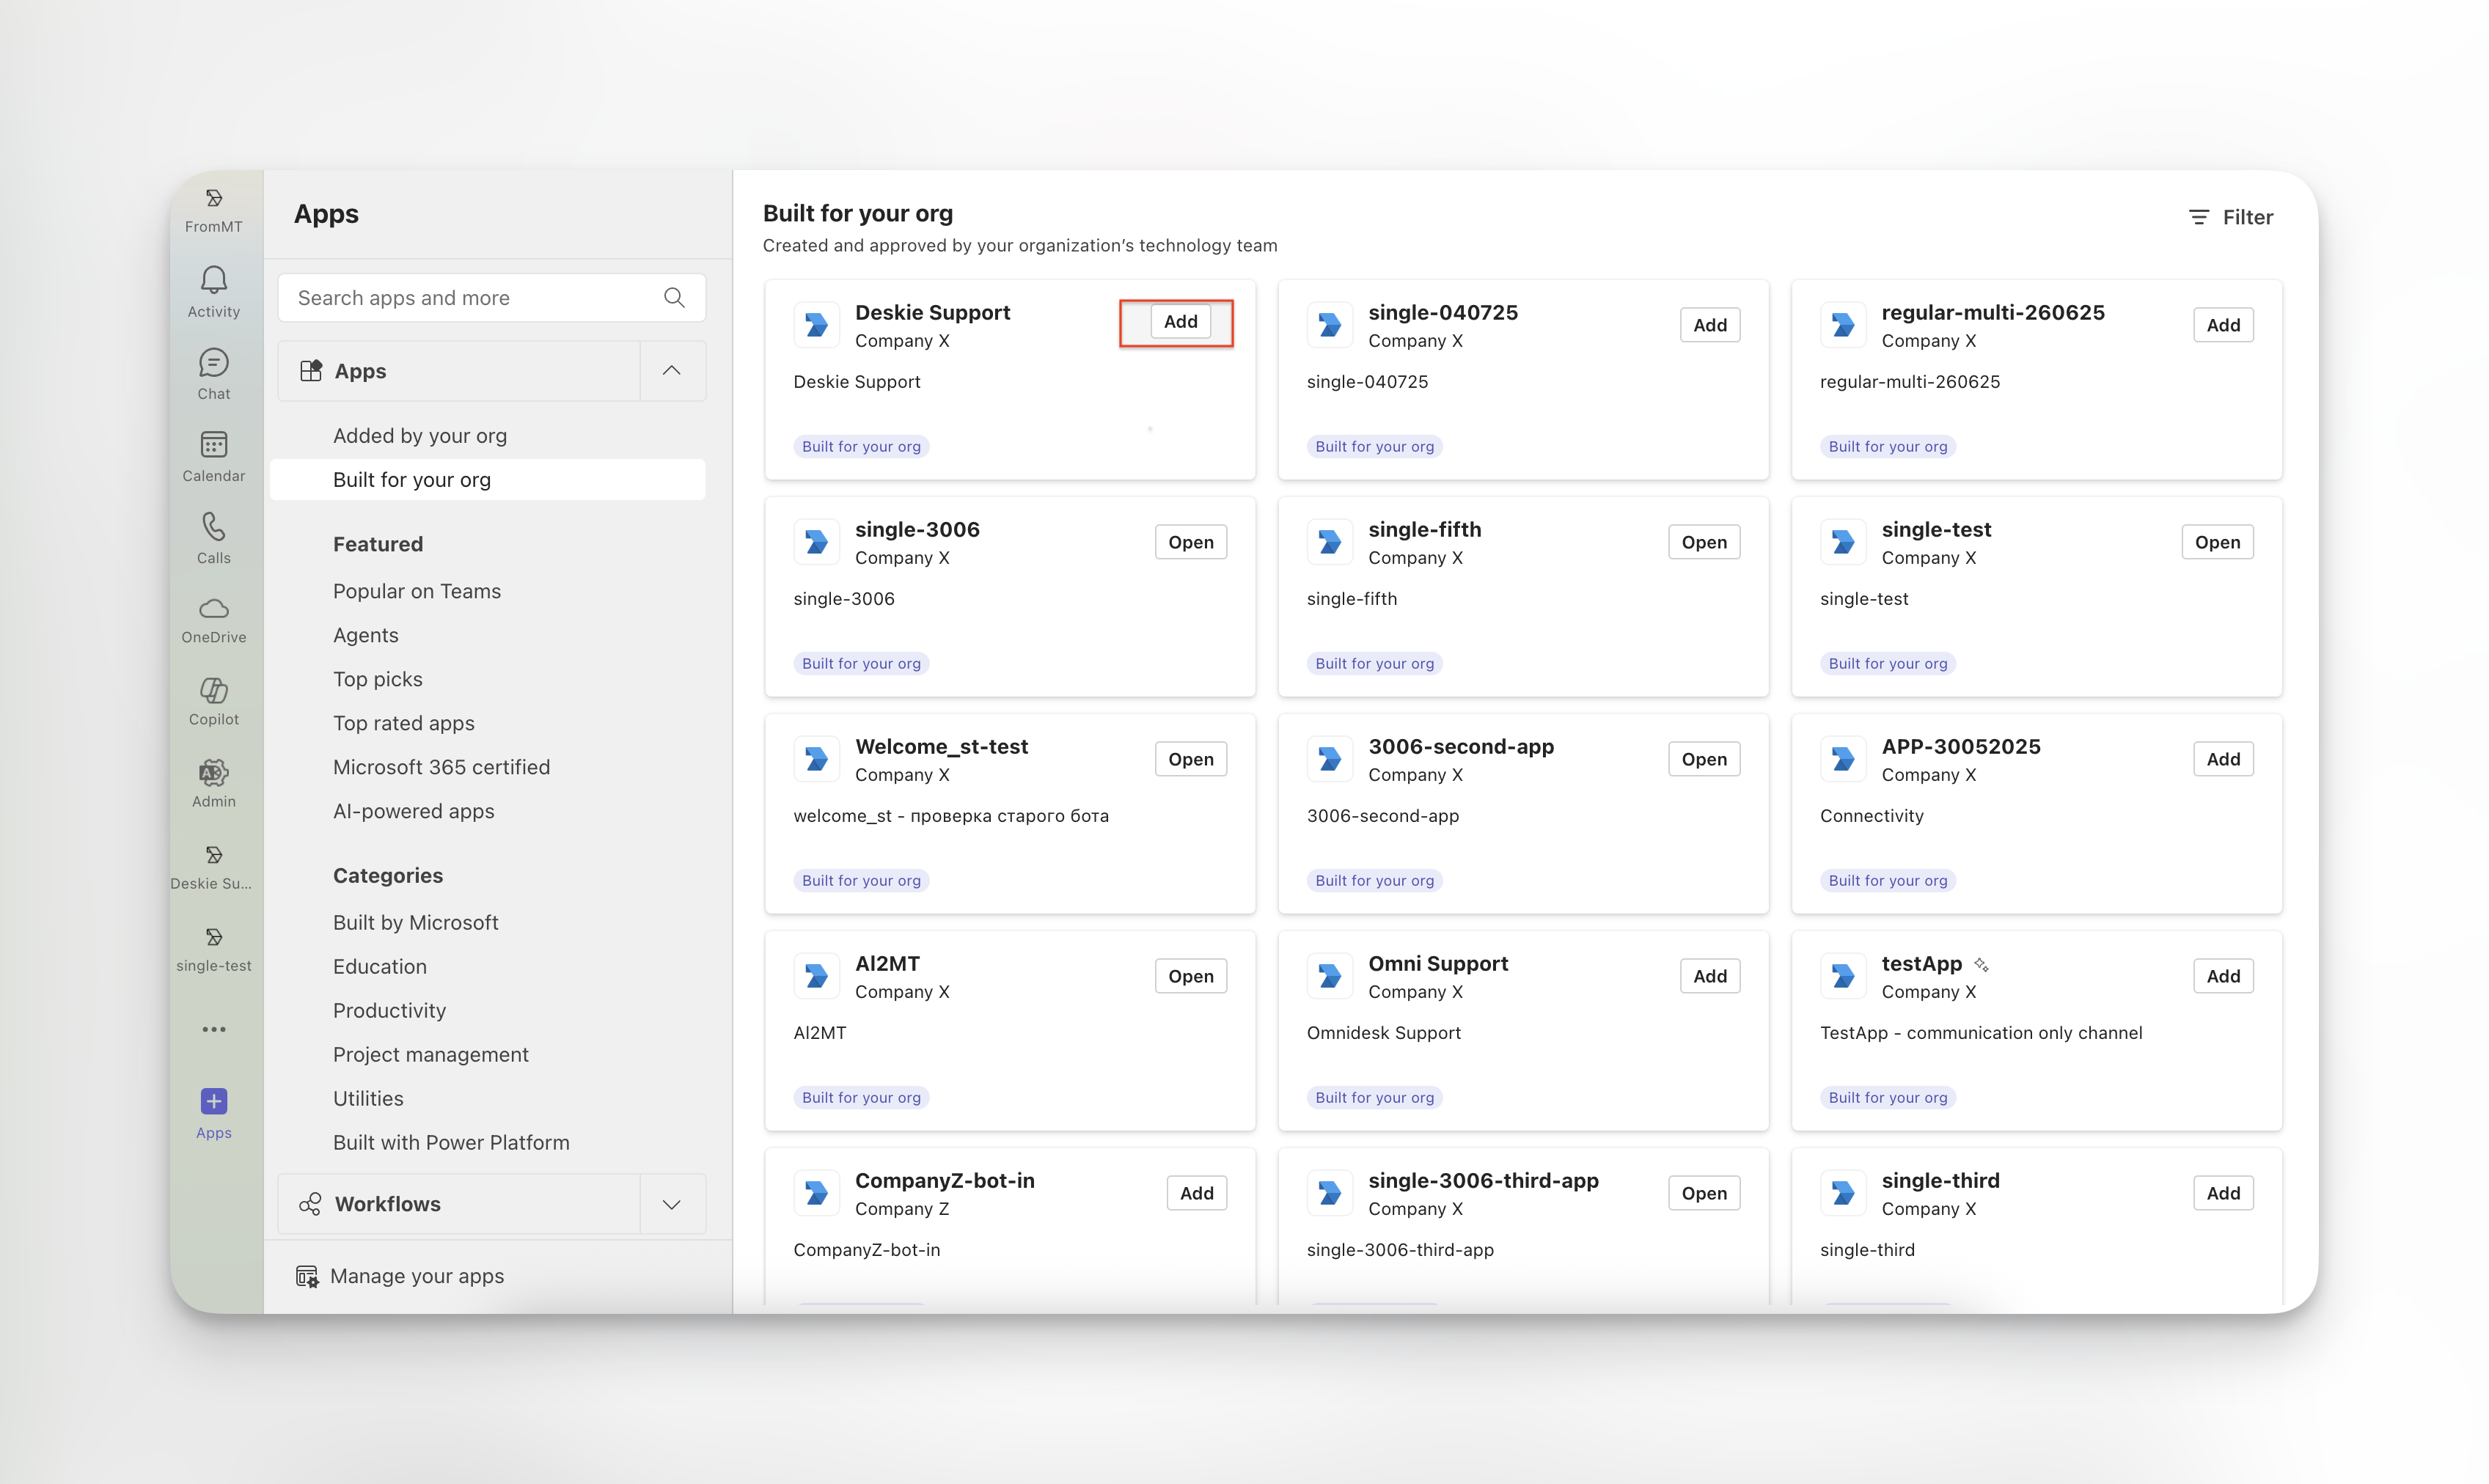
Please note that unlocking and publishing an app may take up to 48 hours, although it usually takes just a few hours. To get the app faster, you can add it through global or custom app policies. Example
5. After adding the app, Teams will prompt you to choose where exactly to open it:
- in a personal chat,
- in a team channel,
- in a group chat.
If the desired chat or channel is not displayed, but you have selected it (see item 6 in step two), use the search or click the "View more" link.
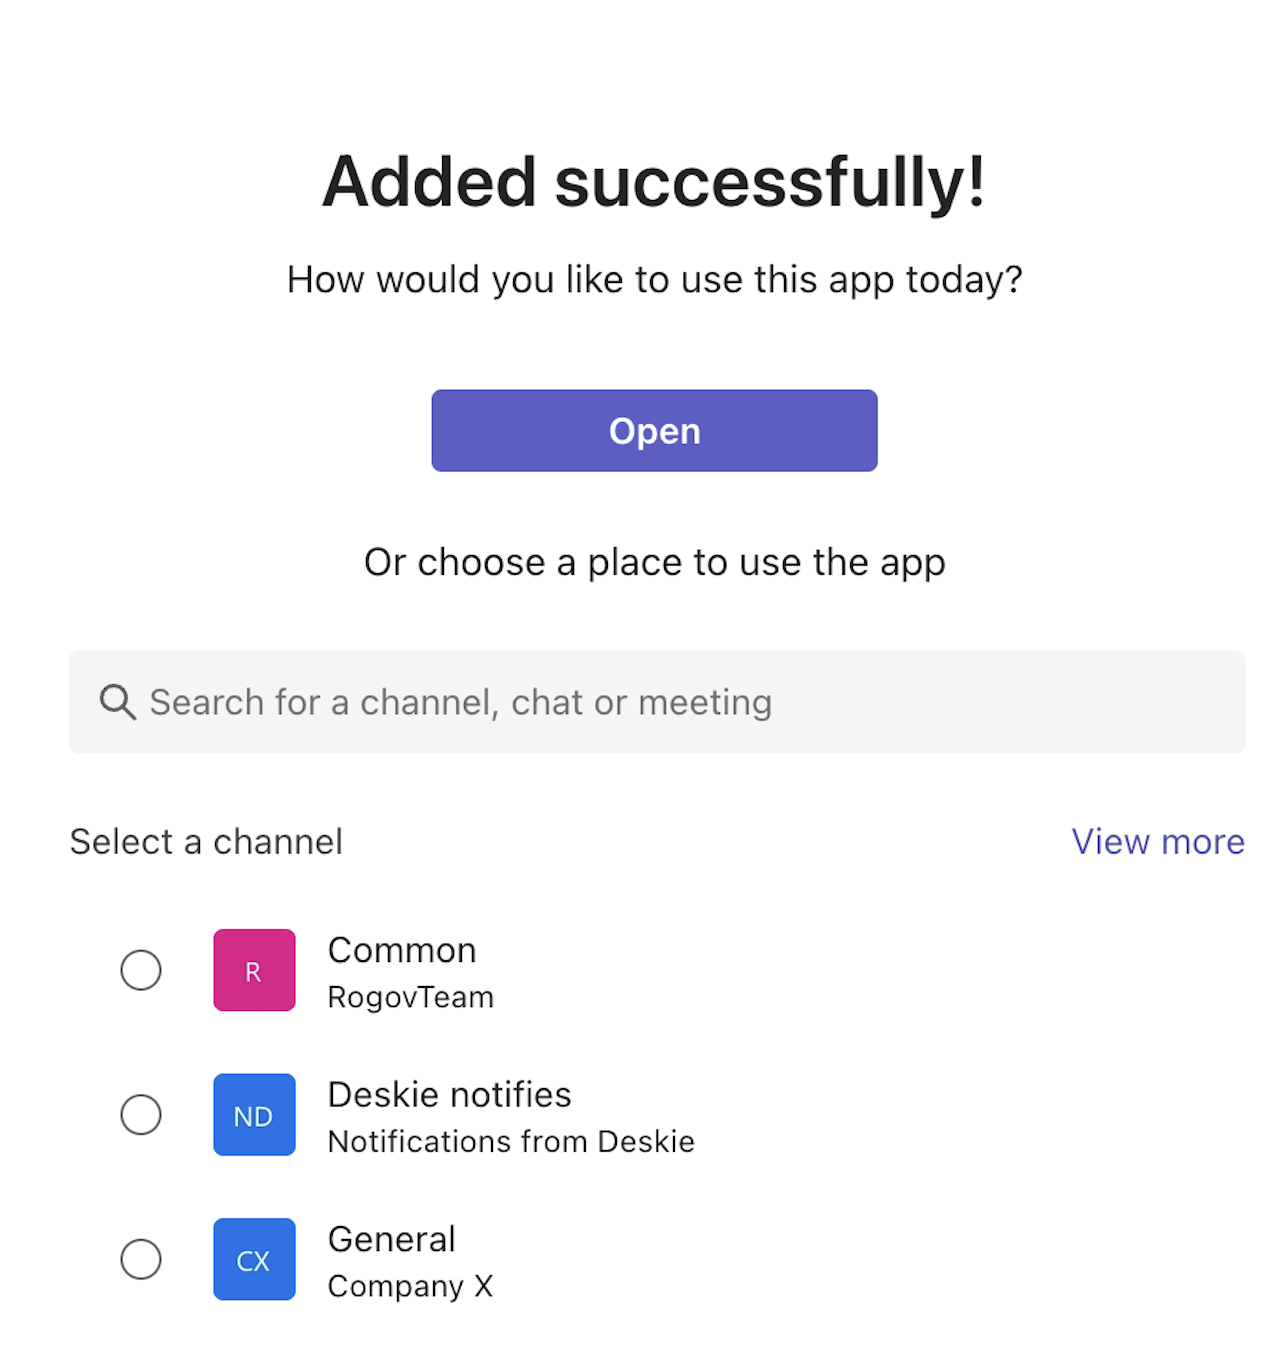
If you do not plan to open the app in group chats, the app will appear in the left-hand tab or will be available in the chat list after sending the first message to the app’s address.
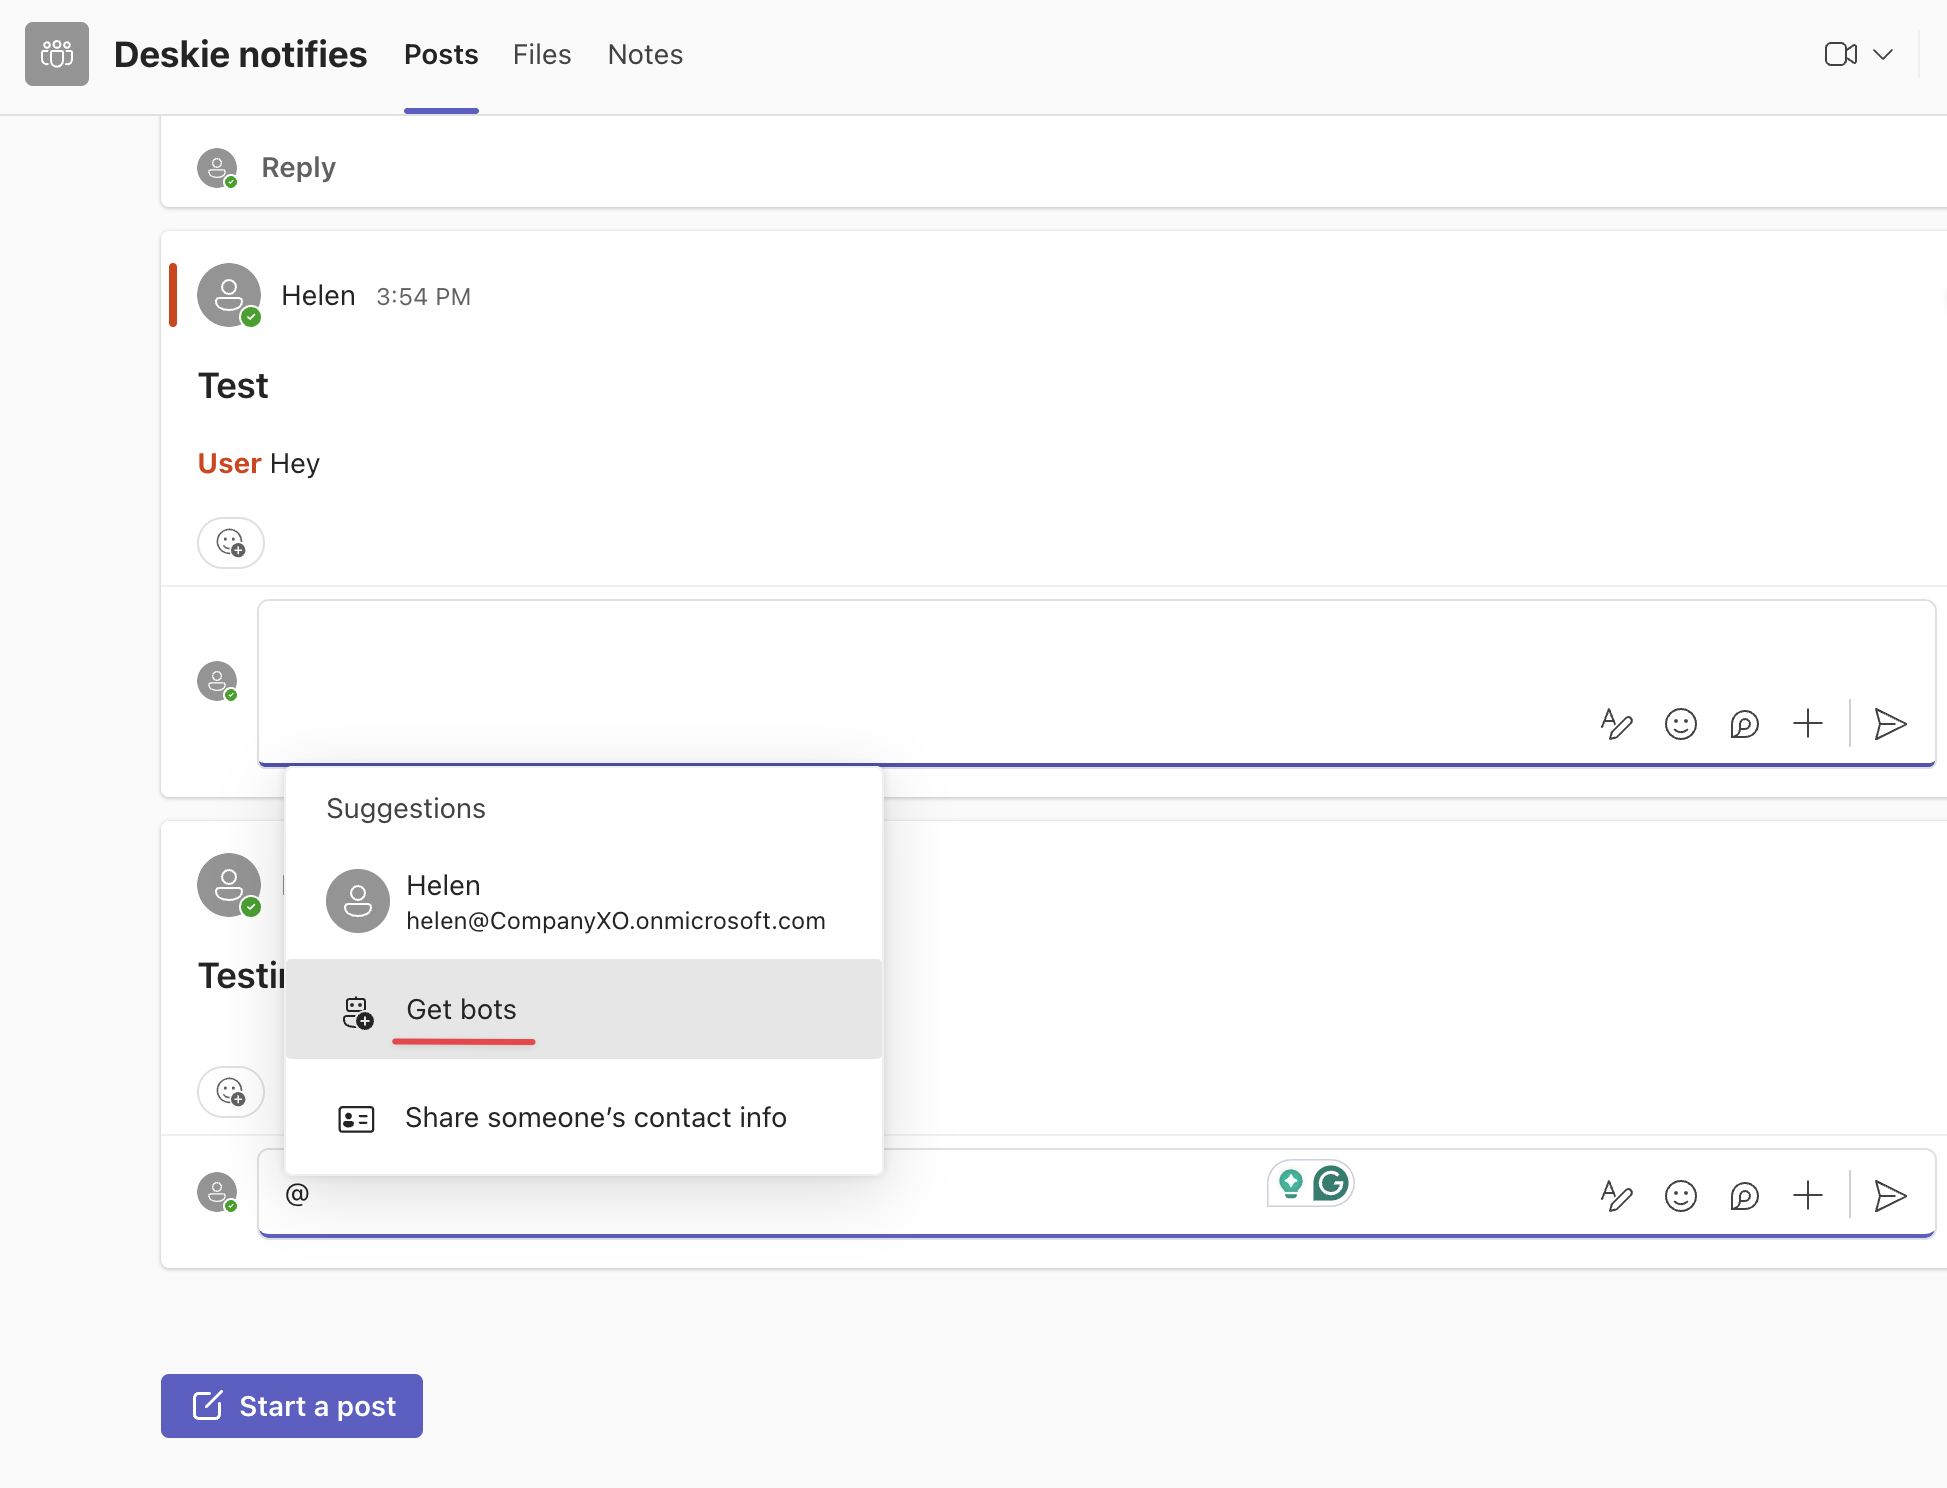

You can add an app only to standard channels. Microsoft Teams does not allow adding apps to shared or private channels.
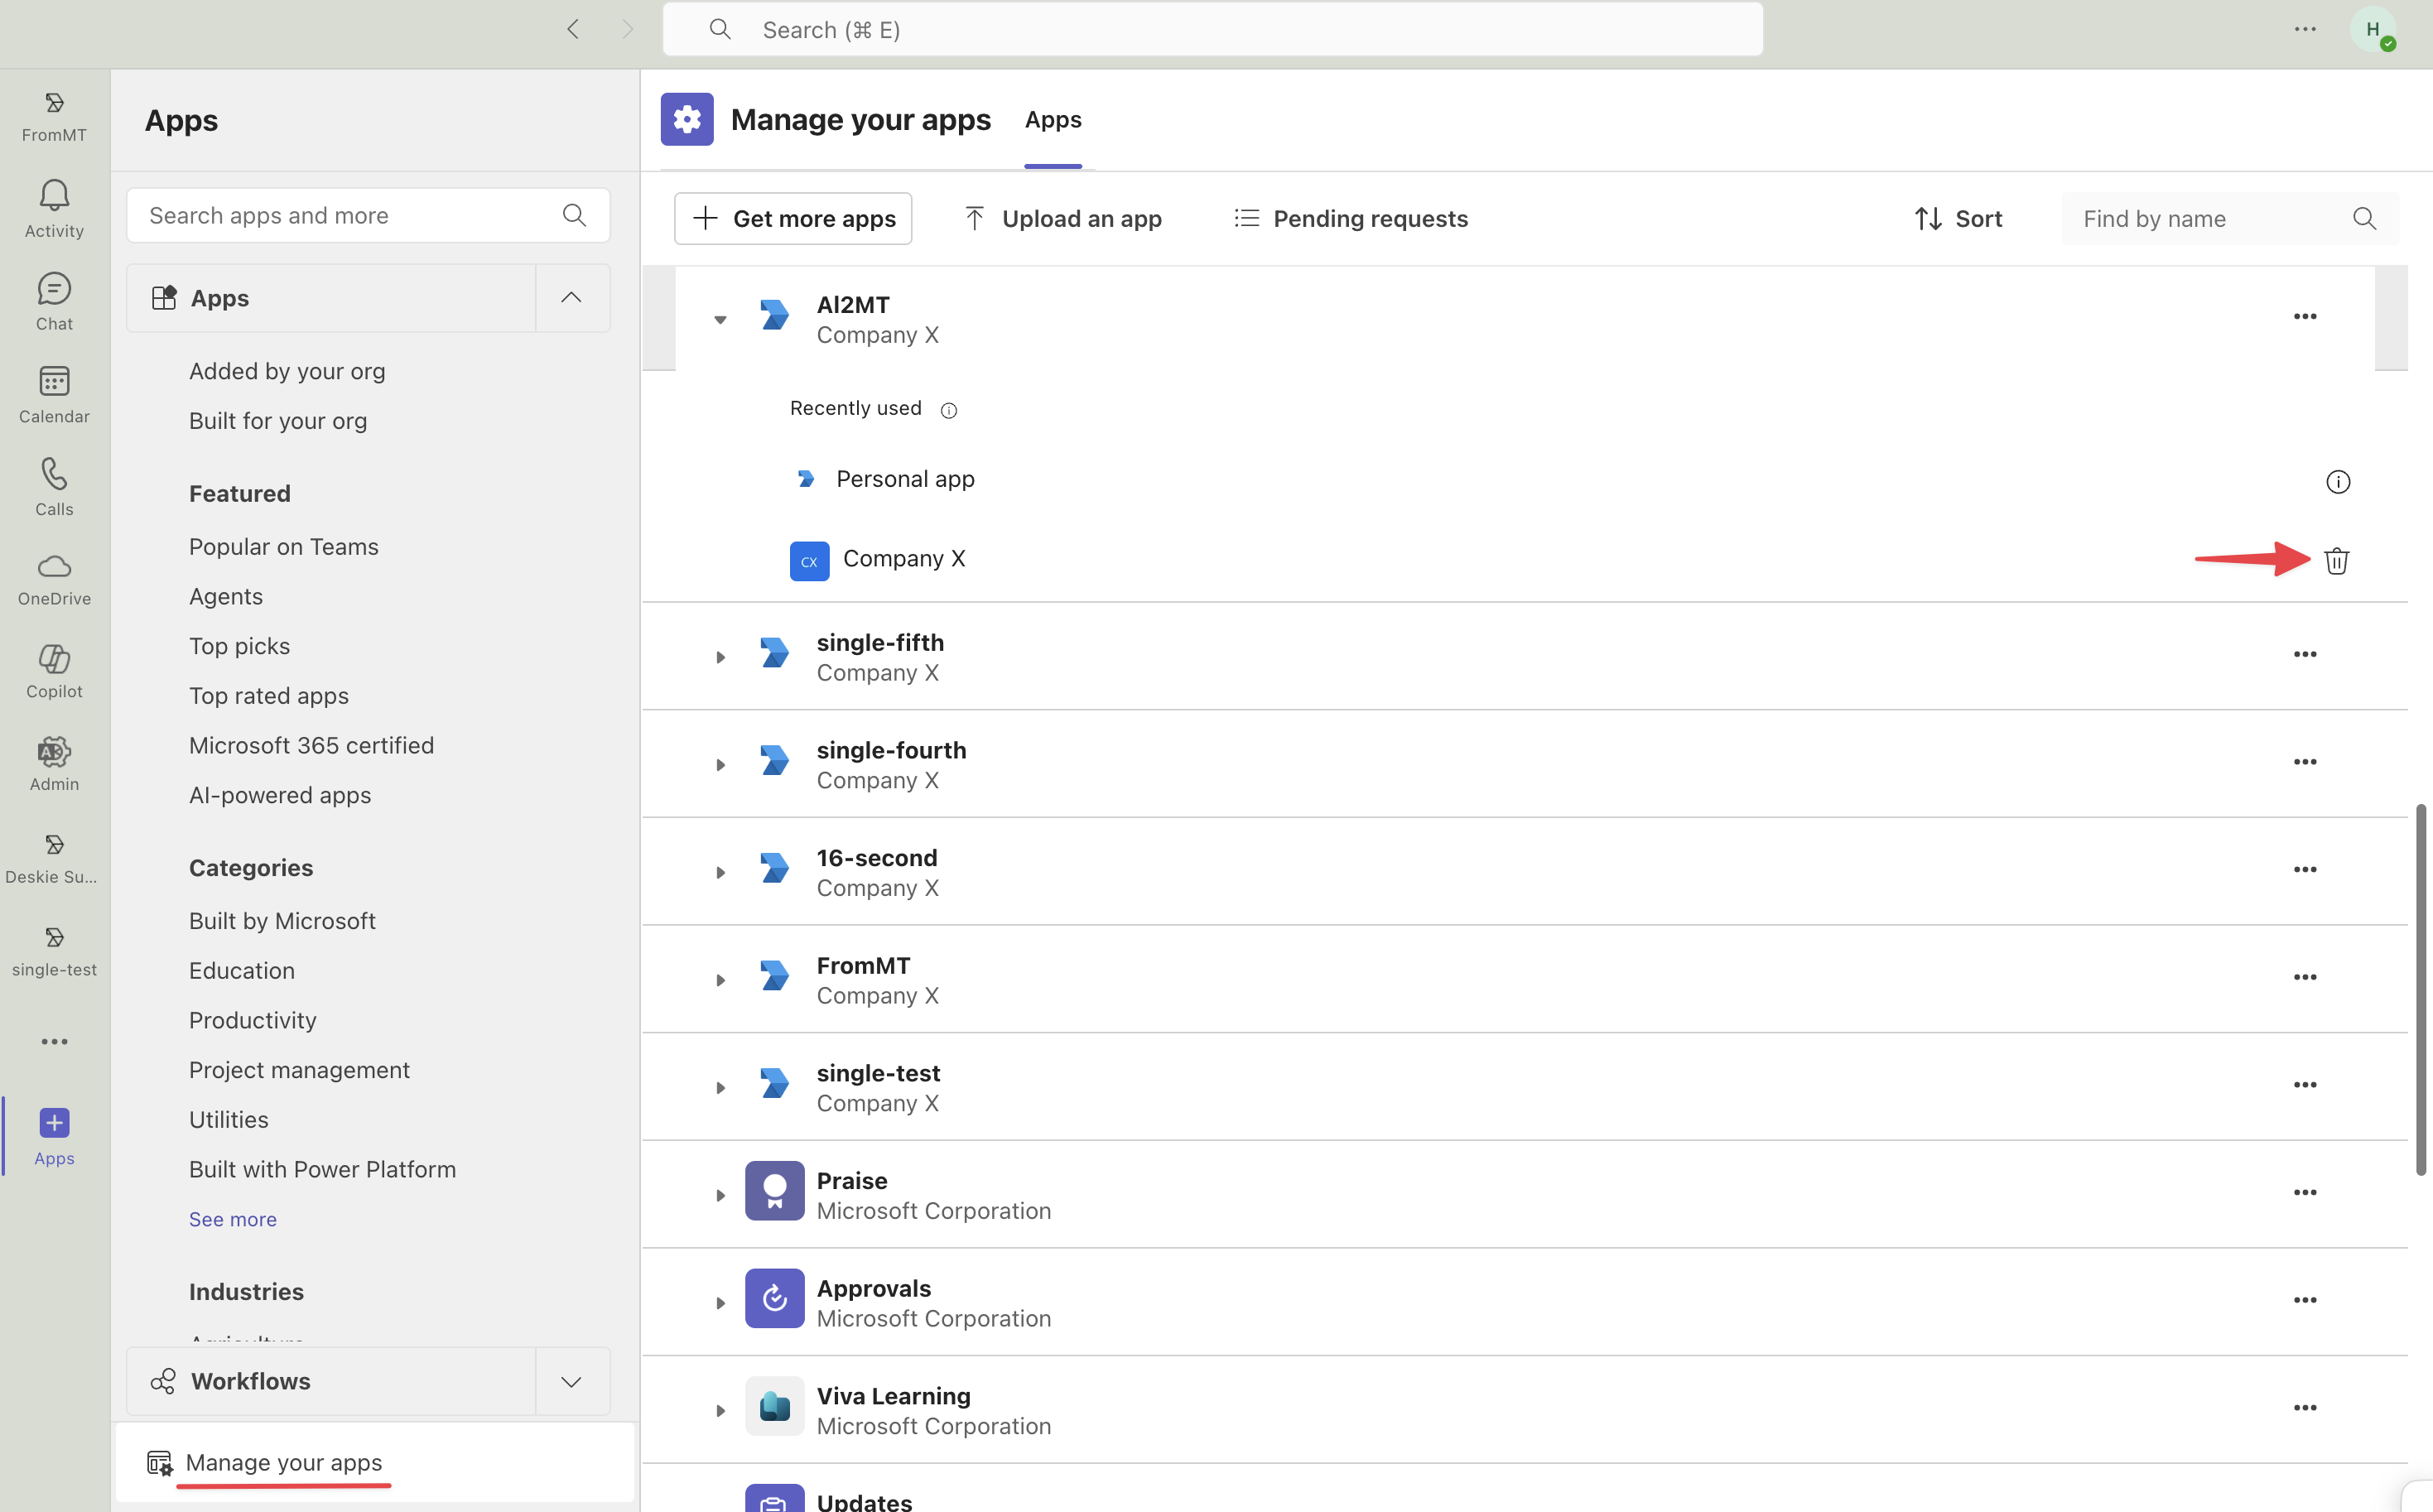
To remove an app from a channel or close a personal chat, go to the "Apps" tab → "Manage your apps" section → click on the desired app → delete one of the listed apps by clicking the delete icon.
6. After adding the app, send a message to the bot in any way so that all the necessary data about your workspace is transmitted to Deskie.
Step 4: Microsoft Graph API permissions
To ensure the bot works correctly, it needs to be granted access to Microsoft Graph API with the required permissions. Without these permissions, the bot won’t be able to, for example, insert the channel name into the case subject, nor will it be able to initiate communication from Deskie. The setup can be done in two ways:
Starting July 31, 2025, Microsoft will no longer allow the creation of multitenant applications (the "Multiple clients" option). However, multitenant bots that are already created will continue to work.
For new bots, this means limited Microsoft Graph API capabilities when working with other workspaces – they won’t be able to create outgoing cases or pull group chat or channel names to include in case subjects.
Option 1— through Microsoft Entra
1. Go to the Microsoft Entra Admin Center → navigate to the "App registration" section → open the "All applications" tab and select the application through which you want to create outgoing cases.
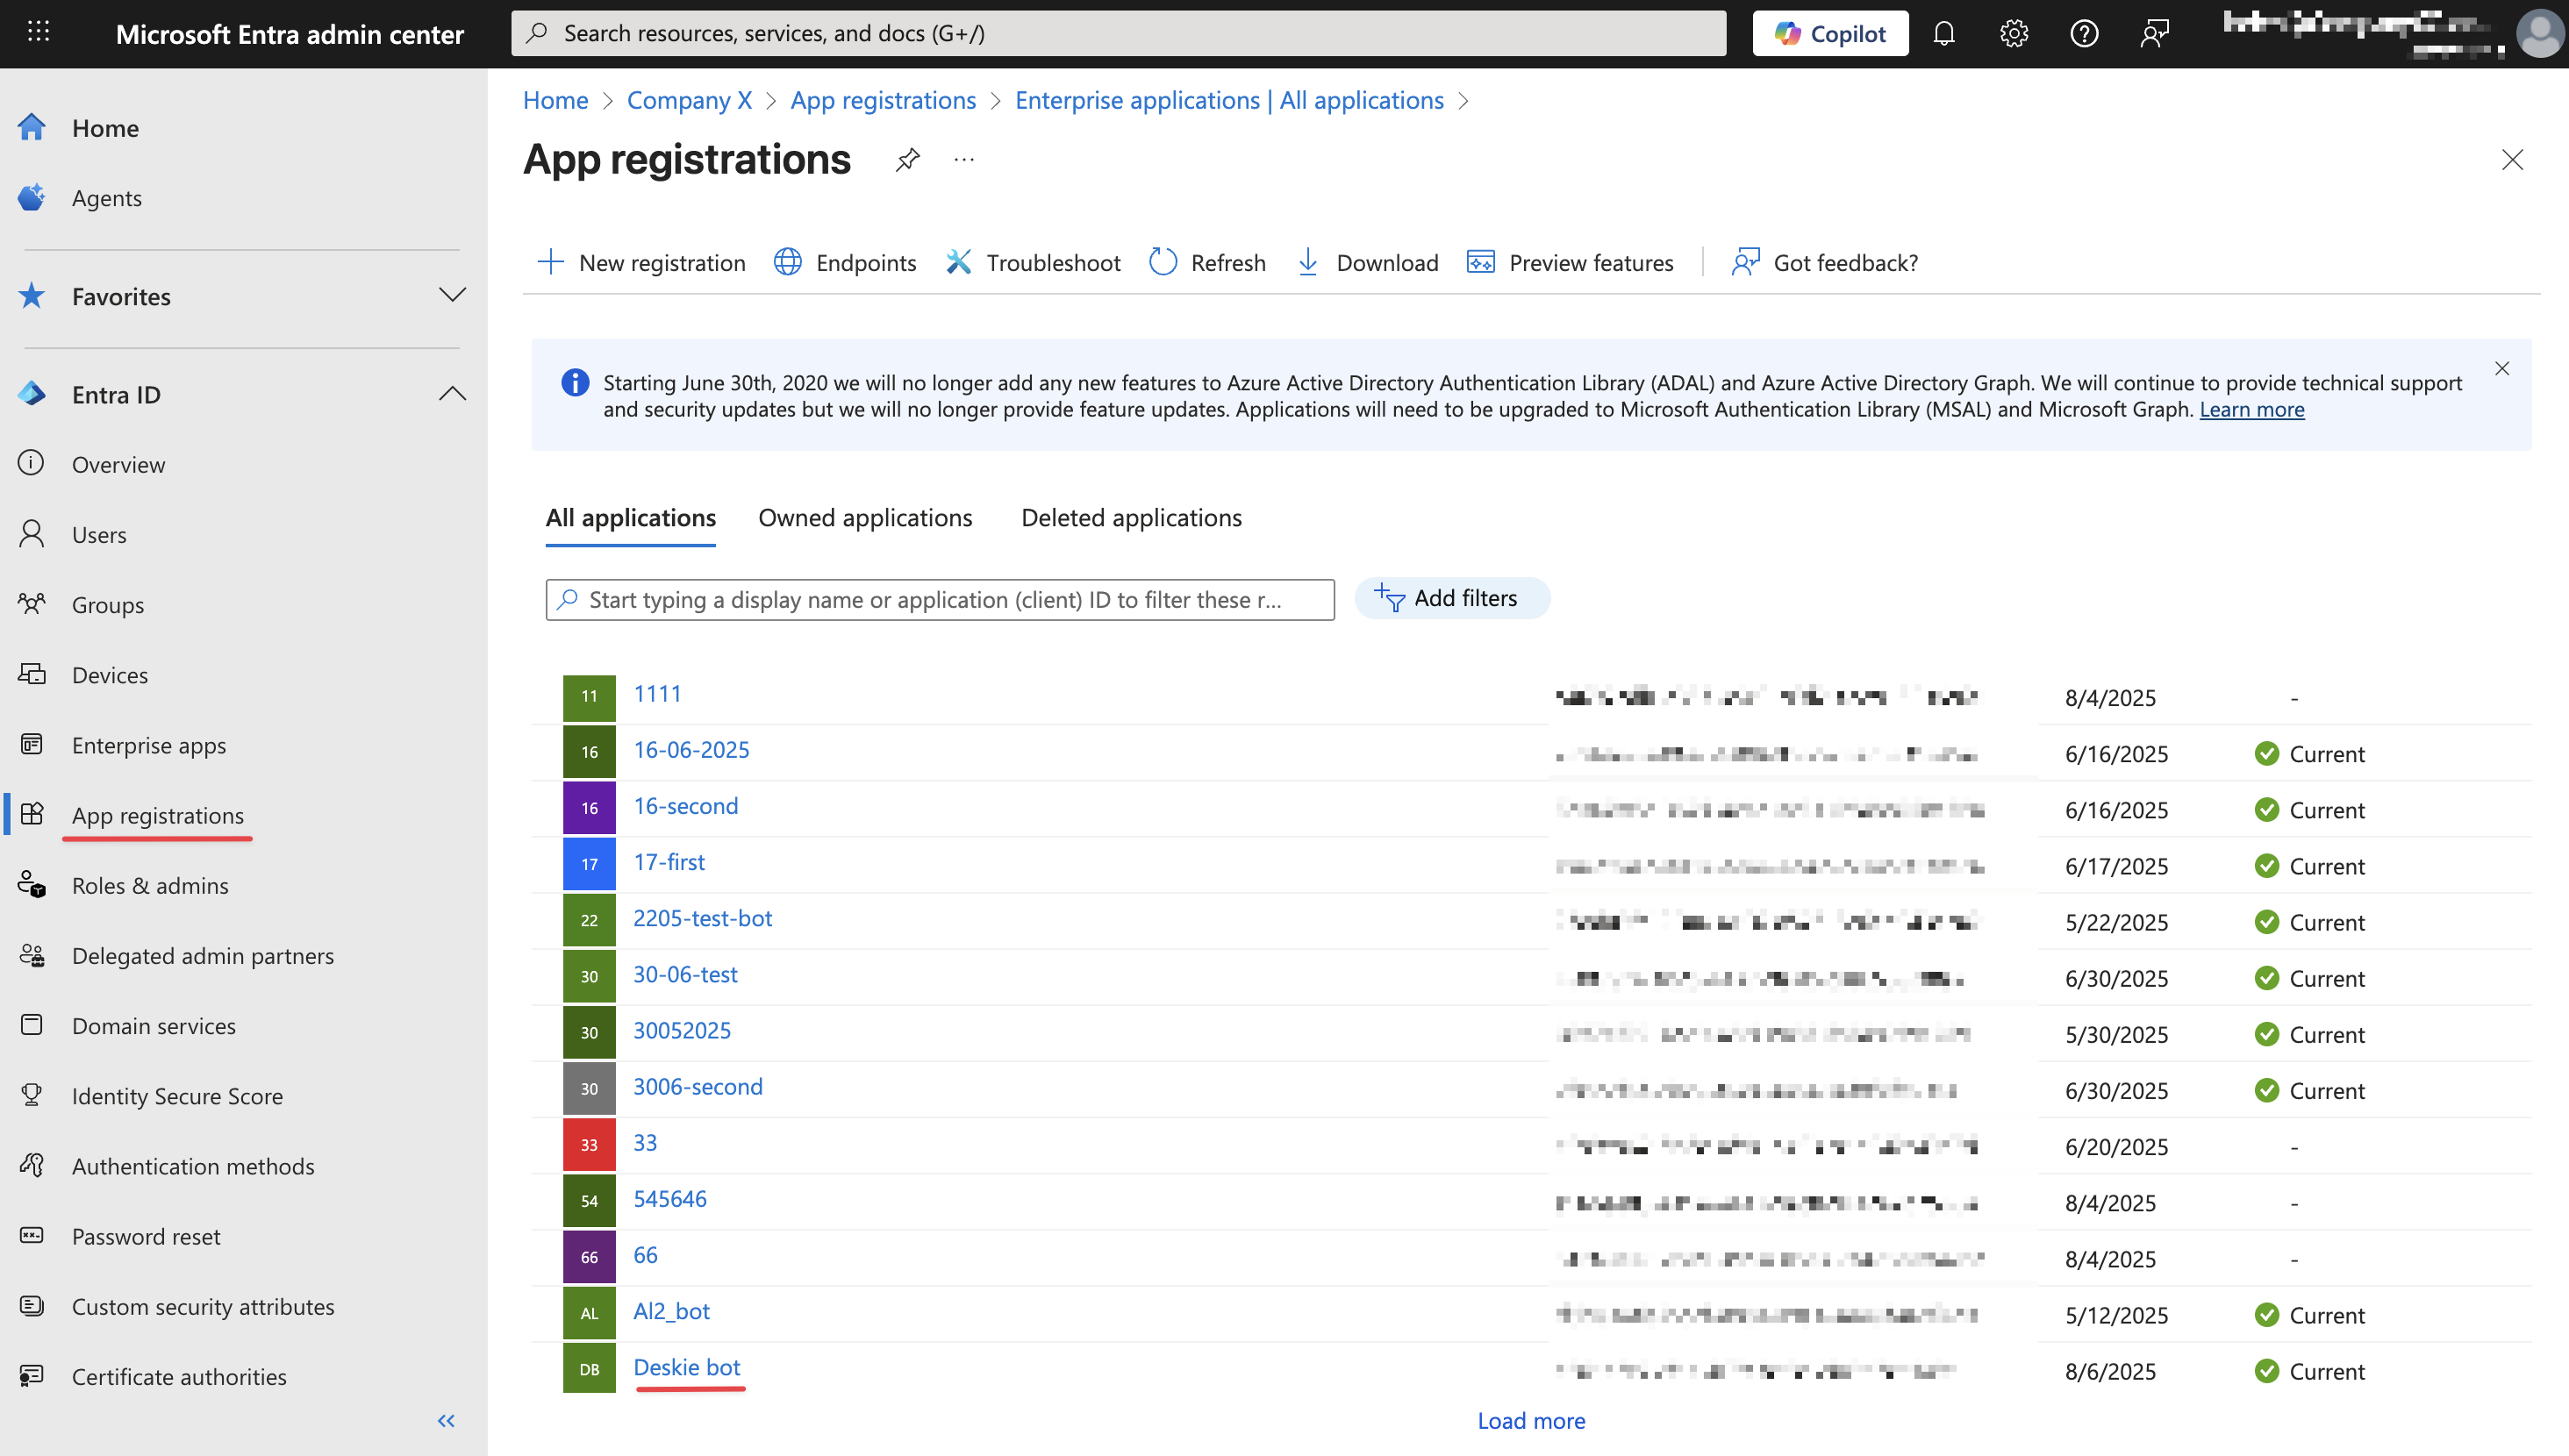
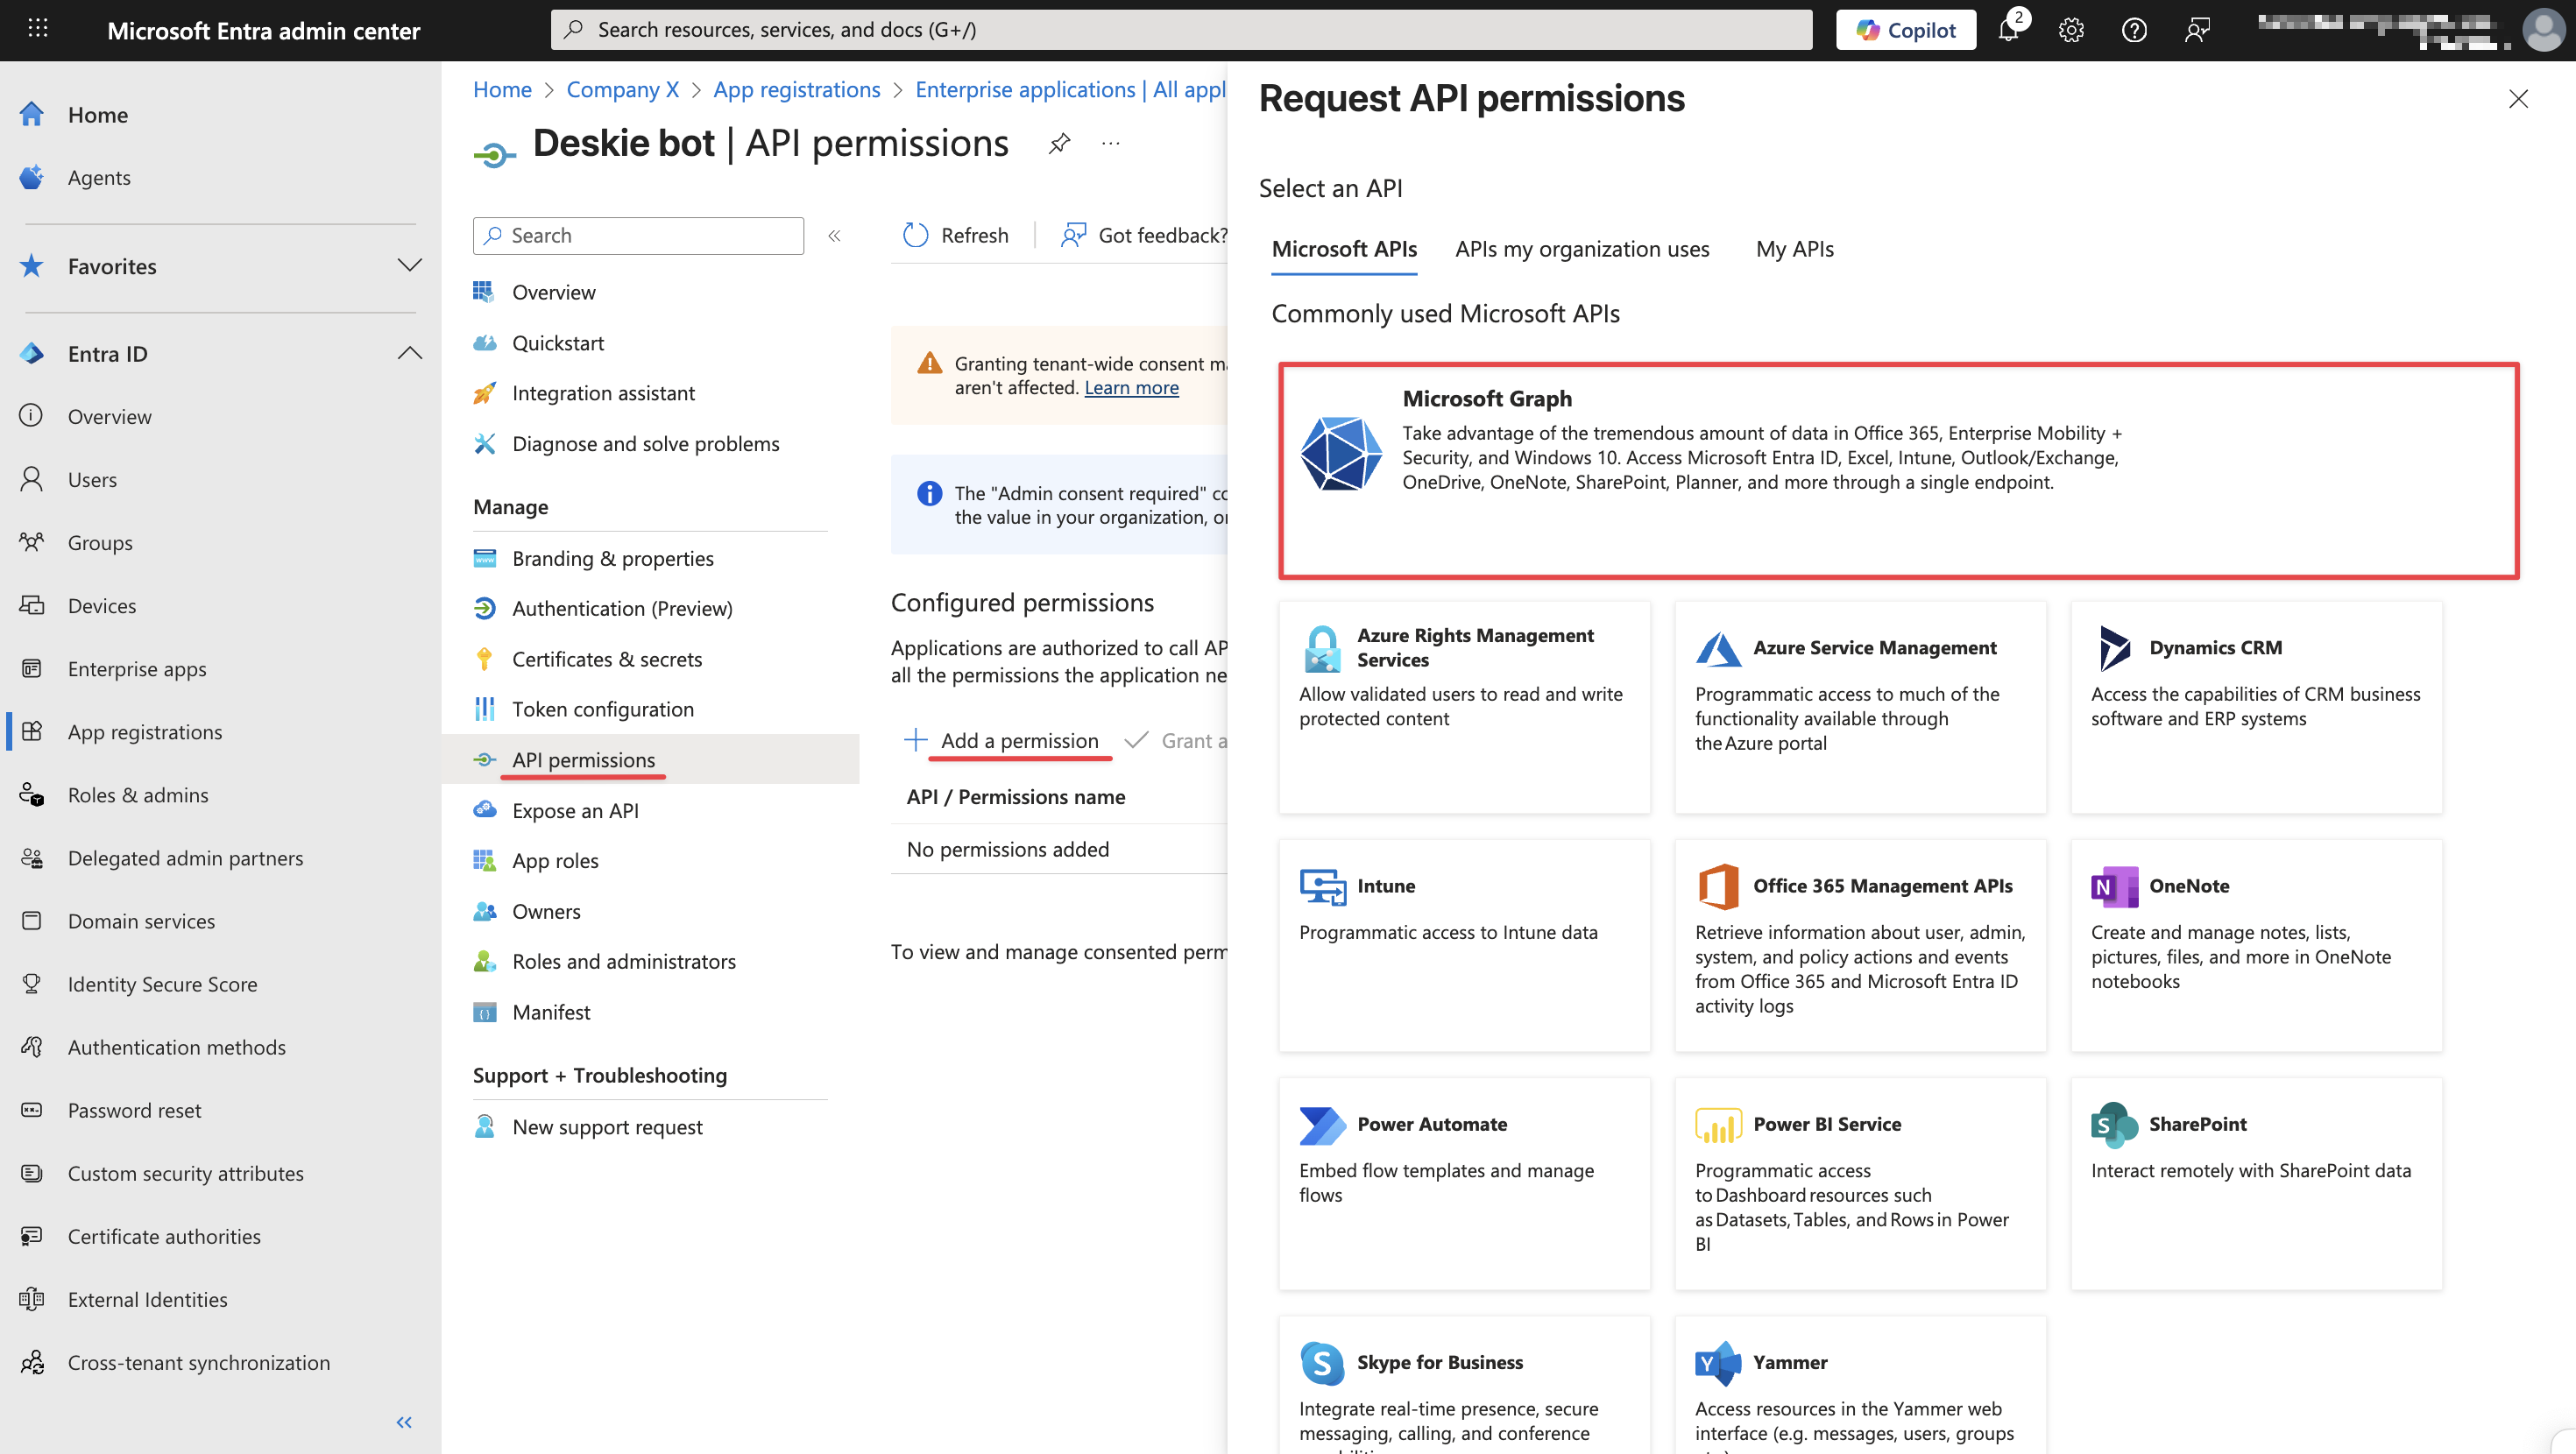
2. On the app page, go to the "Manage" section → the "API permissions" subsection → and click the "Add a permission" button. In the panel that appears, select Microsoft Graph.
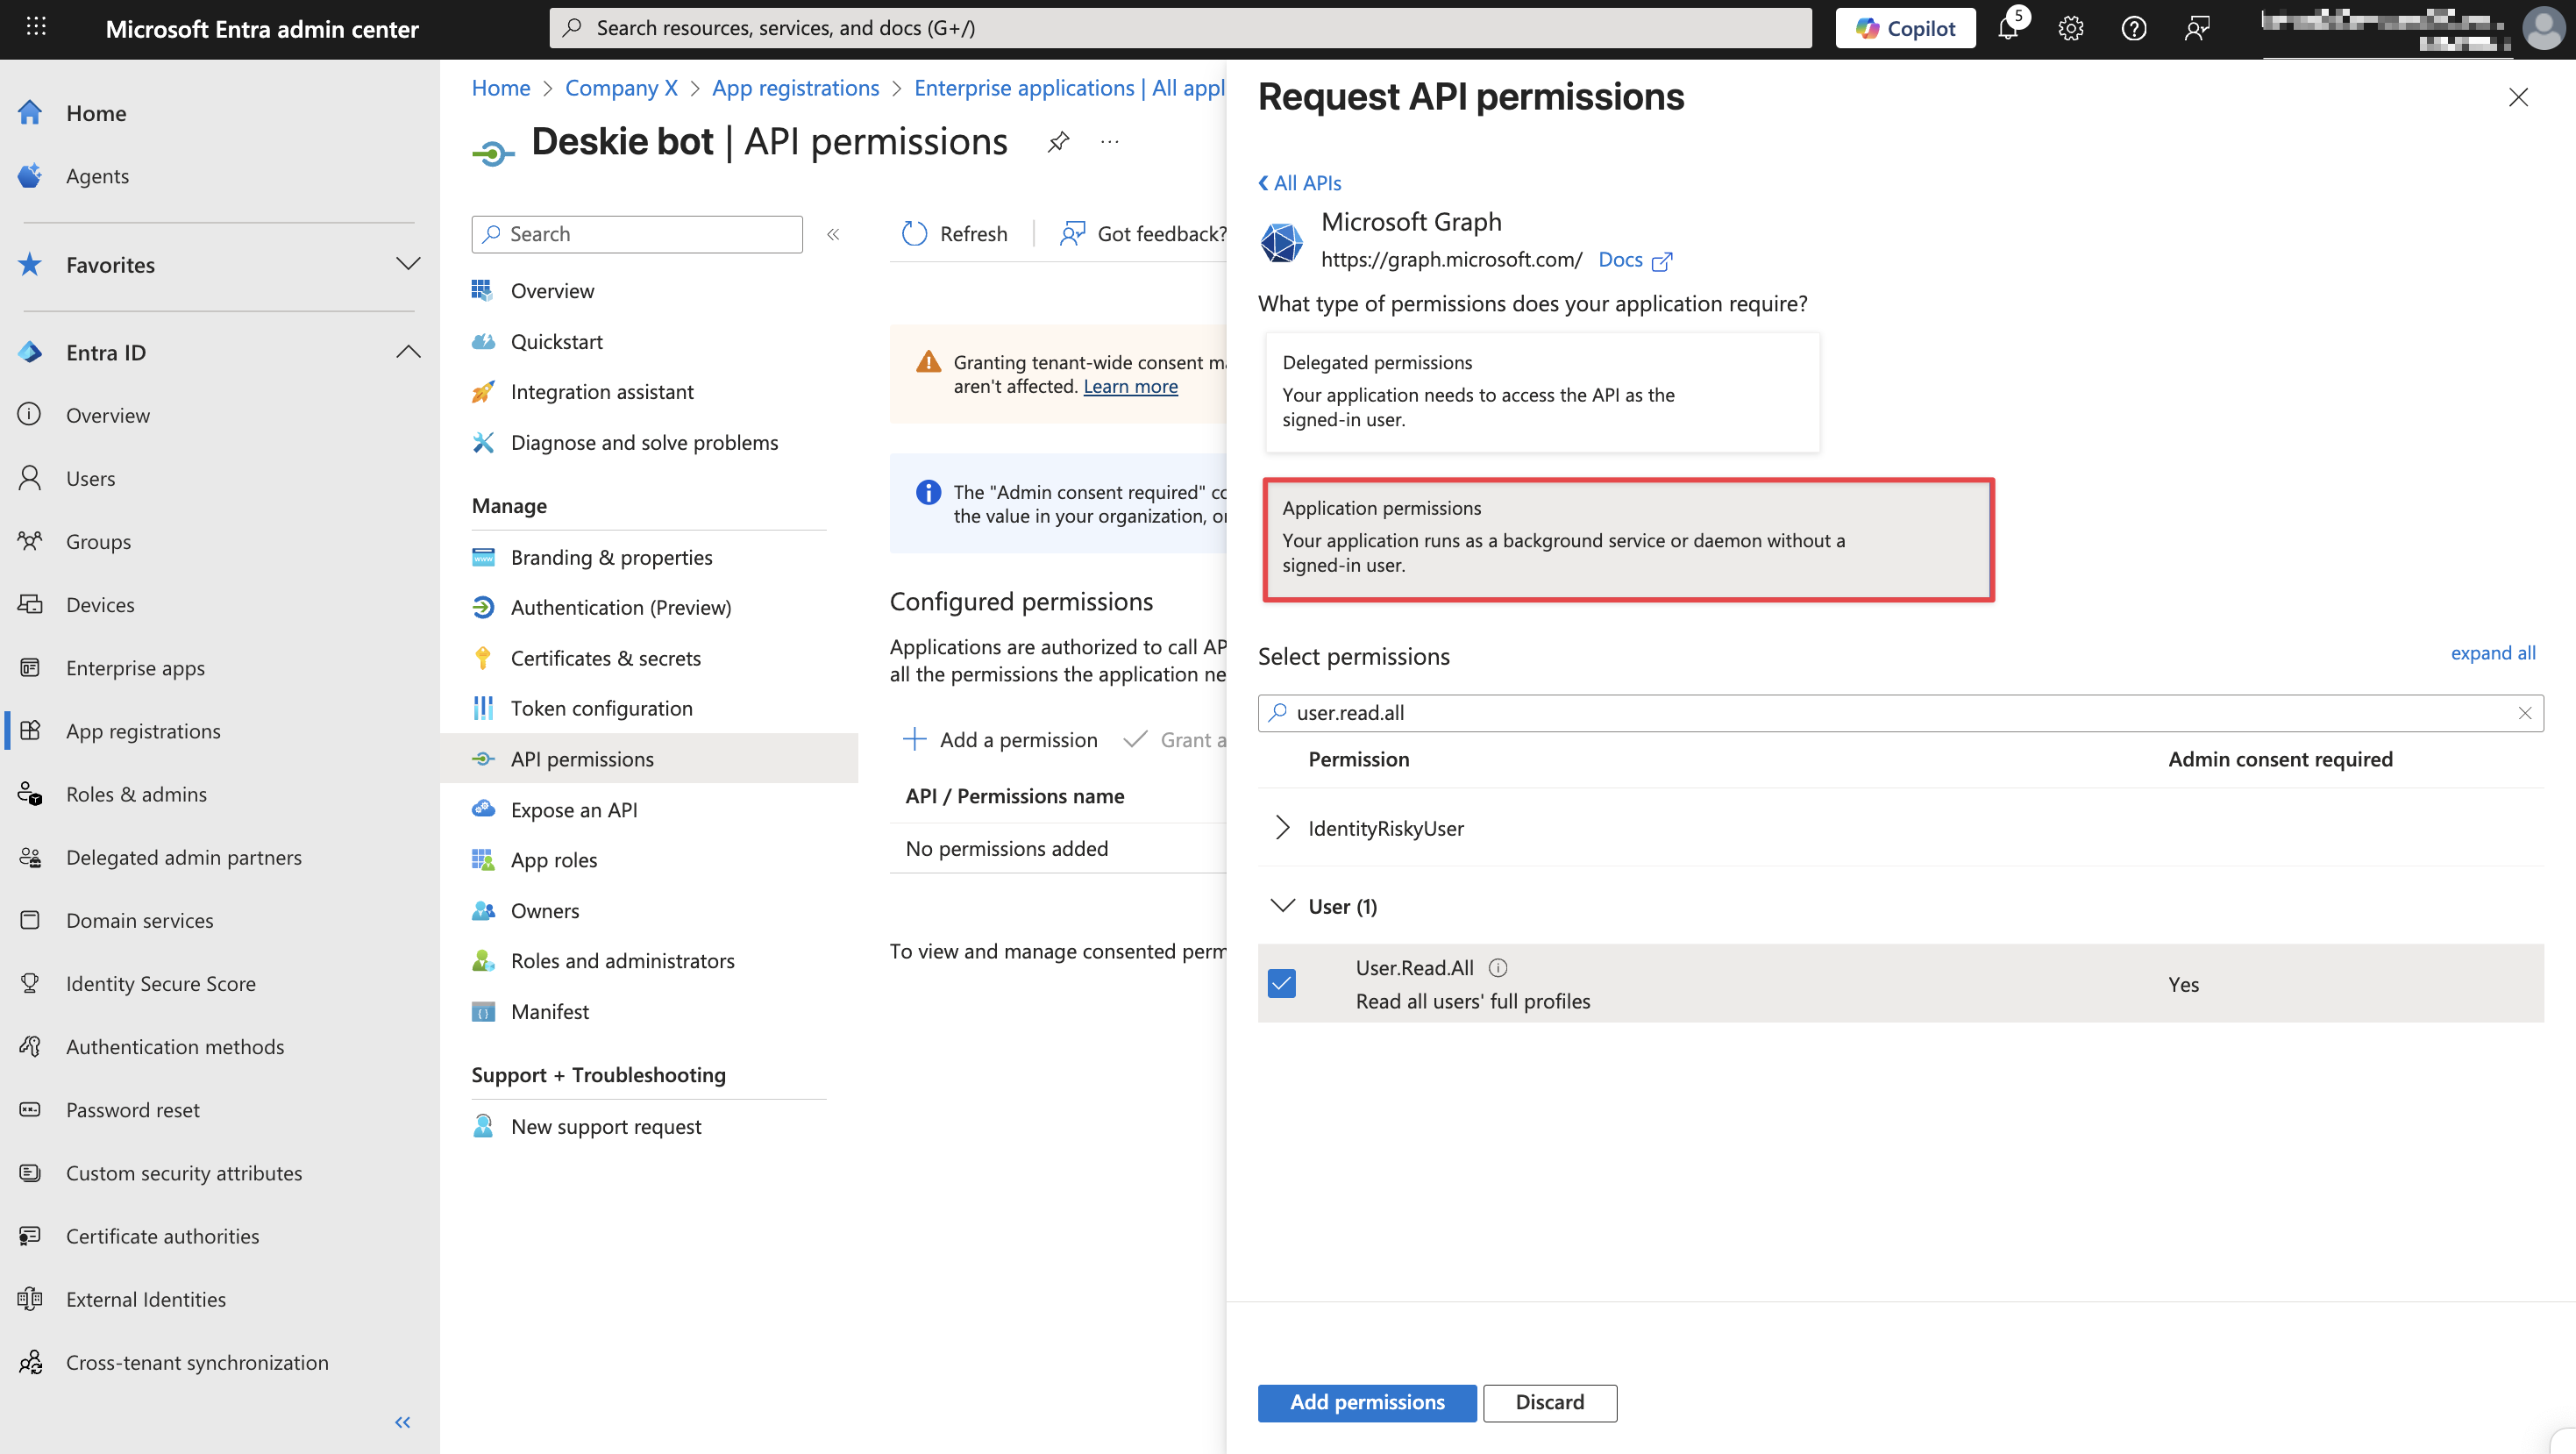
3. Select the "Application permissions" tab and add four permissions:
- Channel.ReadBasic.All,
- Chat.ReadBasic.All,
- Team.ReadBasic.All,
- User.Read.All.
Click the "Add permissions" button.
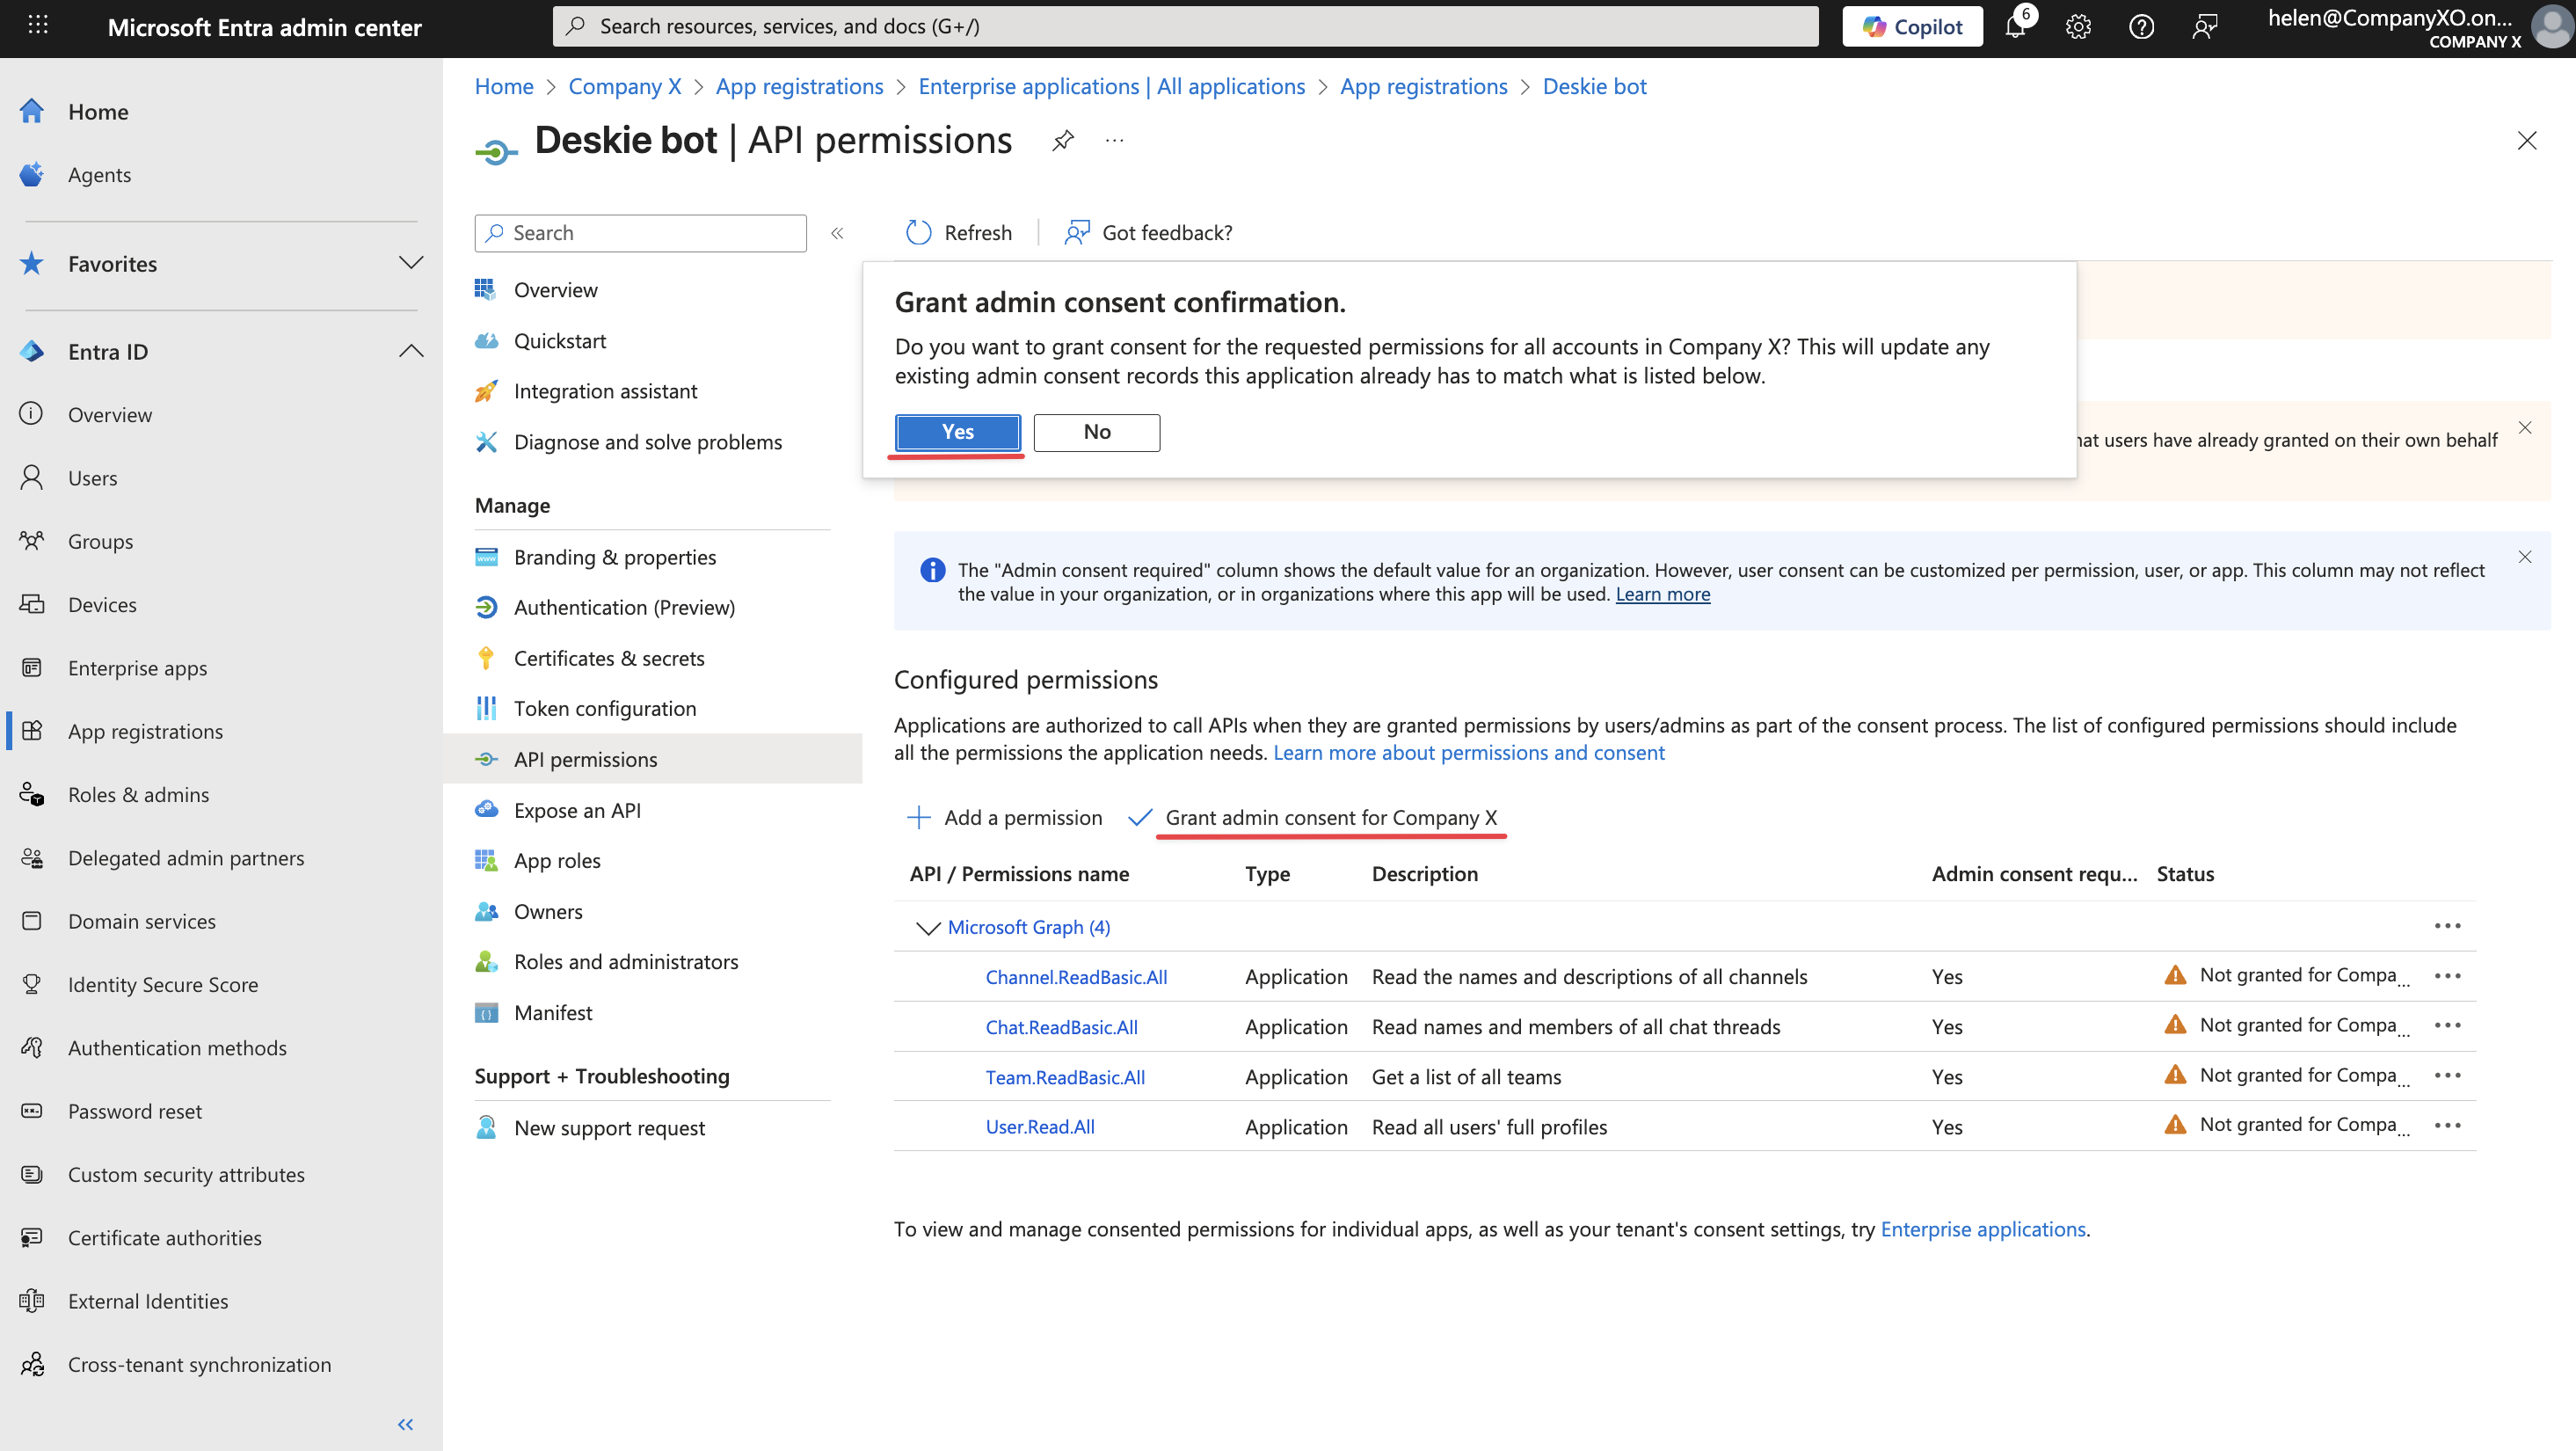
4. To activate the permissions, click the "Grant admin consent for [company name]" button.
Option 2 — through Microsoft Azure
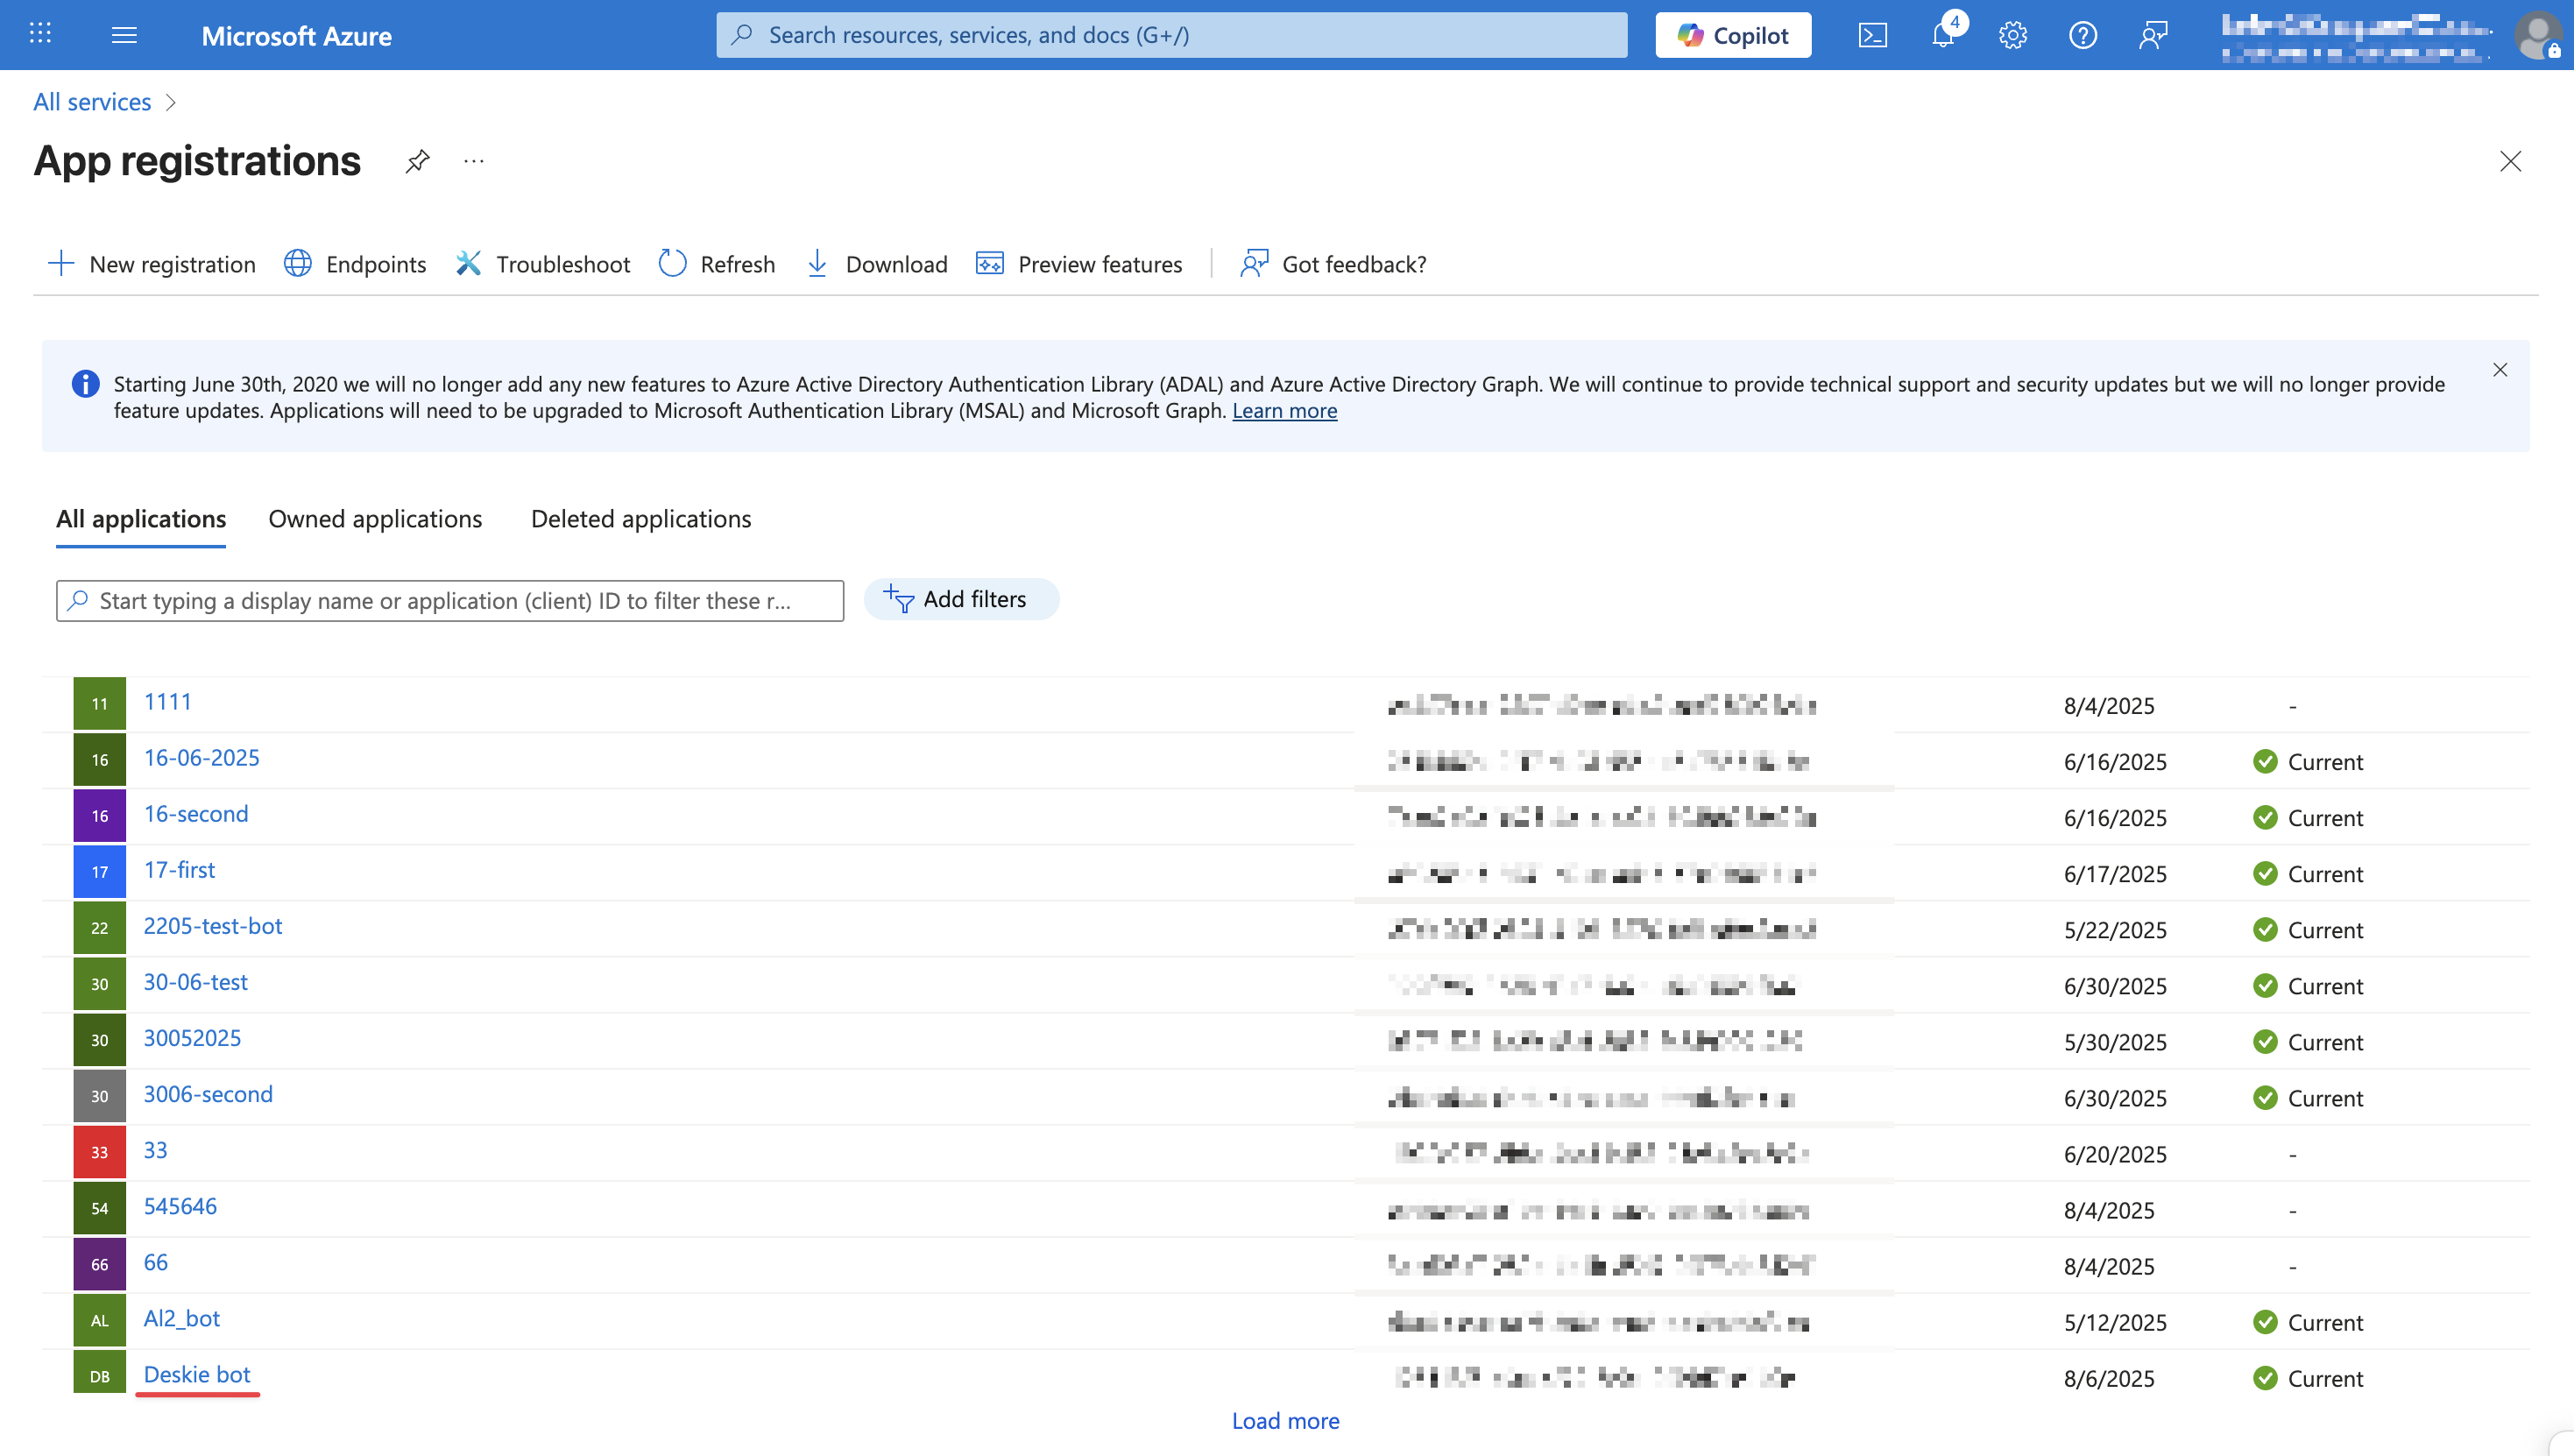
1. Go to the Azure portal → type "App registrations" in the search bar and navigate to the corresponding section → select the "All applications" tab and open the application from the list through which you want to create outgoing cases.
2. On the app page, go to the "Manage" section → the "API permissions" subsection → and click the "Add a permission" button. In the panel that appears, select Microsoft Graph.
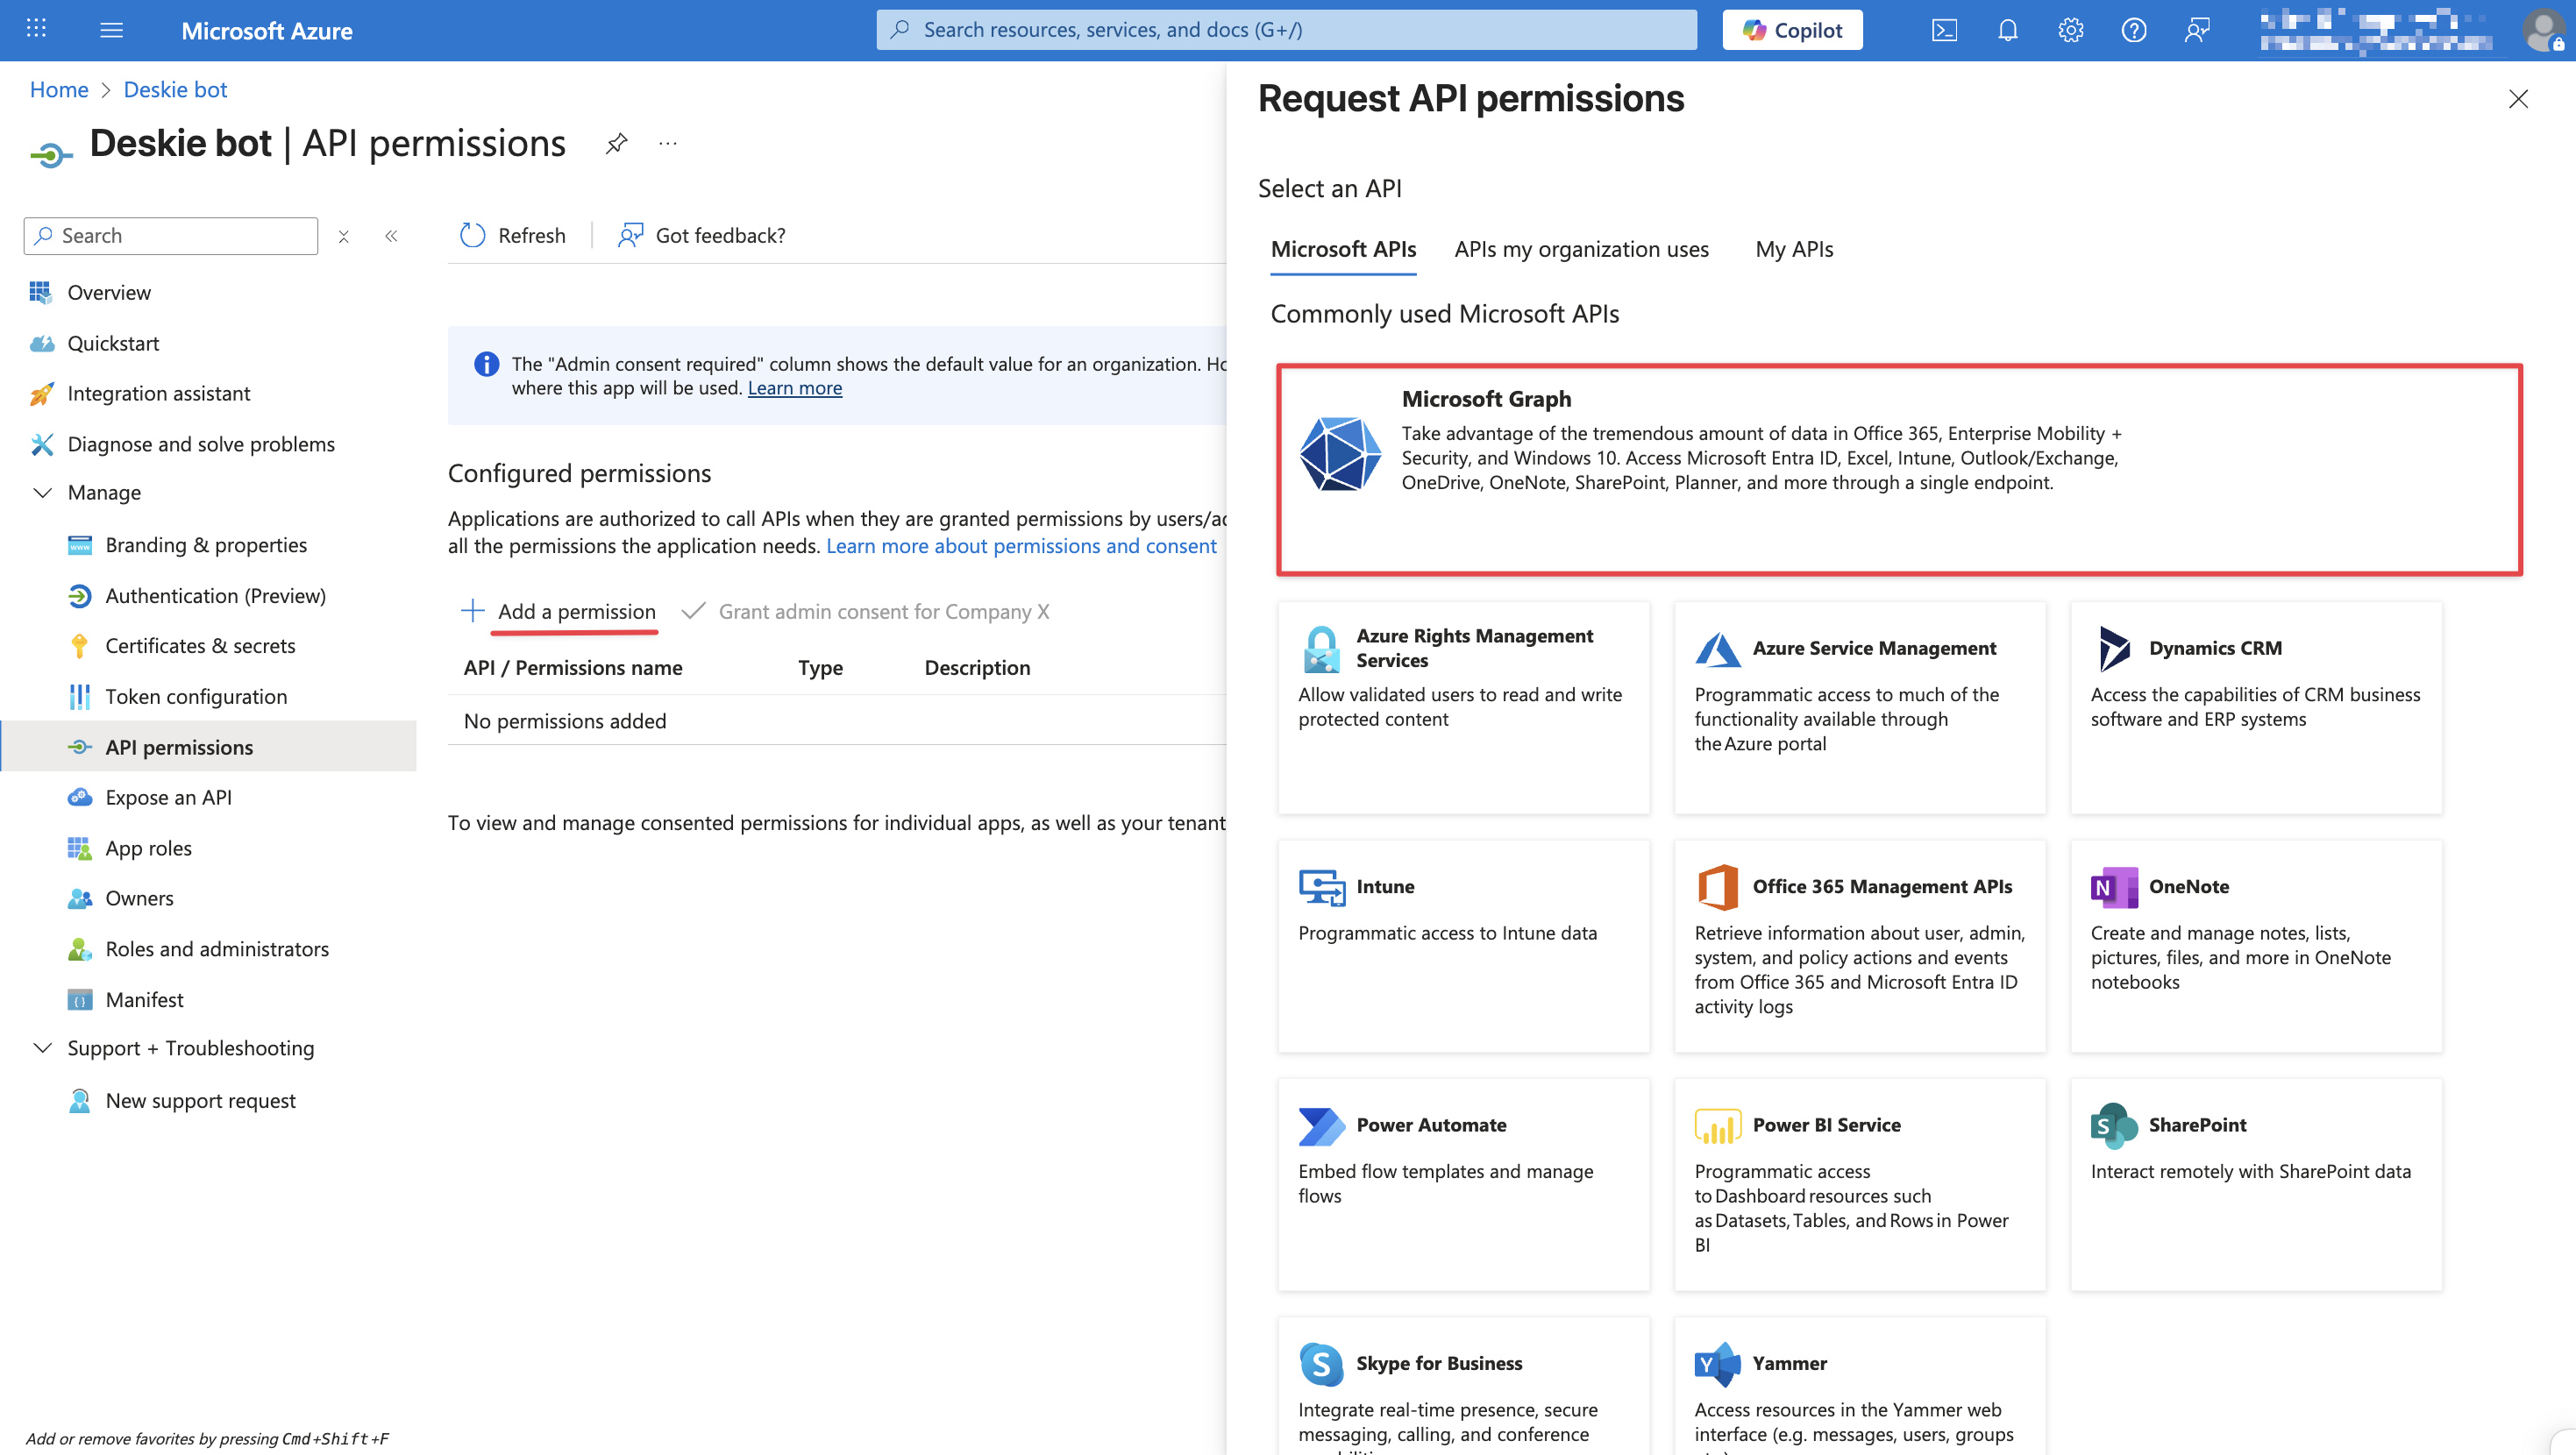
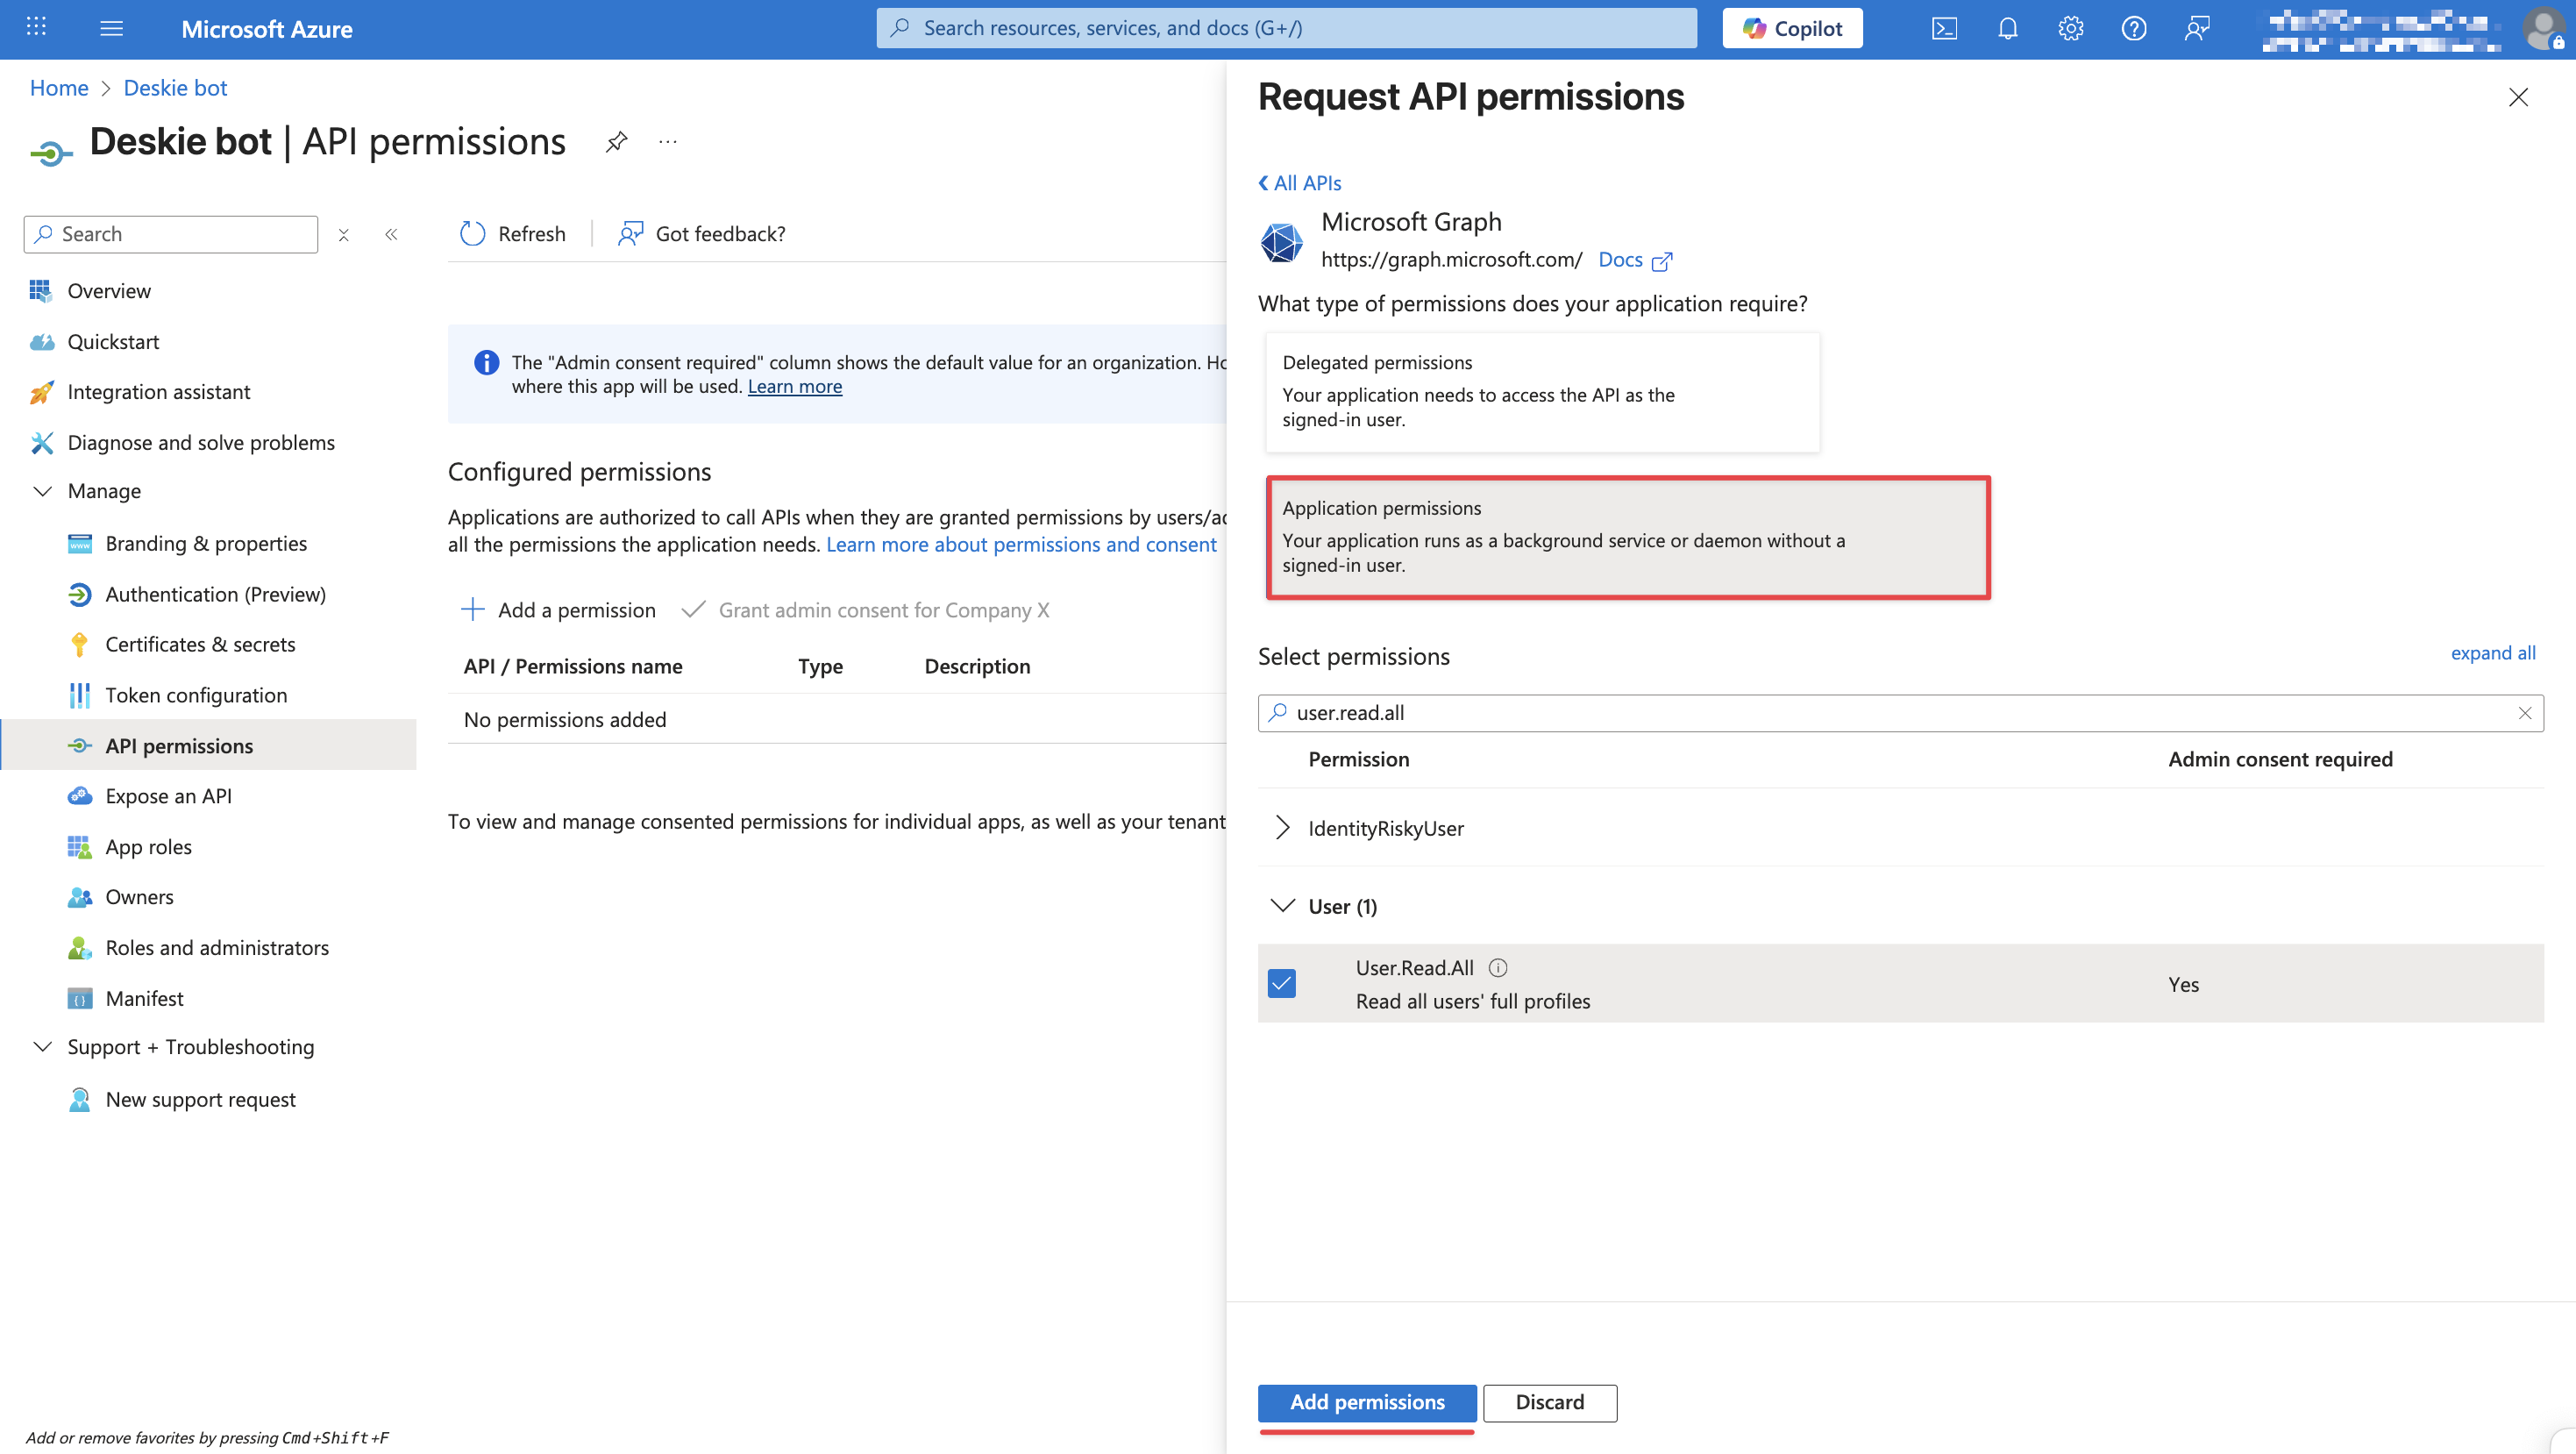
3. Select the "Application permissions" tab and add four permissions:
- Channel.ReadBasic.All,
- Chat.ReadBasic.All,
- Team.ReadBasic.All,
- User.Read.All.
Click the "Add permissions" button.
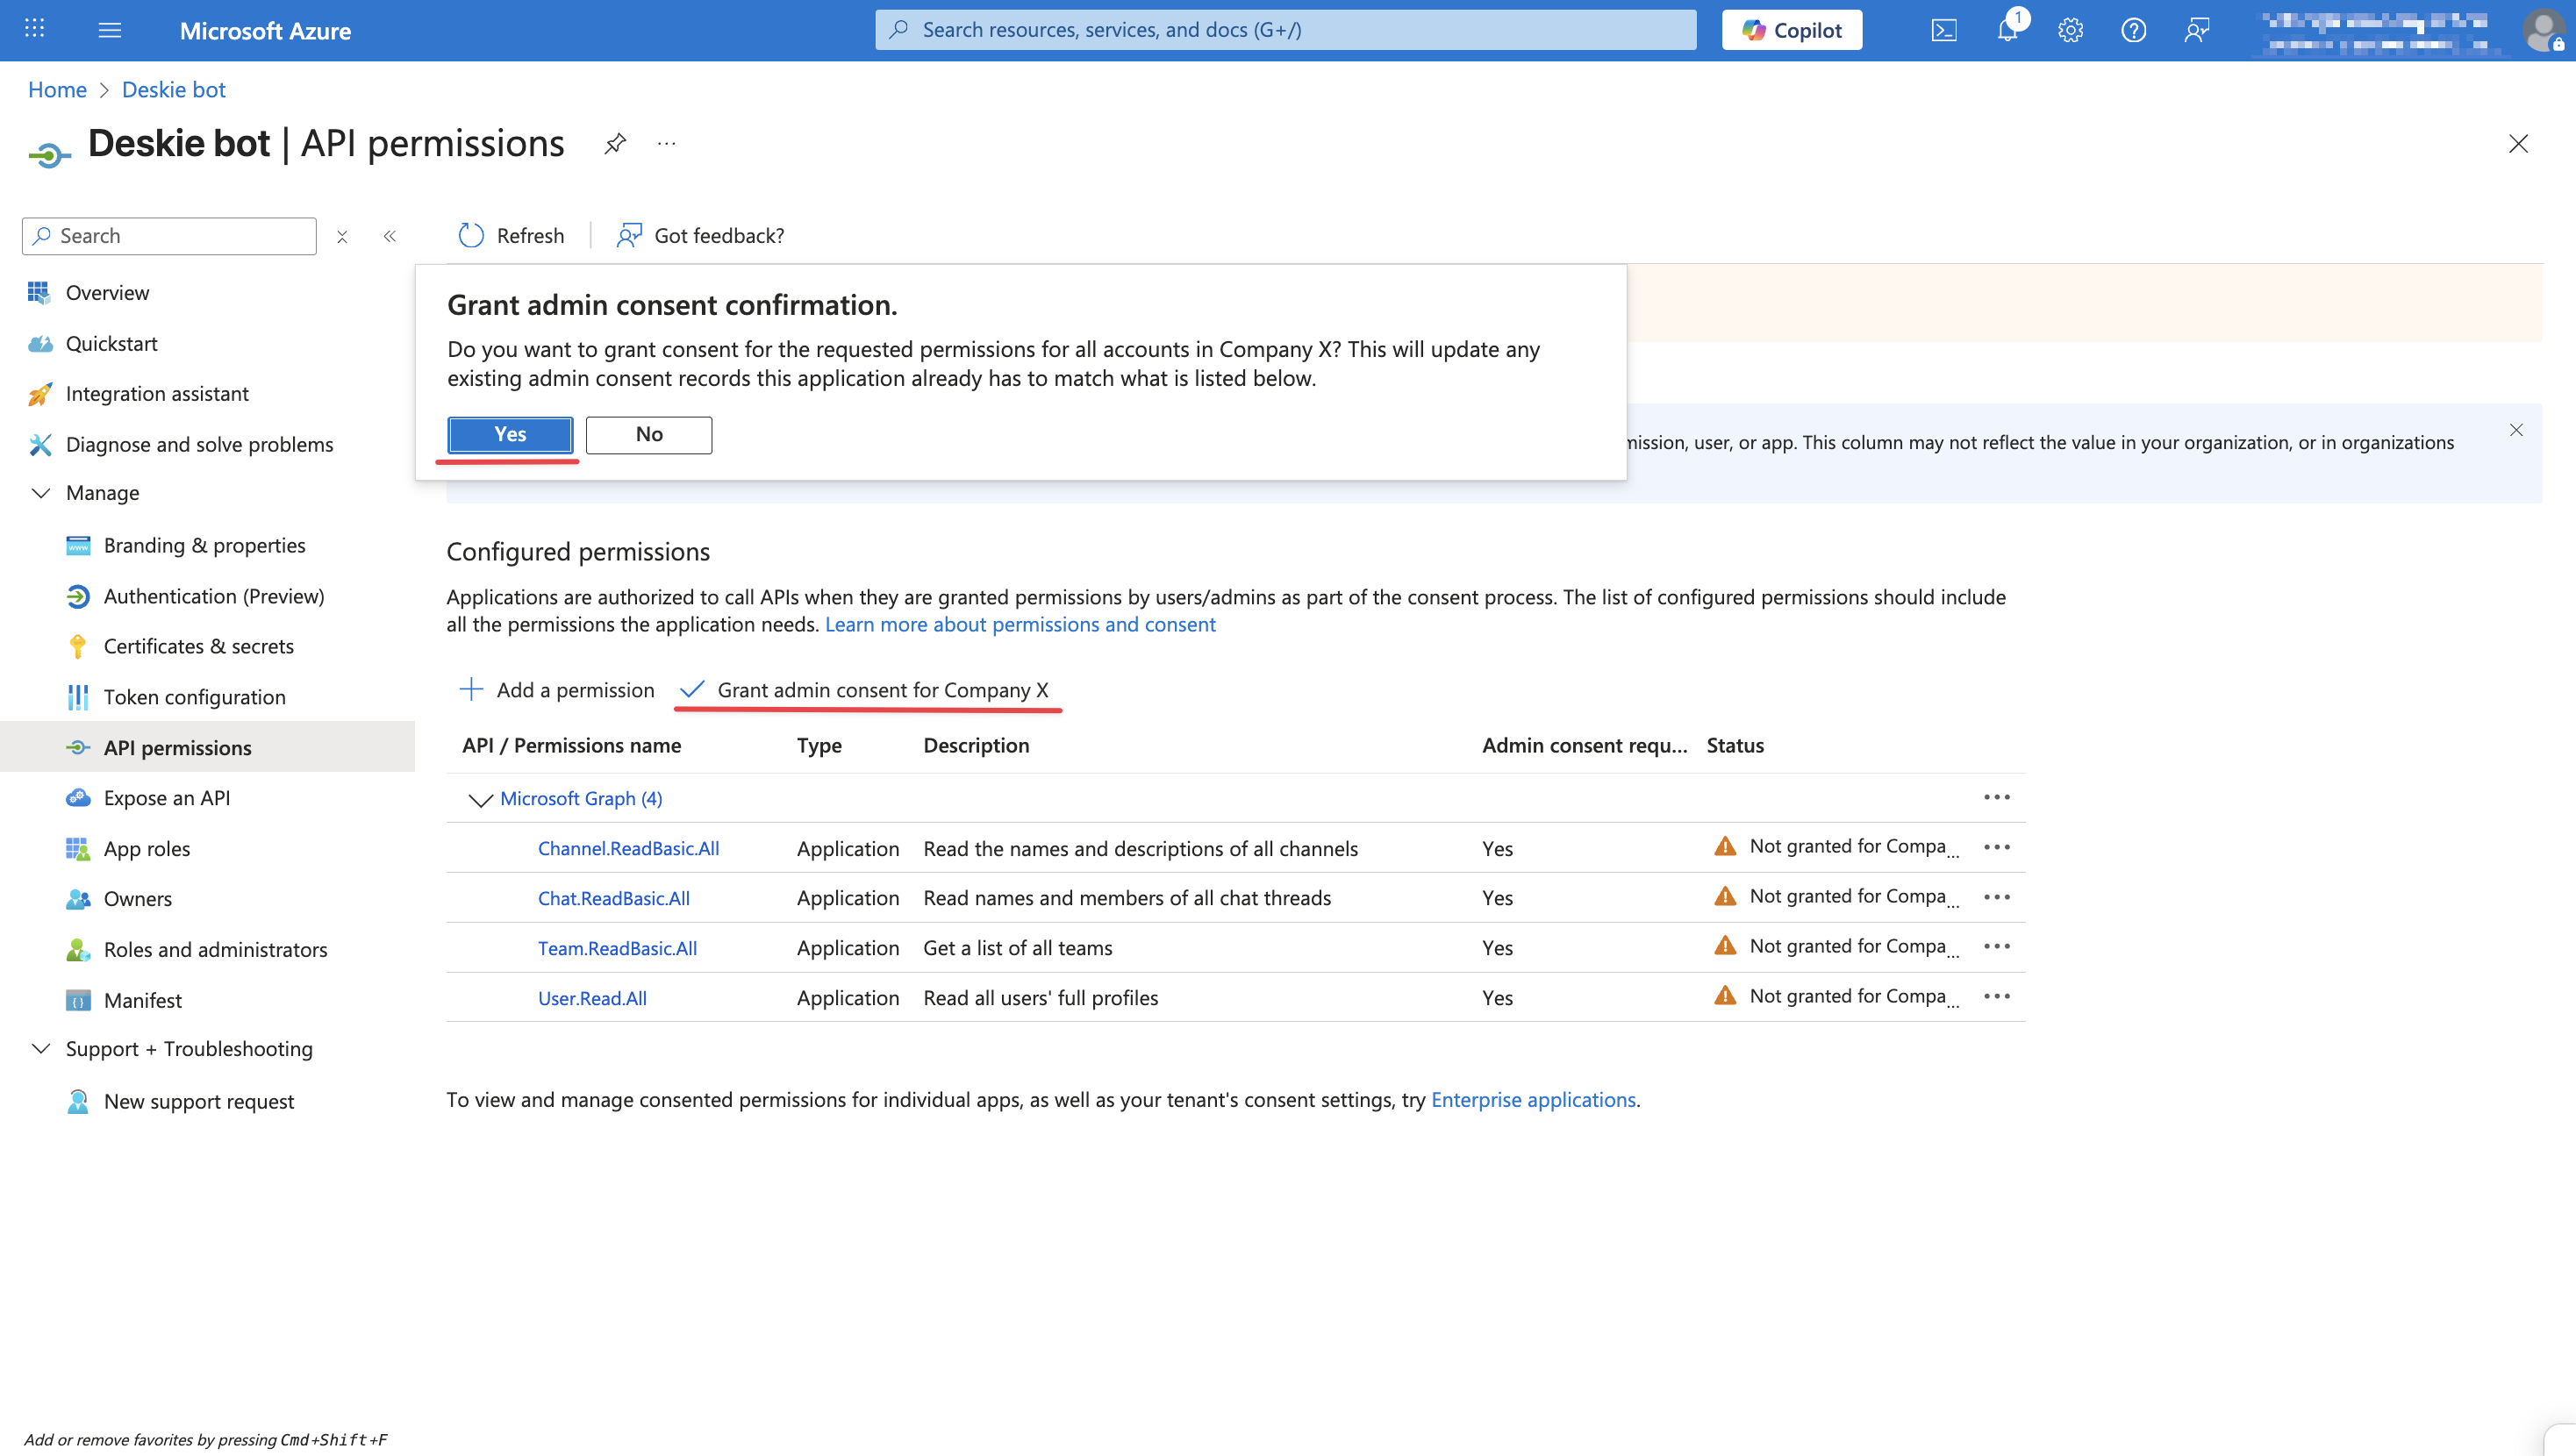
4. Click the "Grant admin consent for [company name]" button and, in the modal window that appears, click "Yes".
Step 5: gues access
By default, Microsoft Teams users must have a commercial subscription or be on a 12-month trial period called Microsoft Teams Exploratory to install and use apps.
If your bot needs to be accessible to external users without a subscription, you can invite them as guest users into your workspace. In that case they can:
- message the bot in private chats;
- participate in group chats with the bot.
If all users who need bot access already belong to your organization and have Teams subscriptions, guest access is not necessary, so you can skip this step.
For guest users to access the app, Teams policies must allow custom apps for guests, and each guest must be a member of at least one Team in the workspace; otherwise, they cannot interact with the app, even if installed.
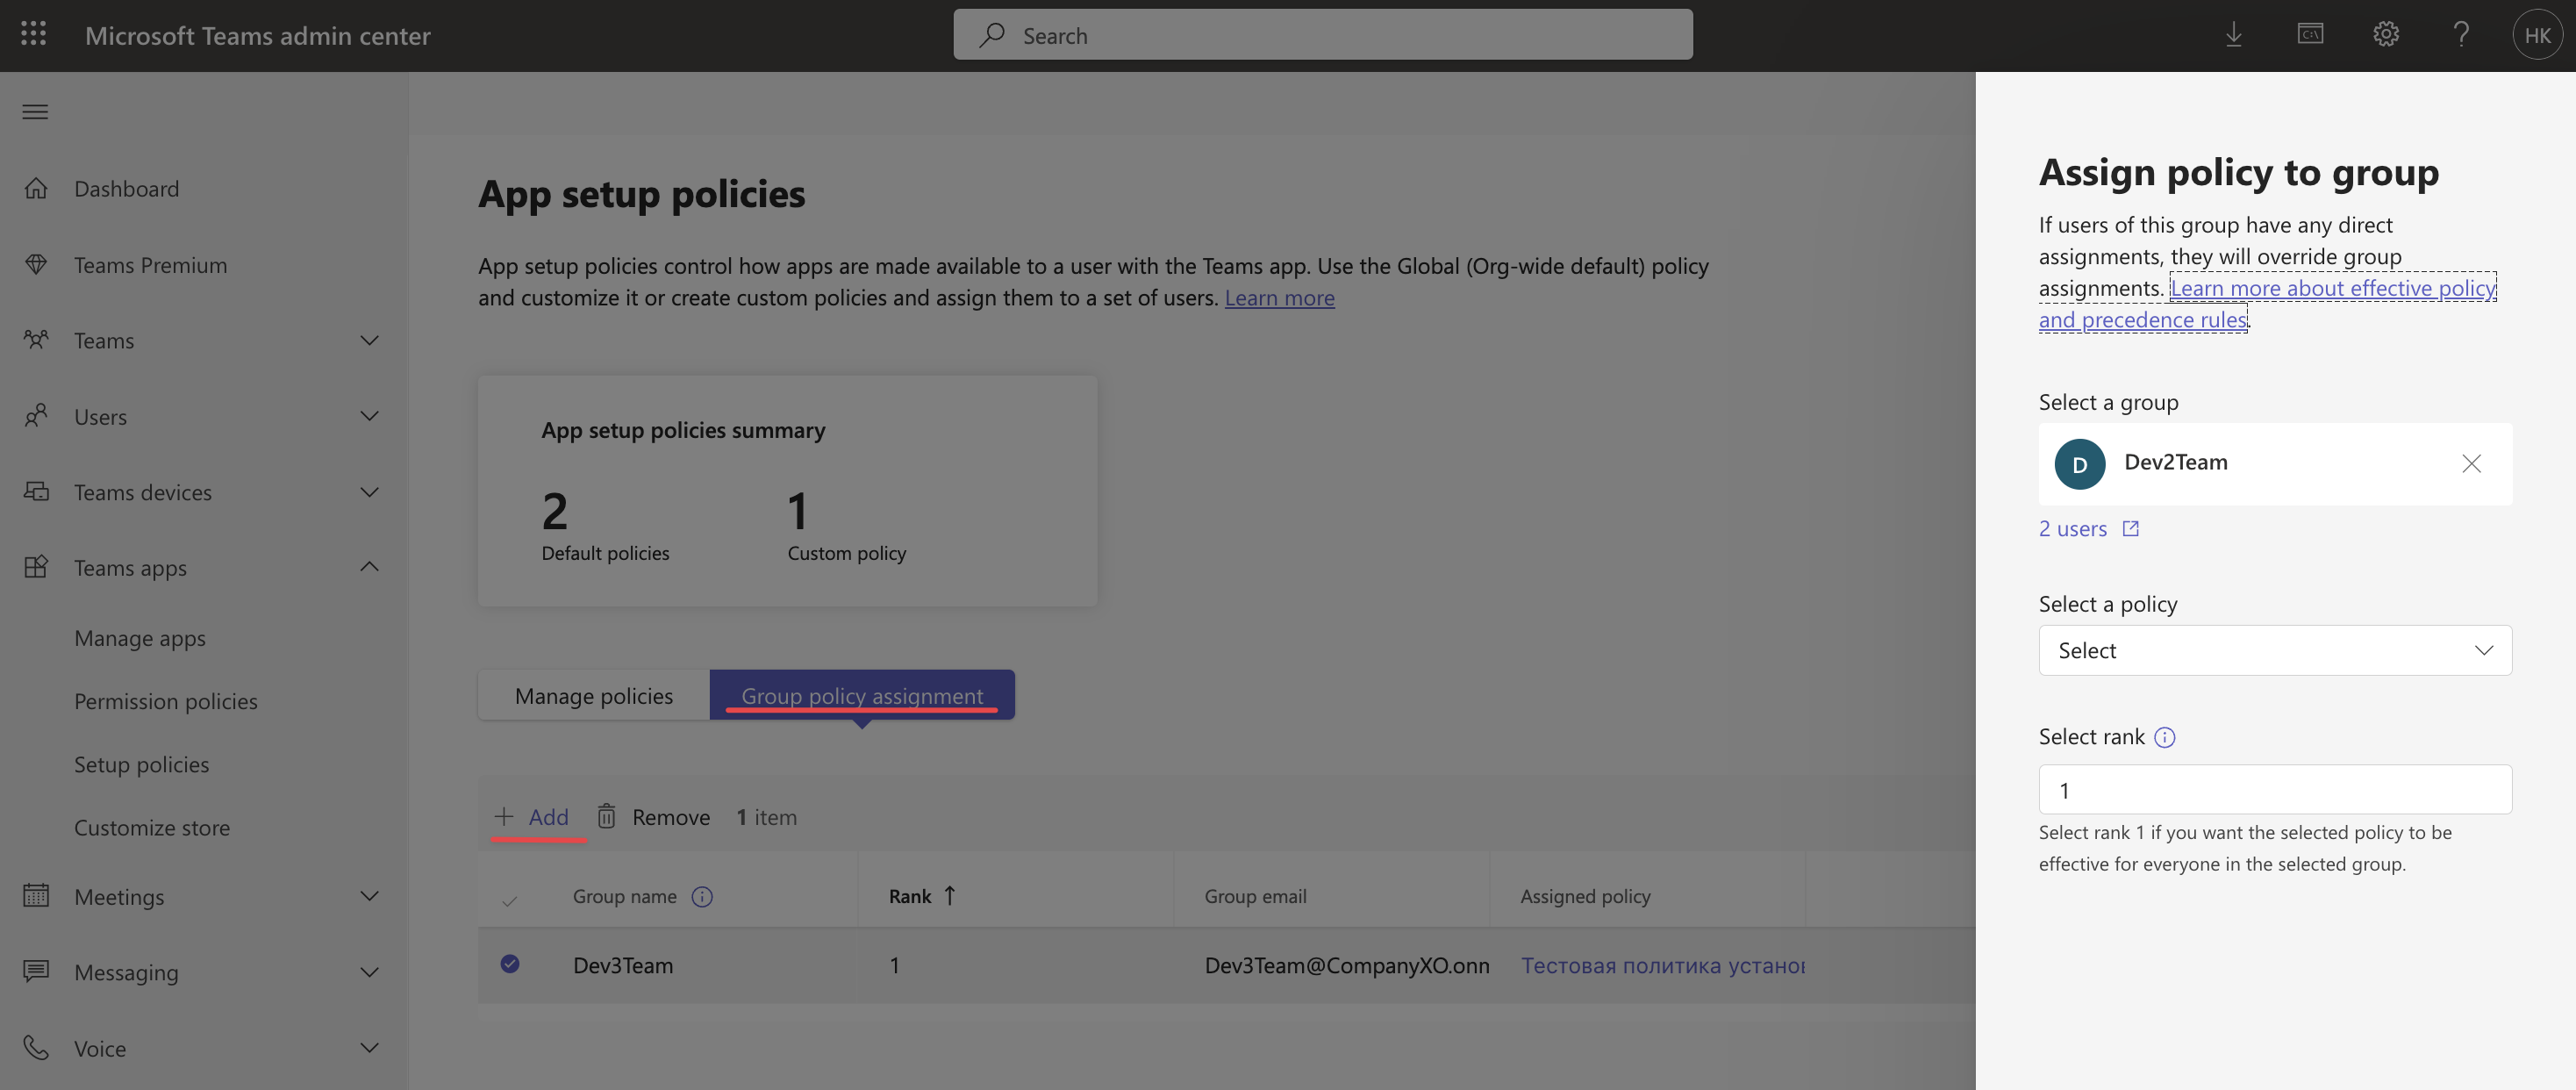
To manage app policies, go to Microsoft Teams admin center → Teams Apps → Setup Policies → modify the global policy or add a new one → add the apps that should be available to users under "Installed apps".
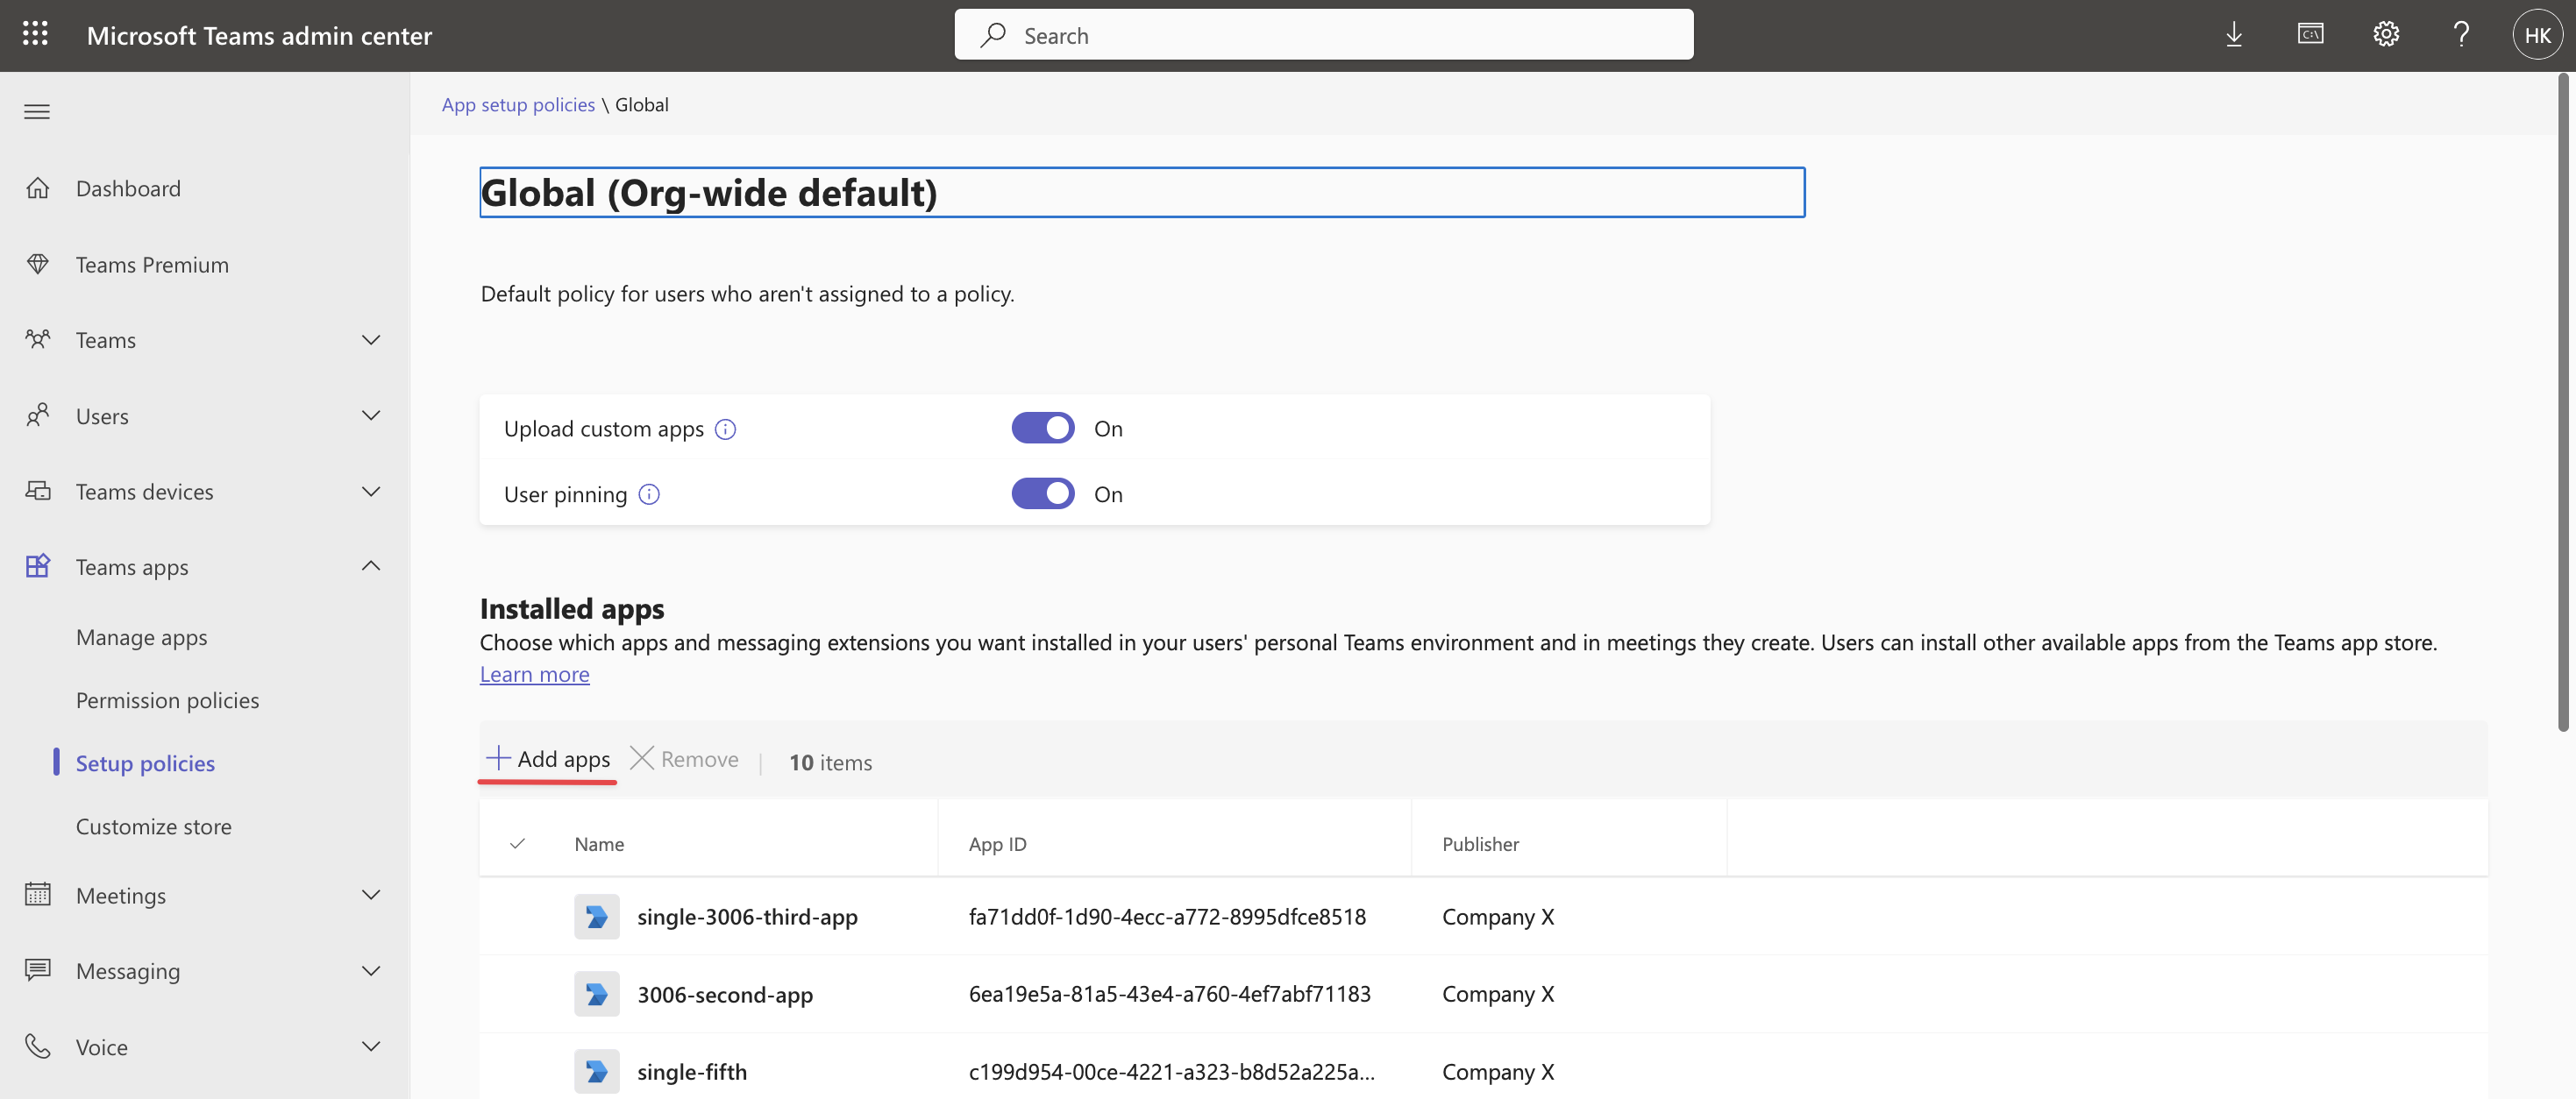
Custom app usage policies can be specified separately for each team in the "Group policy assignment" tab in Microsoft Teams.
There are two ways to add users:
Option 1 — through Microsoft Entra
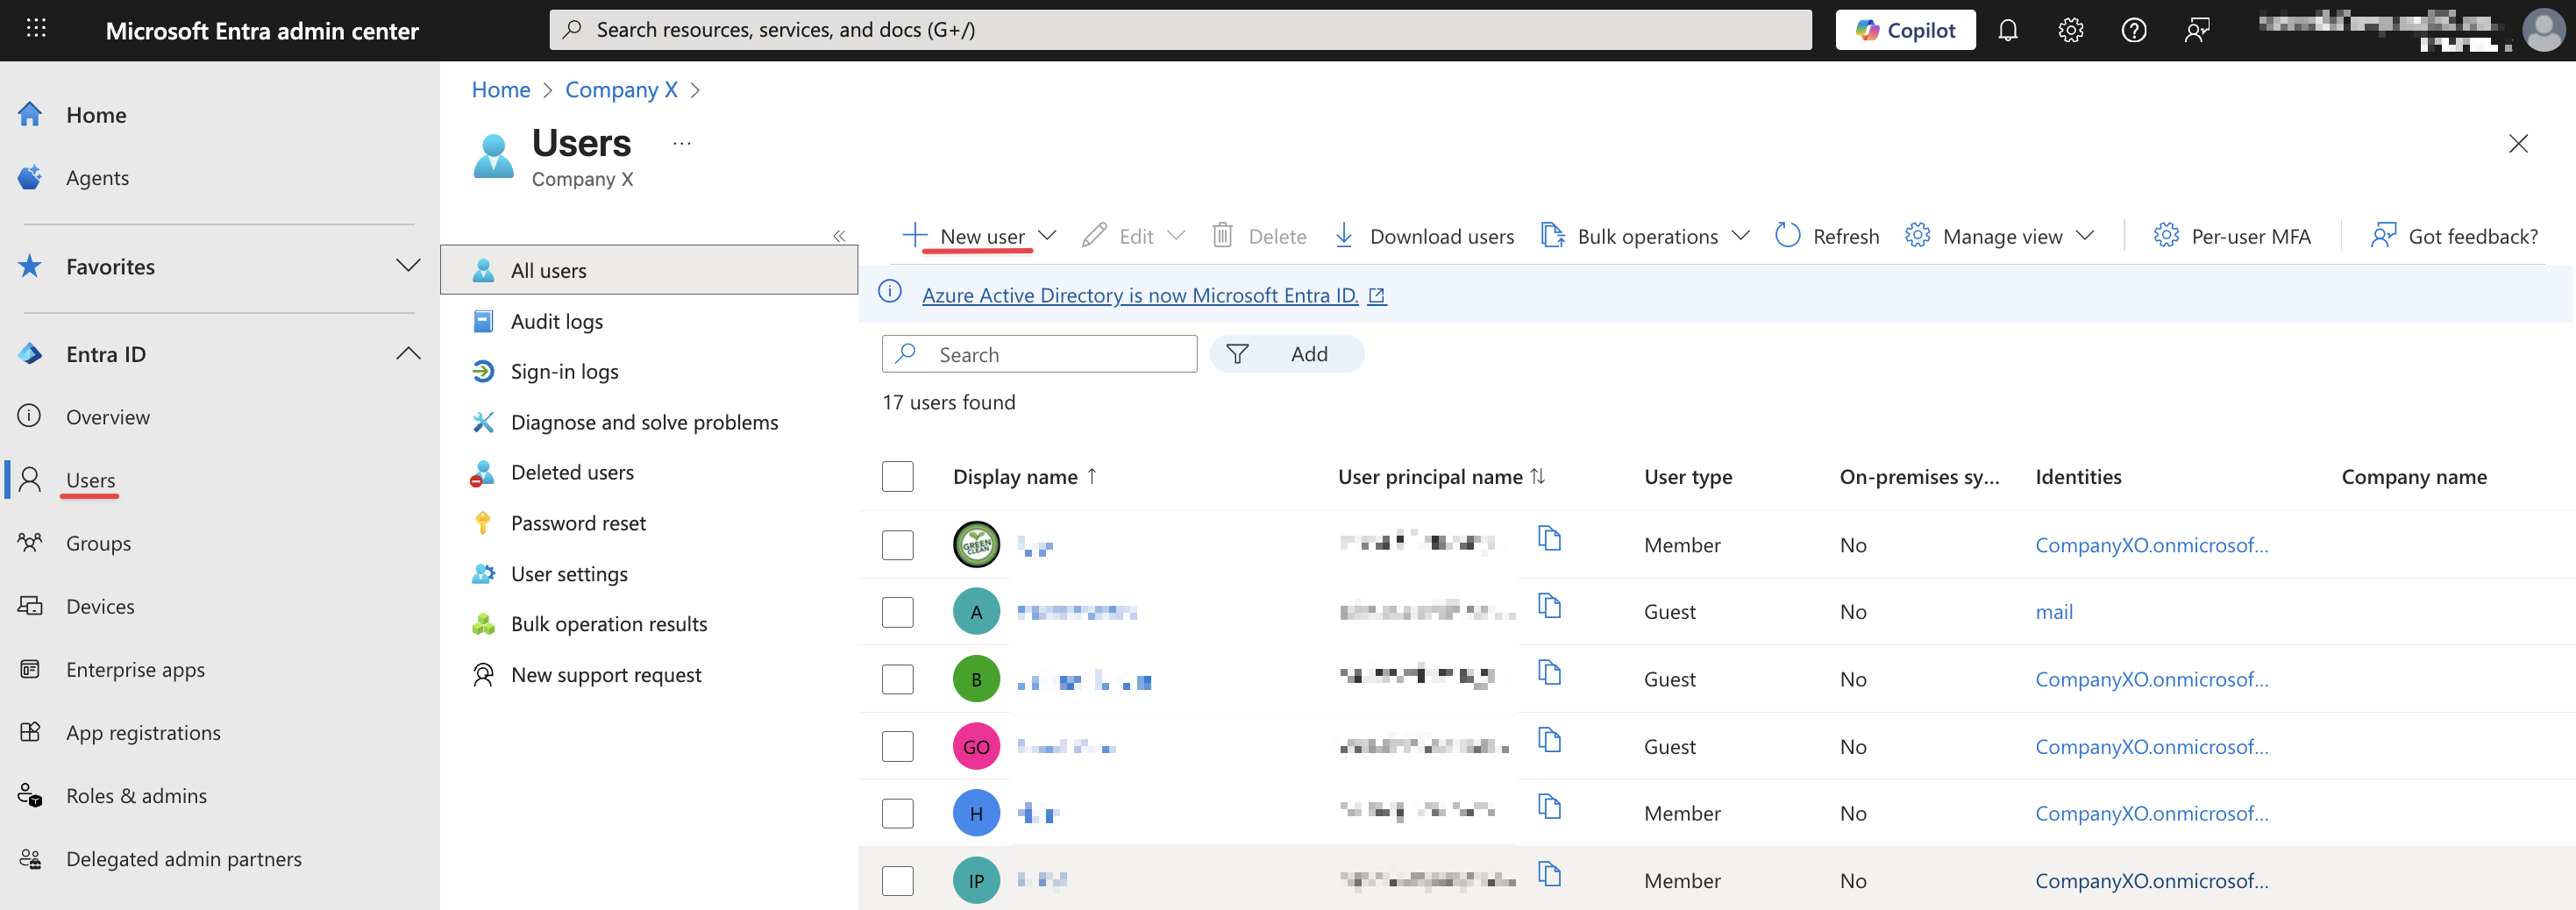
1. Go to the Microsoft Entra admin center → "Entra ID" section → "Users" subsection → "All users" option → click the "New user" button.
2. In the window that appears, select one of the options:
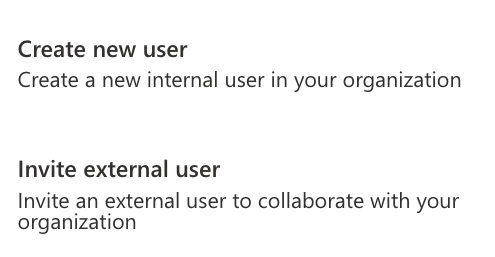
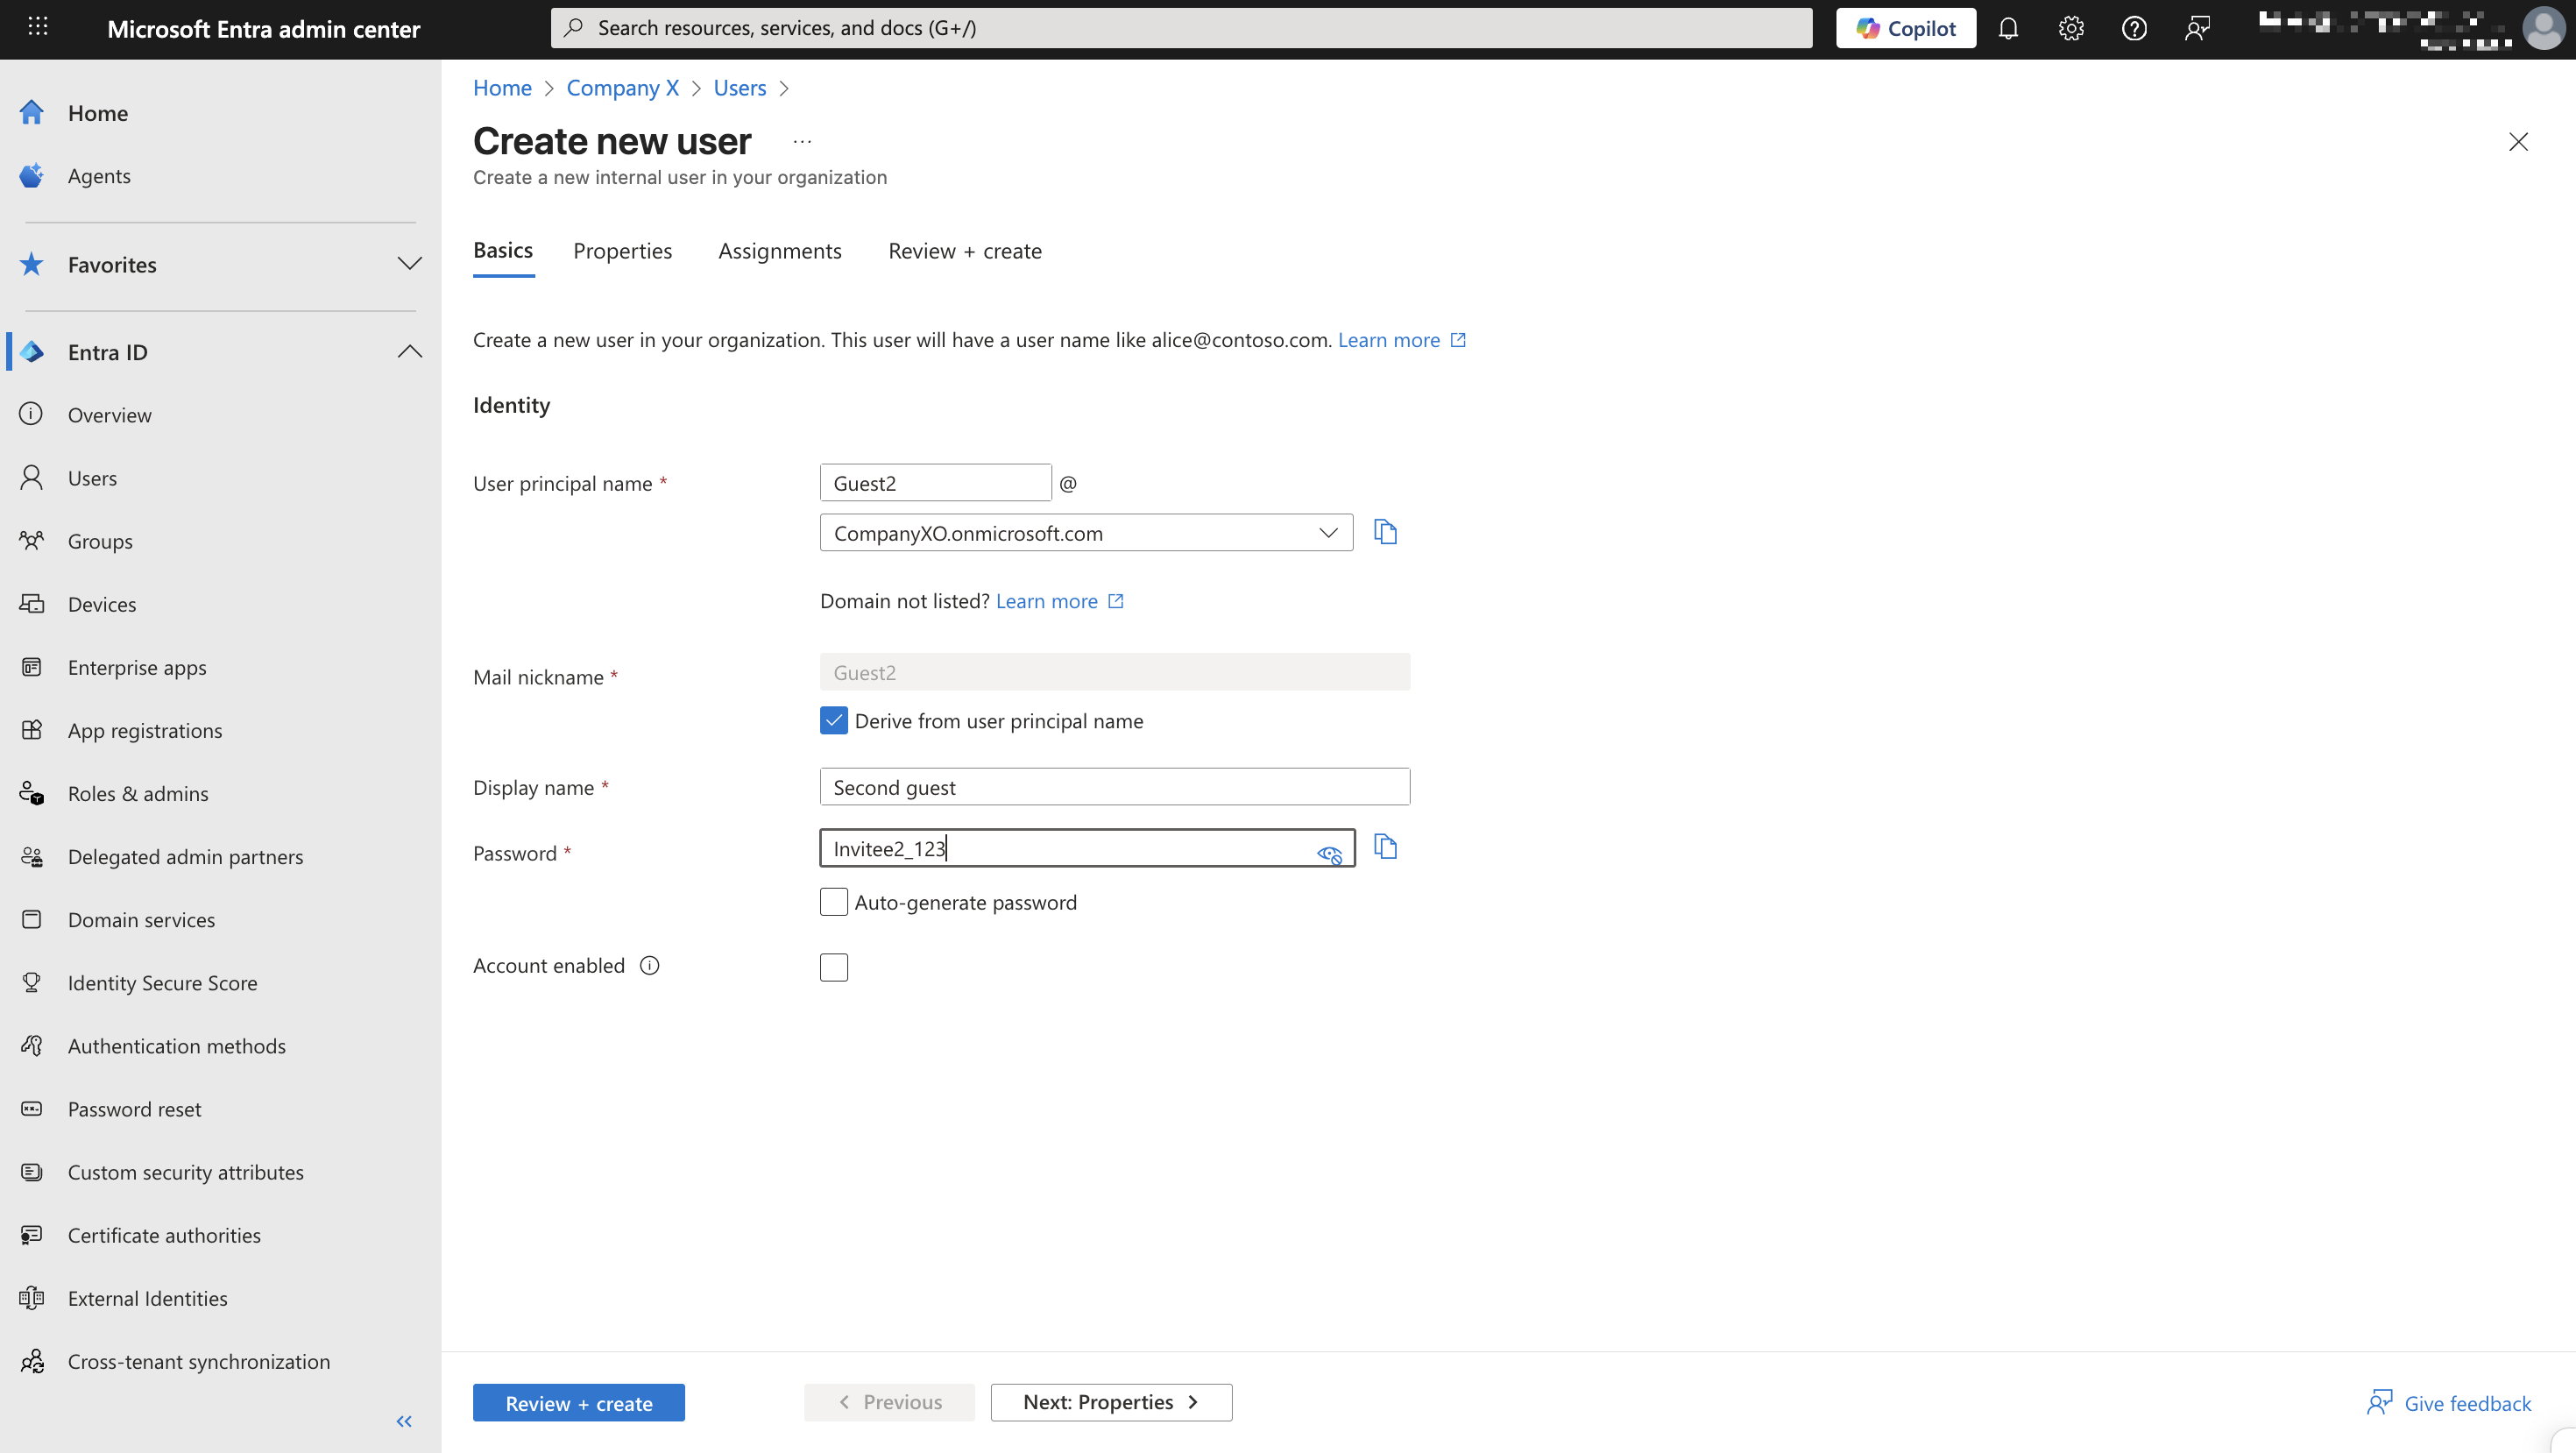
a) Create an internal user so that the user can sign in with your organization's login.
b) Invite an external user by sending an invitation to their email, which already has a registered Microsoft Teams account. The user can also create a free Teams account after receiving the invitation email.
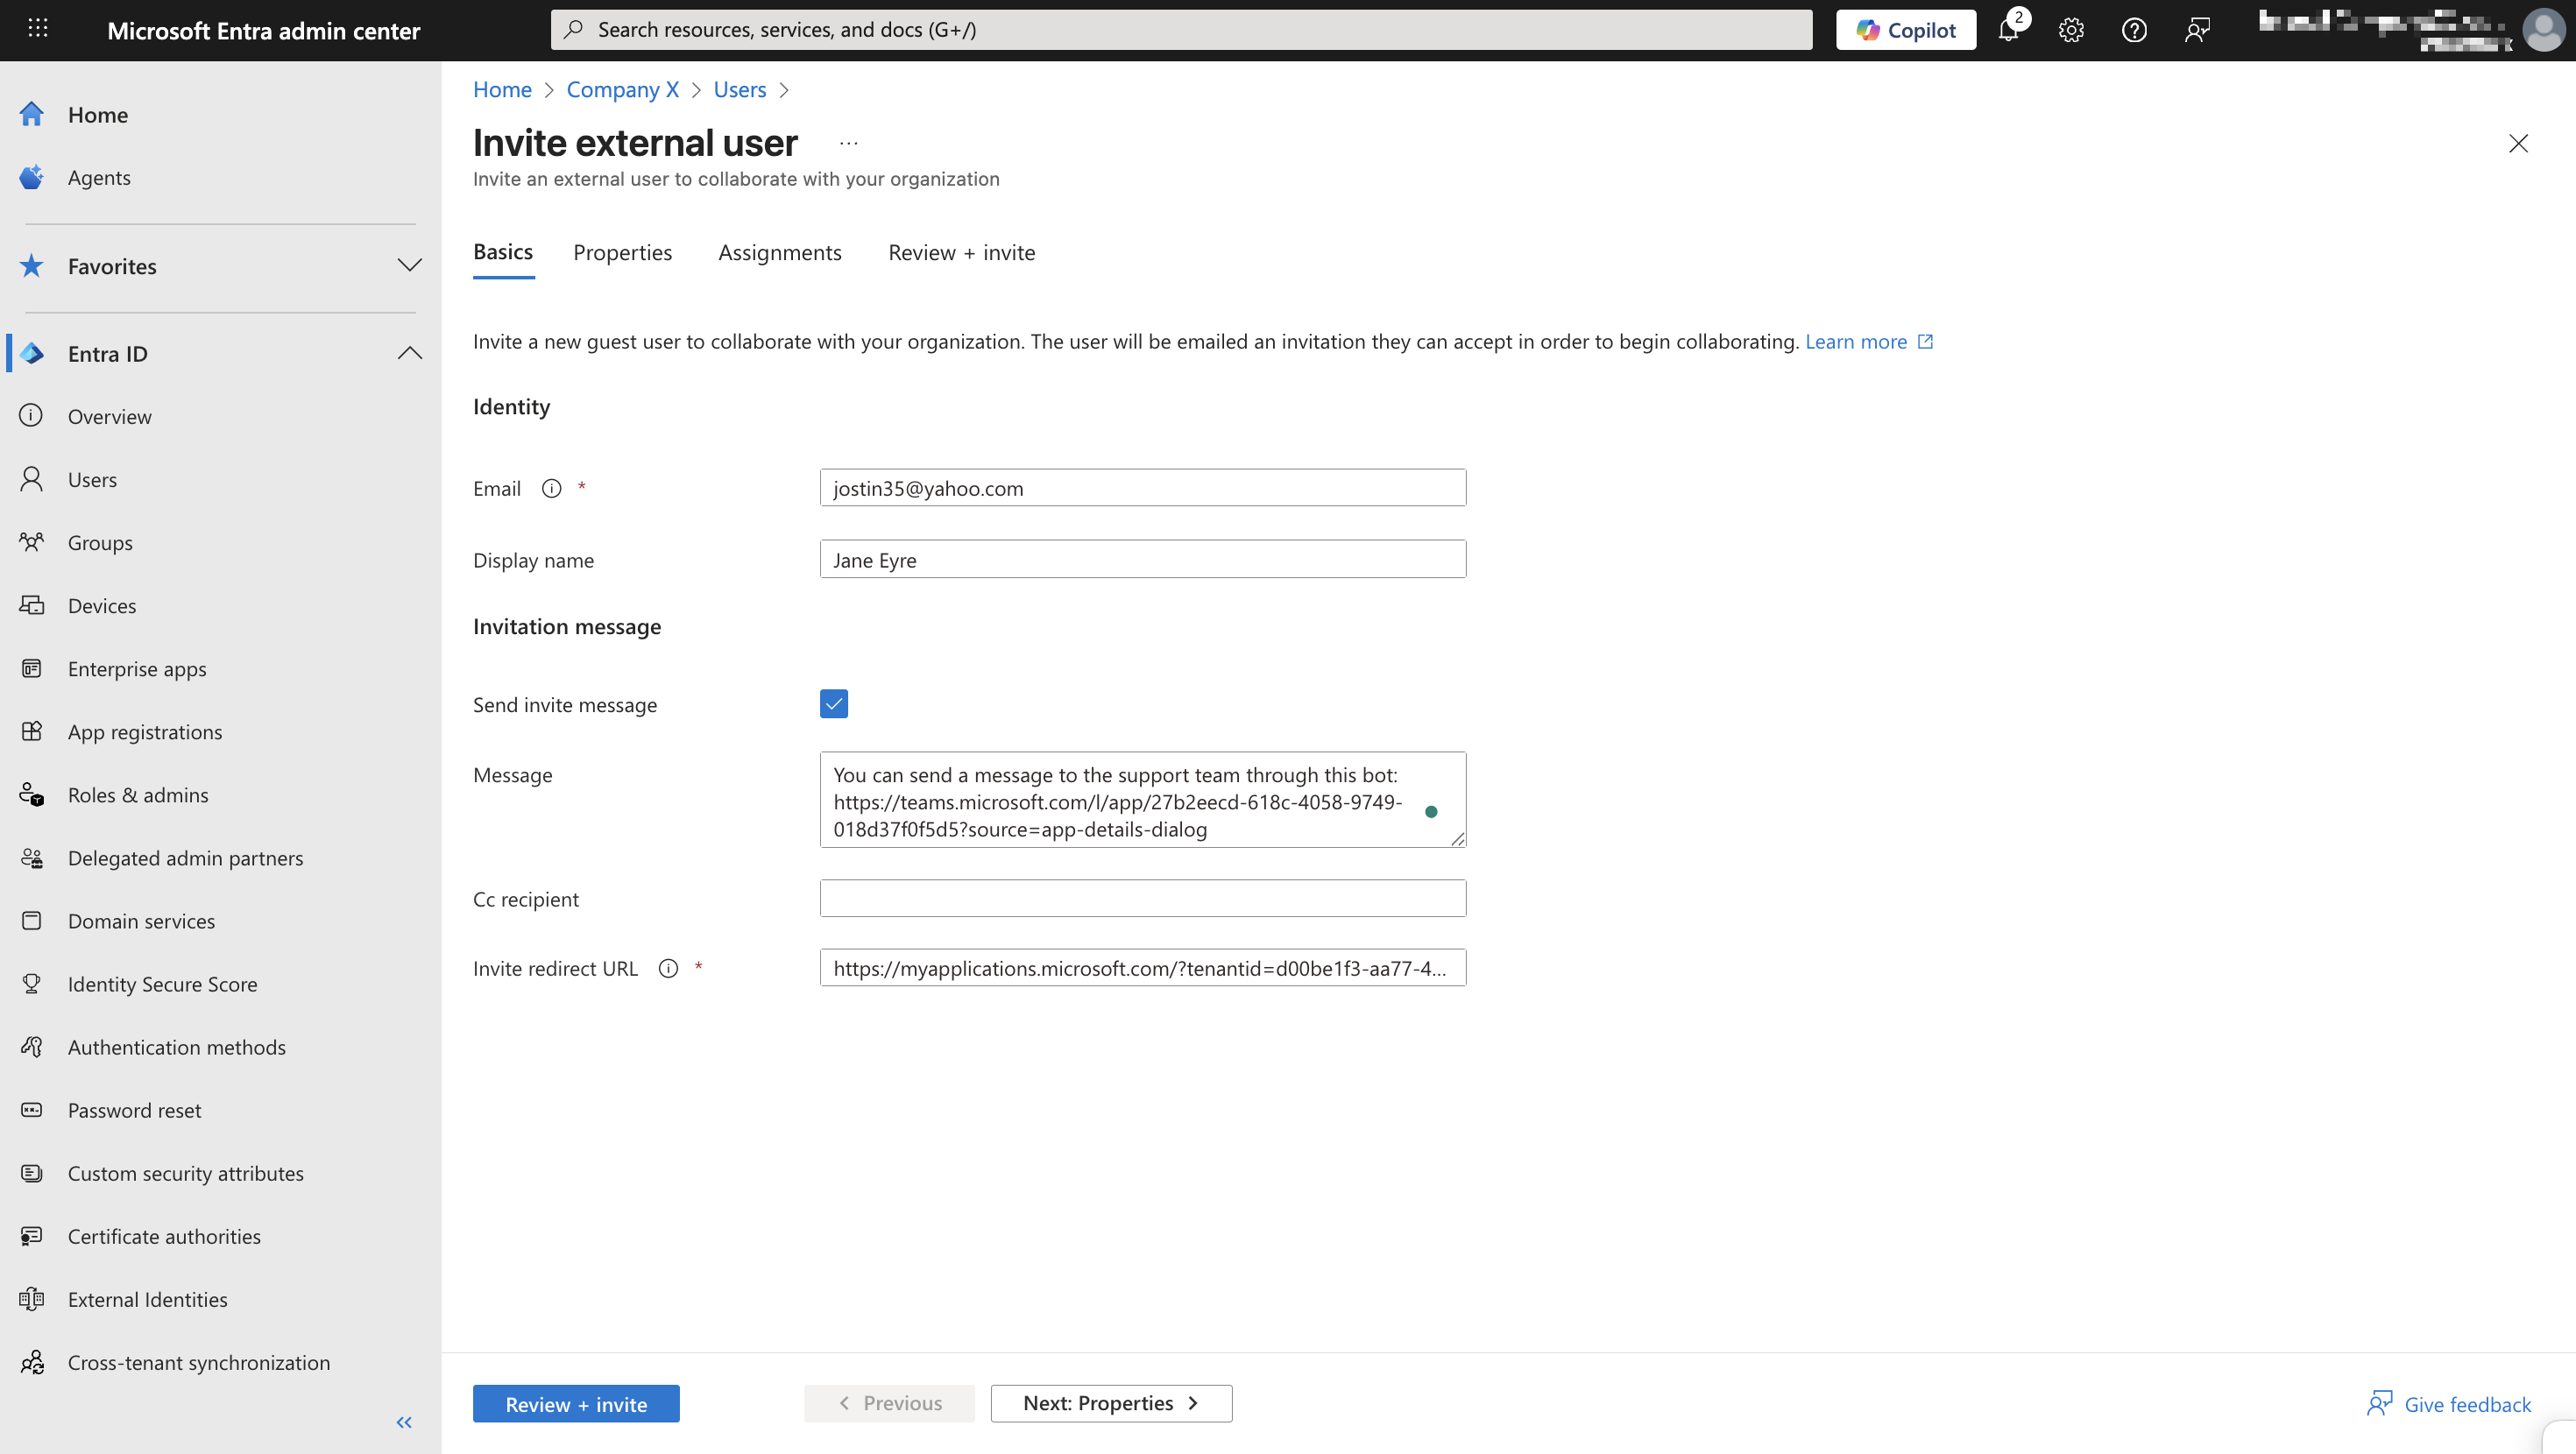
Send in the message that the user will receive the link to the bot from the Microsoft Teams widget channel. After authorization within the company’s space, they will be able to open the conversation with the bot by following the link in the format: "https://teams.microsoft.com/l/chat/0/0?users=28:[bot_ID]".
If needed, you can add extra user details in the "Properties" tab—such as their name, organization, or notes.
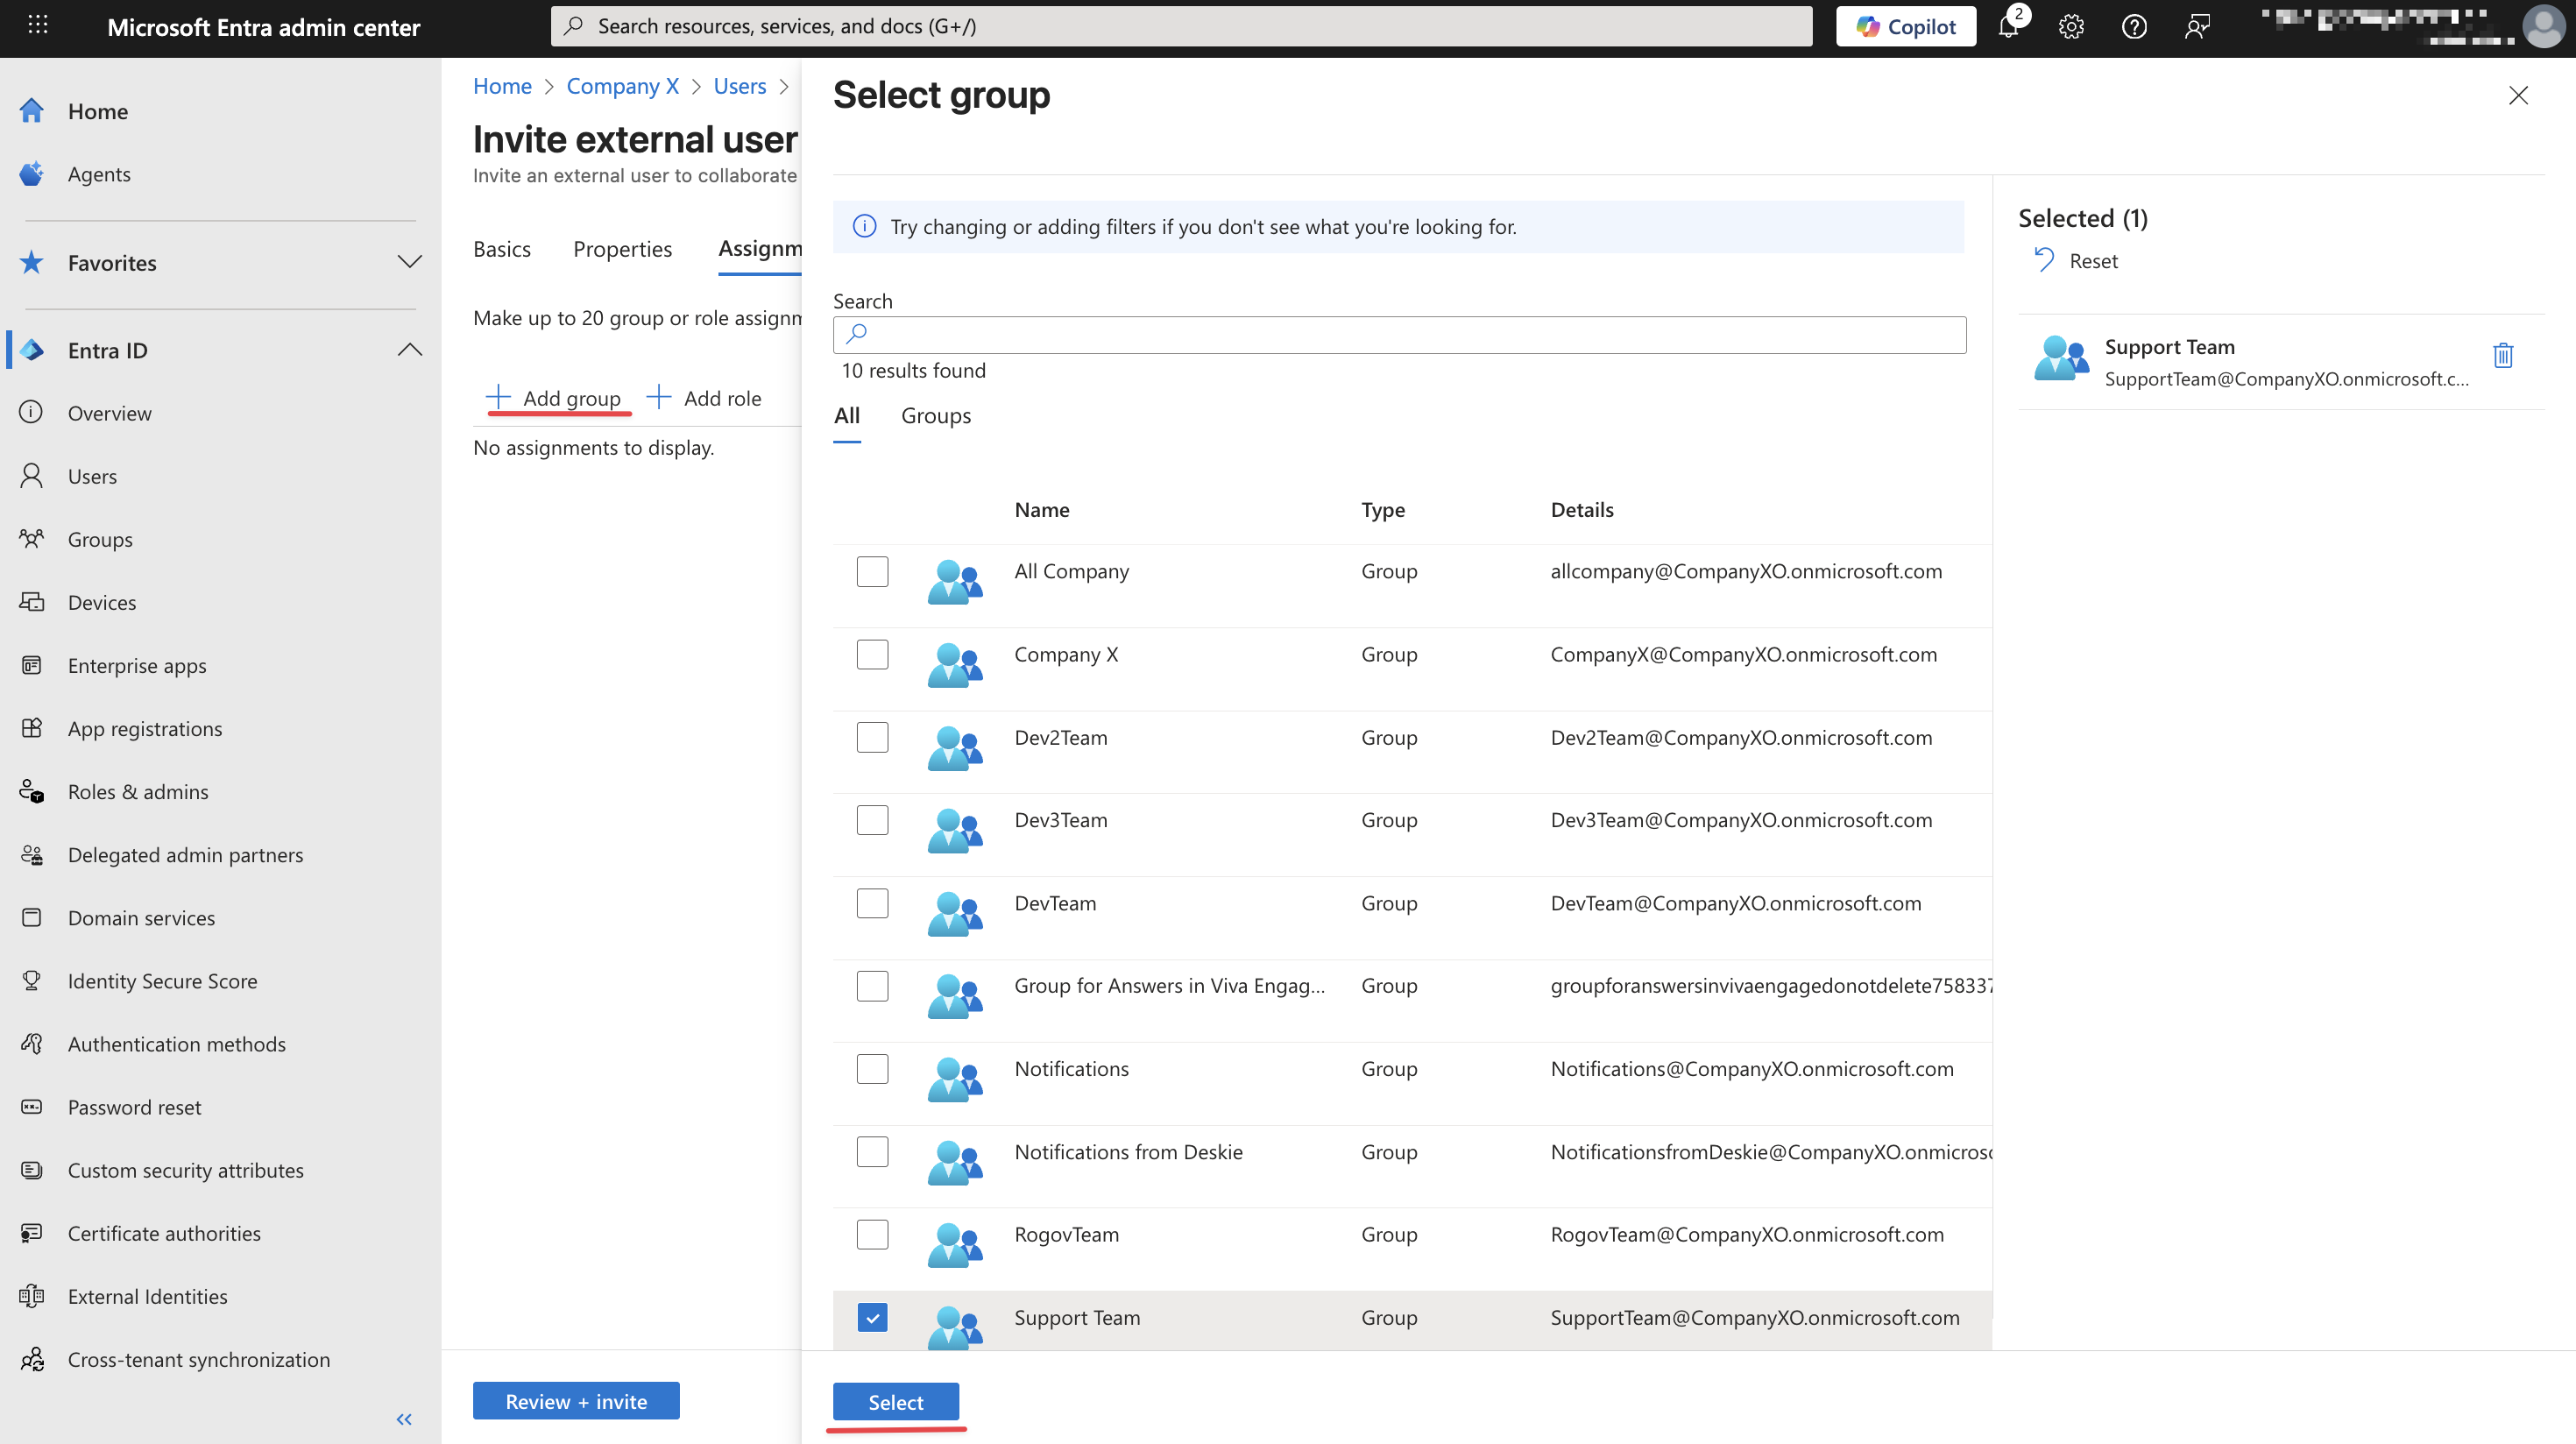
In the "Assignments" tab, you can specify which Teams teams and channels the guest should be added to. This is useful if you want the user to interact with the bot in group chats or channels, not just in a private conversation.
To do this, click the "Add group" button, select the desired teams by ticking the corresponding checkboxes, and then click "Select".
3. Click the "Invite" button, and the user will receive an invitation email.
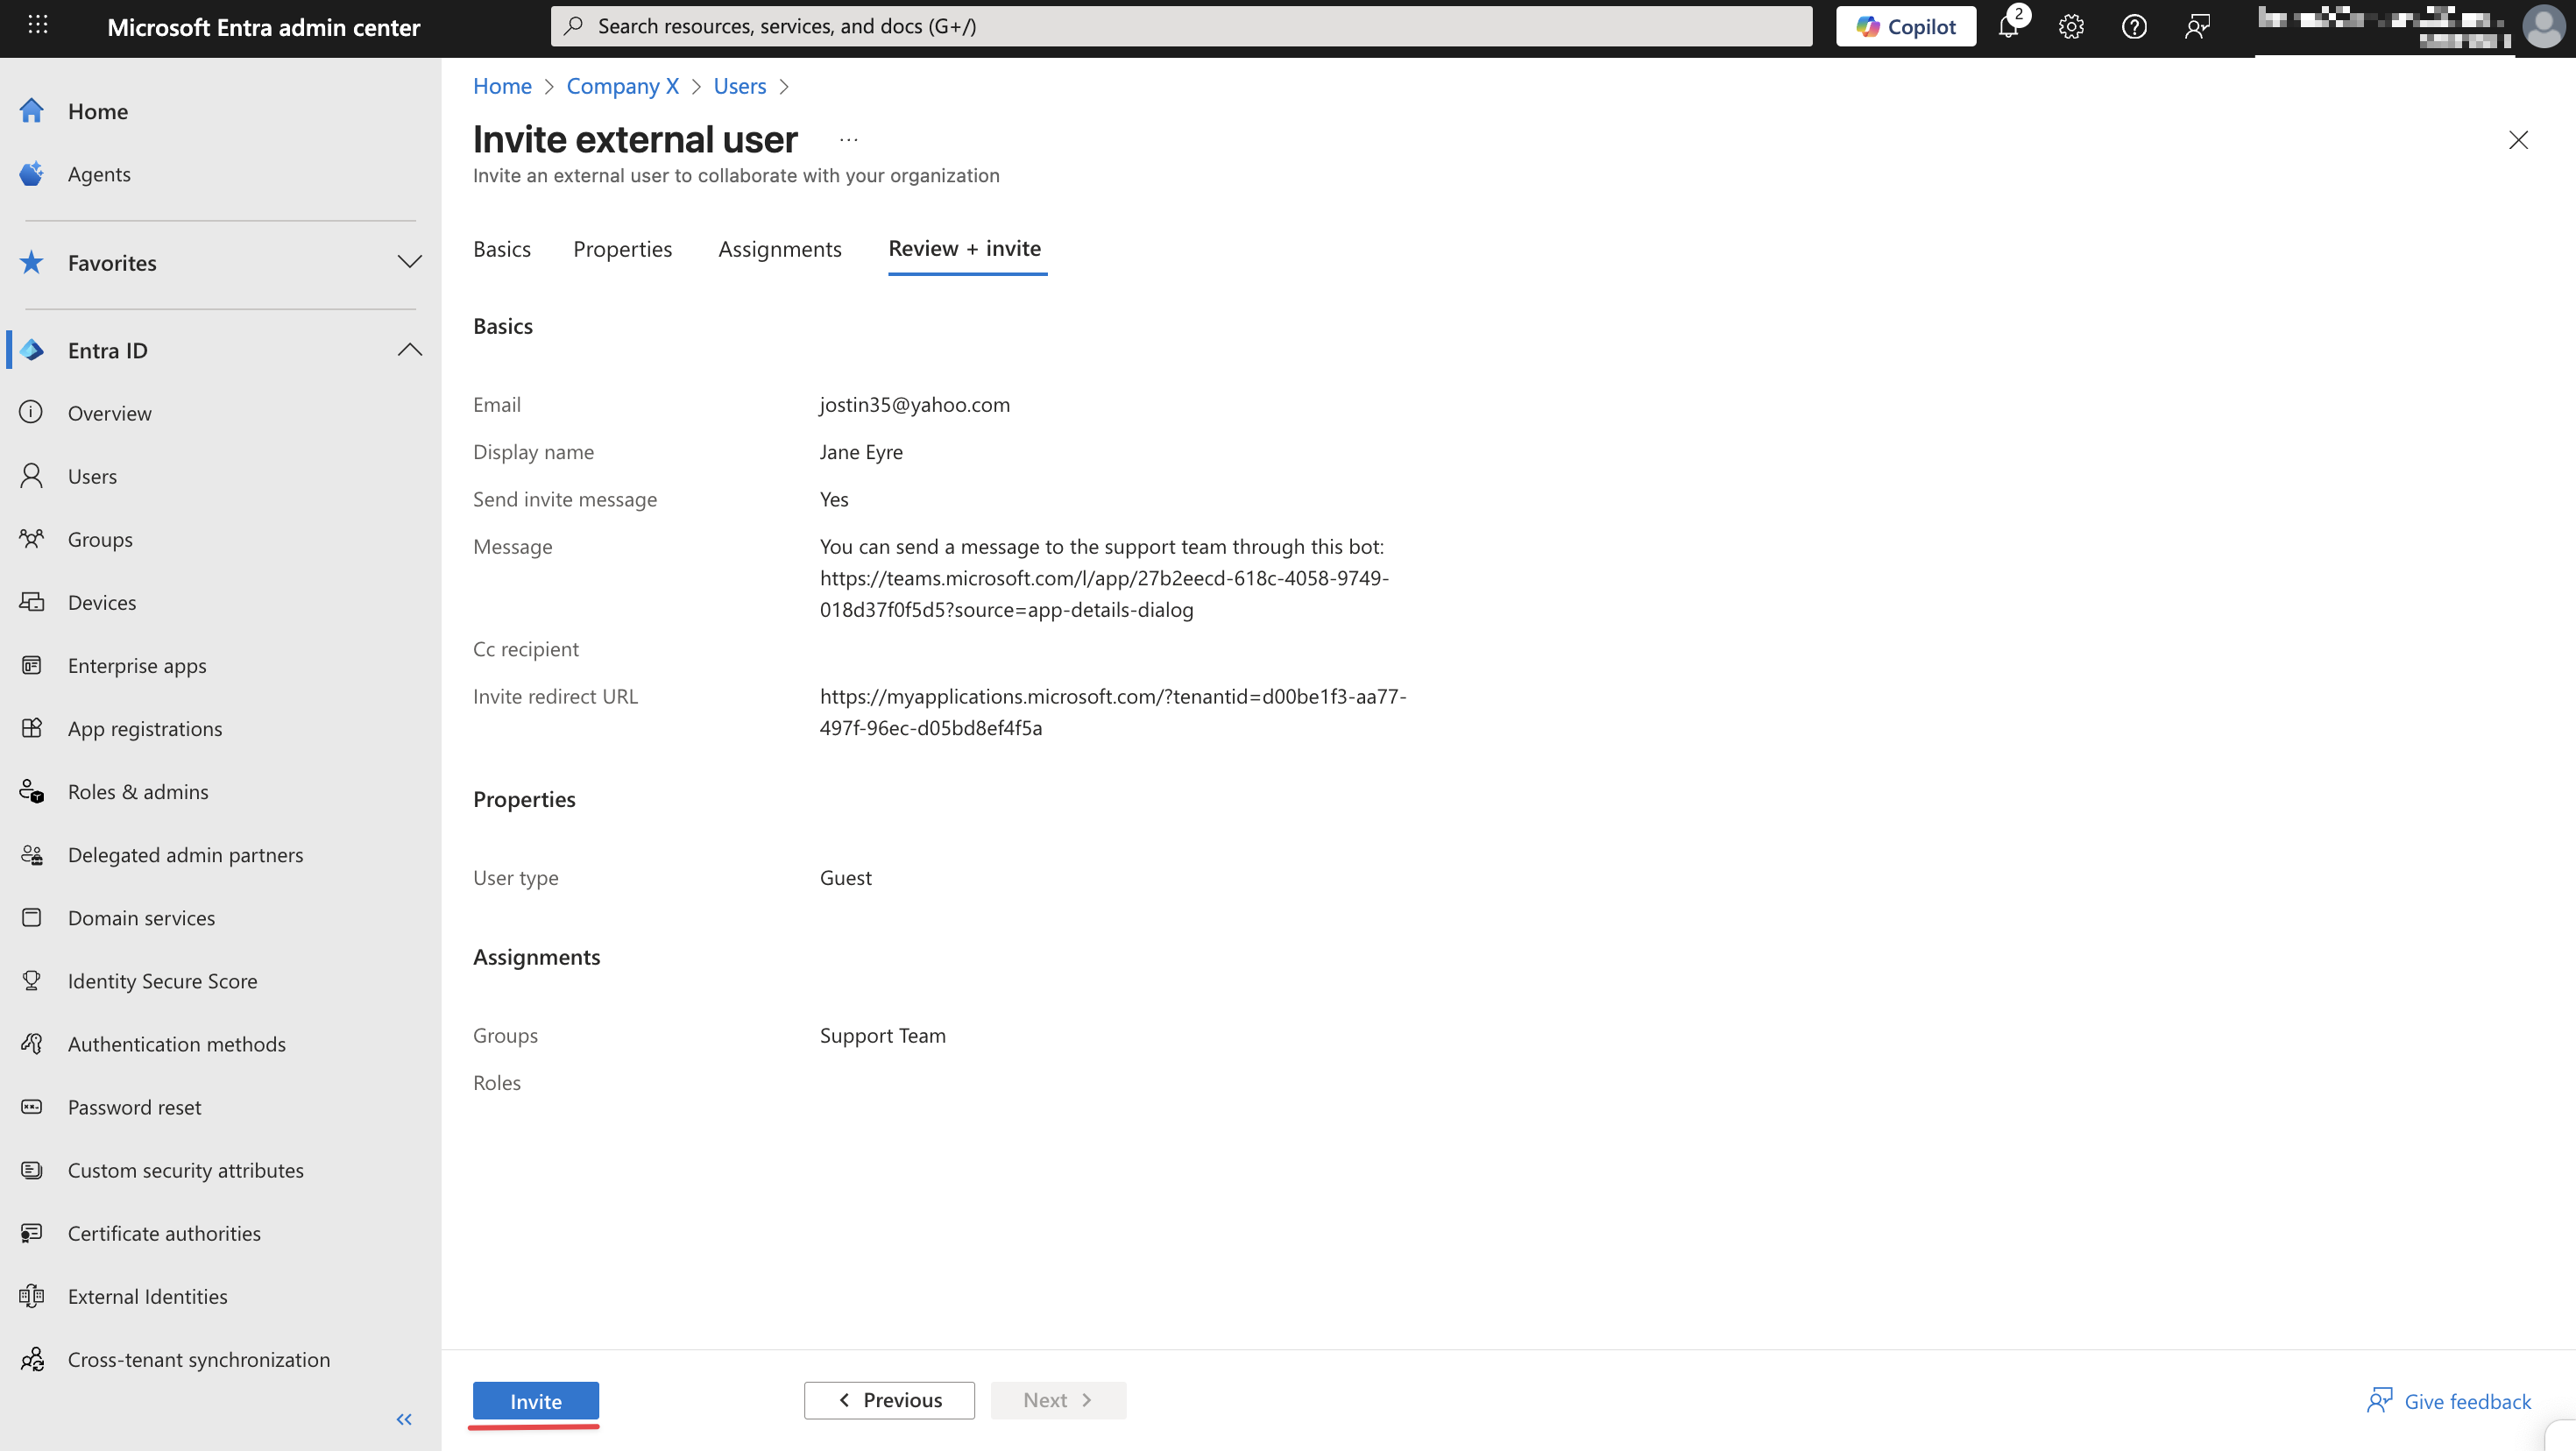
After accepting the invitation in Teams, the guest user will gain access to the assigned teams and will be able to use the app both in group chats and in private conversations with the bot.
Option 2 — through Microsoft Azure
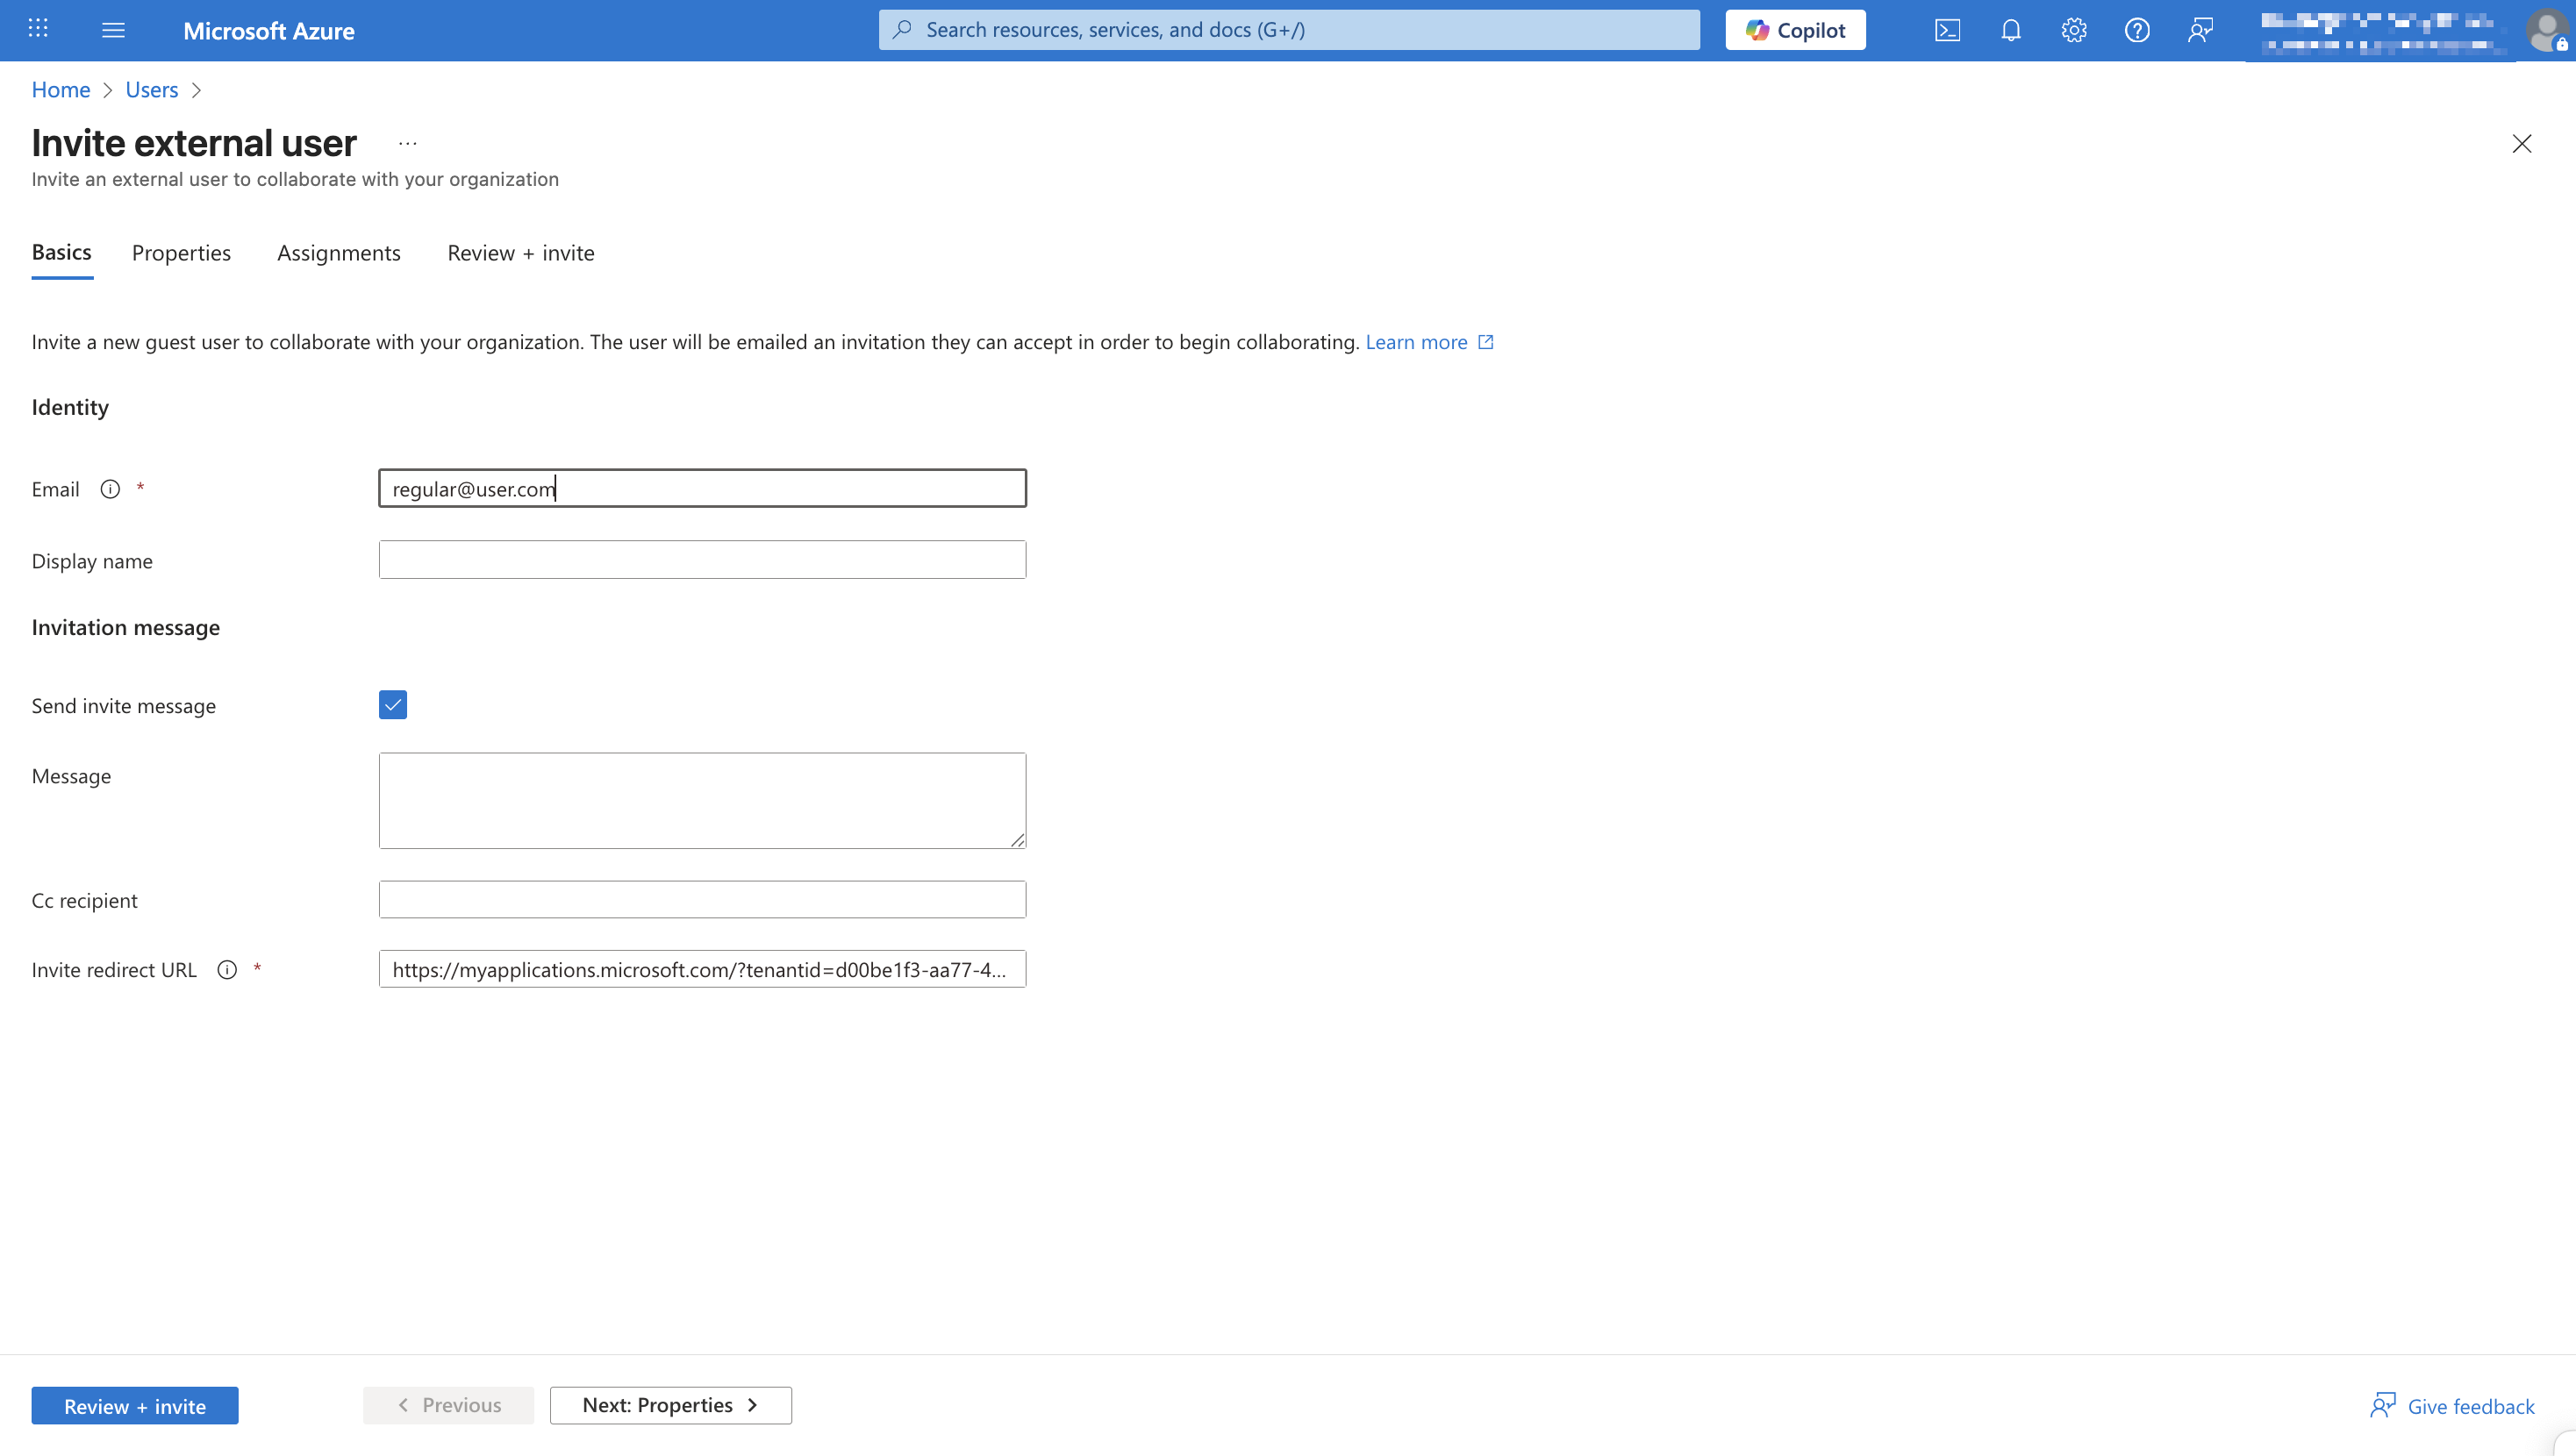
1. Go to the Users page in Azure Active Directory using the Microsoft Teams administrator account → click "New user" → select the option "Invite external user".

2. On the page that opens, enter the email address of the user you want to invite.
If desired, you can also specify:
- display name,
- invitation message,
- additional recipient (CC).
Then click "Review + invite", and afterwards click "Invite" to send the invitation.
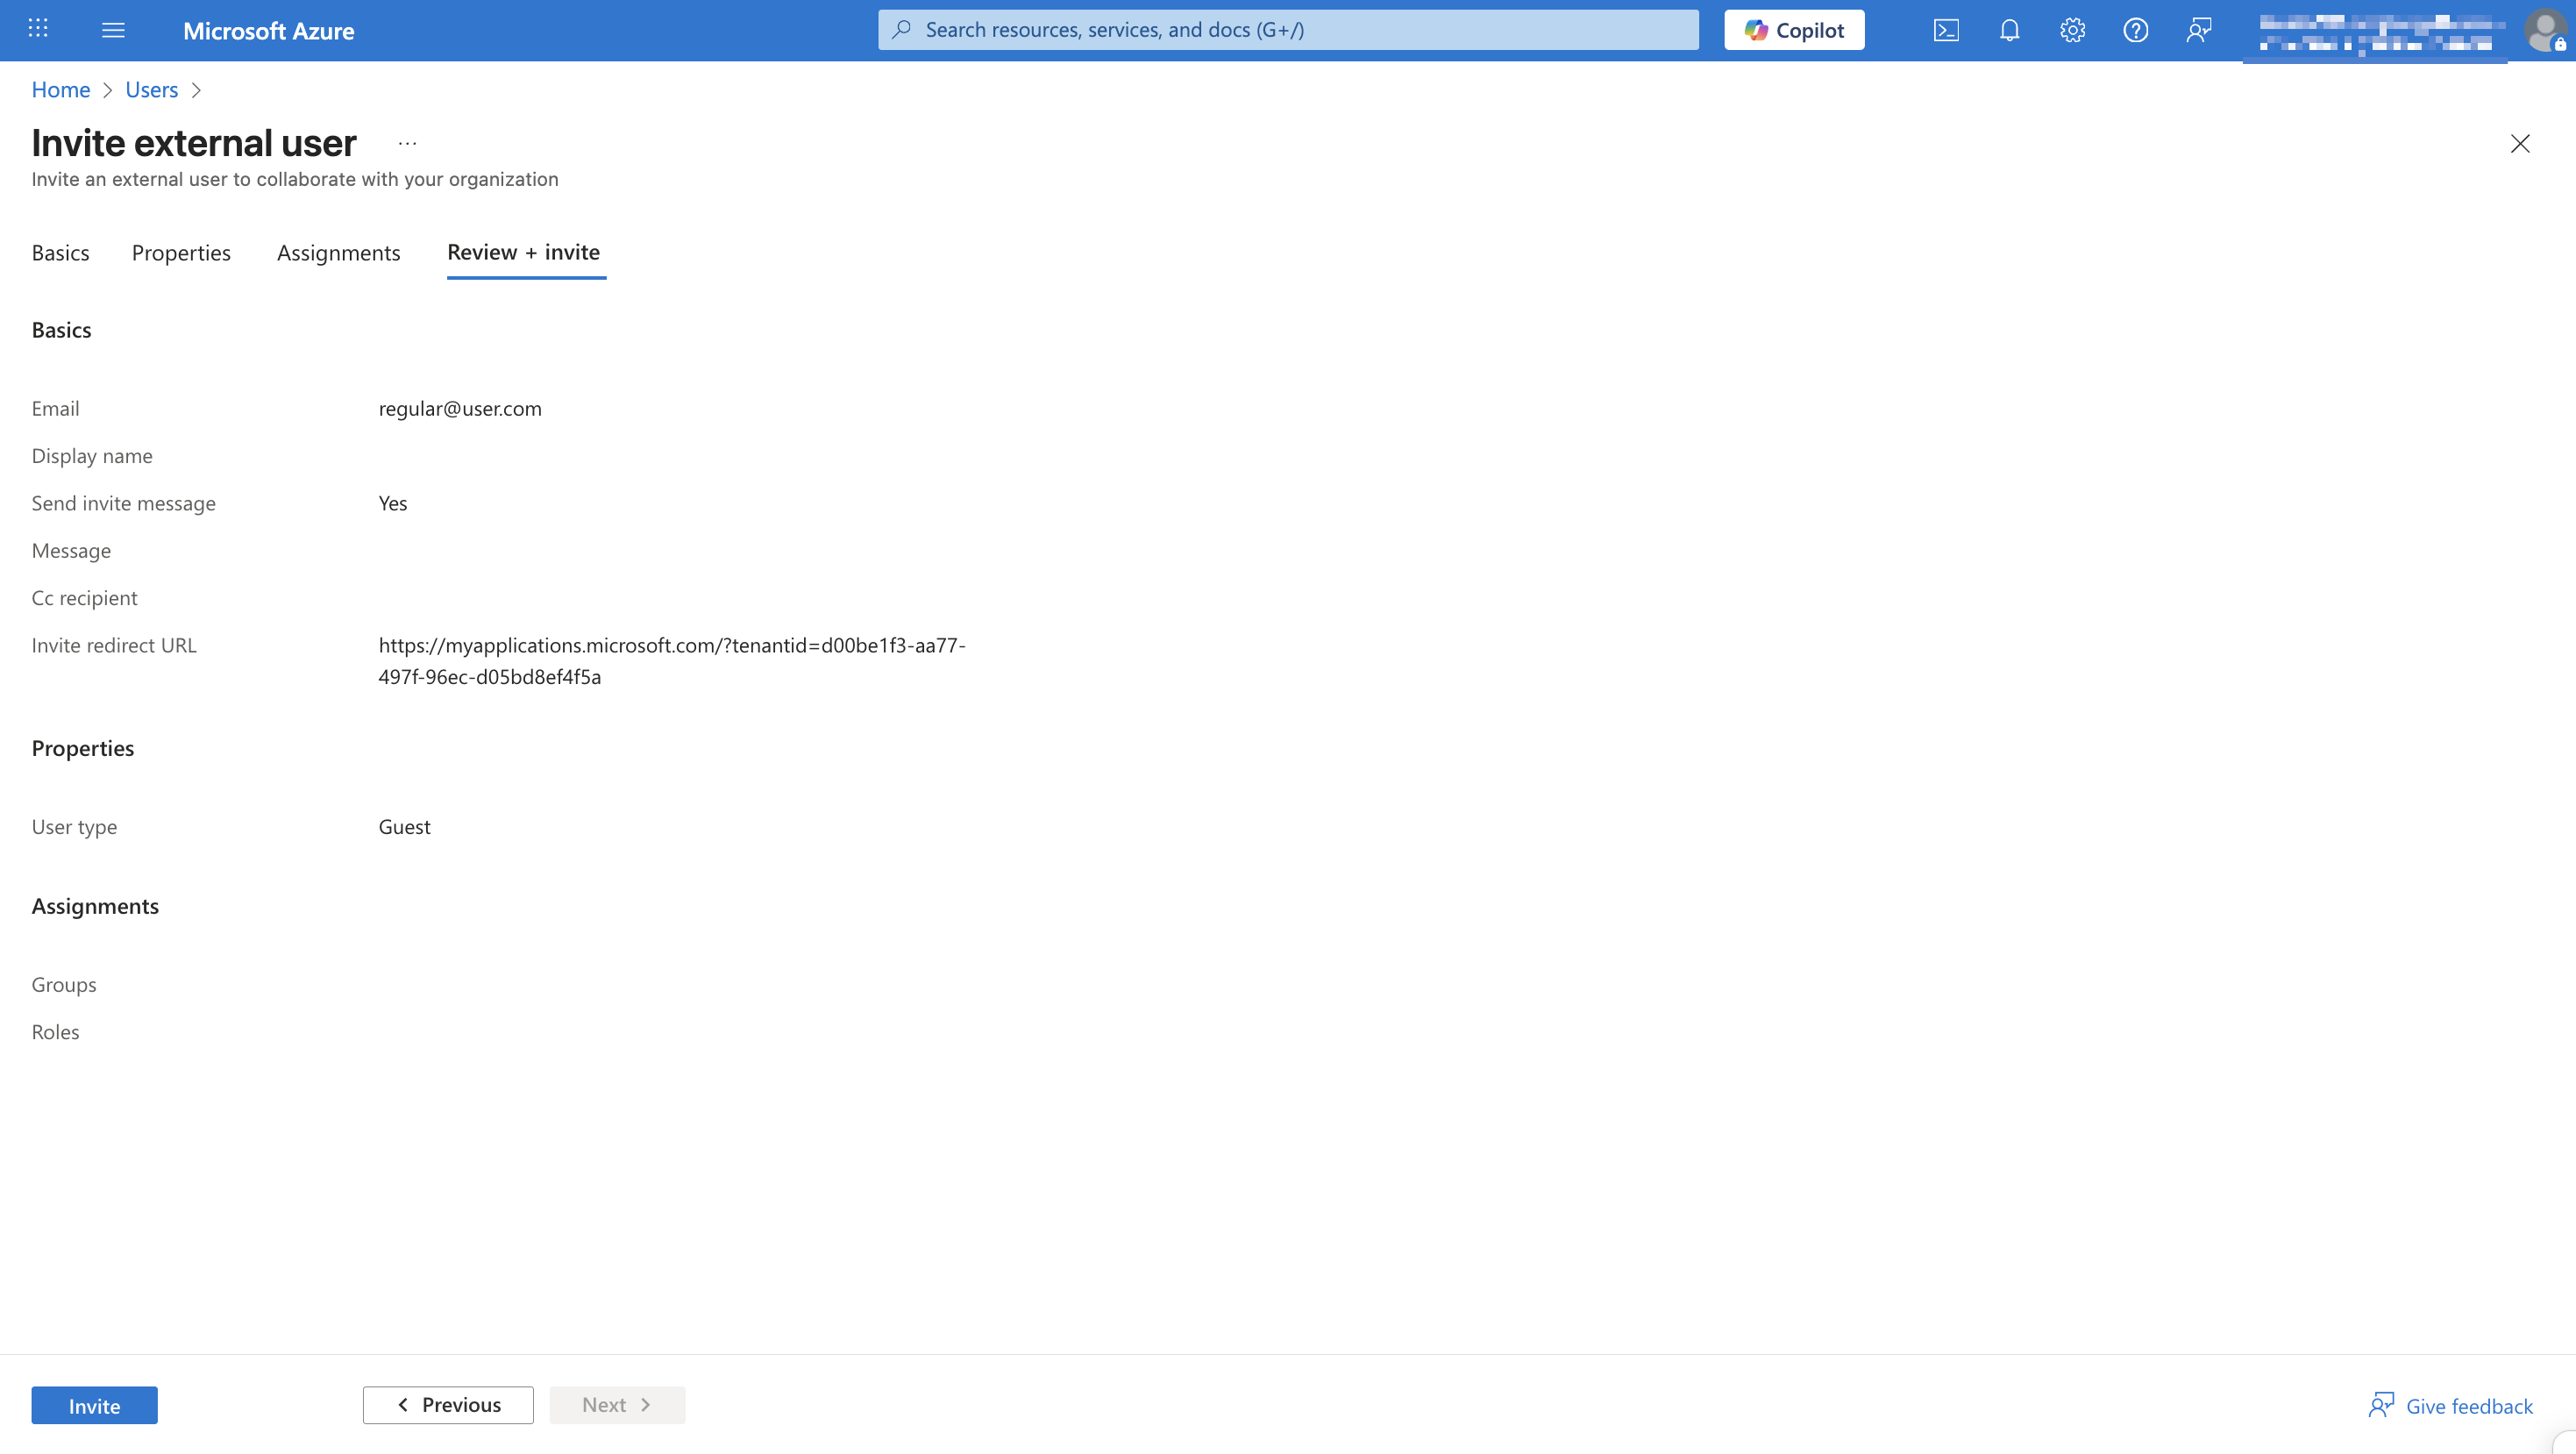
3. The user will receive an email with a link that they need to follow to authenticate in the workspace. They will also need to set up 2FA using the Microsoft Authenticator:
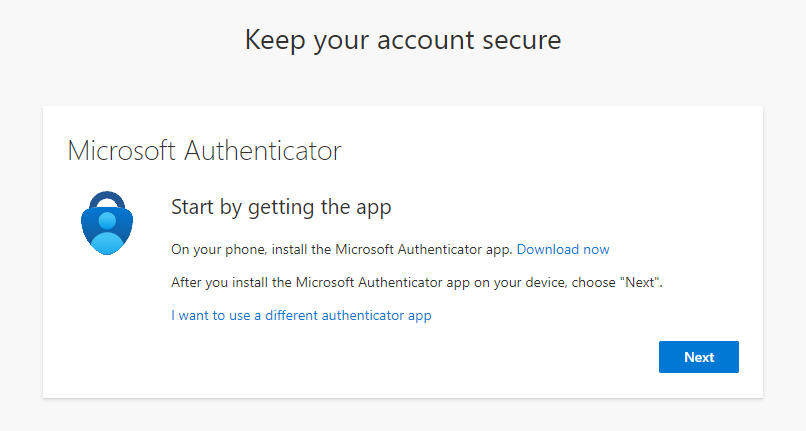
After accepting the invitation in Teams, the guest user will gain access to the assigned teams and will be able to use the app both in group chats and in private conversations with the bot.
What do Microsoft Teams cases look like in Deskie?
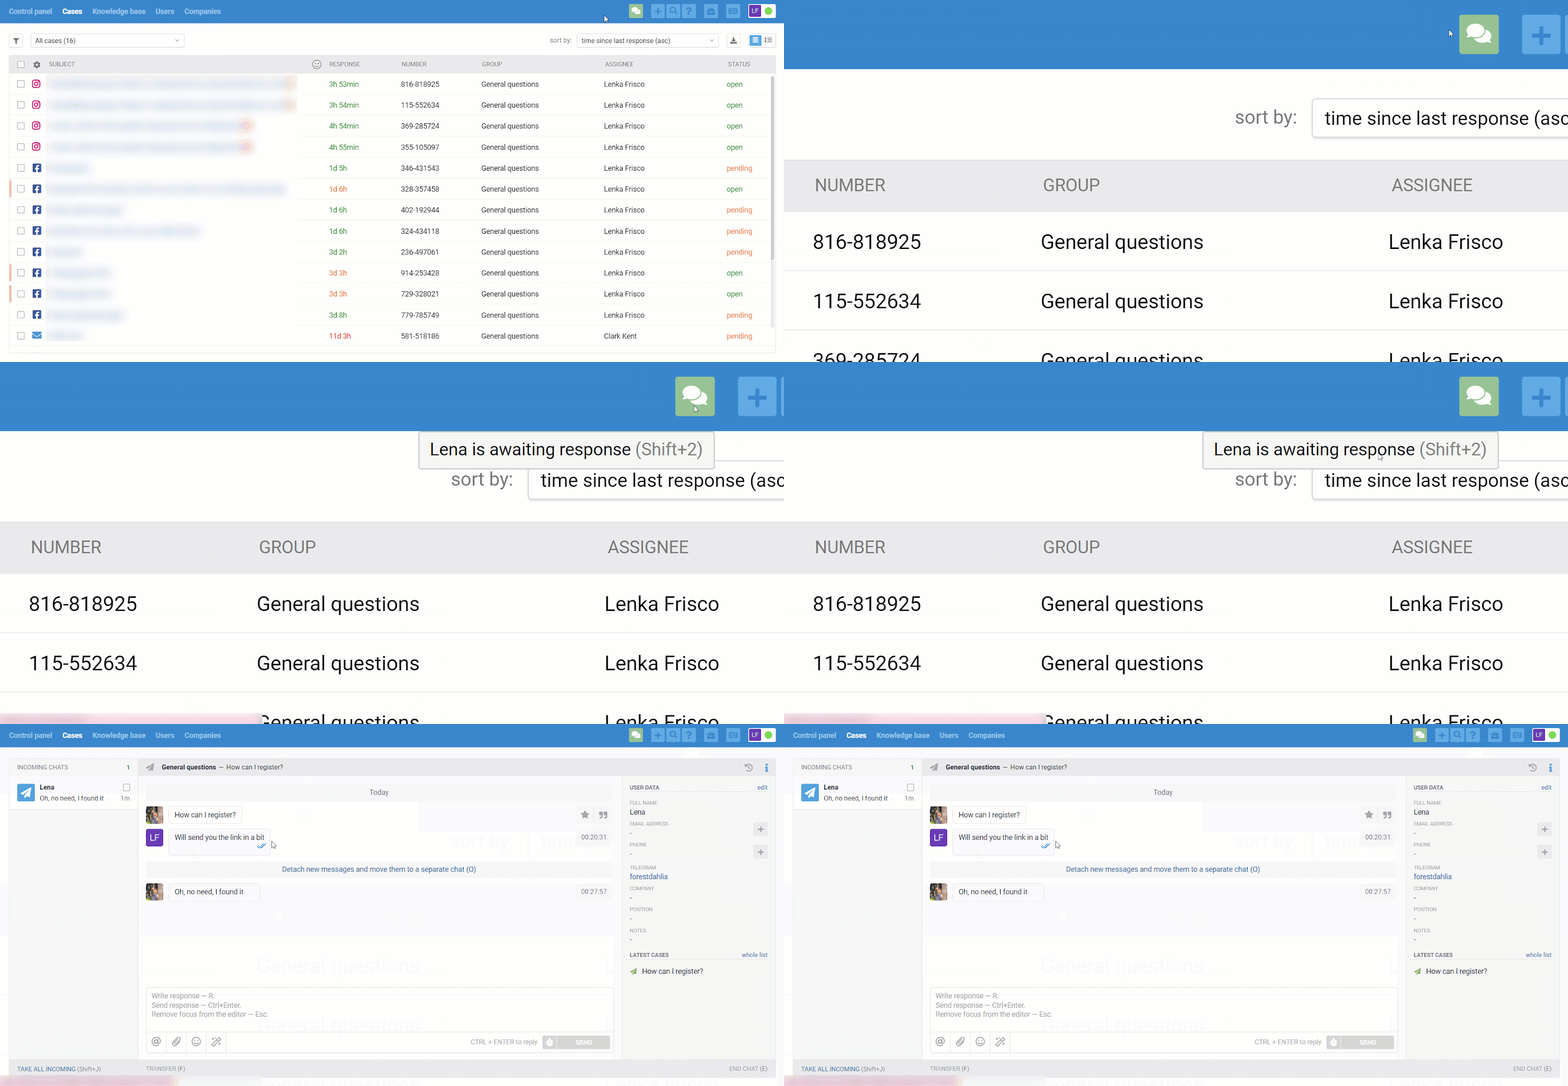
Group chat behavior in Microsoft Teams
Group communication in Microsoft Teams is implemented similarly to other channels that support this option. More
Important distinctions:
- To have the group or channel name automatically inserted into the subjects of cases, the application must be granted the corresponding Microsoft Graph API permissions.
- Files sent to a bot in group chats do not arrive in Deskie — this is a limitation of Microsoft Teams. We recommend asking users to share links to files from cloud storage.
⚠️ This restriction does not apply to personal chats — files are delivered correctly there.
Creating outgoing cases
- In addition to handling new cases from users addressed to the bot, agents can also create outgoing cases directed to specific users (team members) or to standard team channels, provided the application has access to them.
To enable the creation of outgoing cases, it is essential to add API permissions and send at least one message to the bot from your workspace.
- The search for users and channels works for anyone the bot has access to through API. However, even without API access, you can still create outgoing cases to specific users who have messaged you before. To do this in Microsoft Teams, just click on their contact in the right-hand info panel on the case page in the agent's account.
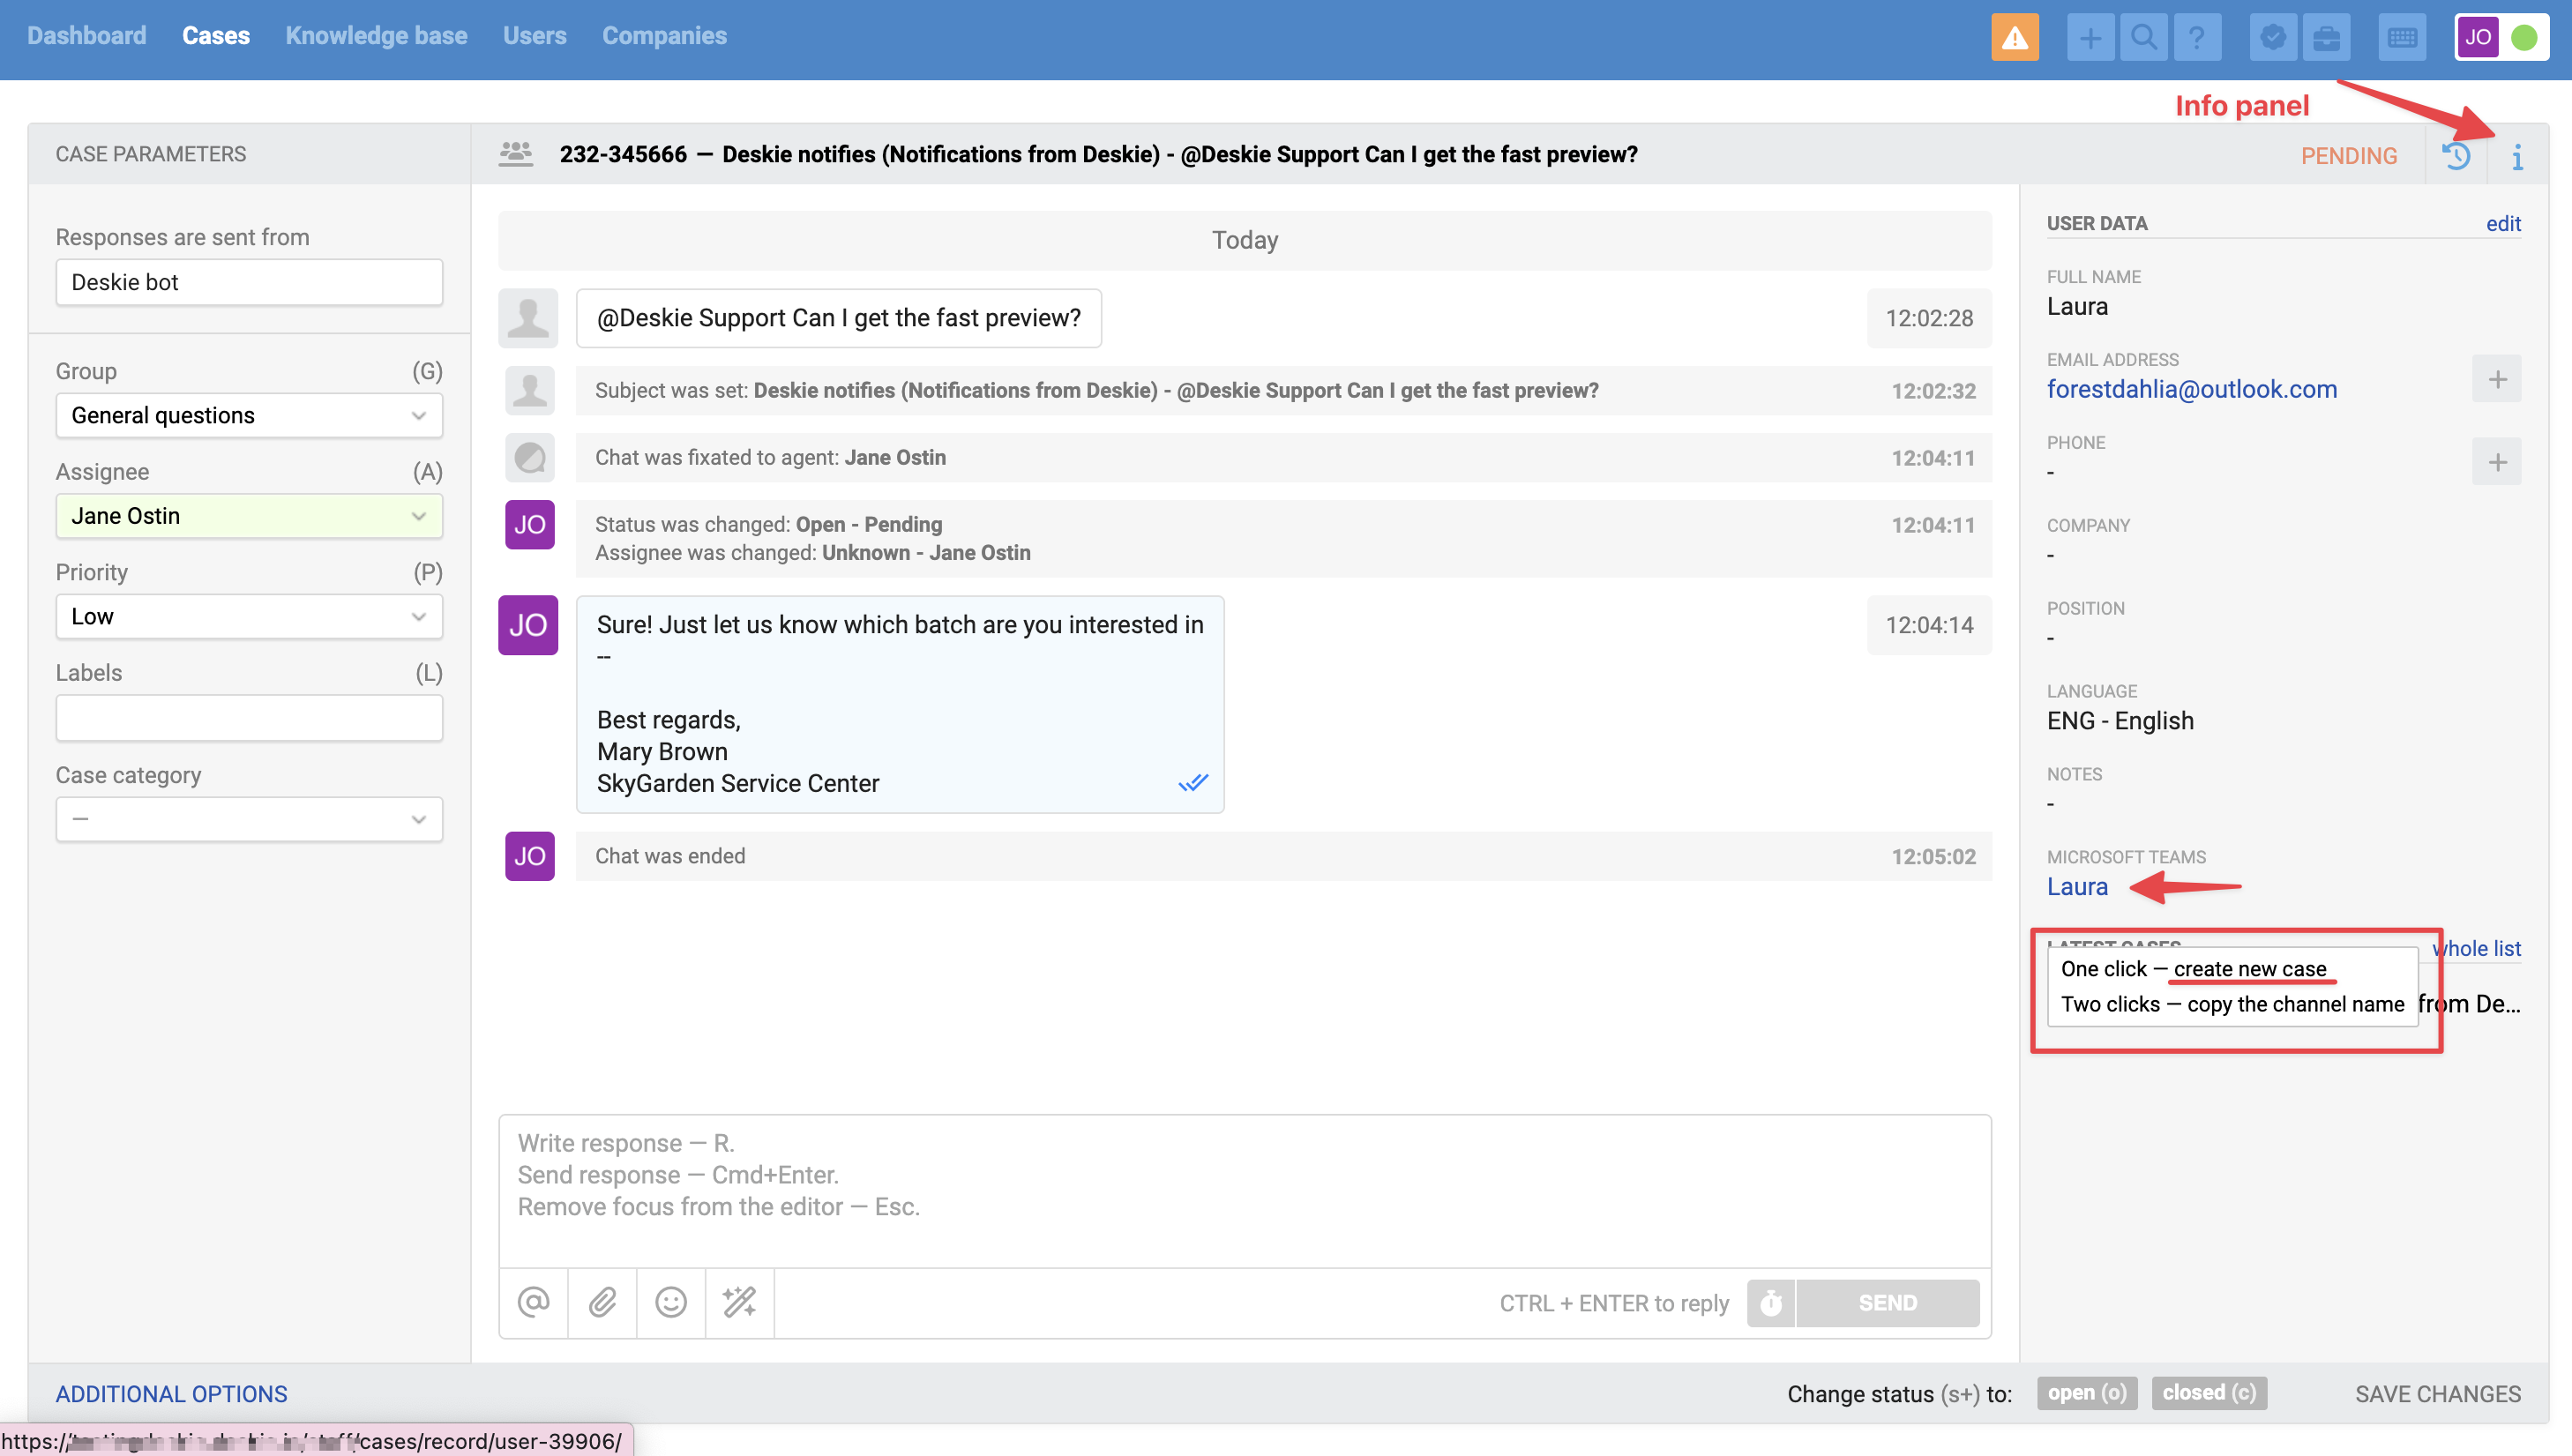
- To create an outgoing case in Teams, on the case creation page in the "Send from" field, you need to select Microsoft Teams, then start typing the name of the user or channel in the "User" field. In the search results, you can easily distinguish channels and users by the labels — channel and member, respectively.
- Outgoing cases can only be created to standard channels. Microsoft currently does not support applications in public or private channels.
- In the search results in the "User" field, the team of the channel will also be displayed.

Sharing the app with another workspace
If your bot needs to work not only within your organization but also for other organizations to use it in their Teams workspace, you need to provide the manifest and instructions to the external IT team so they can install the app in their workspace.
For example, if you are a contractor or service provider and the customer wants to communicate with your support service directly through Teams, you must give them the opportunity to install your bot in their environment.
Starting July 31, 2025, Microsoft will no longer allow the creation of multitenant applications (the "Multi Tenant" option). However, multitenant bots that have already been created will continue to work and can still be used for integration.
What you need to do on your side
1. In the Teams developer center, go to the apps list page → select the app you want to share.
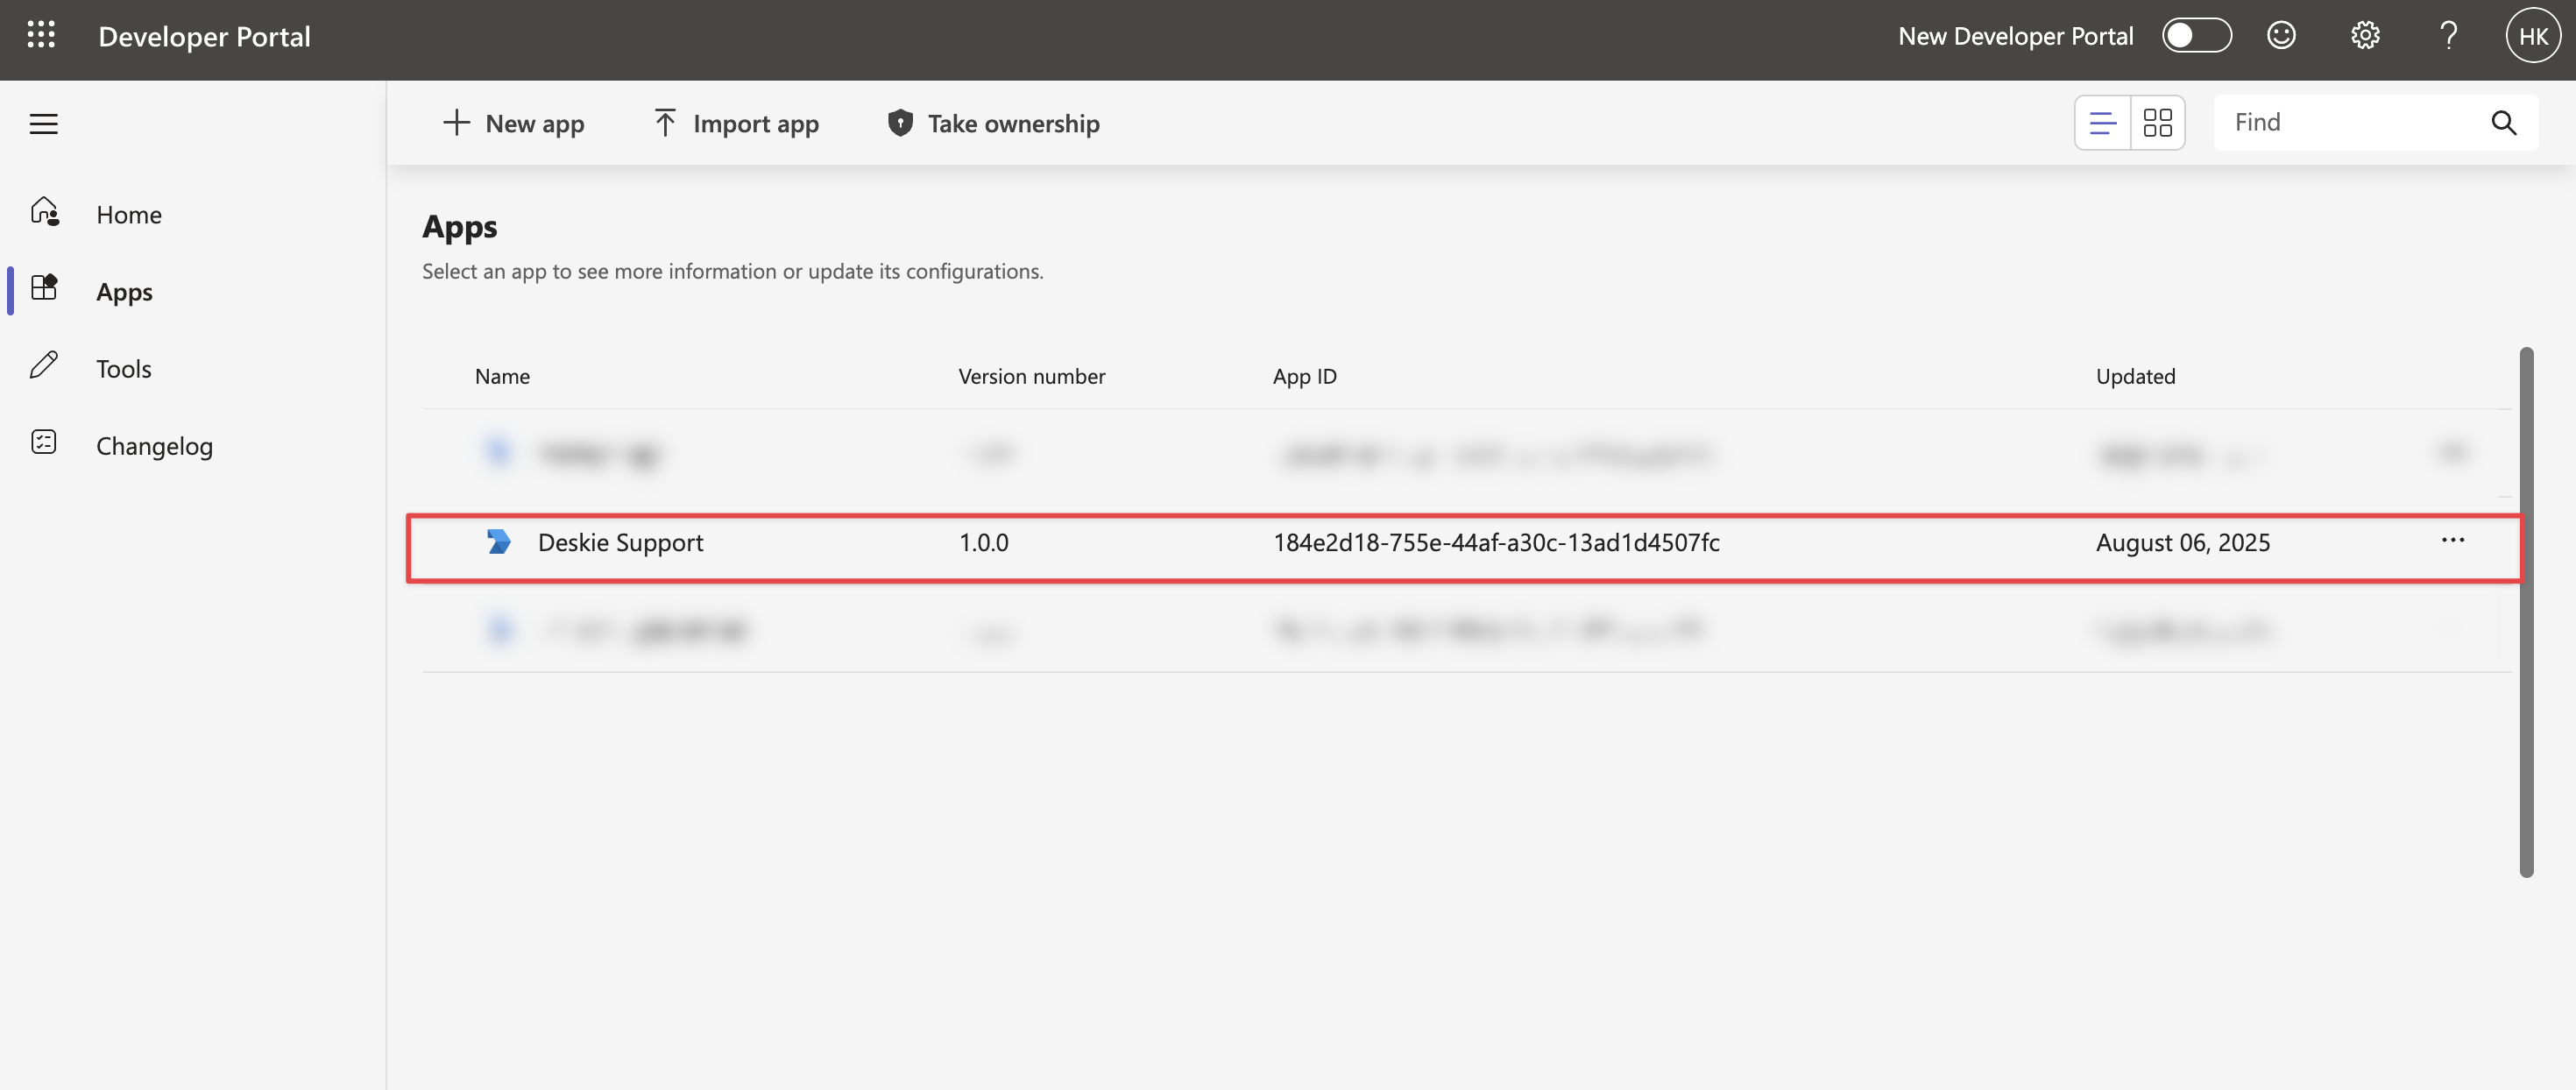
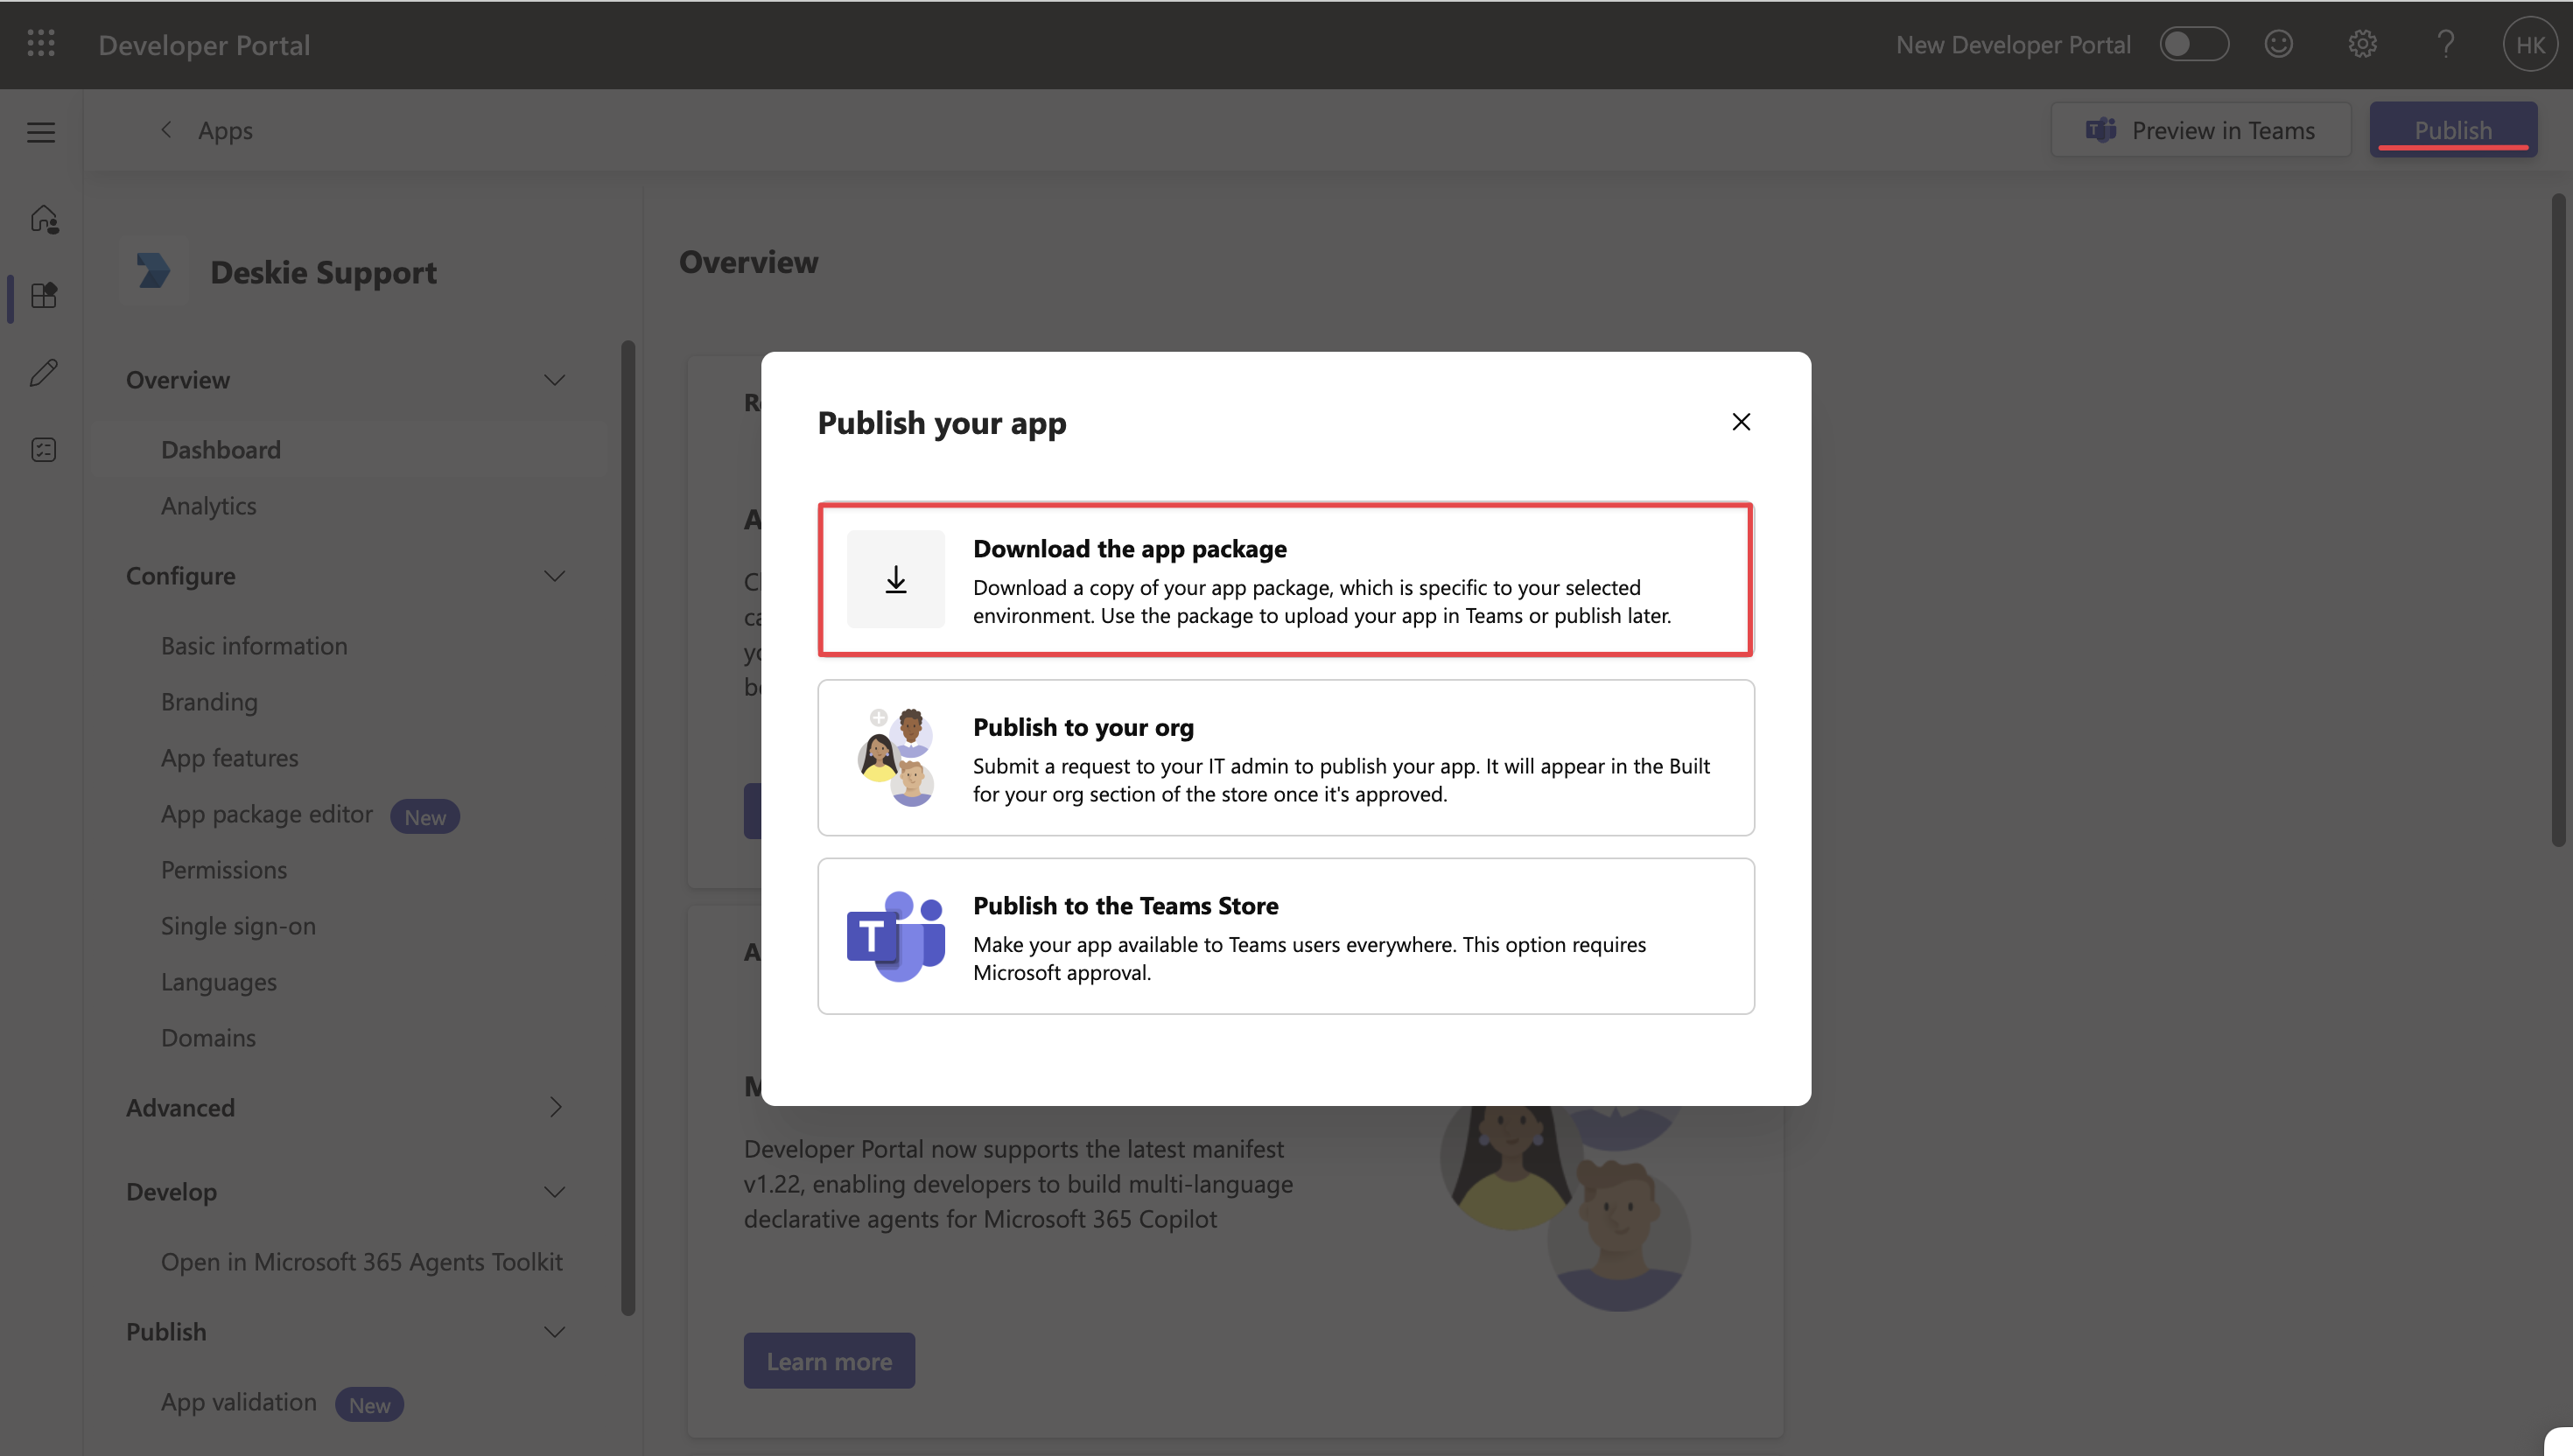
In the upper right corner, click the "Publish" button and select the option "Download the app package".
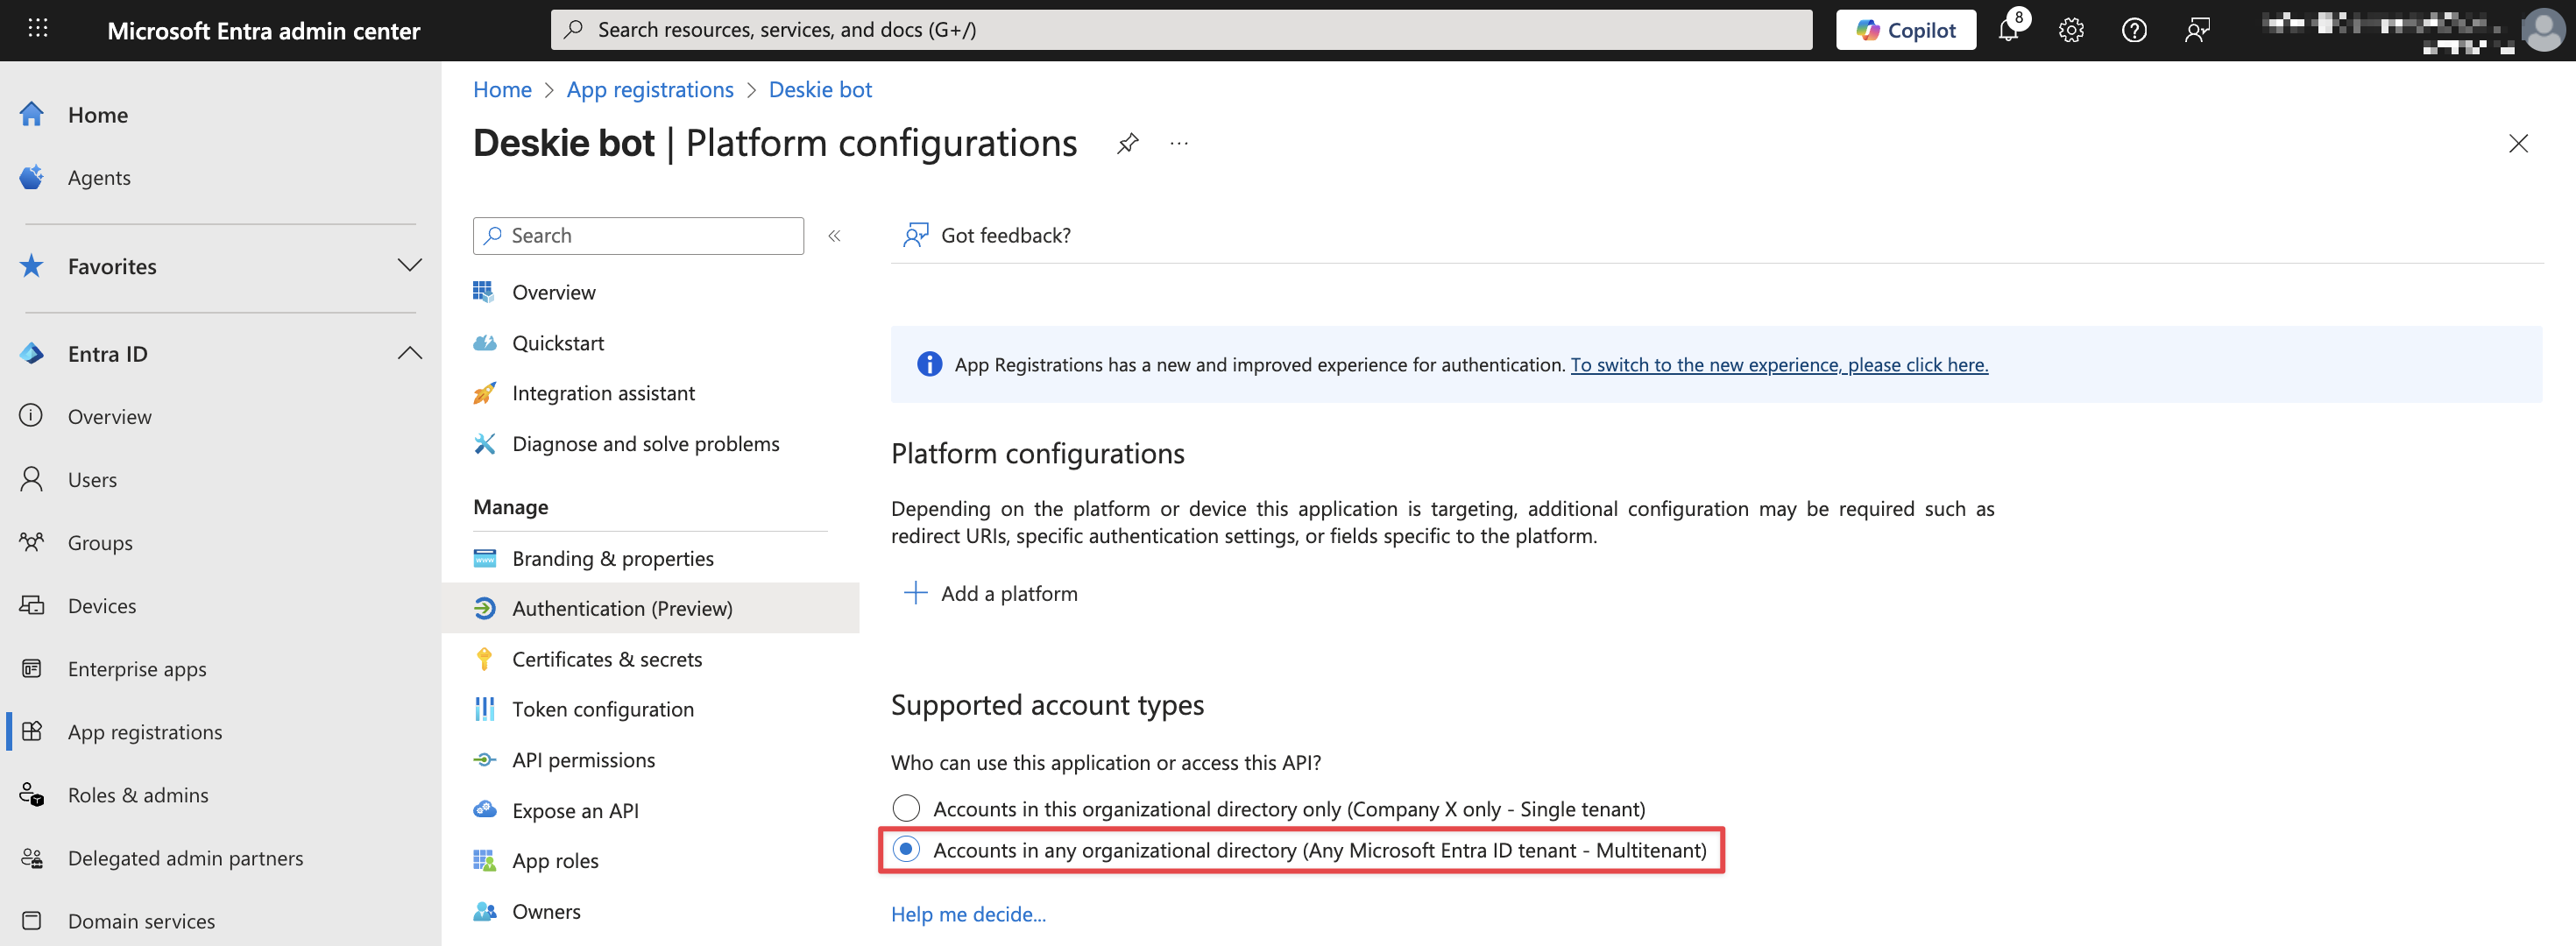
2. To provide API permissions for the bot in other workspaces, go to the Microsoft Entra admin center → App registrations → All applications:
а) select your bot used by the application → Manage → Authentication (Preview) → in the "Supported account types" section, choose "Accounts in any organizational directory (Any Microsoft Entra ID tenant - Multitenant)".
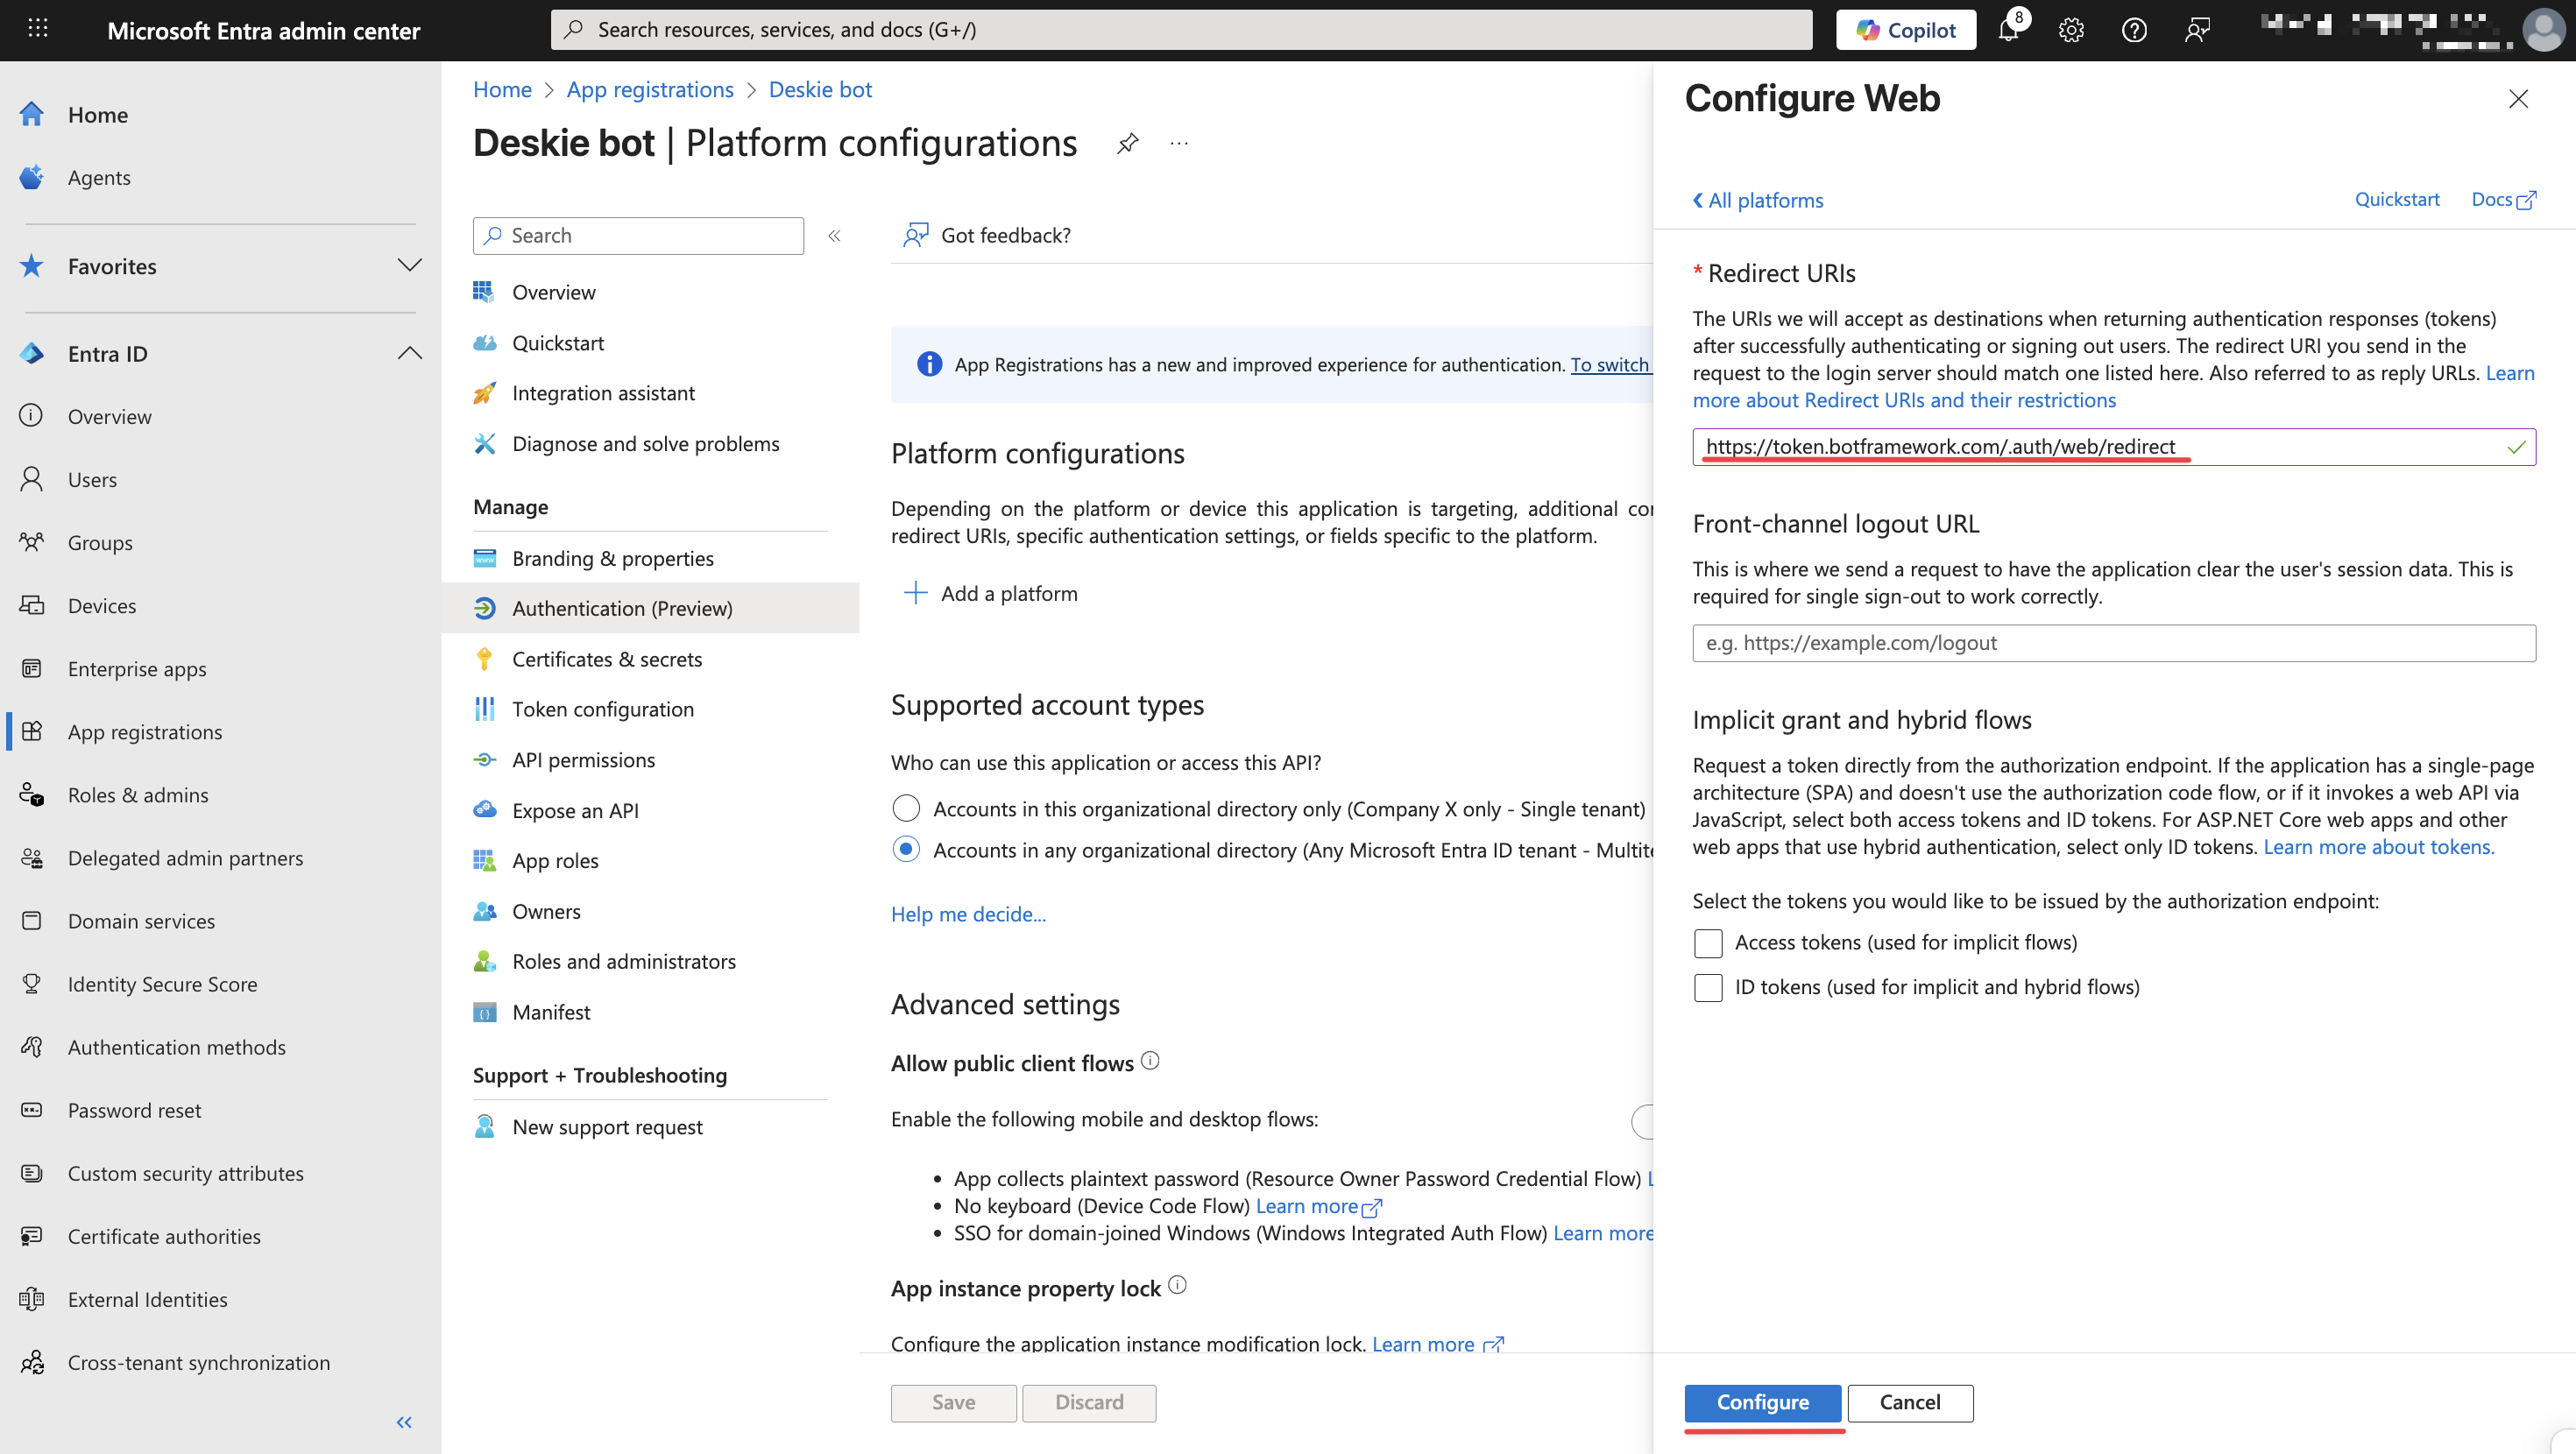
b) click the "Add a platform" button → select "WEB" → in the "Redirect URI" field, enter the following link and click the "Configure" button:
https://token.botframework.com/.auth/web/redirect
c) select your bot used by the application → Manage → Authentication (Preview) → in the "Supported account types" section, choose "Accounts in this organizational directory only (Company X only - Single tenant)".
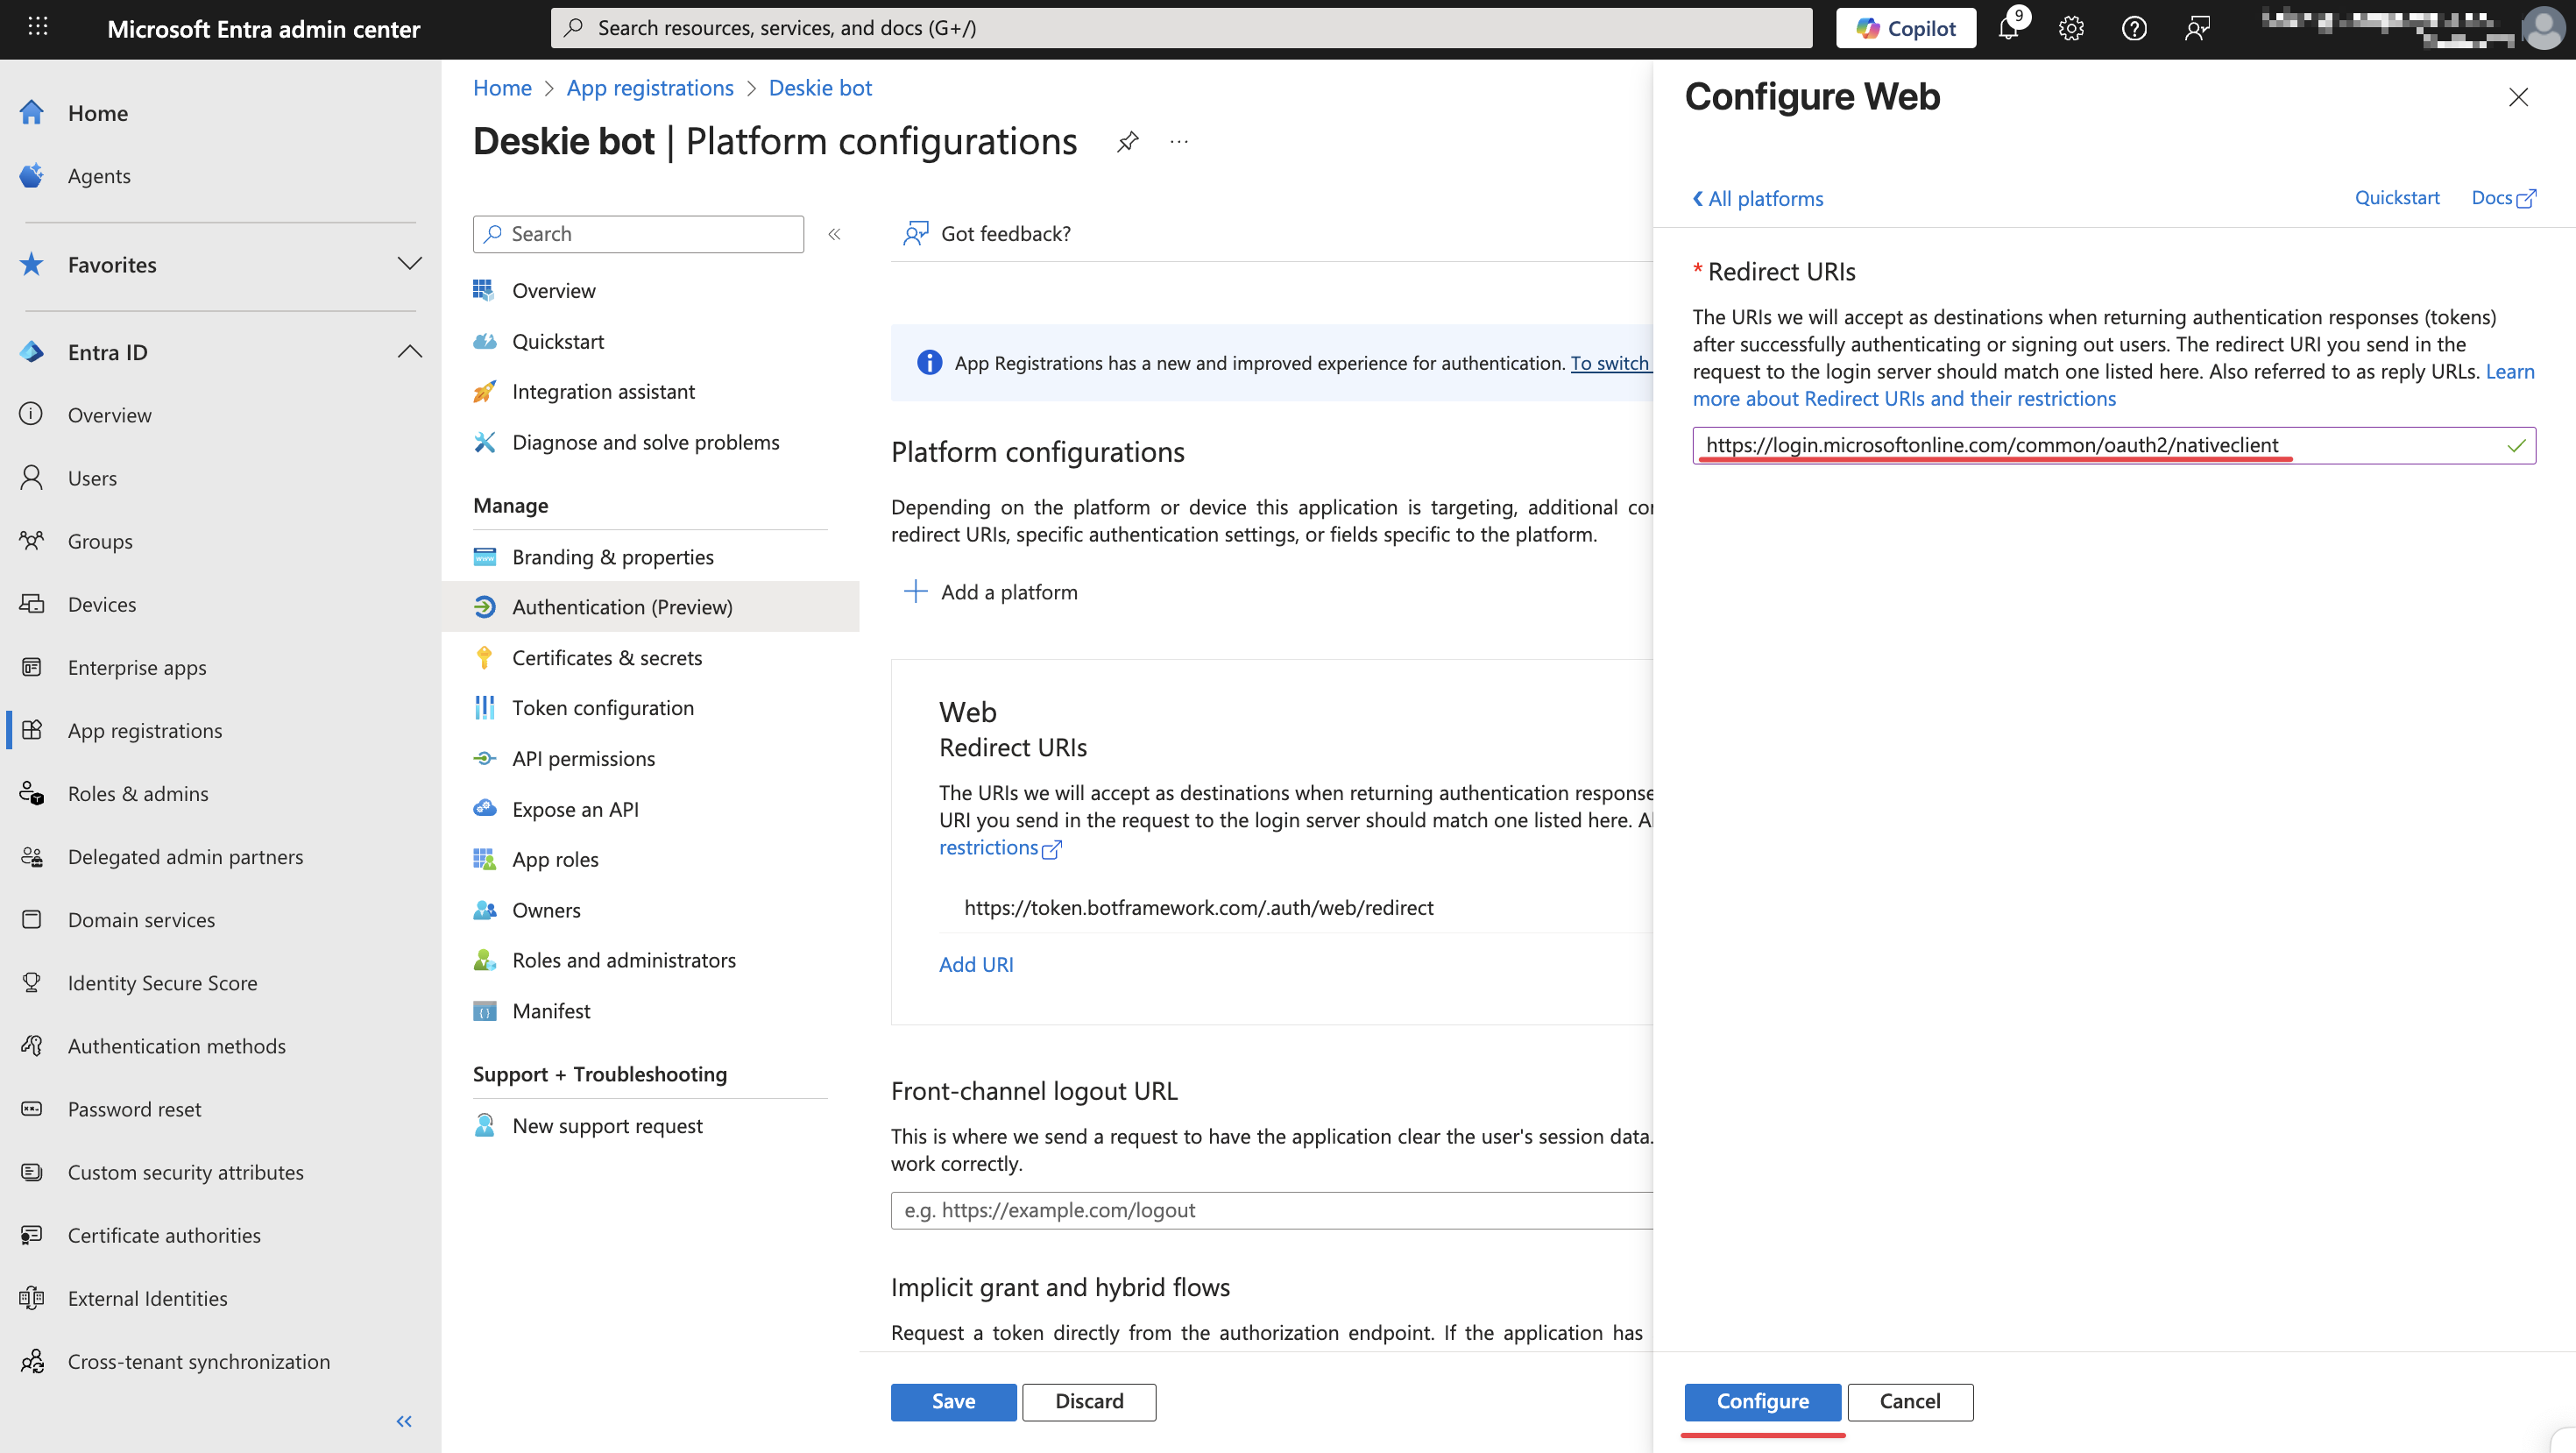
Enter the following link in the "Redirect URI" field and click the "Configure" button:
https://login.microsoftonline.com/common/oauth2/nativeclient
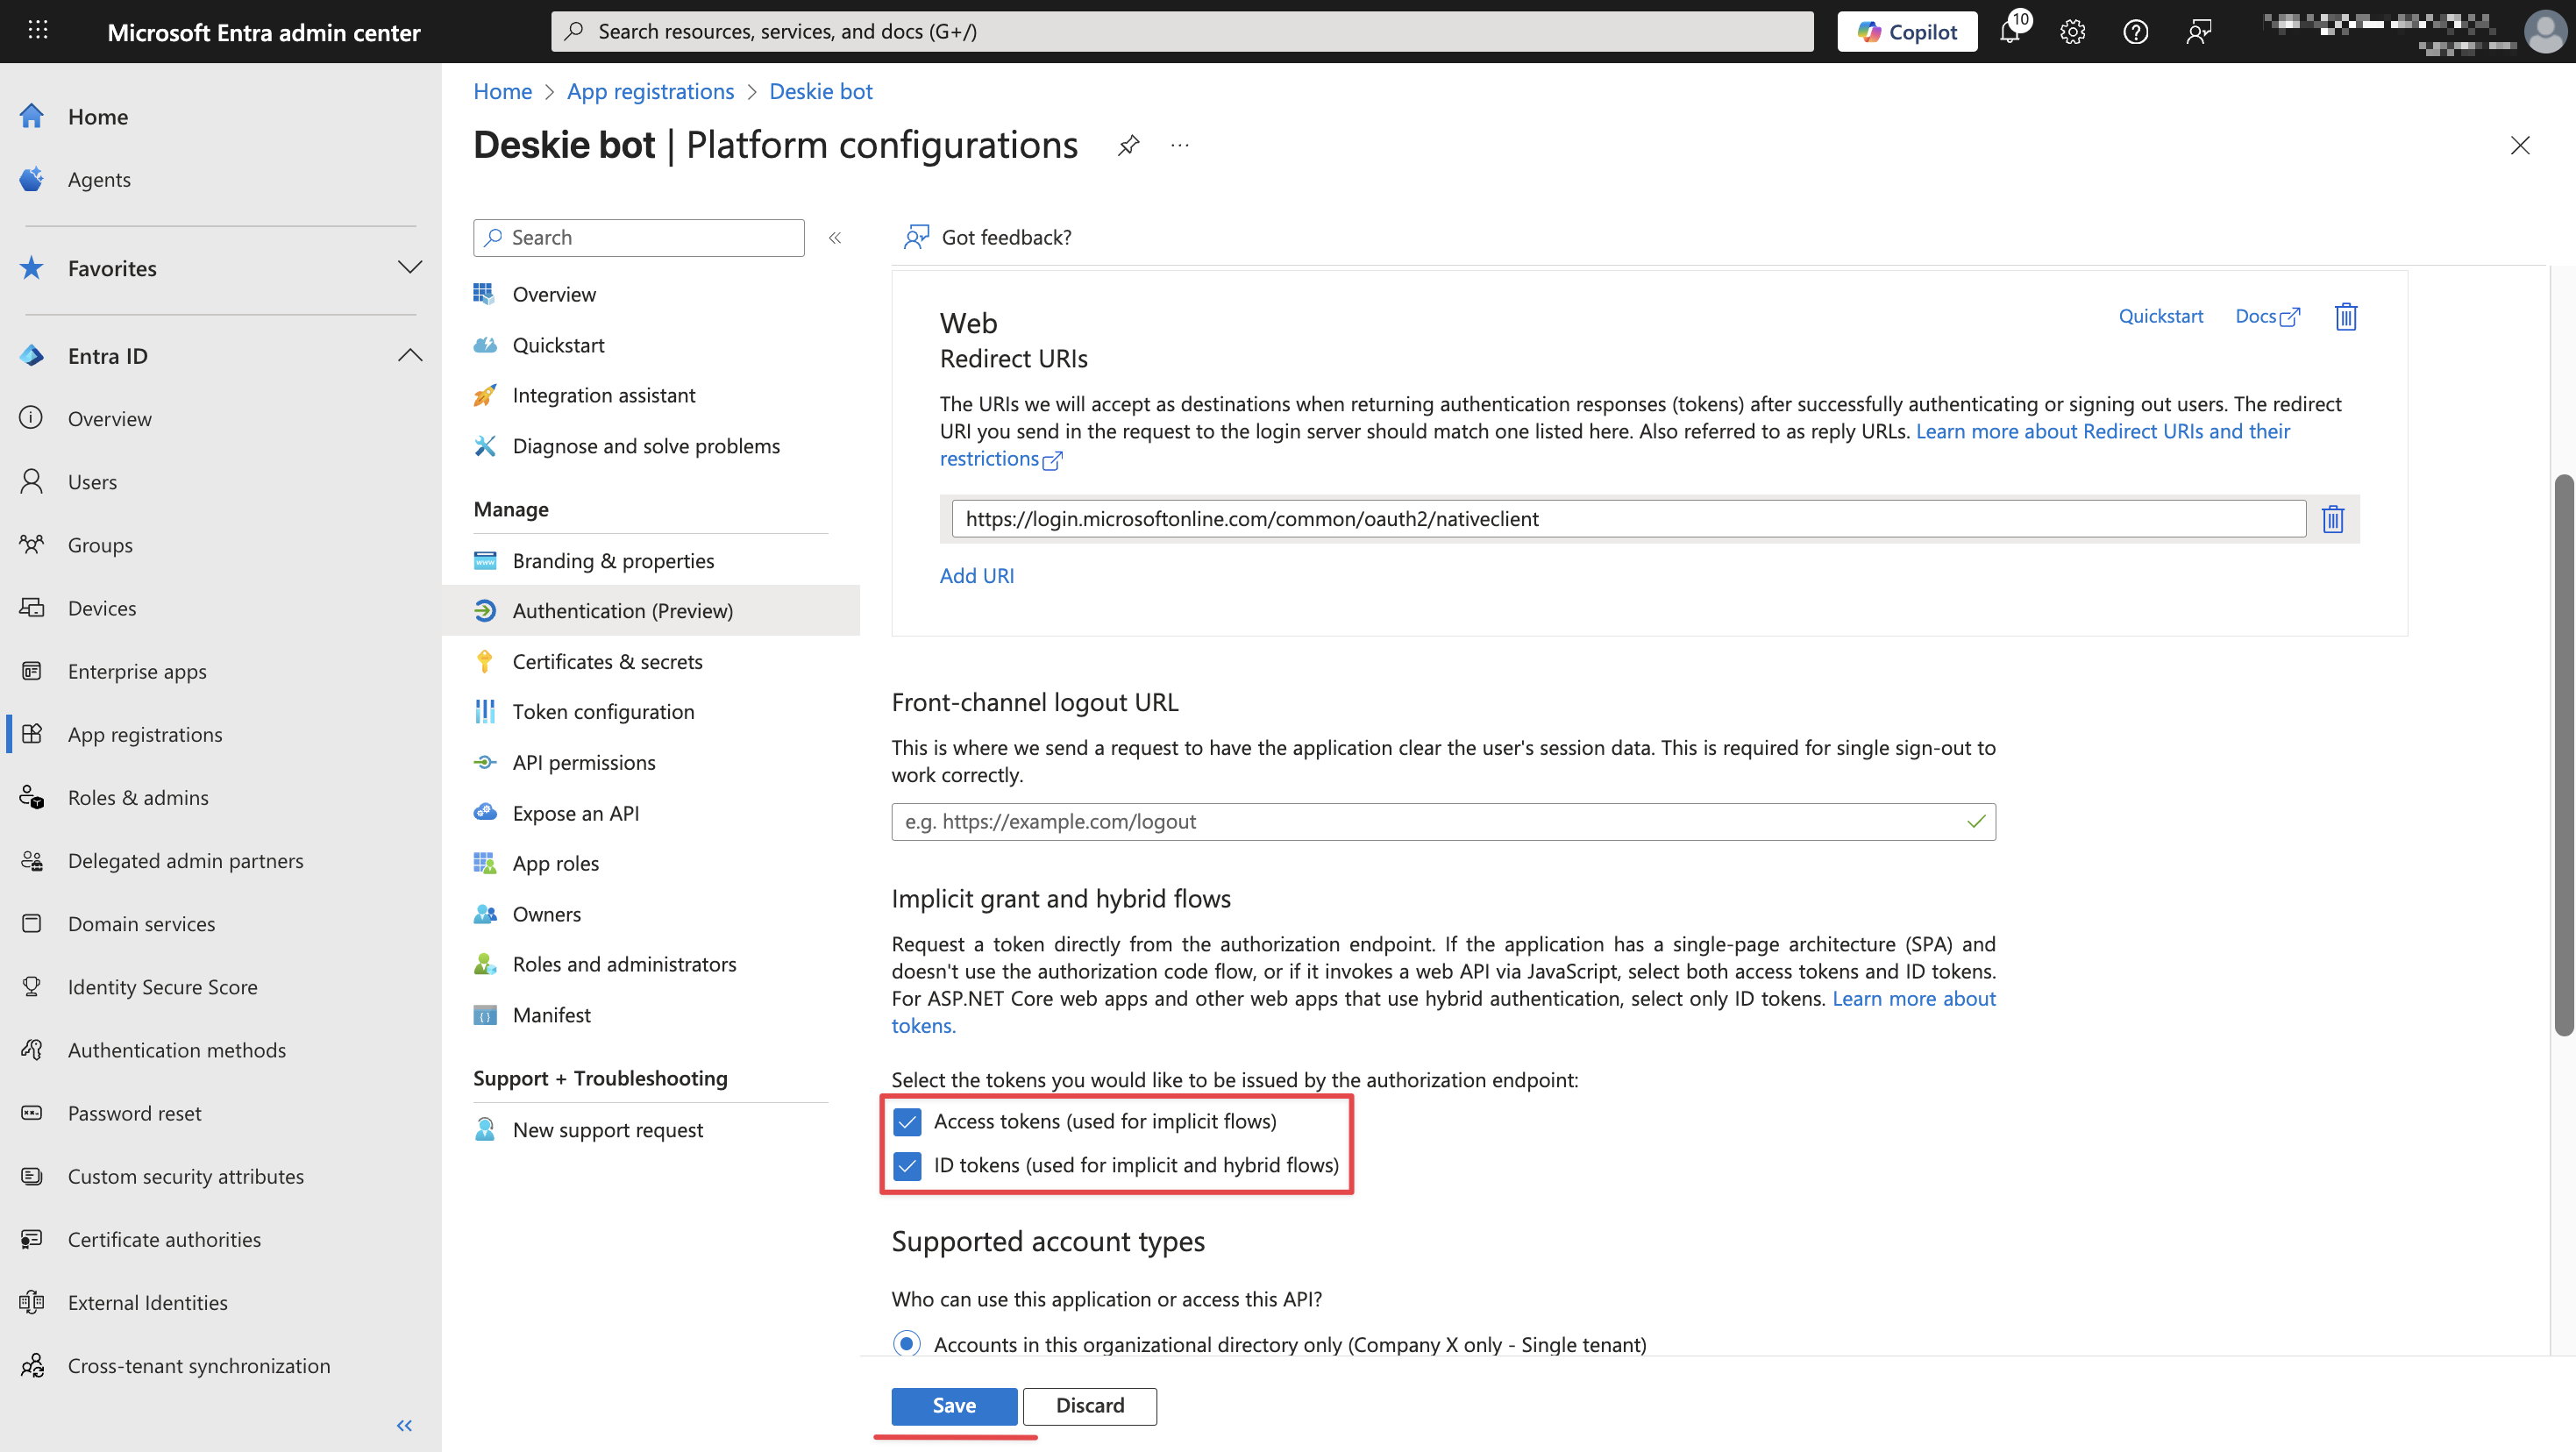
d) in the "Implicit grant and hybrid flows" section, check the boxes for "Access tokens" and "ID tokens" → click the "Save" button.
What your client needs to do on their side:
1. Go to the link to grant access to the bot: https://login.microsoftonline.com/common/adminconsent?client_id=[bot_ID].
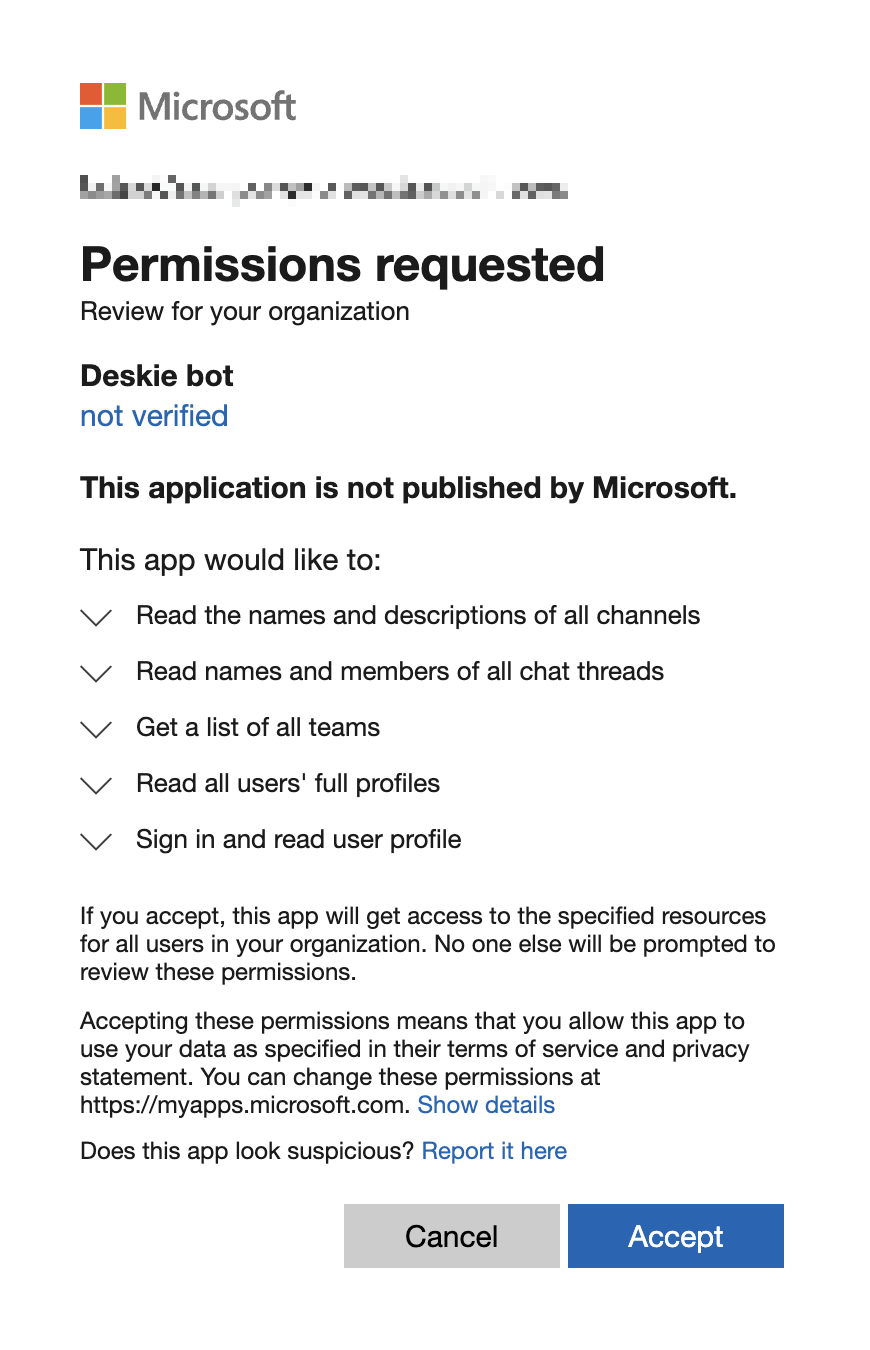
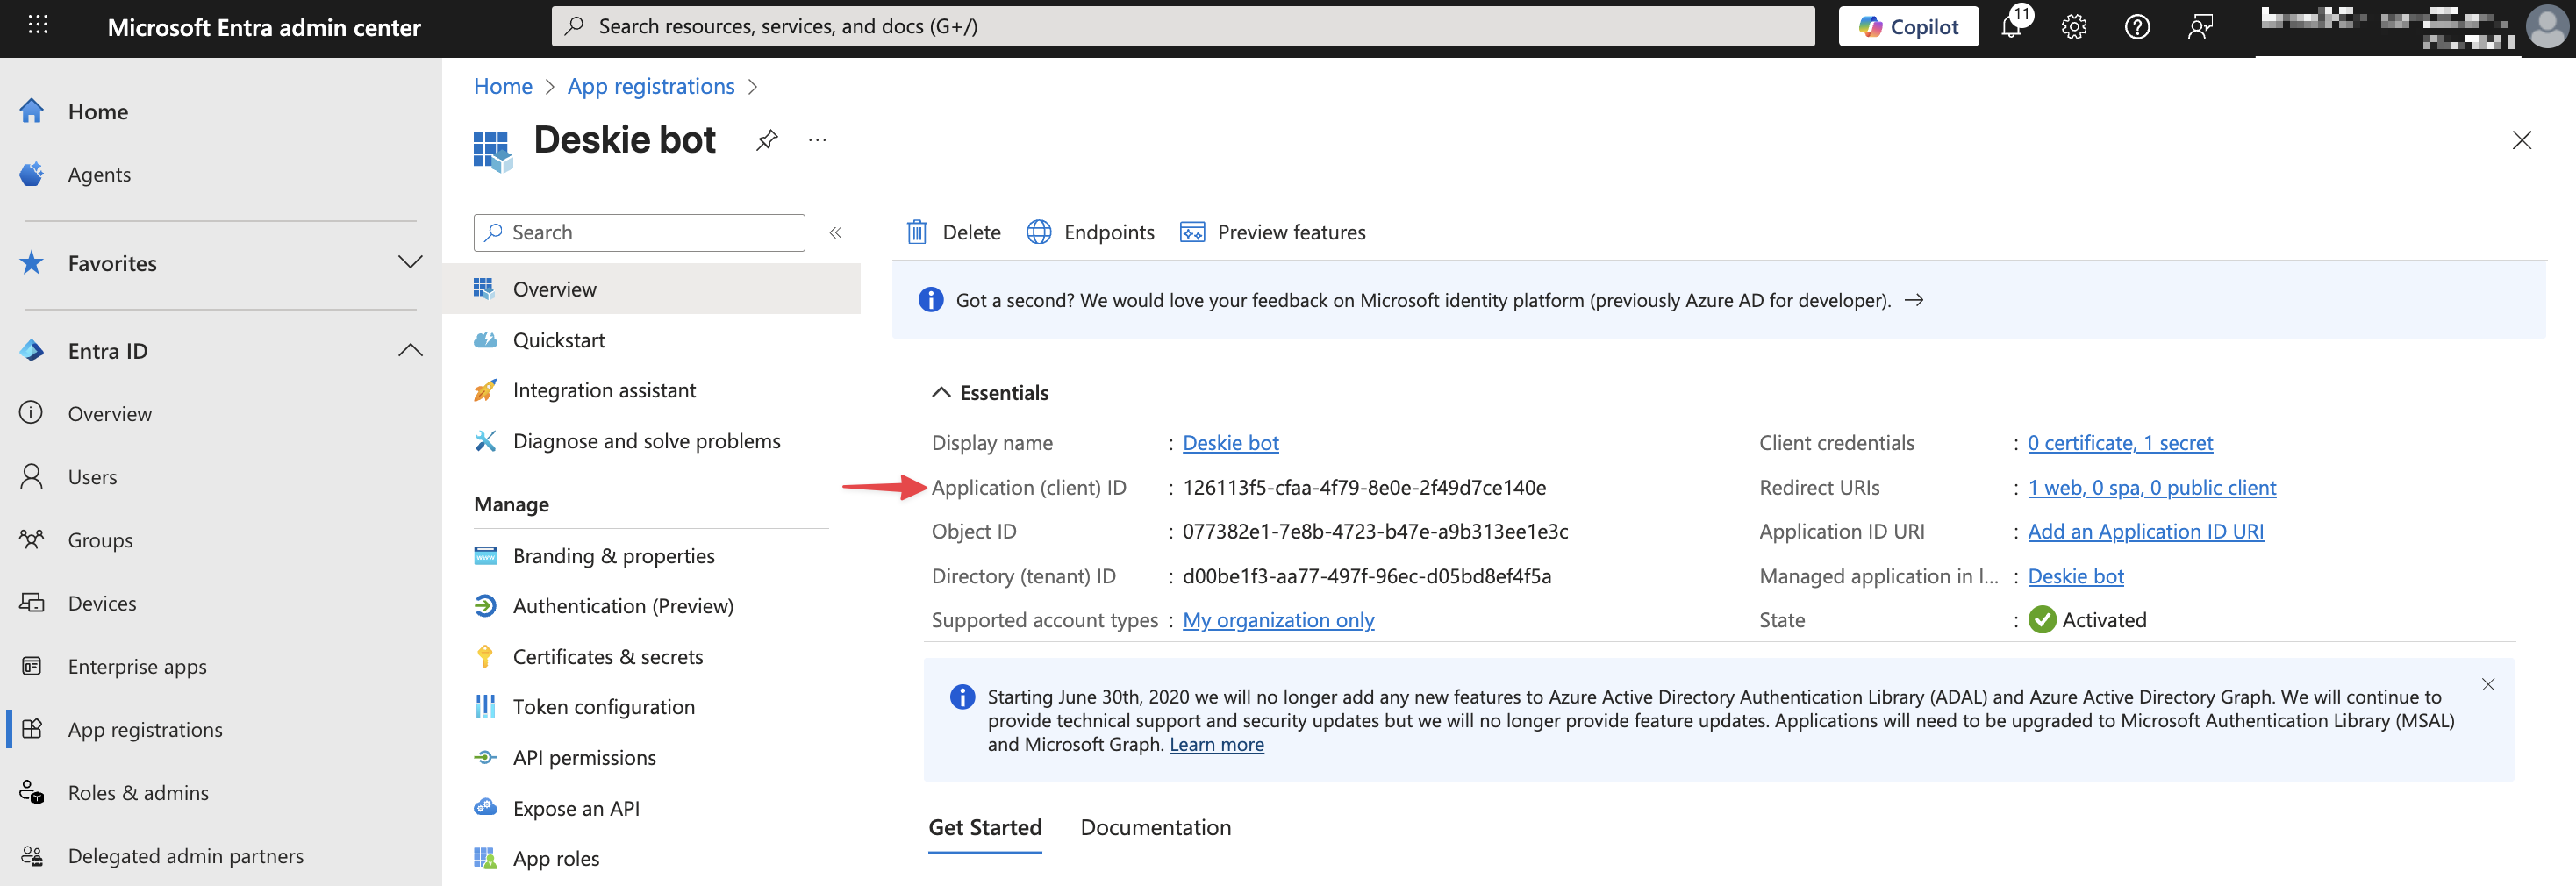
The Bot ID (not the App ID!) can be found in the manifest or in the Microsoft Entra admin center (in the workspace where the bot is installed): go to "App registrations" → “All applications” tab → click the needed one → in the "Overview" section, copy the "Application (client) ID".
If an error appears after the redirect, ignore it — it does not affect the connection.
{
"error": {
"code": "ServiceError",
"message": "Missing required query string parameter: code. Url = token.botframework.com/.auth/web/redirect?admin_consent=True&tenant=08940500-f0e6-4a81-abb2-f6883e8831b0"
}
}
2. The client’s administrator who wants to add your app needs to go to their workspace’s app list page and click the "Import app" button.

After importing, the app needs to be published within the organization. To do this, open the app from the list, go to the "Publish in org" section, and click the "Publish your app" button.
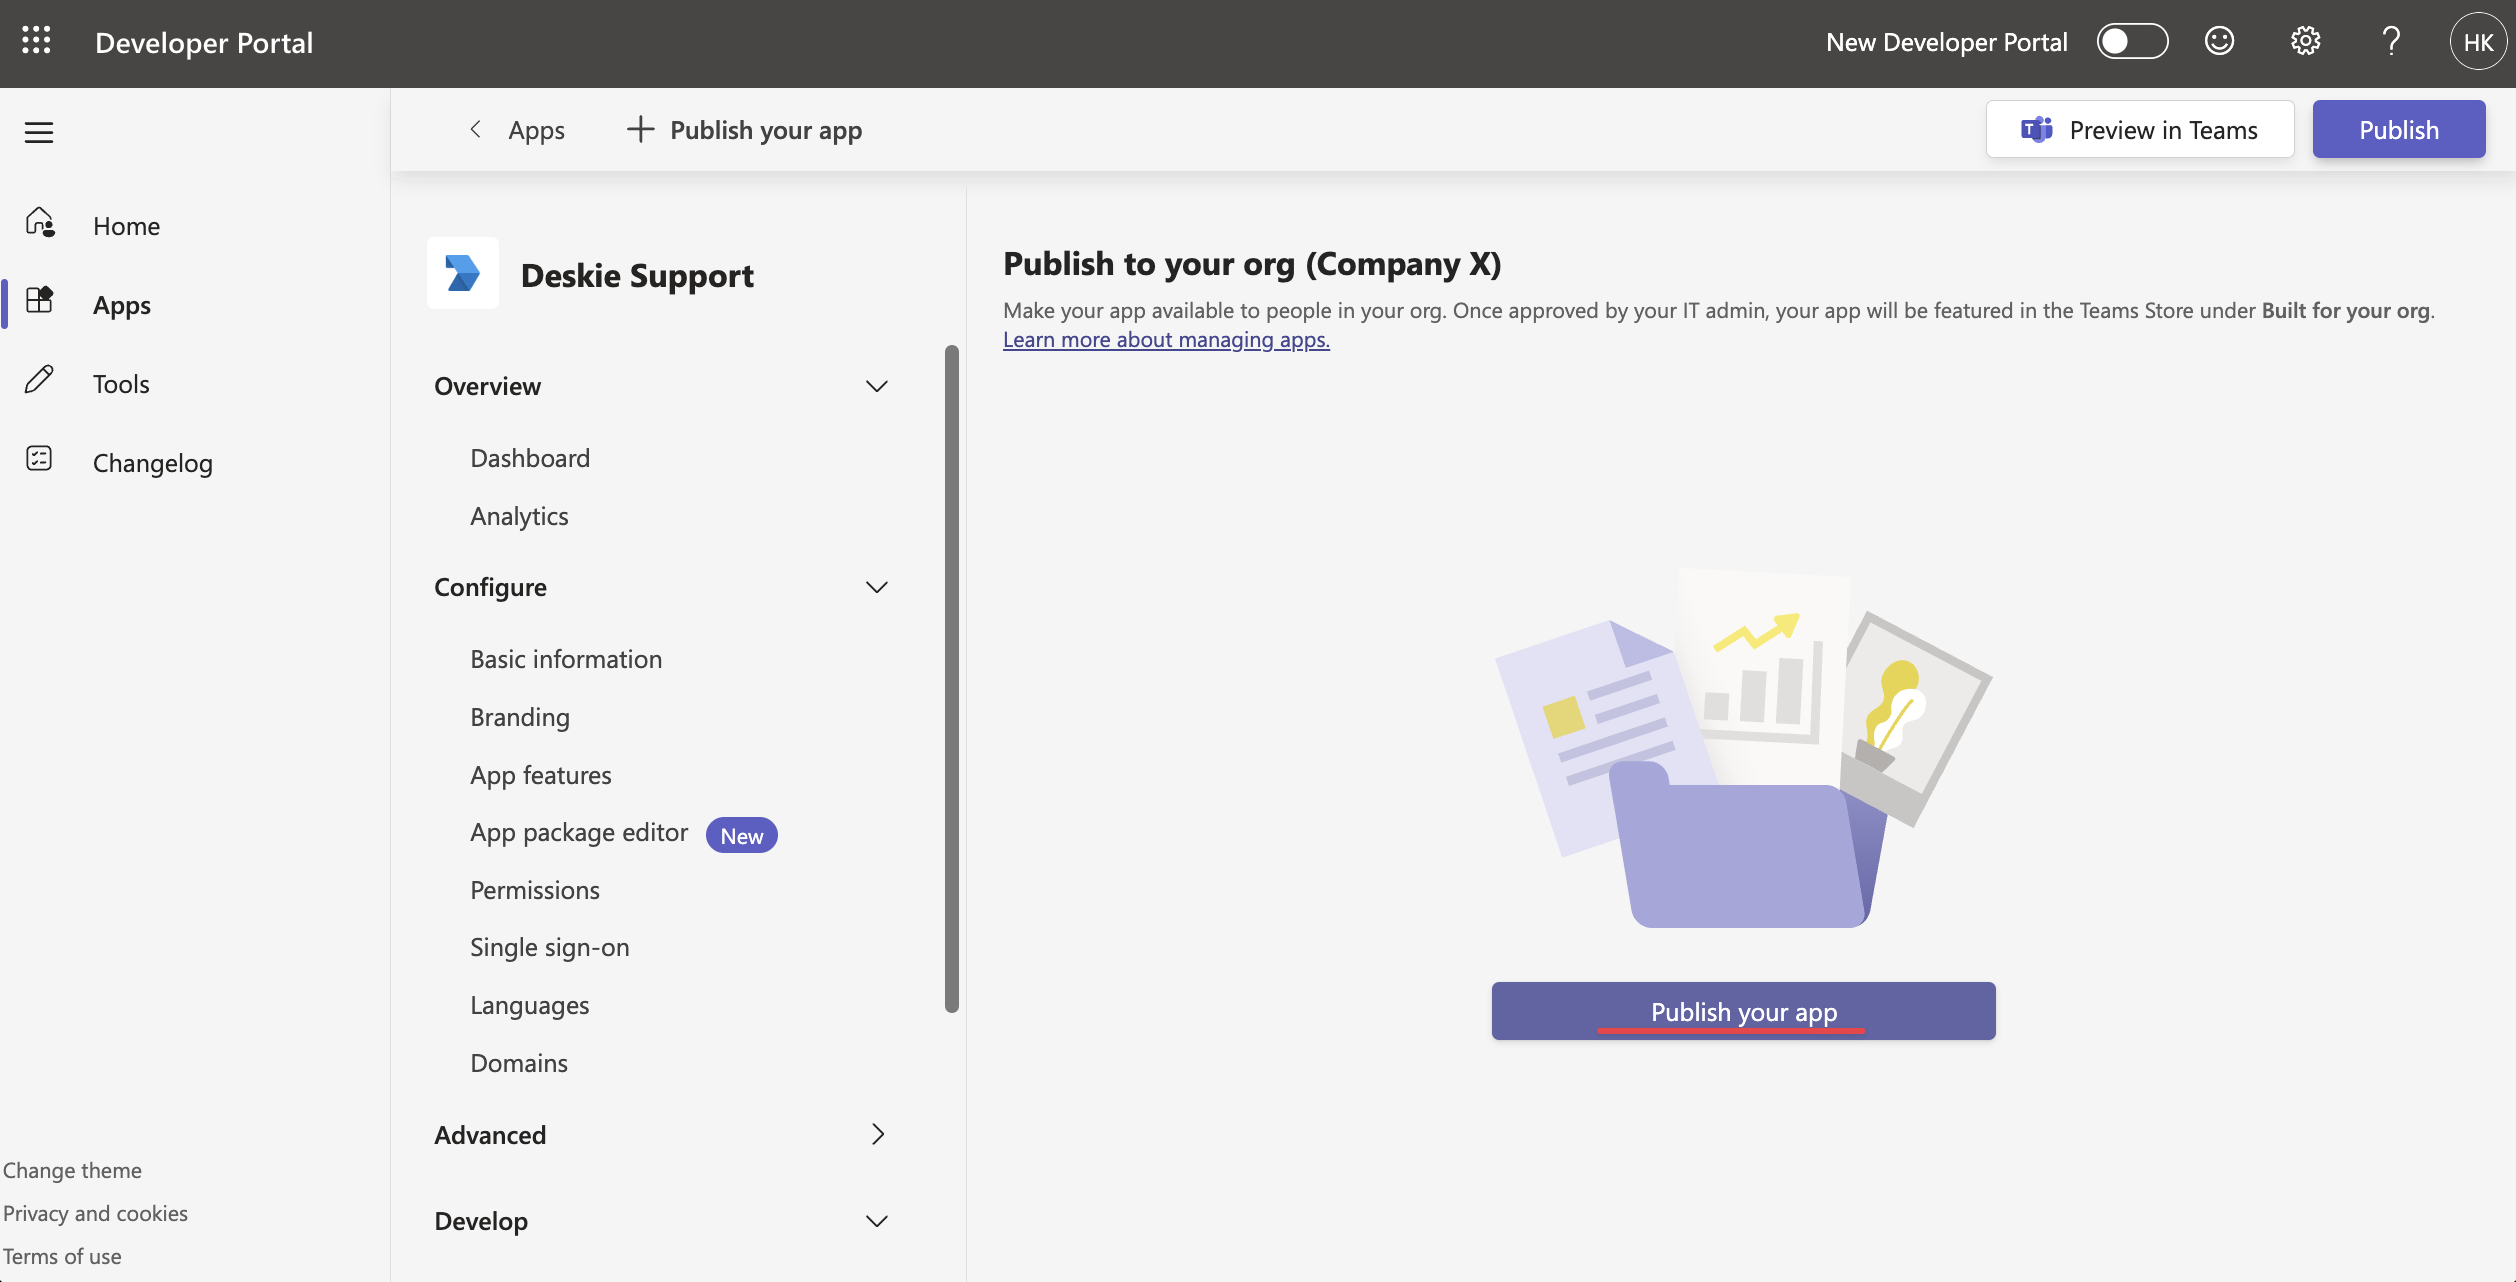
If everything is done correctly, the publish status will change to "Submitted":

3. The new app requires approval by default because it is initially added as blocked. Use the instructions we gave in step 3 — adding the app to Teams.
