
The Telegram channel can be connected to Deskie in two ways:
- through a Telegram bot that your customers send messages to (instructions ↓);
- through the unofficial Telegram API provided by the Wazzup service (instructions ↗).
Each option has its pros and cons, so you can choose whichever connection method works best for you. The main differences between the official and unofficial Telegram API are described in the table:
| Official API (connecting via a bot) | Unofficial API (Wazzup + personal number) |
|---|---|
| The method Telegram permits for business-to-customer communication. We recommend using it in Deskie. | Prohibited by Telegram rules. |
| Not tied to a phone number — you can connect up to 20 bots to a single personal account. You can build bots with your own logic and connect them to Deskie using the "there is a functioning bot" option. | Connects a regular Telegram account — one phone number equals one account. |
| Telegram doesn't pass the customer's phone number to bots, so you can only identify the customer by asking them directly for the details you need. | You know the customer's username and the phone number they're writing from, if their privacy settings allow it. |
| You can't start a conversation first. | You can message the customer first. |
| You can only register the bot's token with one service at a time: if you connect a bot to Deskie, you won't be able to use that same bot in, say, your CRM. | Can be used with several services at once, as long as they support Wazzup integration or connecting personal numbers. |
| Customers can only find your company's Telegram contact by the bot's name. You can also share a link to a chat with the bot on your website or in a contact form. | If a customer has your phone number saved and it's linked to Telegram, they can message you in the messenger. They can also find you by username or by the contact name set in their Telegram. |
Once you've decided on a connection type, jump to the relevant part of the guide:
— Personal Telegram account as a channel
- Connecting via Wazzup ↗
- Initiating a conversation in Telegram from Deskie
- Initiating a conversation in Telegram via API
— What Telegram cases look like in Deskie
Connecting a Telegram bot
You can connect a Telegram bot along the path: administrator account — section "Channels" — subsection "Telegram". Depending on whether you're connecting a regular bot or one with its own logic, choose the option that fits.
a. No bot, or bot can't do anything
If you don't have a bot created in Telegram, or you have one but it doesn't do anything (you haven't written separate logic for it that would let it perform actions), choose the first option:
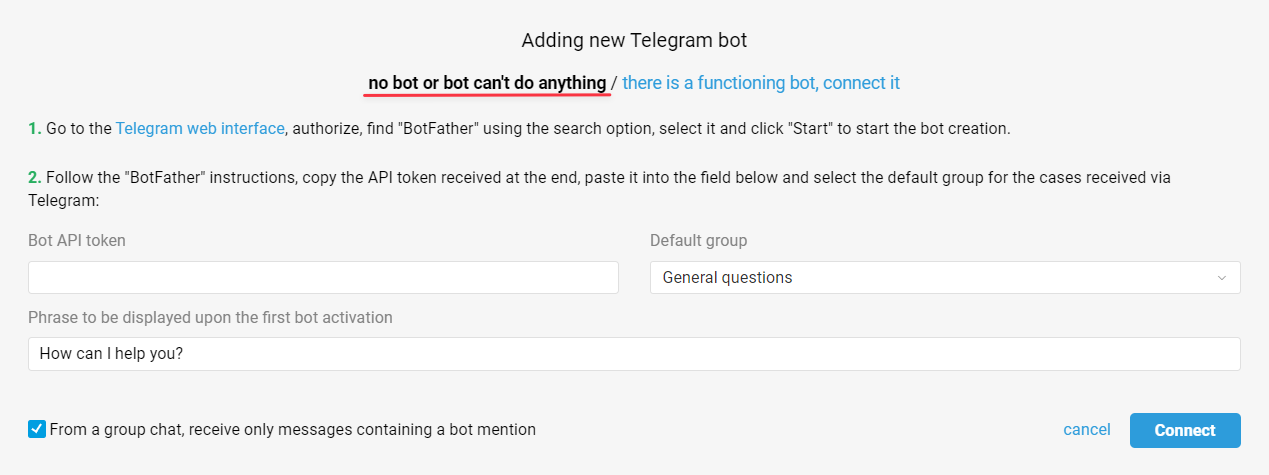
To connect it, just specify the bot's API token you got when creating the bot via @BotFather, specify the default group, and click "Connect".
b. There is a functioning bot
If you have a working Telegram bot (you've written separate logic for it so that, for example, it answers certain questions or shows the customer data depending on which button they press), choose the second connection option:
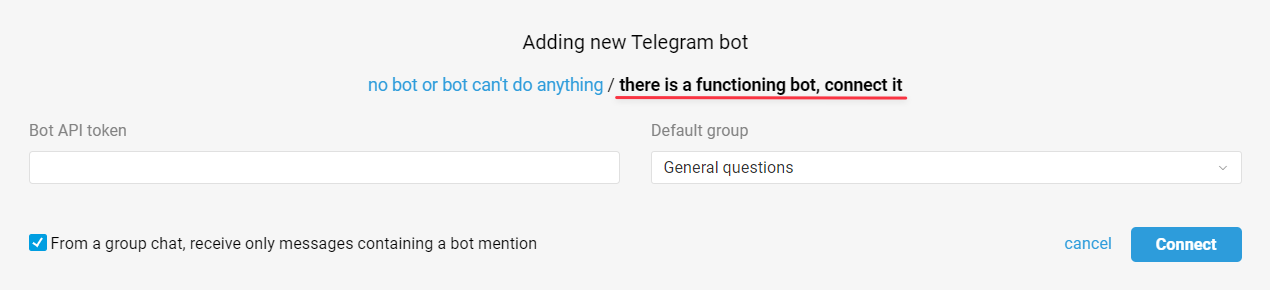
Specify the bot's API token, choose the default group, and click "Connect". A button will appear to the right of the connected bot's name that opens a popup with instructions.
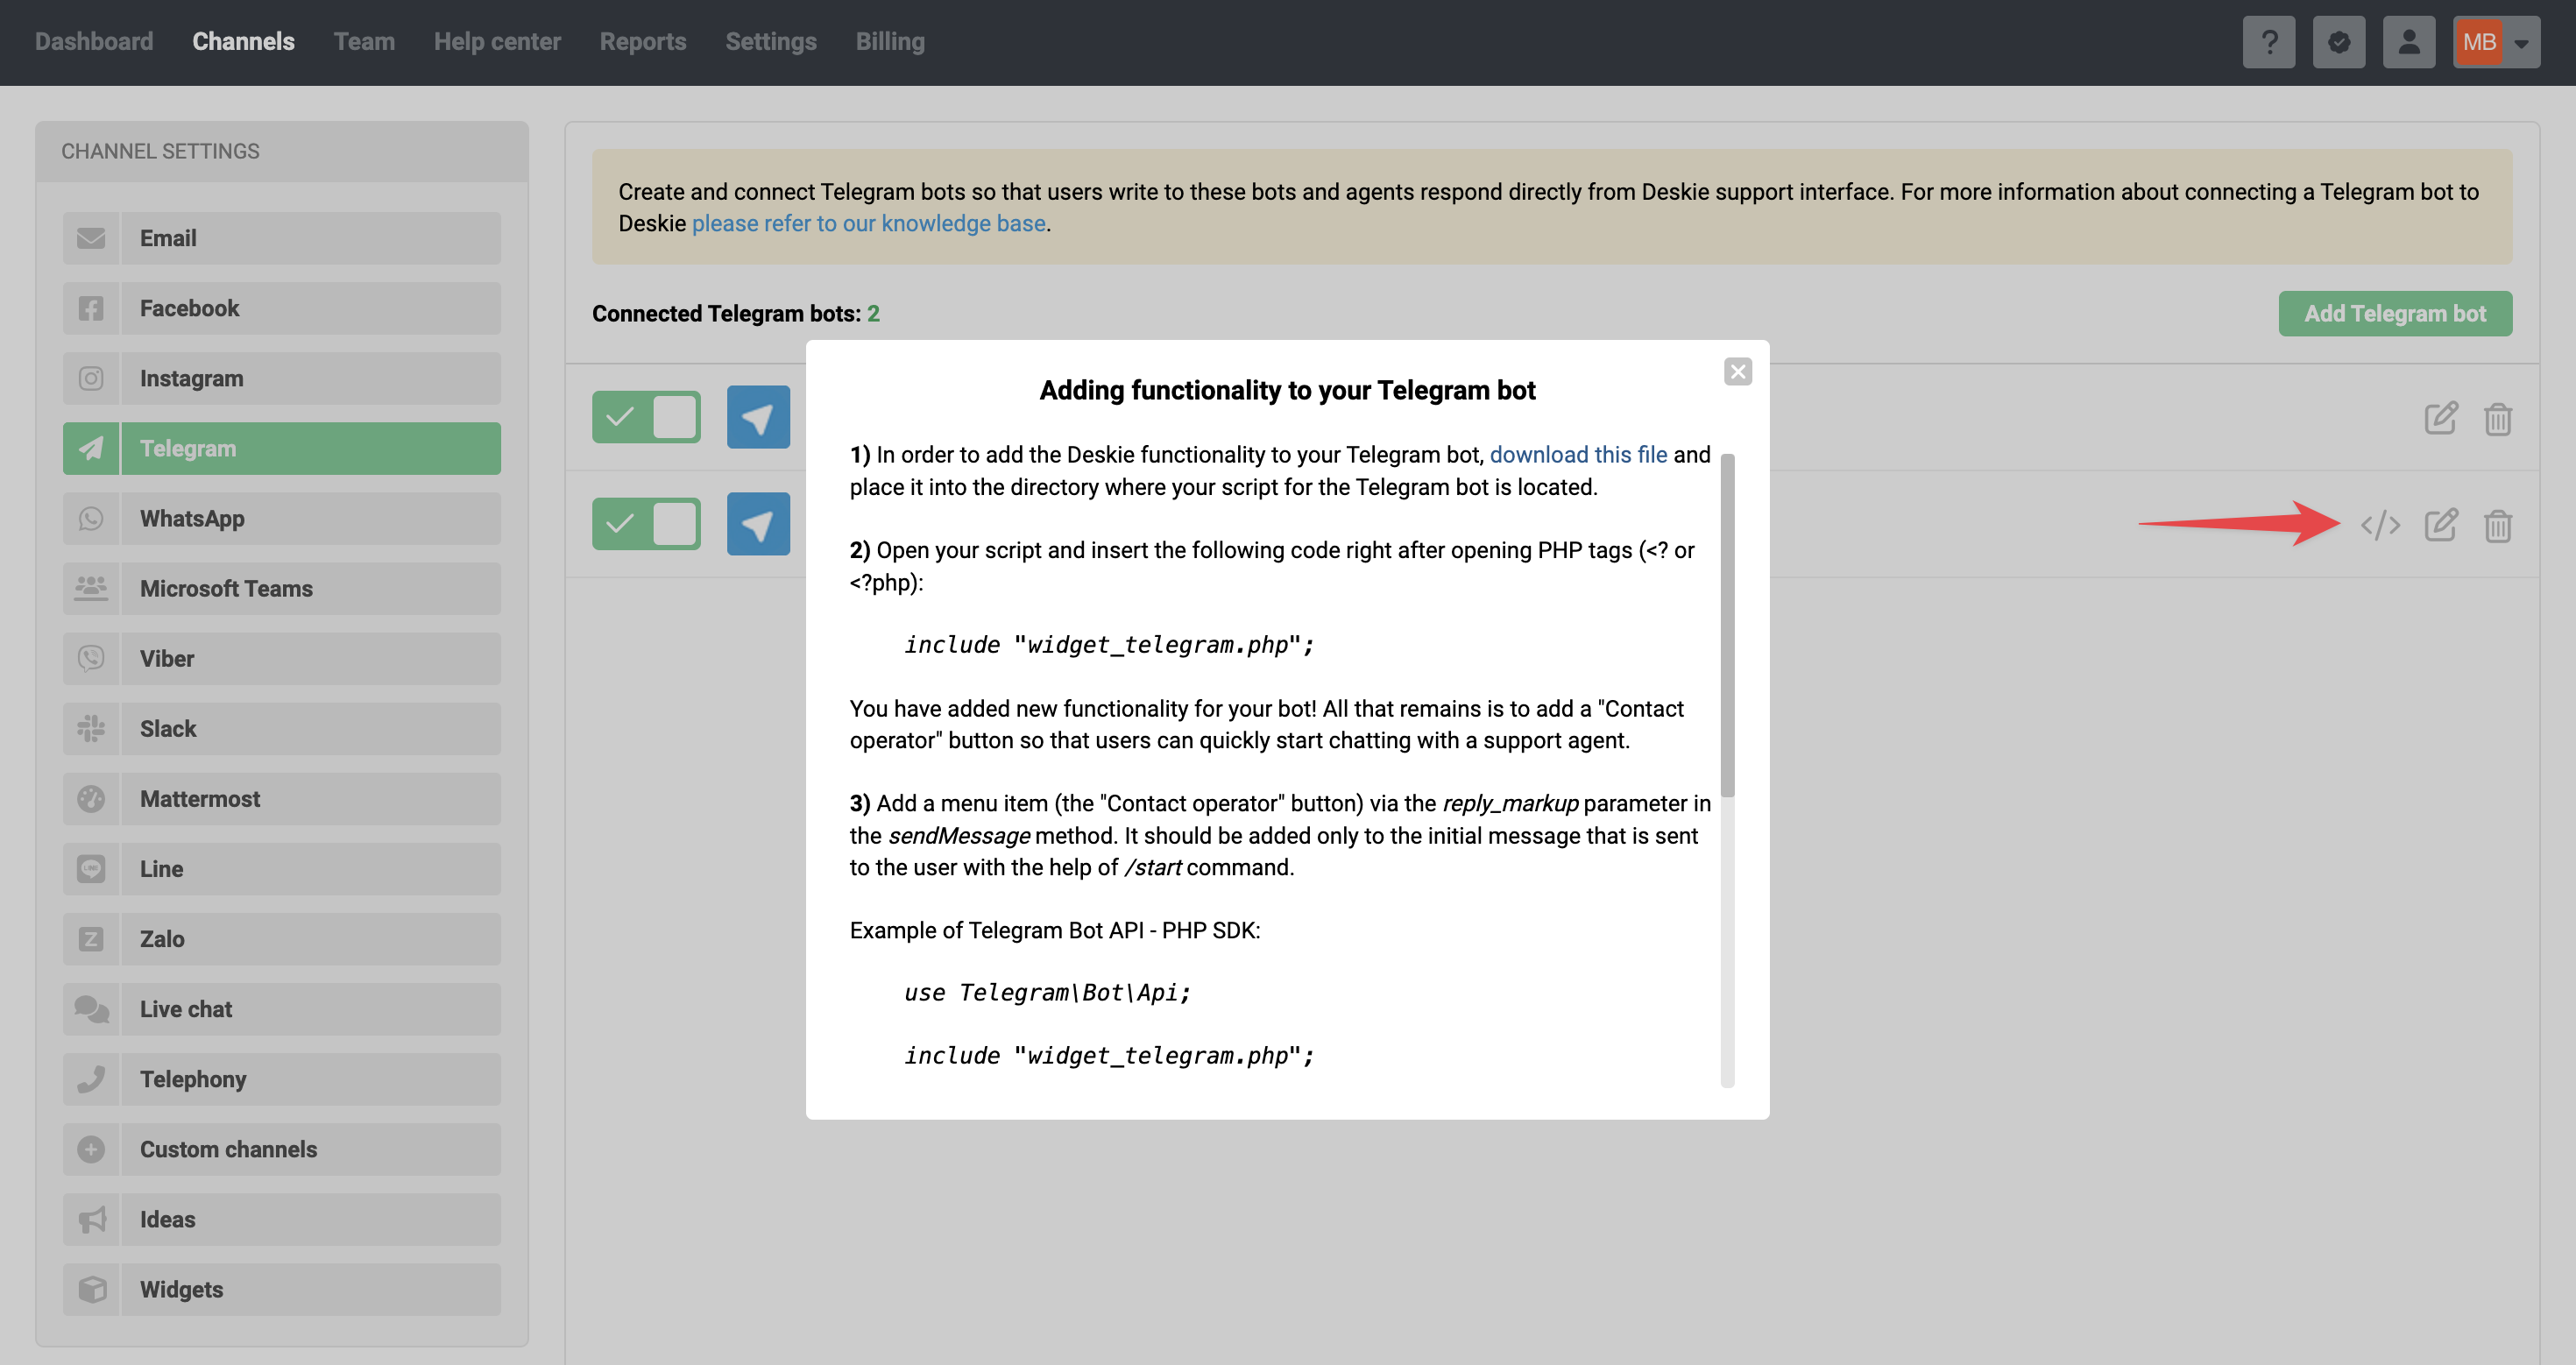
The first step of the instructions links to a file with sample PHP code and a unique webhook URL you'll need to receive messages.
Group communication
For the bot to see user messages in a group, you need to grant it the relevant permissions. You can also choose, on the Deskie side, exactly which messages from the group chat get sent to the service.
We cover the logic of working with group chats in detail in this article.
Deskie-side settings
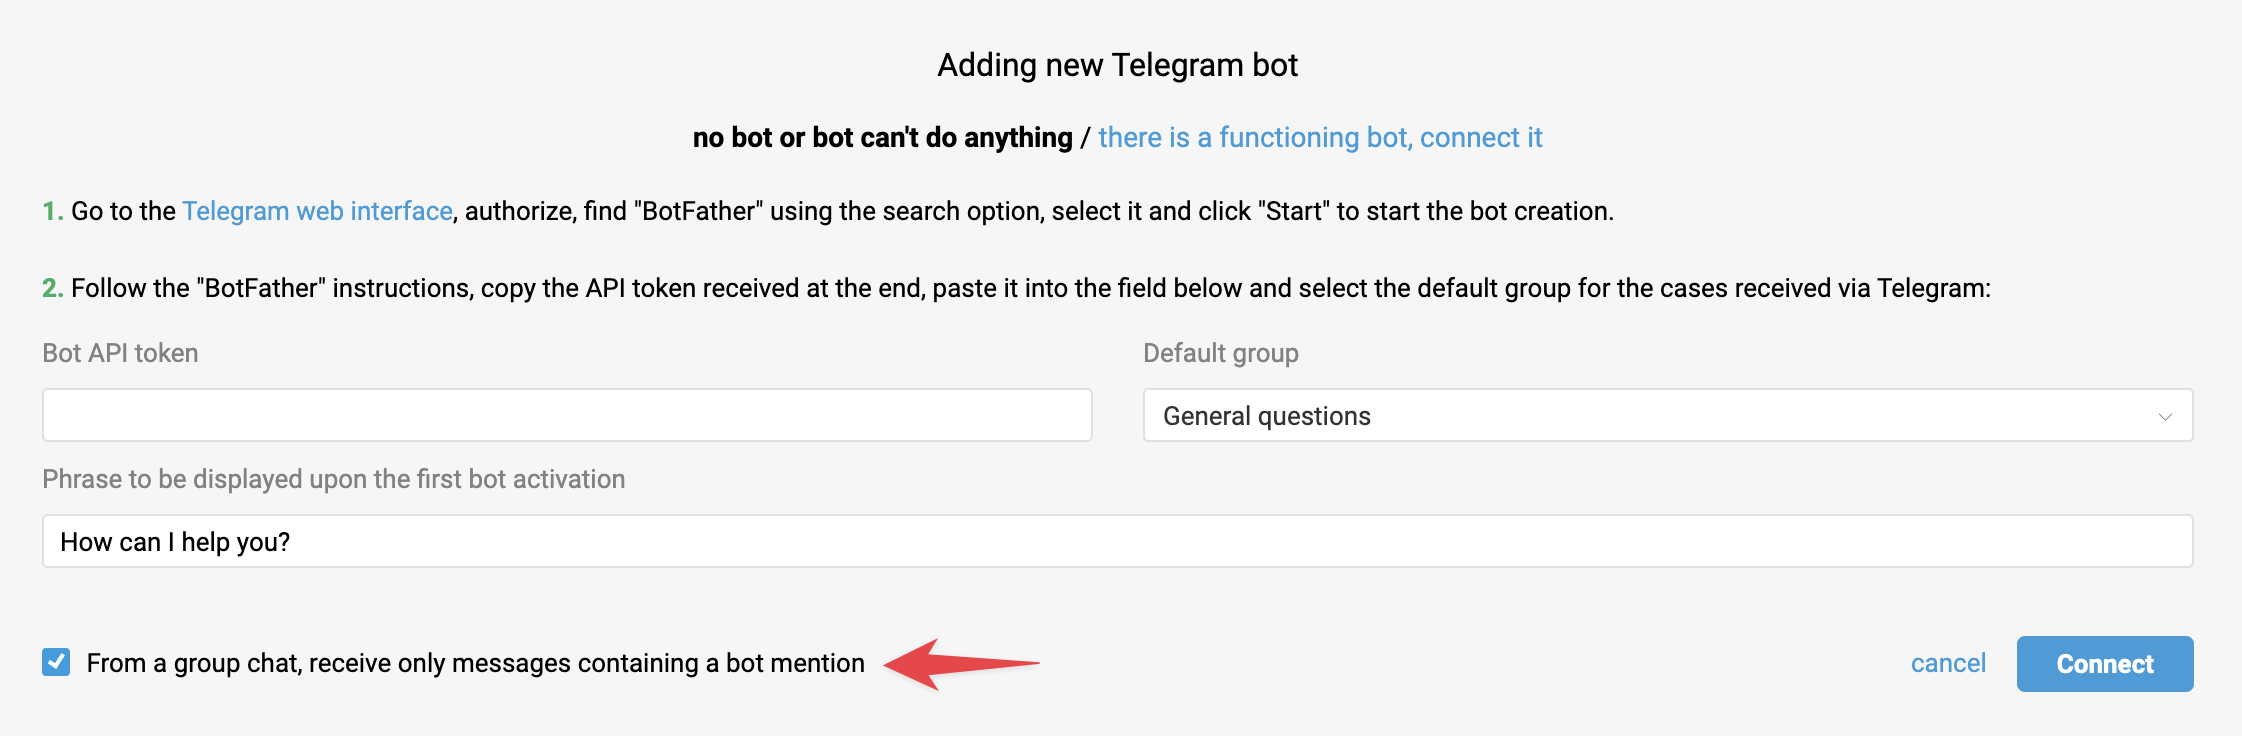
In the Telegram bot connection and editing form, you can choose:
— from group chats the bot has been added to, accept only messages that mention the bot — checkbox checked;
— from group chats the bot has been added to, accept all messages — checkbox unchecked.
Telegram-side settings
You can change the bot's settings on the Telegram side in @BotFather, using commands that start with /, or through the BotFather app, opened via the Open button on the left.
For your Telegram bot to receive messages from group chats, you need to:
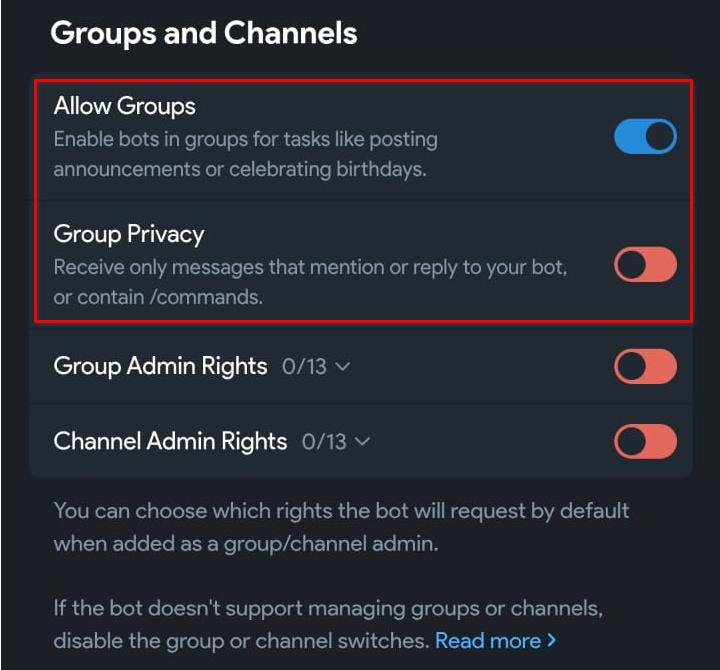
- allow adding the bot to groups via the /setjoingroups parameter. This is usually already enabled by default for a new bot;
- turn off privacy mode for the bot, so it receives messages sent by group members. You need to change this setting before adding the bot to the group. If you changed /setprivacy after the bot was already added to the group, remove the bot from the group and add it again.
For the bot to receive reactions from a group chat, it must be made a group administrator.
In @BotFather, check the following settings for your bot and change them if needed:
- /setjoingroups — should be set to Enabled;
- for /setprivacy, choose Disable:
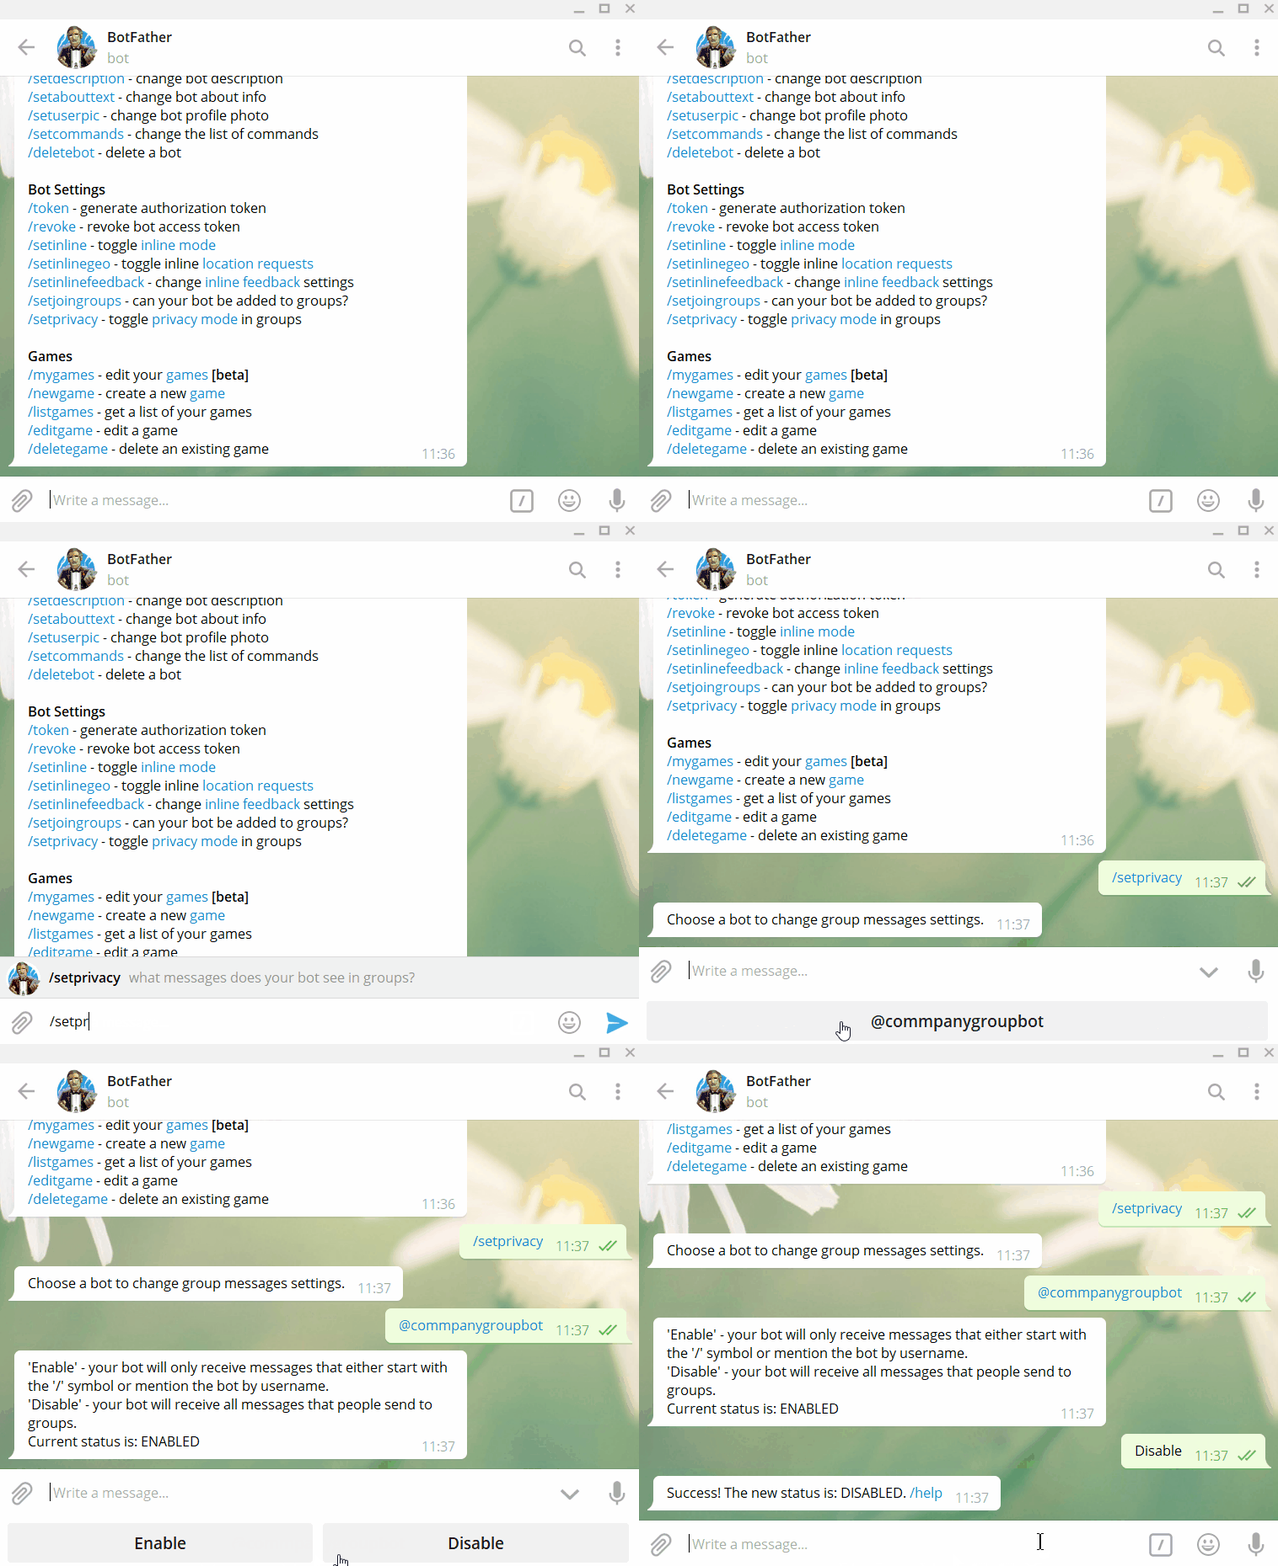
You can also configure these settings through the BotFather app, in the BotSettings section:
Communication between bots
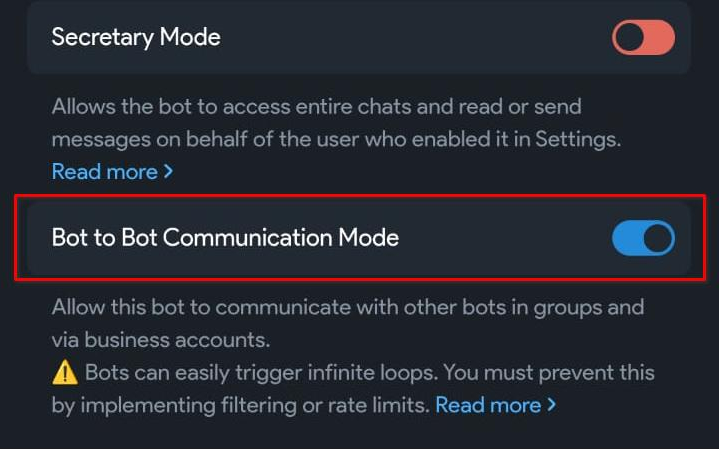
By default, bots can't see each other's messages — this is a Telegram restriction meant to prevent bots from looping replies back and forth. But for scenarios Telegram allows, you can enable bot-to-bot communication. To do this, run the /setbot2bot command for your bot in @BotFather, or enable Bot to Bot Communication Mode through the BotFather app.
No messages from Telegram
If messages from Telegram have stopped coming in, one common reason is that Deskie's webhook URL got reset in the Telegram bot's settings. This can happen if:
- you changed the bot's settings in Telegram;
- Telegram revoked the bot's token (the token was compromised, users reported it, etc.);
- you connected the bot to another service — a bot can only use one active webhook URL at a time.
Solution: turn your Telegram bot off and back on in the administrator account: "Channels" section → "Telegram" subsection, so Deskie re-registers the correct webhook URL in the bot's settings.
Paste this into your browser's address bar, replacing [TOKEN] with your bot's token:
https://api.telegram.org/bot[TOKEN]/getWebhookInfo
The response from the Telegram API shows the current webhook URL that Telegram sends bot updates to. If the url field is empty, or shows a different service, messages from Telegram won't reach Deskie.
Also pay attention to the pending_update_count and last_error_message fields:
- pending_update_count shows how many updates Telegram hasn't been able to deliver to the webhook URL yet. If this number is growing or not going down, Telegram is receiving updates for the bot but can't deliver them to Deskie;
- last_error_message only appears if there's an error, and shows the most recent delivery error. For example, it might show a connection error, a timeout, or a certificate issue. In that case the webhook URL may be set correctly, but messages still won't reach Deskie. The error text will help you understand the cause.
Personal Telegram account as a channel
You can connect a personal Telegram number through the unofficial Telegram API provided by the Wazzup service. Setup instructions for the Wazzup integration are here.
Mentions in groups
When setting up the integration for Telegram accounts, you'll need to choose the logic for receiving messages from group chats: all of them, or only the ones where you're mentioned with @.
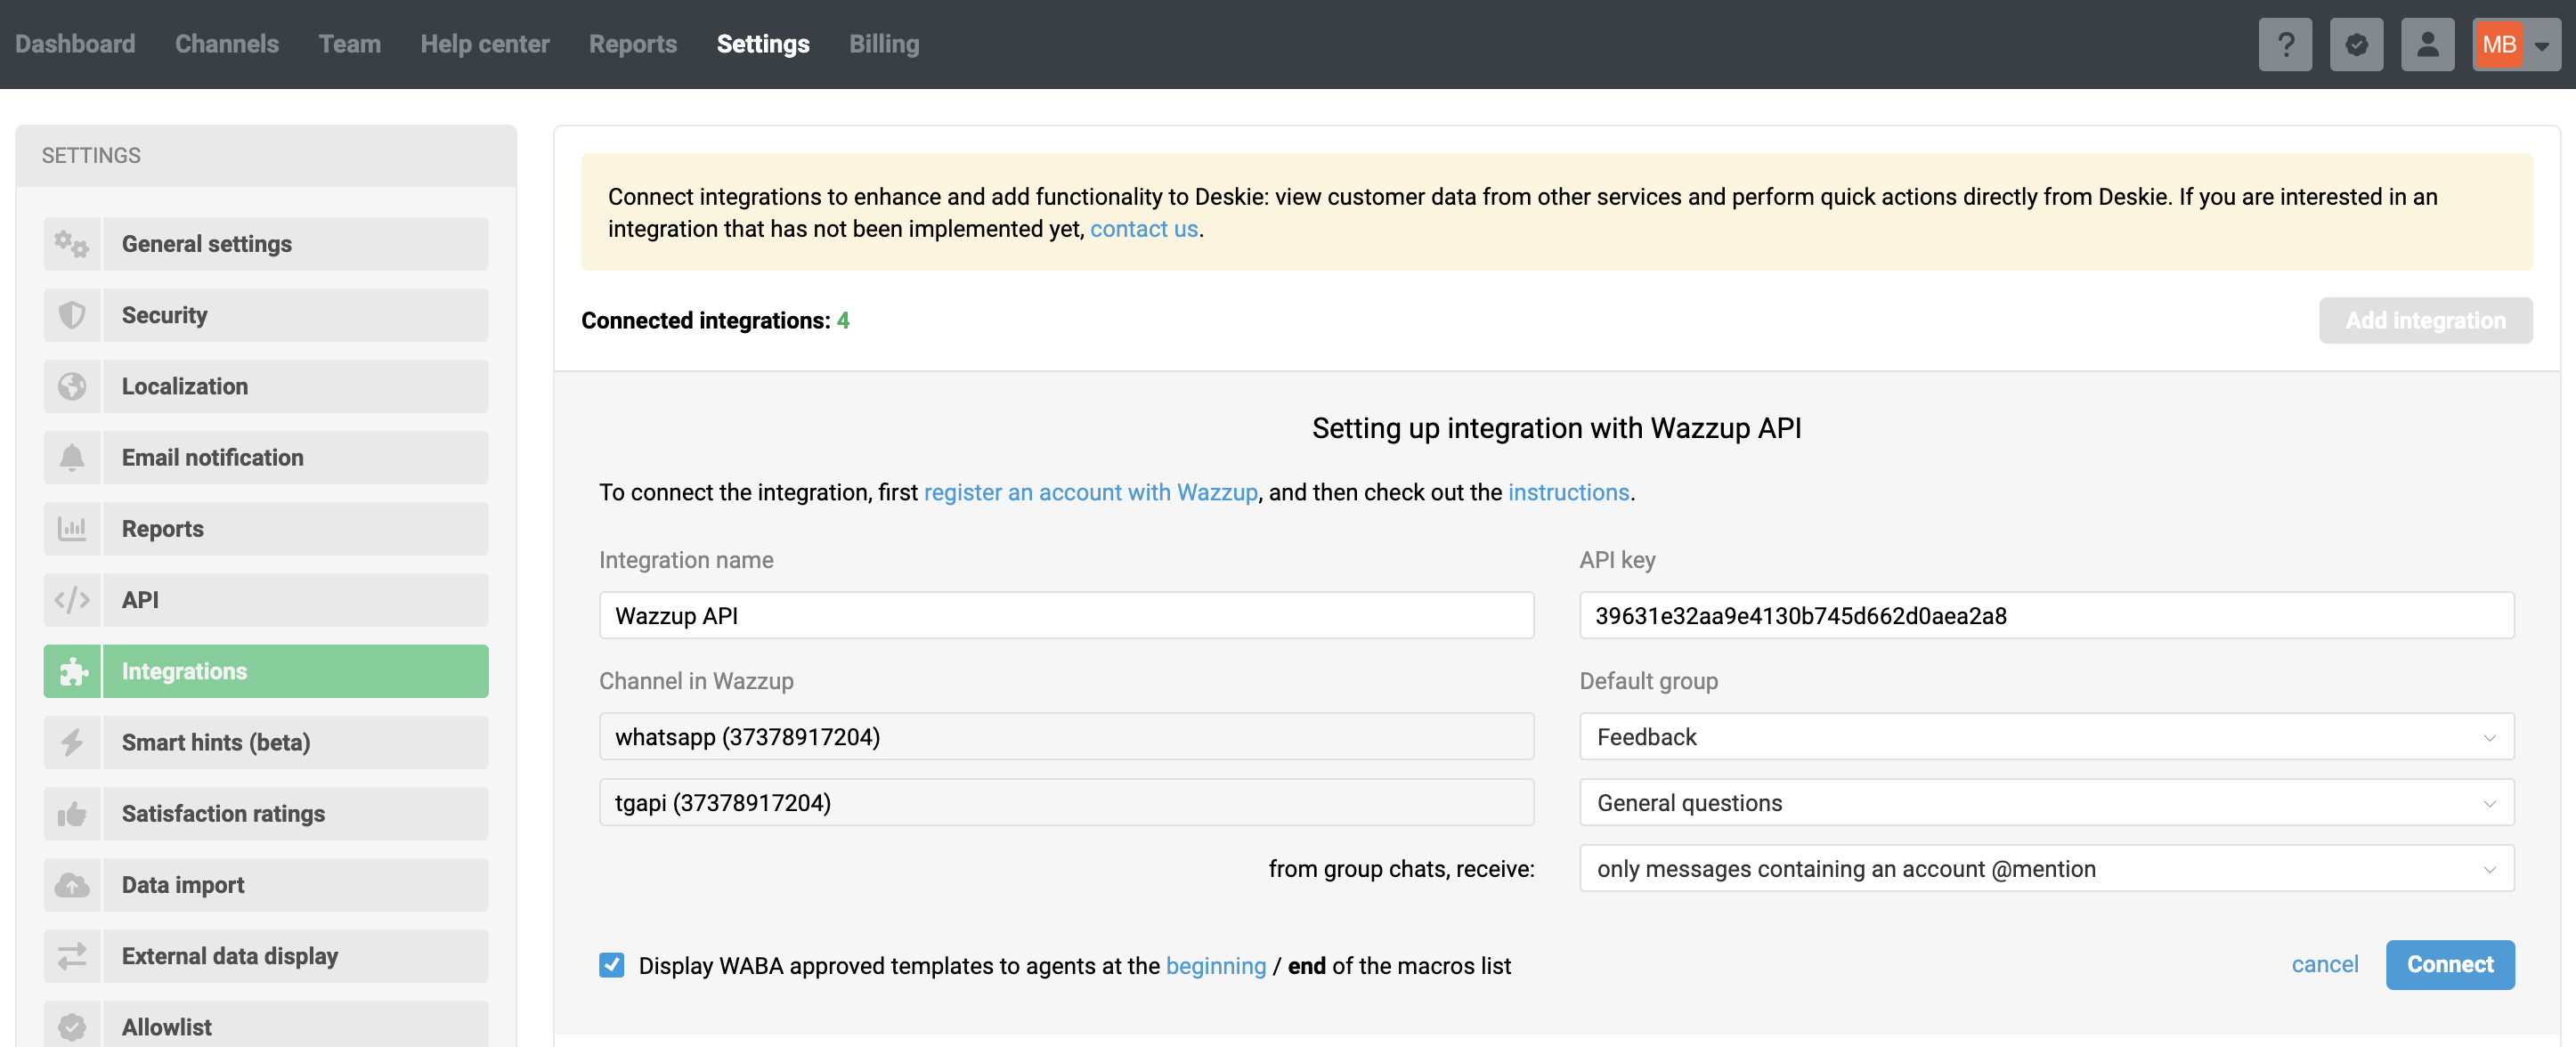
To receive only messages that mention your account from group chats in Wazzup, set your Telegram account's username as the account name.
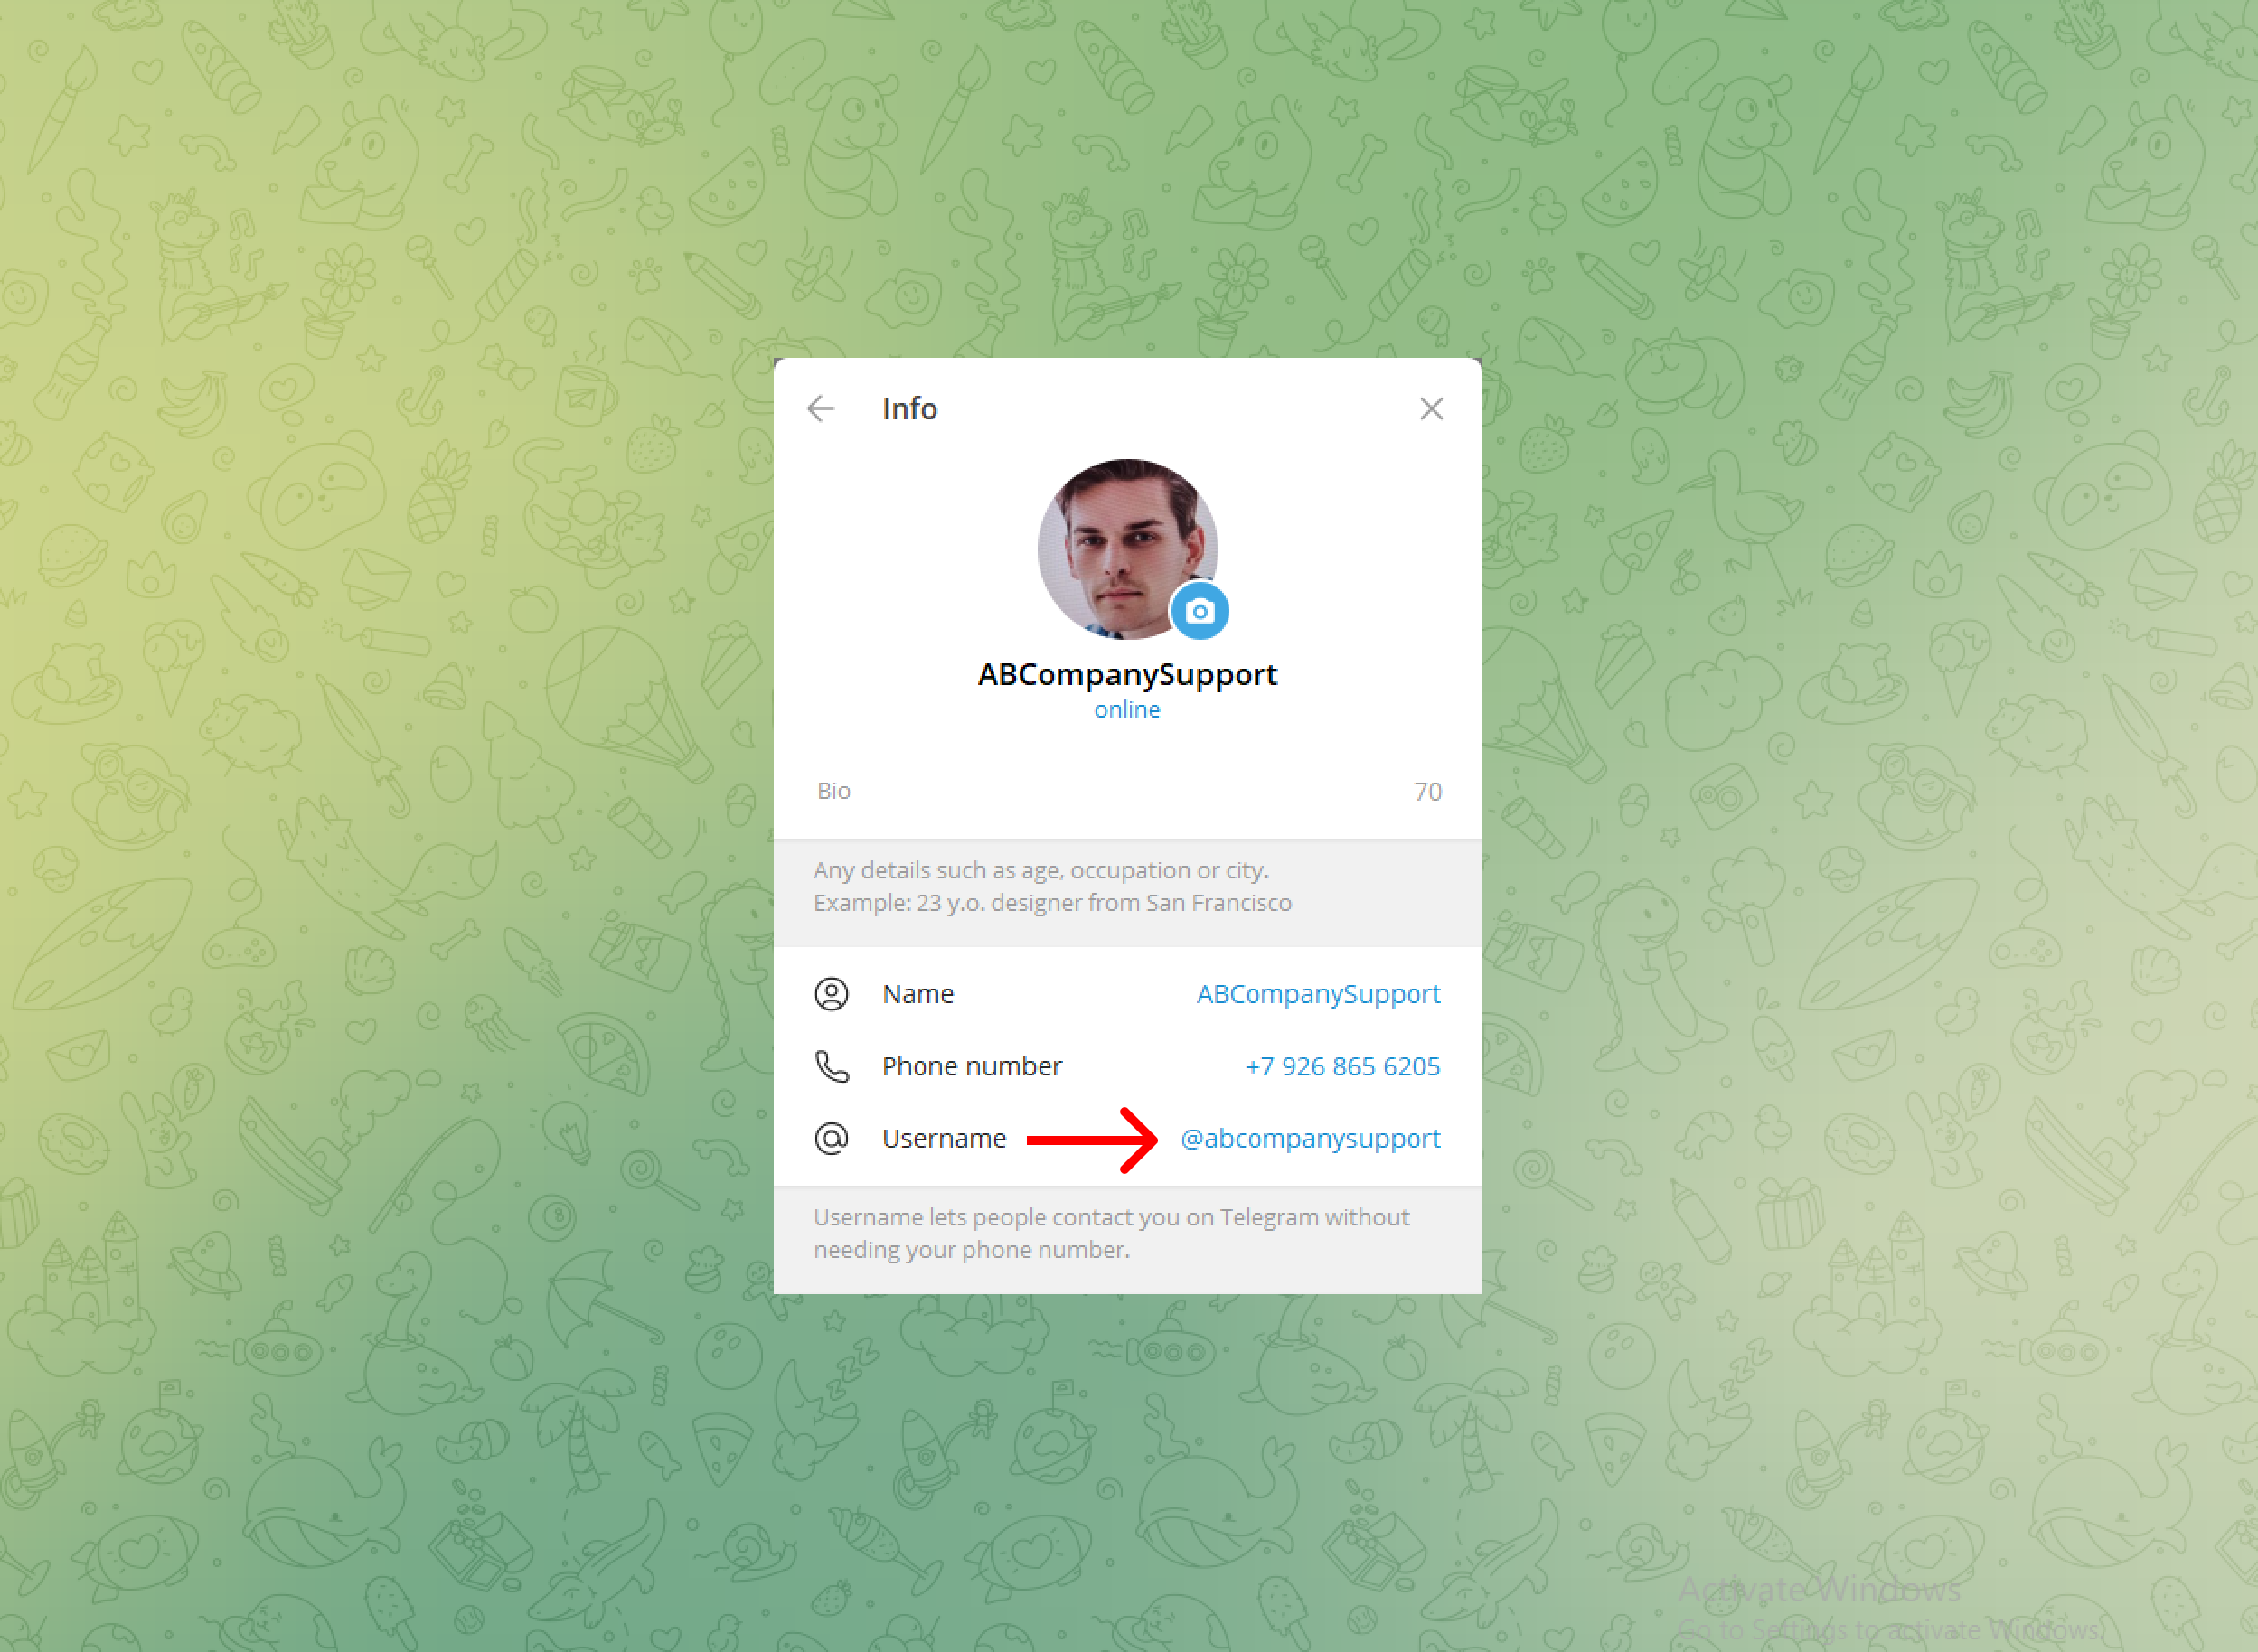

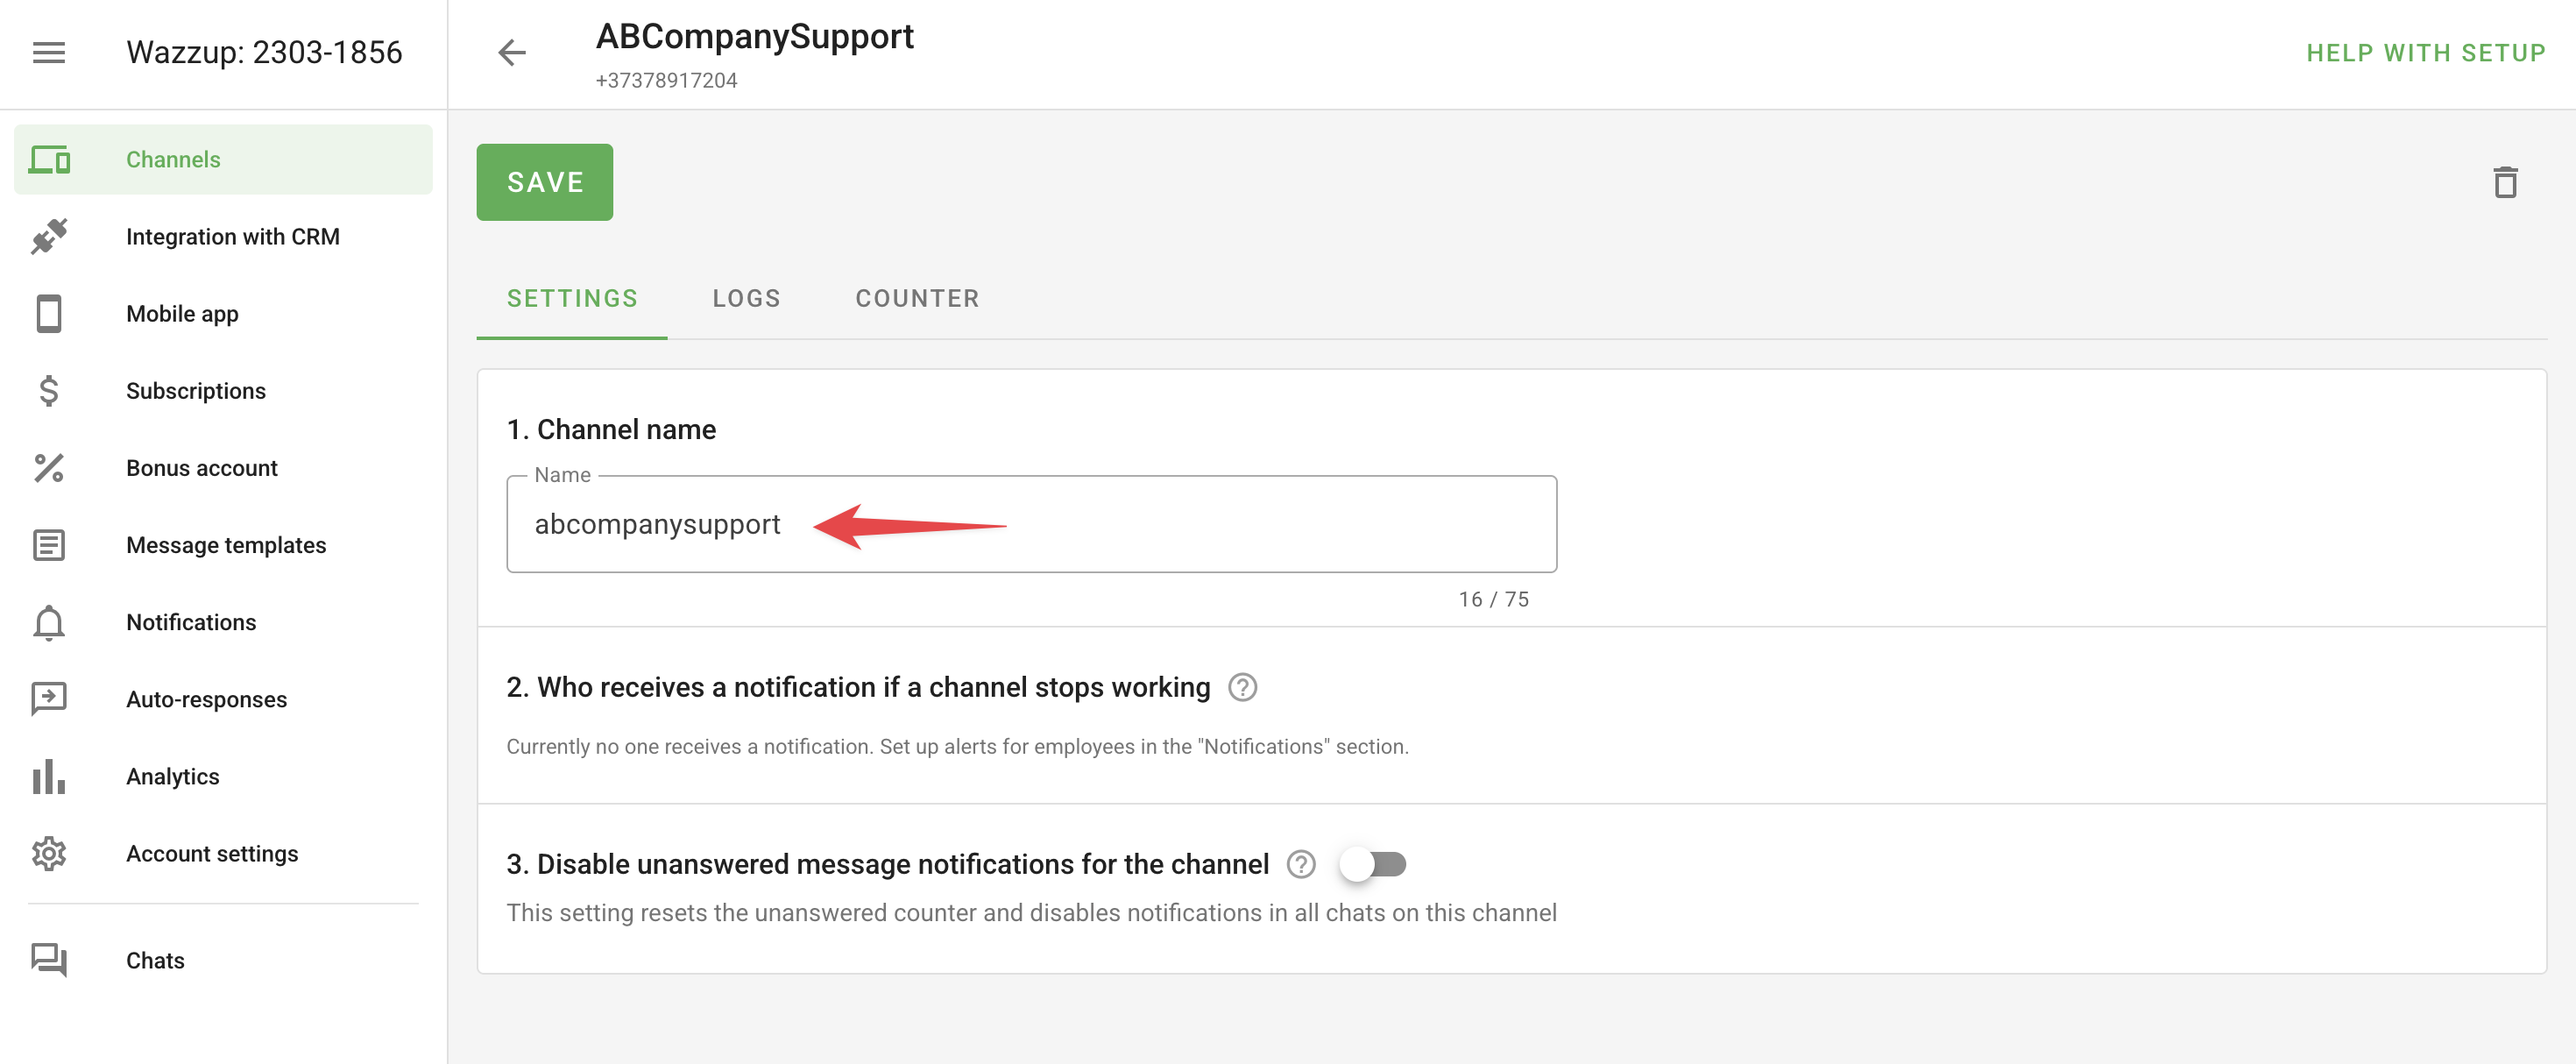
⚠️ Wazzup doesn't pass along the sender's identity for group chat messages to third-party services — meaning all group chat messages will come in under the group's name rather than a specific user's.
Supergroups
Wazzup doesn't support supergroups by default, though a group can automatically convert into a supergroup in some cases. Check Wazzup's recommendations and limitations, and contact their support if you need this enabled.
Initiating a conversation in Telegram from Deskie
If you have a regular Telegram account with a phone number connected in Wazzup via the unofficial API, you can start conversations with users from Deskie. Creating cases in Telegram works no differently from creating cases by email or calls. The key is to select the user's profile specifically for the Telegram channel on the case creation page.
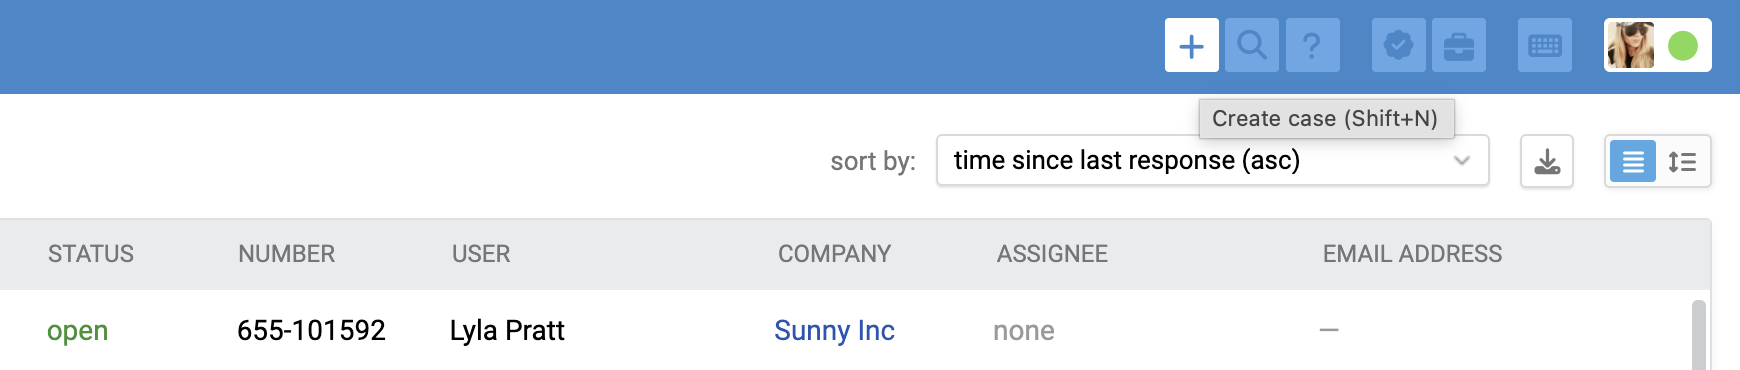
1. In the agent account, click the plus icon in the top-right corner to create a new case:
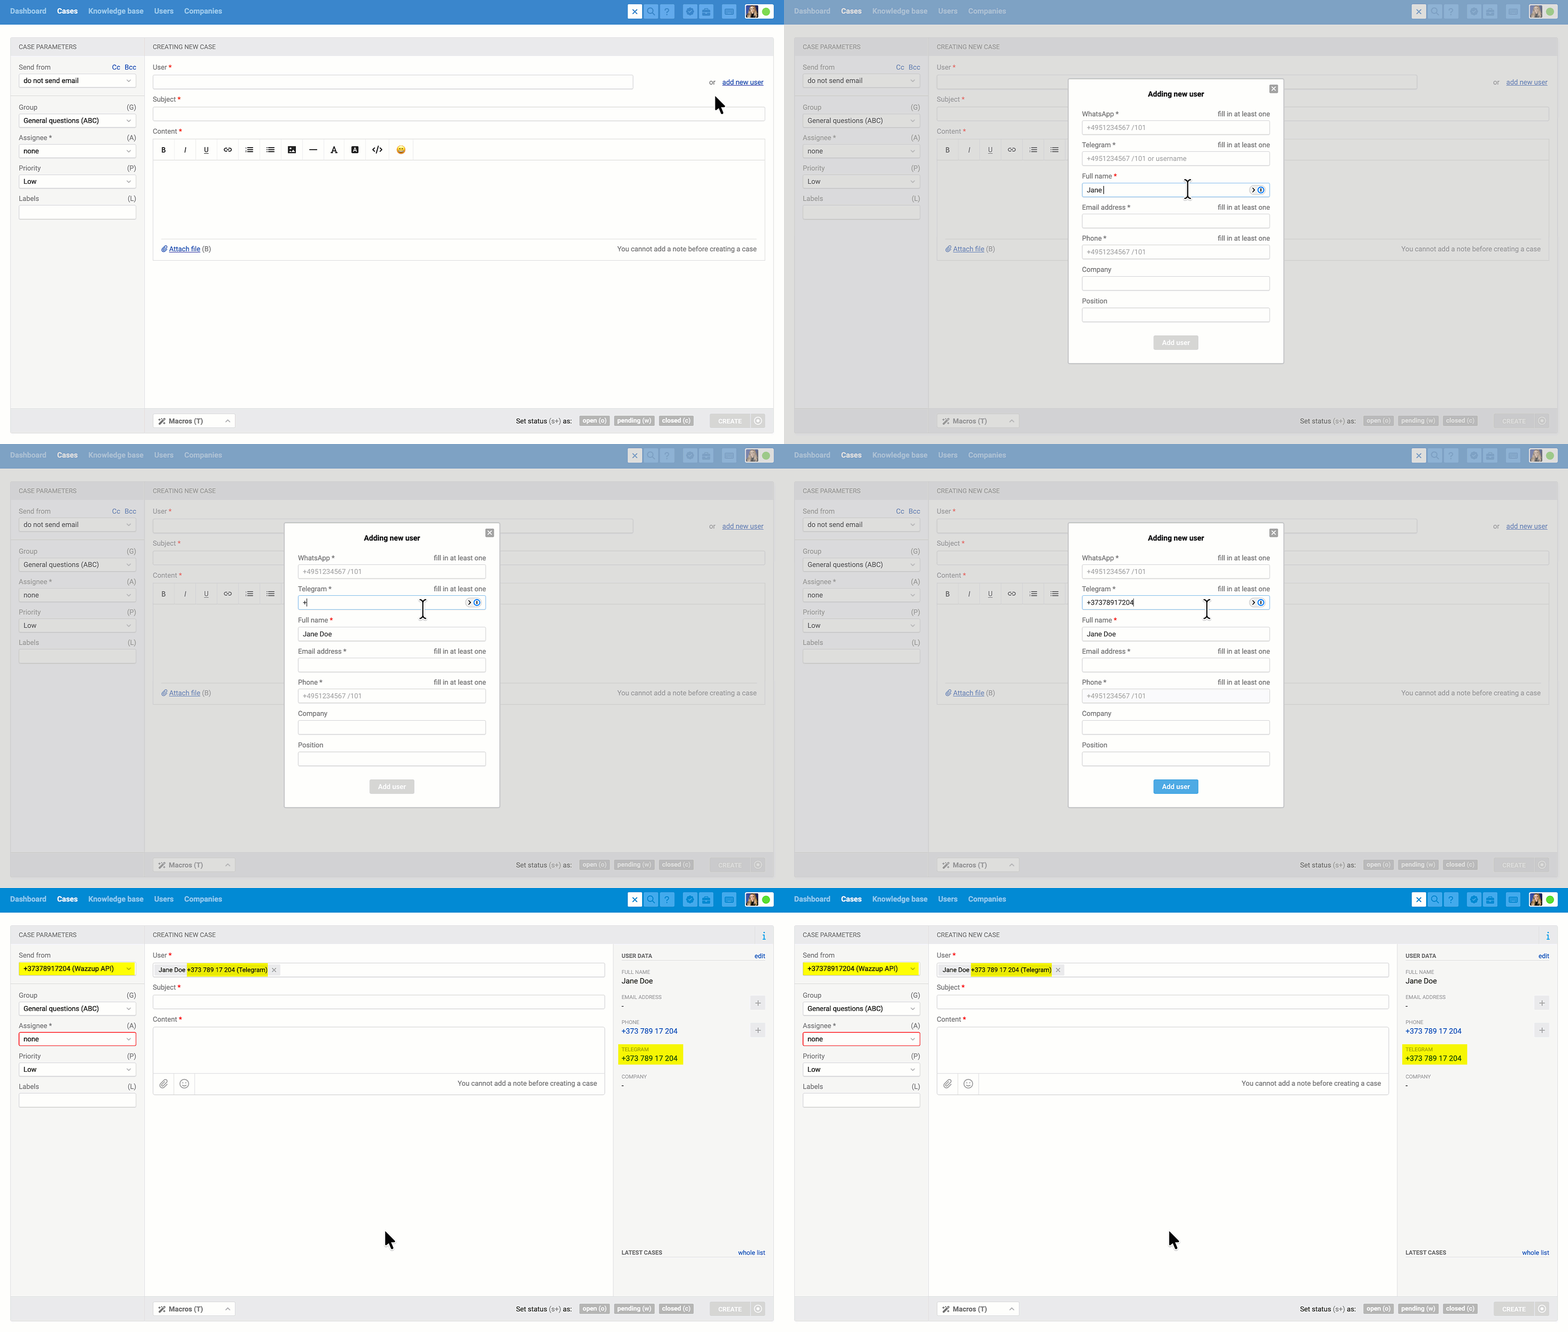
2. Create a user profile for the Telegram channel. You can do this two ways.
Method 1
Click "add new user", and in the form that opens, fill in the "Full name" field and enter the phone number linked to Telegram, or the user's Telegram username, specifically in the "Telegram" field.
Important
- The phone number must be entered in international format, starting with "+" — for example, "+92686562051".
- You don't need to fill in the "Phone" field separately — creating a profile for the Telegram channel automatically creates a user profile for the "Calls" channel too.
Method 2
Enter the user's phone number or Telegram username directly in the "Recipient" field, then choose the profile for the "Telegram" channel specifically from the dropdown:
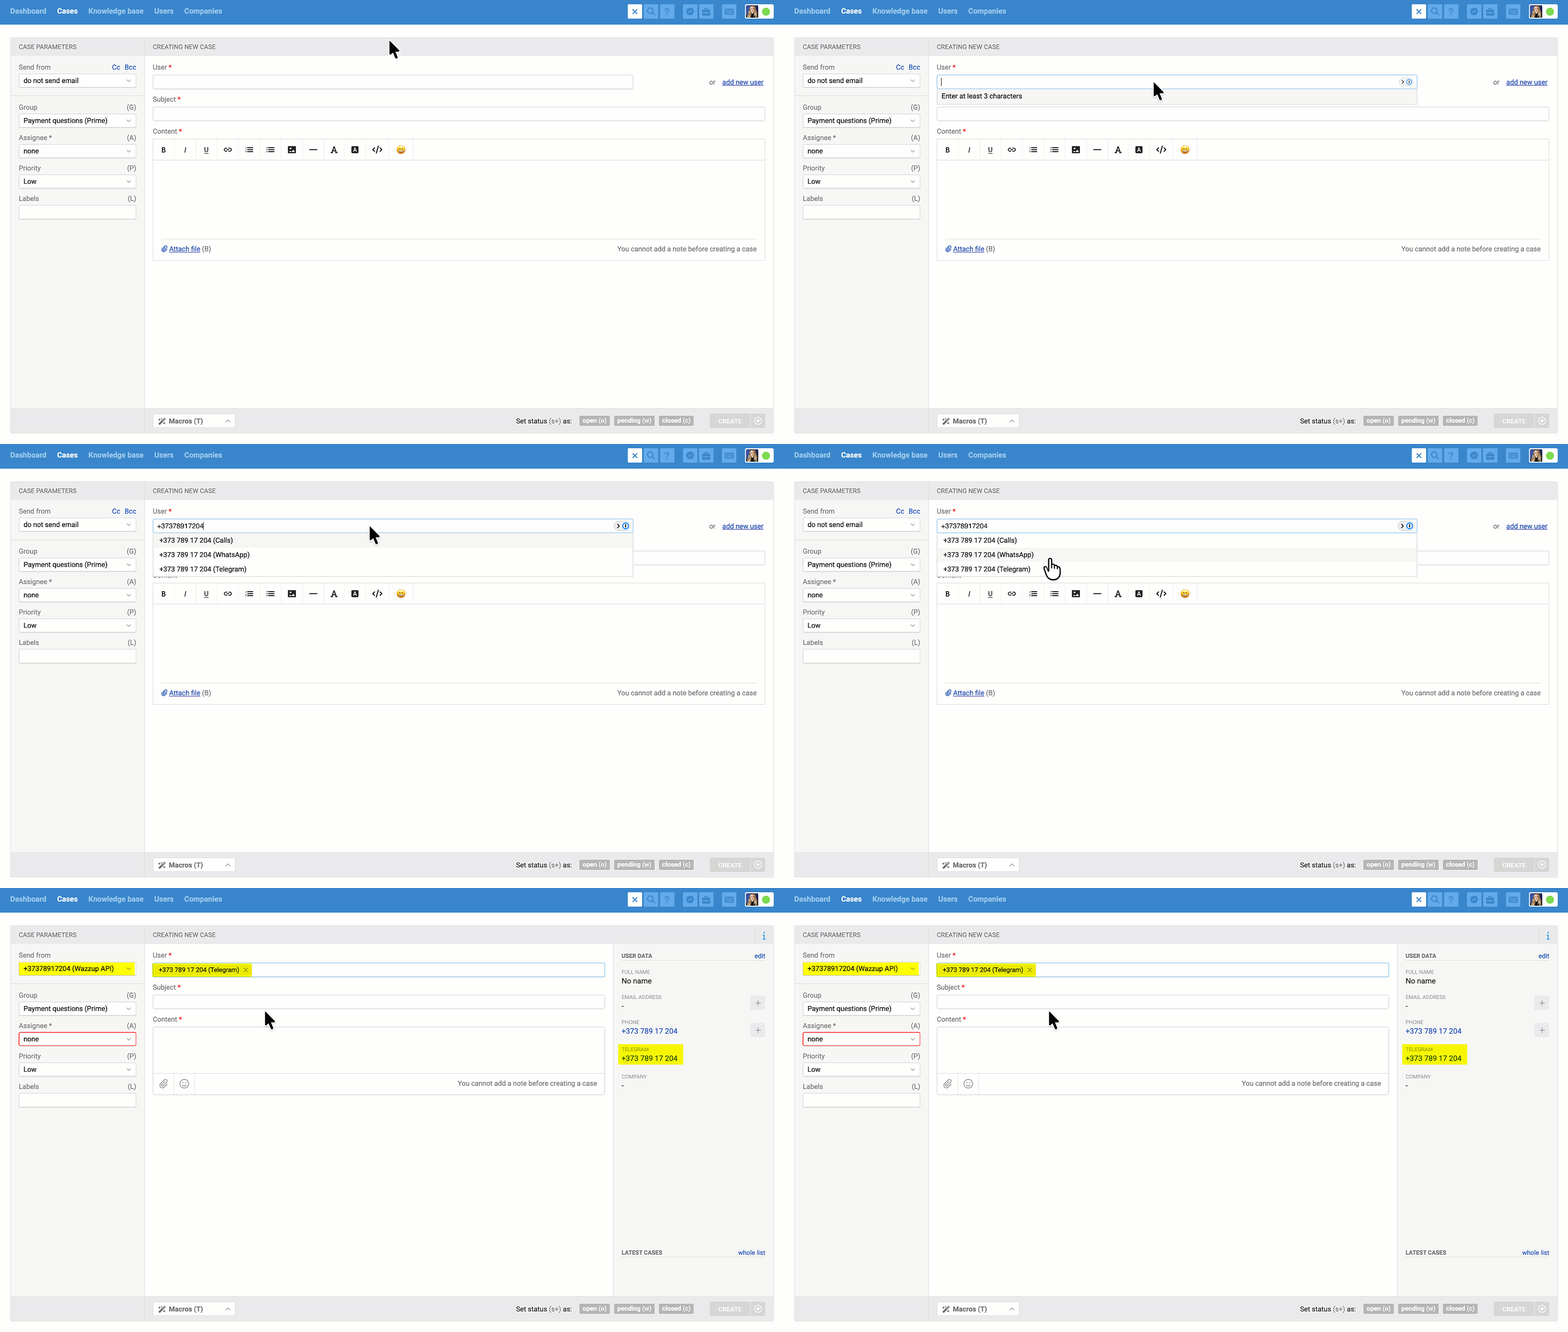
When you just enter a phone number or username in the "User" field, a user profile is created without a name. If you'd like, you can either edit the created profile by clicking "edit" on the "user data" panel, or leave it as is — the name from the user's Telegram profile will be pulled in automatically once they send their first reply.
Of course, if the agent sets a name in the user profile themselves, it won't later be overwritten by the name from the user's Telegram profile.
3. If you have several Telegram accounts connected in Wazzup, you can also choose which one to send the message from, in the "Send from" field:
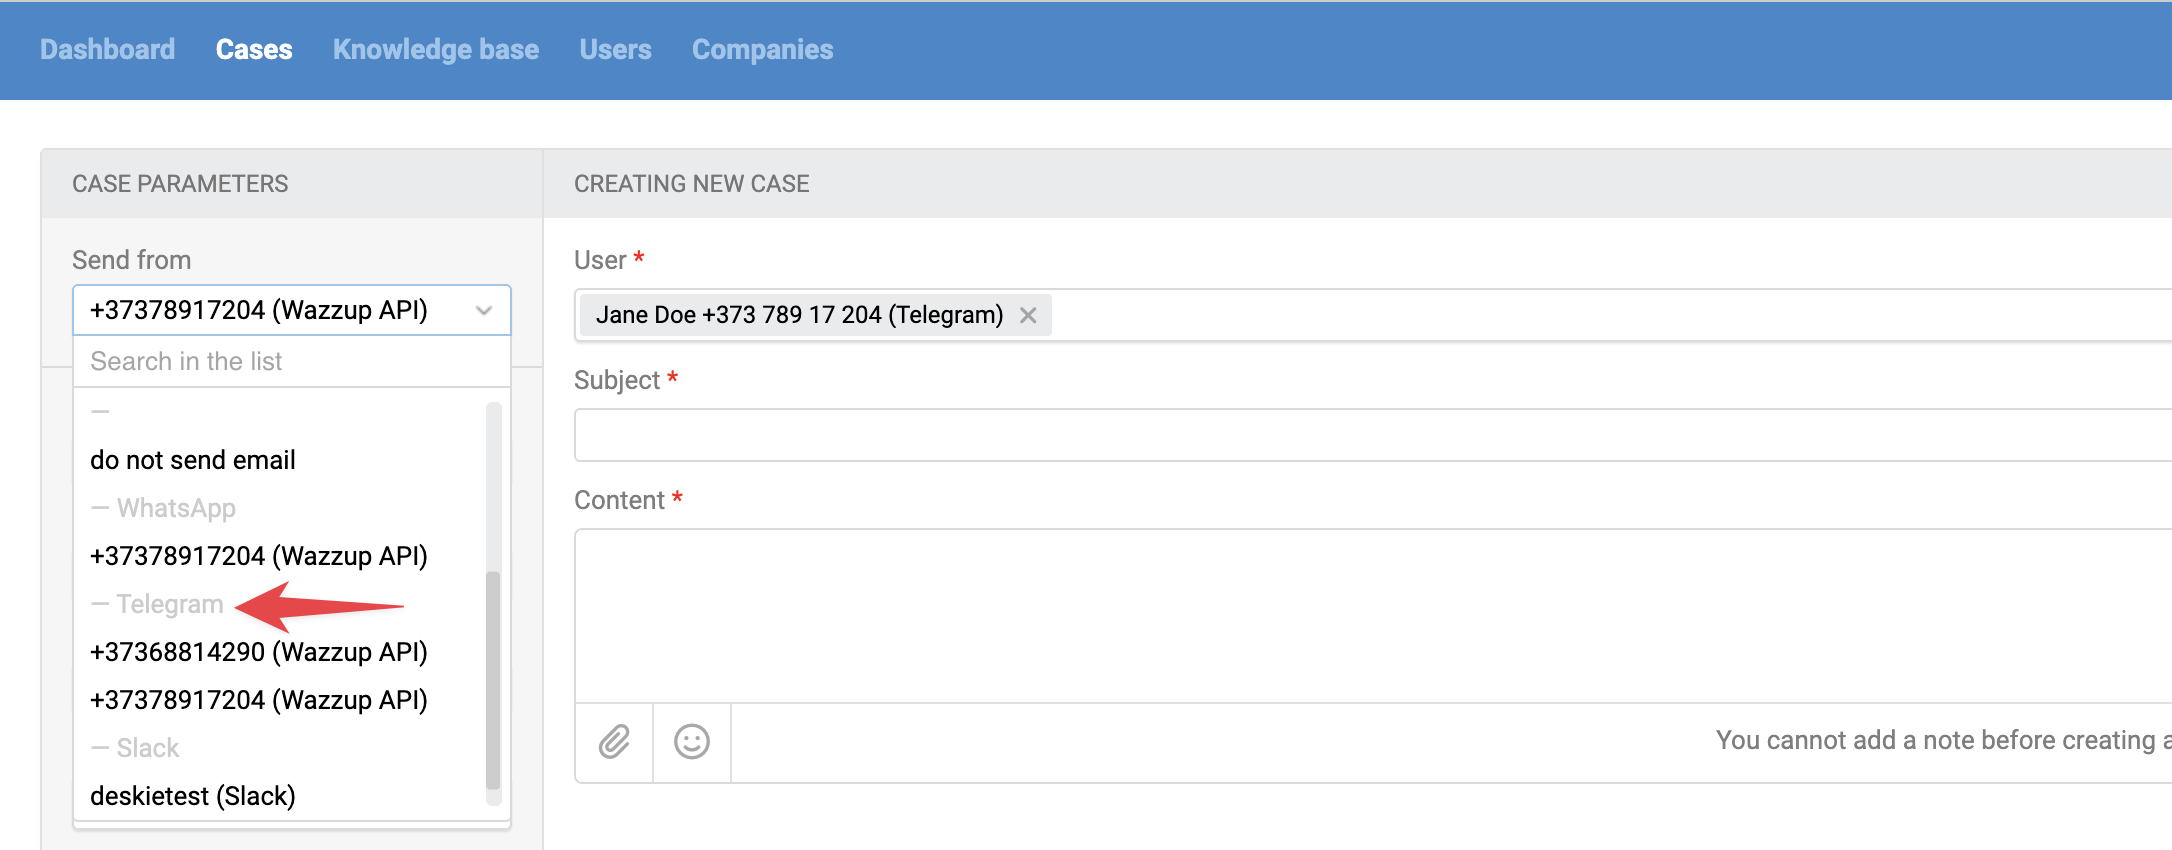
As with creating email cases, we'll remember the account you selected in this field and automatically pre-fill it the next time you create a new case for the Telegram channel.
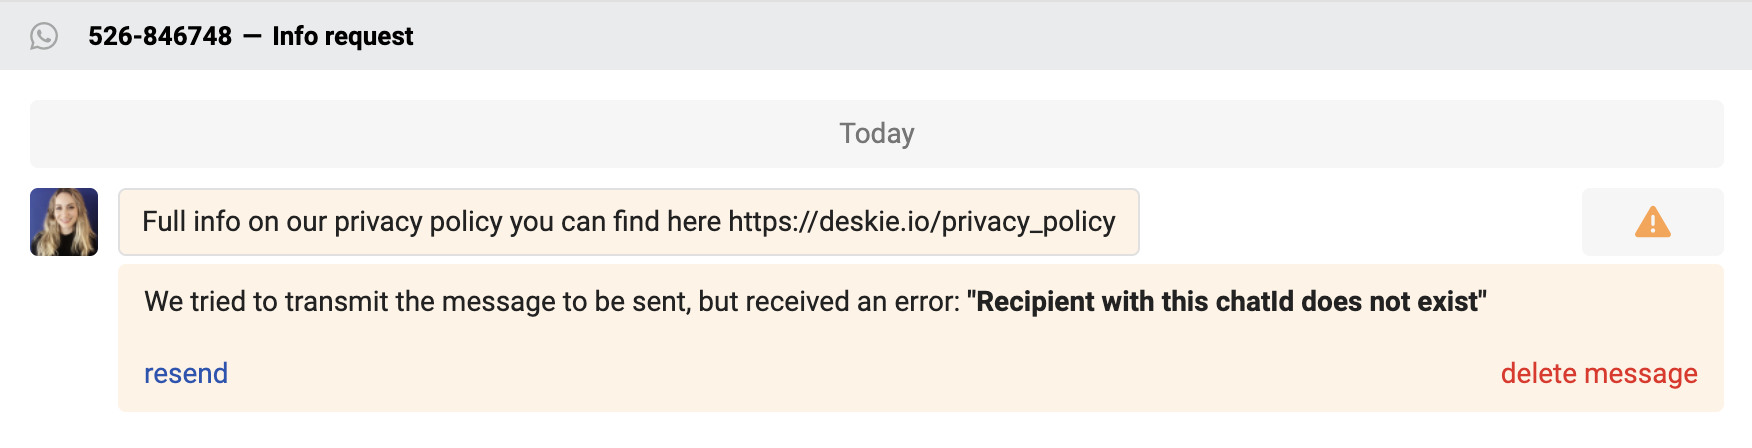
4. Fill in the "Subject" and "Content" fields and click "Create" to send the message to the user. If the message is sent to an account that doesn't exist, the agent will get an error.
Initiating a conversation in Telegram via API
So you can start conversations outside the agent account too, we added the user_telegram_data parameter to the methods for creating a user and creating a case.
As in the agent account, you can pass either the user's phone number or their Telegram username in this parameter.
If you have several Telegram integrations connected, you can also specify which phone number to send the message from when creating cases via the API, using the telegram_account parameter.
What Telegram cases look like in Deskie
The all cases list only shows cases with asynchronous communication — each side replies whenever they can — while real-time chats are shown separately and handled through a dedicated interface.
When a new chat comes in (Telegram, Viber, Slack, VK messages, Facebook messages, and other synchronous channels), a green icon appears in the top-right corner of the agent account. Incoming chats and new replies in chats show up there:
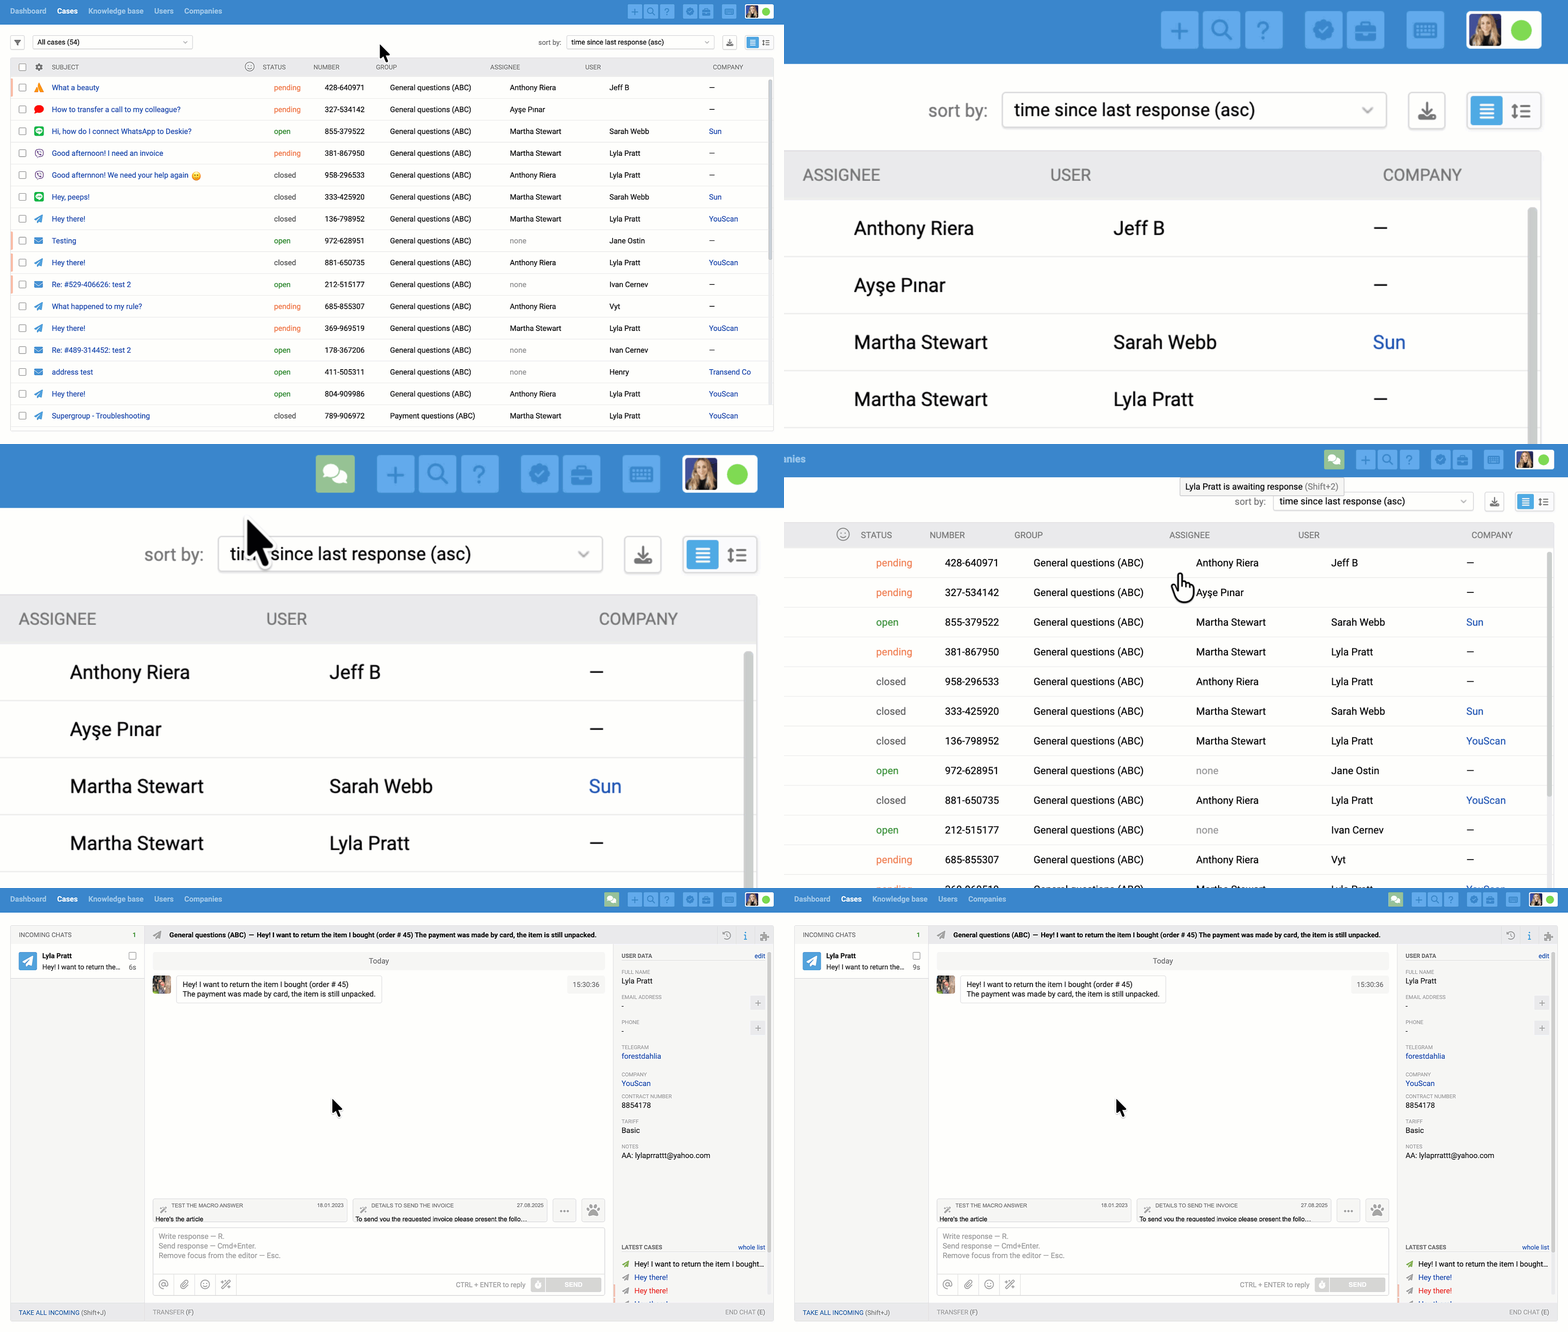
Chats also appear in the all cases list, but only once they're ended:
- if the agent ends the chat themselves via the "end chat" link in the bottom-right corner;
- after 10 minutes (the default value) of inactivity from both sides;
- when one of the automation rules with an "end chat and set status" action fires (for example, if you don't plan to respond to chats quickly and want to see them in the all cases list right away).
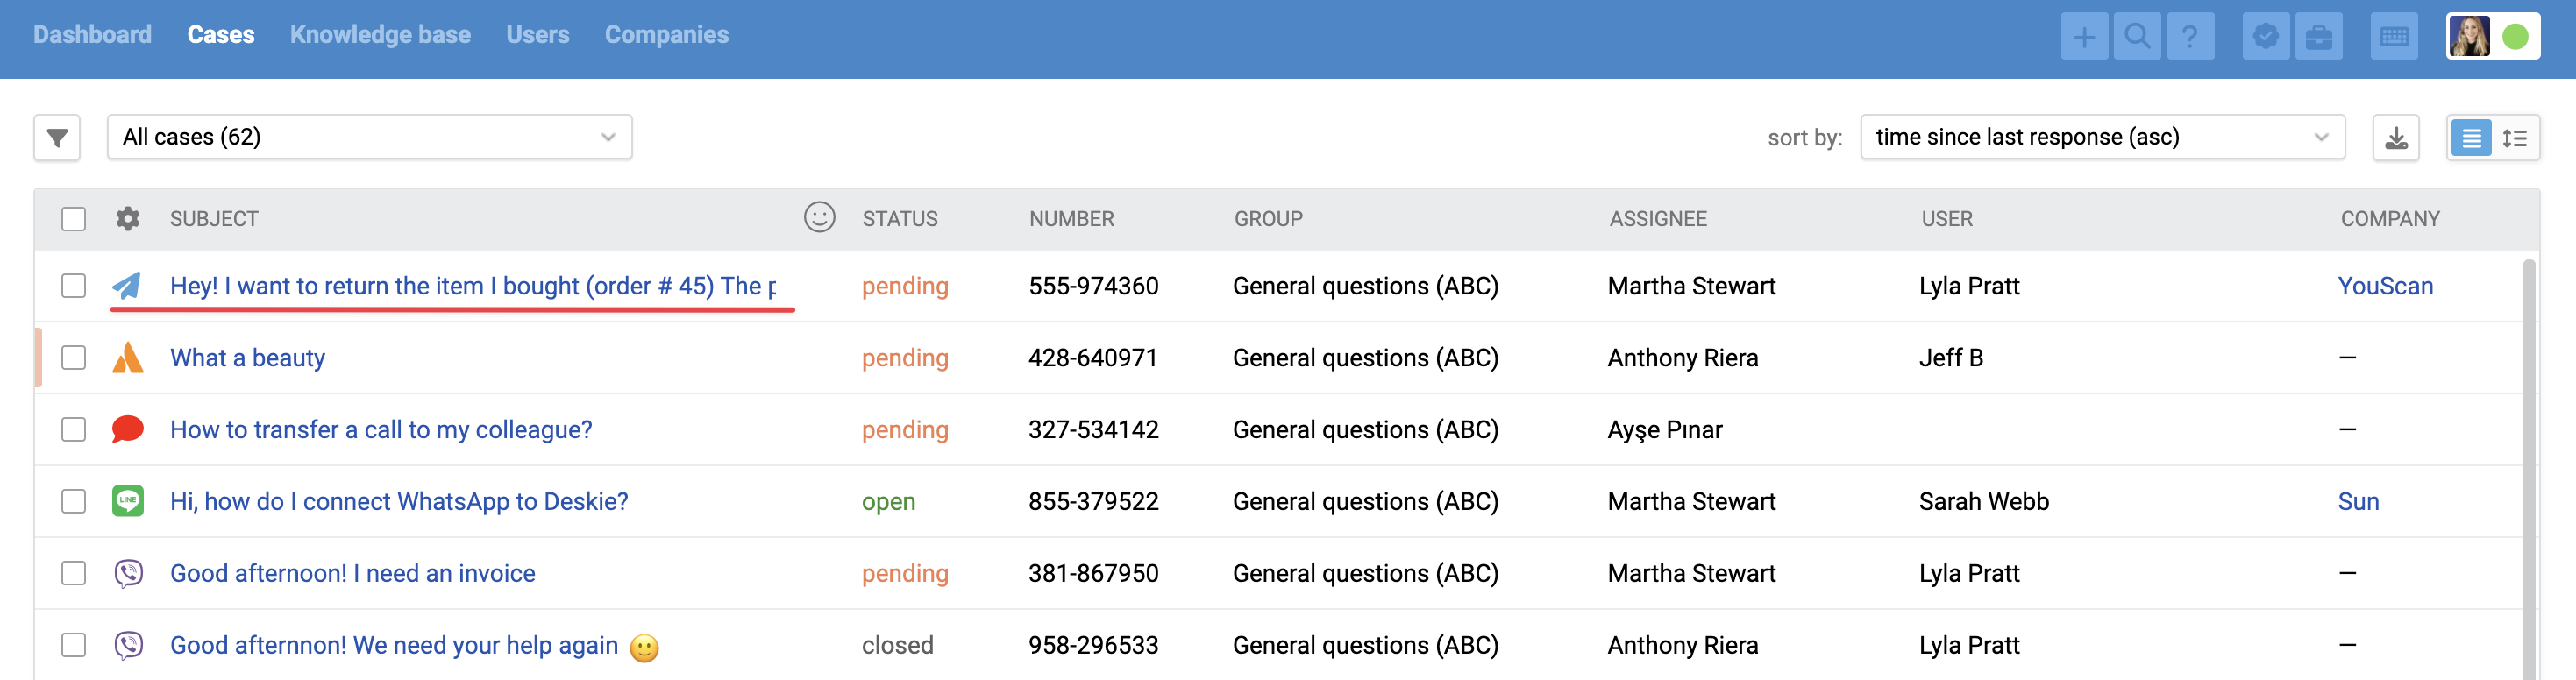
We deliberately separate synchronous and asynchronous communication, because providing top-notch support means accounting for the specifics and expectations customers have, depending on the type of channel they're using.
For example, a user emailing you is fine waiting a few hours for a reply, but in chats, even a 5-minute wait can feel like forever to them. If you don't take this into account and treat email and chat cases the same way, some customers will end up with an unpleasant experience.
For more information on working with chats, check out our video guide:
If you decide to work with chats from the all cases list, setup instructions are here. Cases covering different ways to distribute cases among agents are covered in our knowledge base here.