Widgets allow your customers to quickly ask for help through a convenient communication channel, leave an idea for service improvements, and also browse the knowledge base to get the information they are interested in.
You can create a widget along the path: administrator account — the "Channels" section — the "Widgets" subsection. Then, click on the "Add Widget" button to create and configure the widget.
Widget setup is a step-by-step constructor: select the options you need and track changes in the preview window to the right of the form in real-time.
If you prefer the video format, you can check out the widget guide on our Youtube channel.
Widget display settings
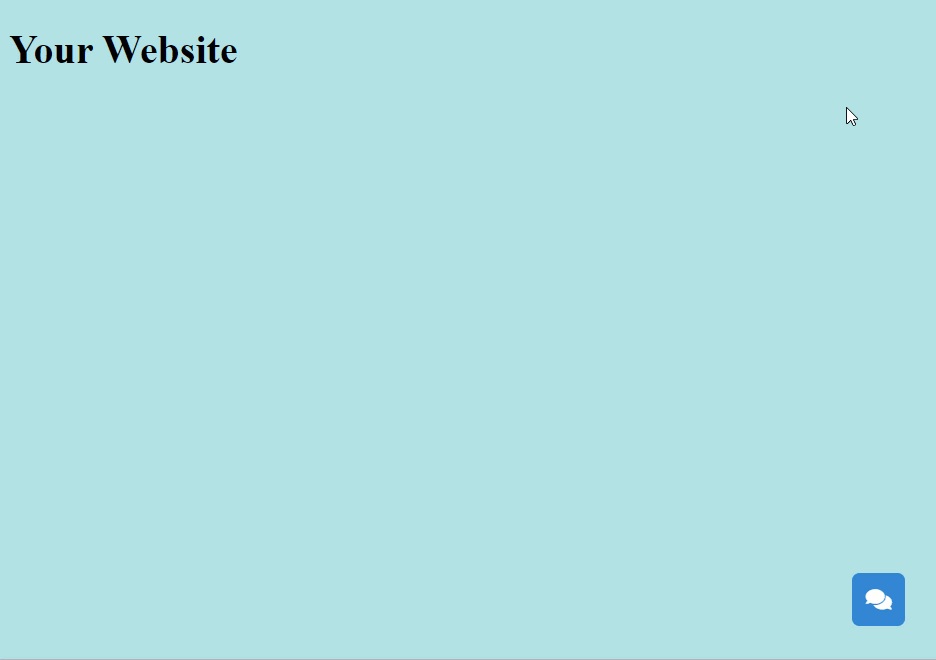
You can choose the widget button's format, location, icon, and color theme. We display real-time changes in the preview window on the right. You can also view the full-screen version of the widget by clicking on the button below the preview window.
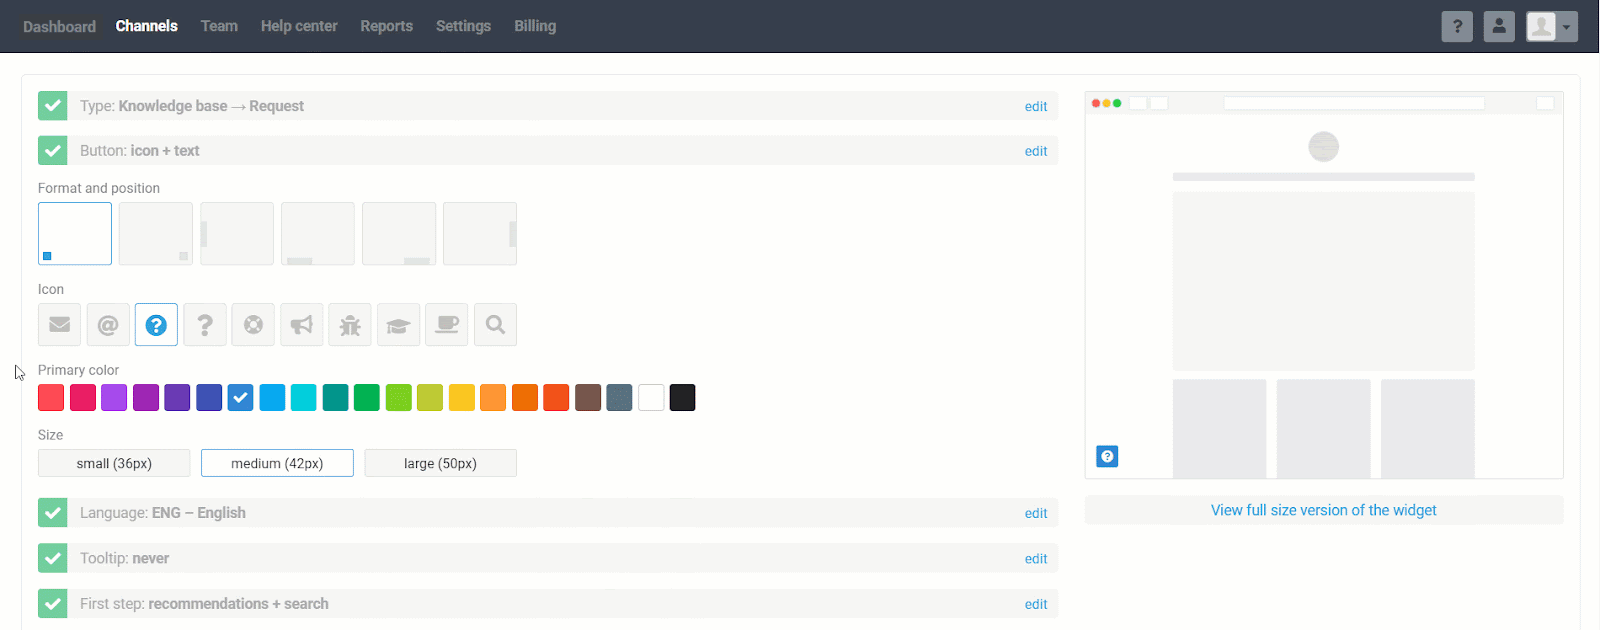
Format and position
If you plan to use social networks or instant messengers, then the widget may only look like an icon in the lower-left or right corner of the website.
If communication is supposed to be through a feedback form, buttons with text are also available. You can add them to the bottom of the website or knowledge base and "stick" to one of the page's sides.
The themes for widgets are fully consistent with the themes of the Help Center. You can either combine different colors or set the same palette for the Help Center and the widget.
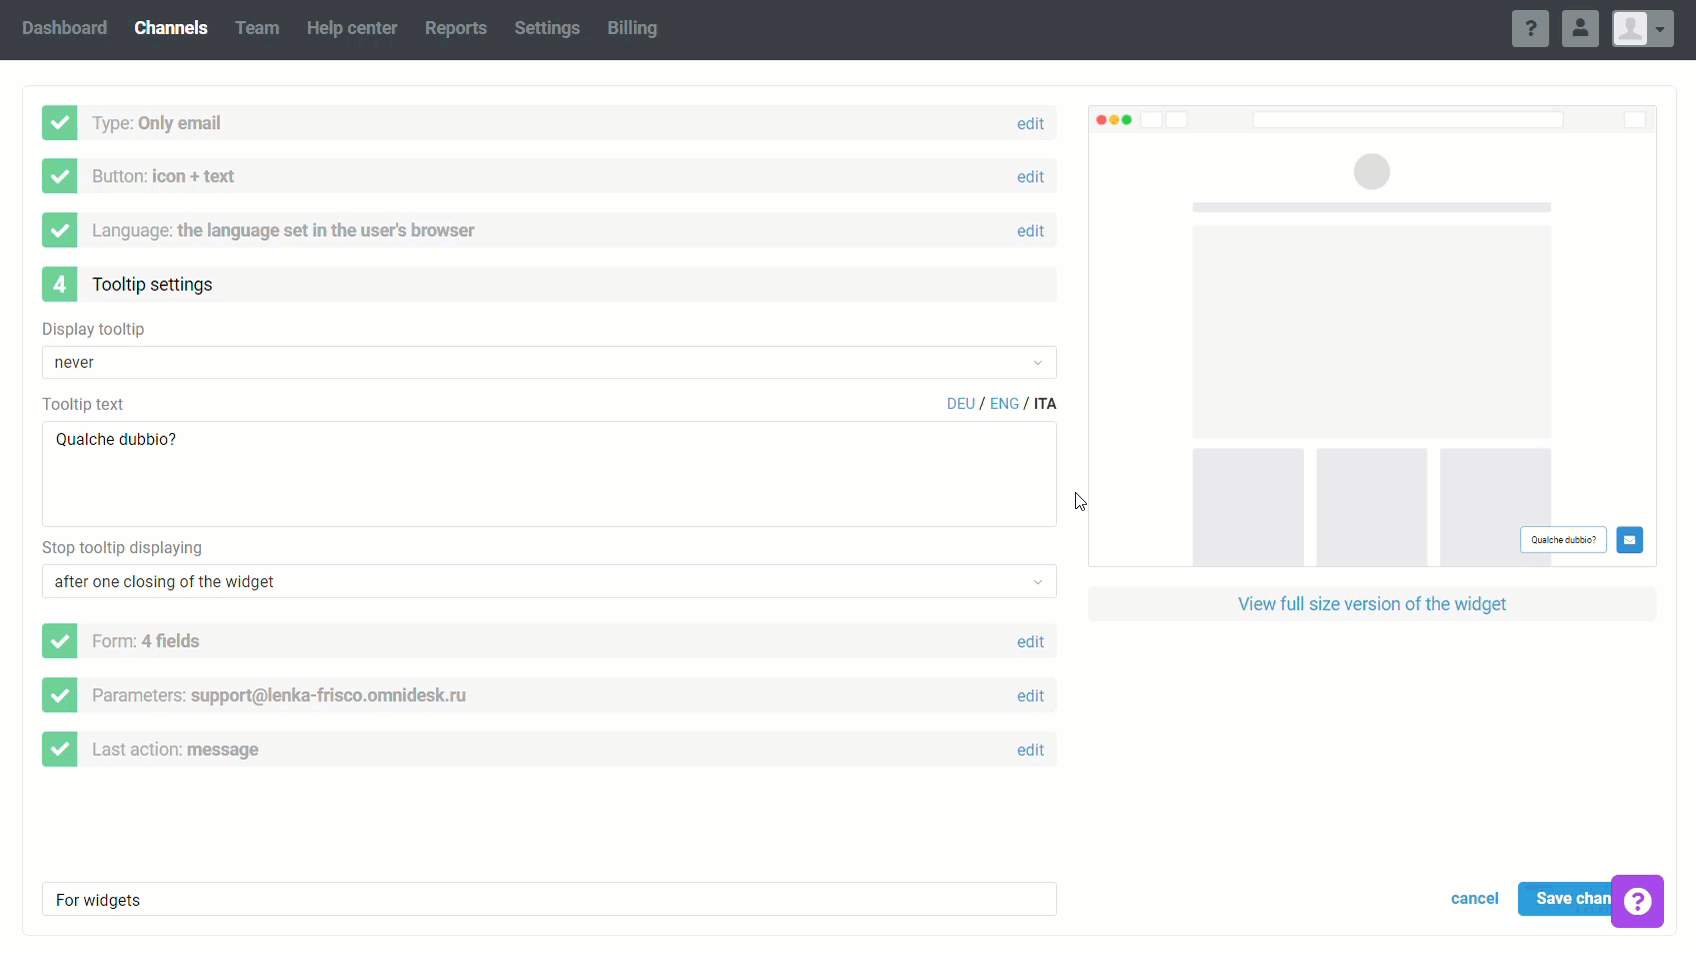
Tooltip
To make it easy for customers to understand that a widget is a way to quickly get in touch with you, add a tooltip to grab extra attention. In addition, the tooltip can be displayed in different languages. For more information about this setting, see the section Multilingualism in widgets.
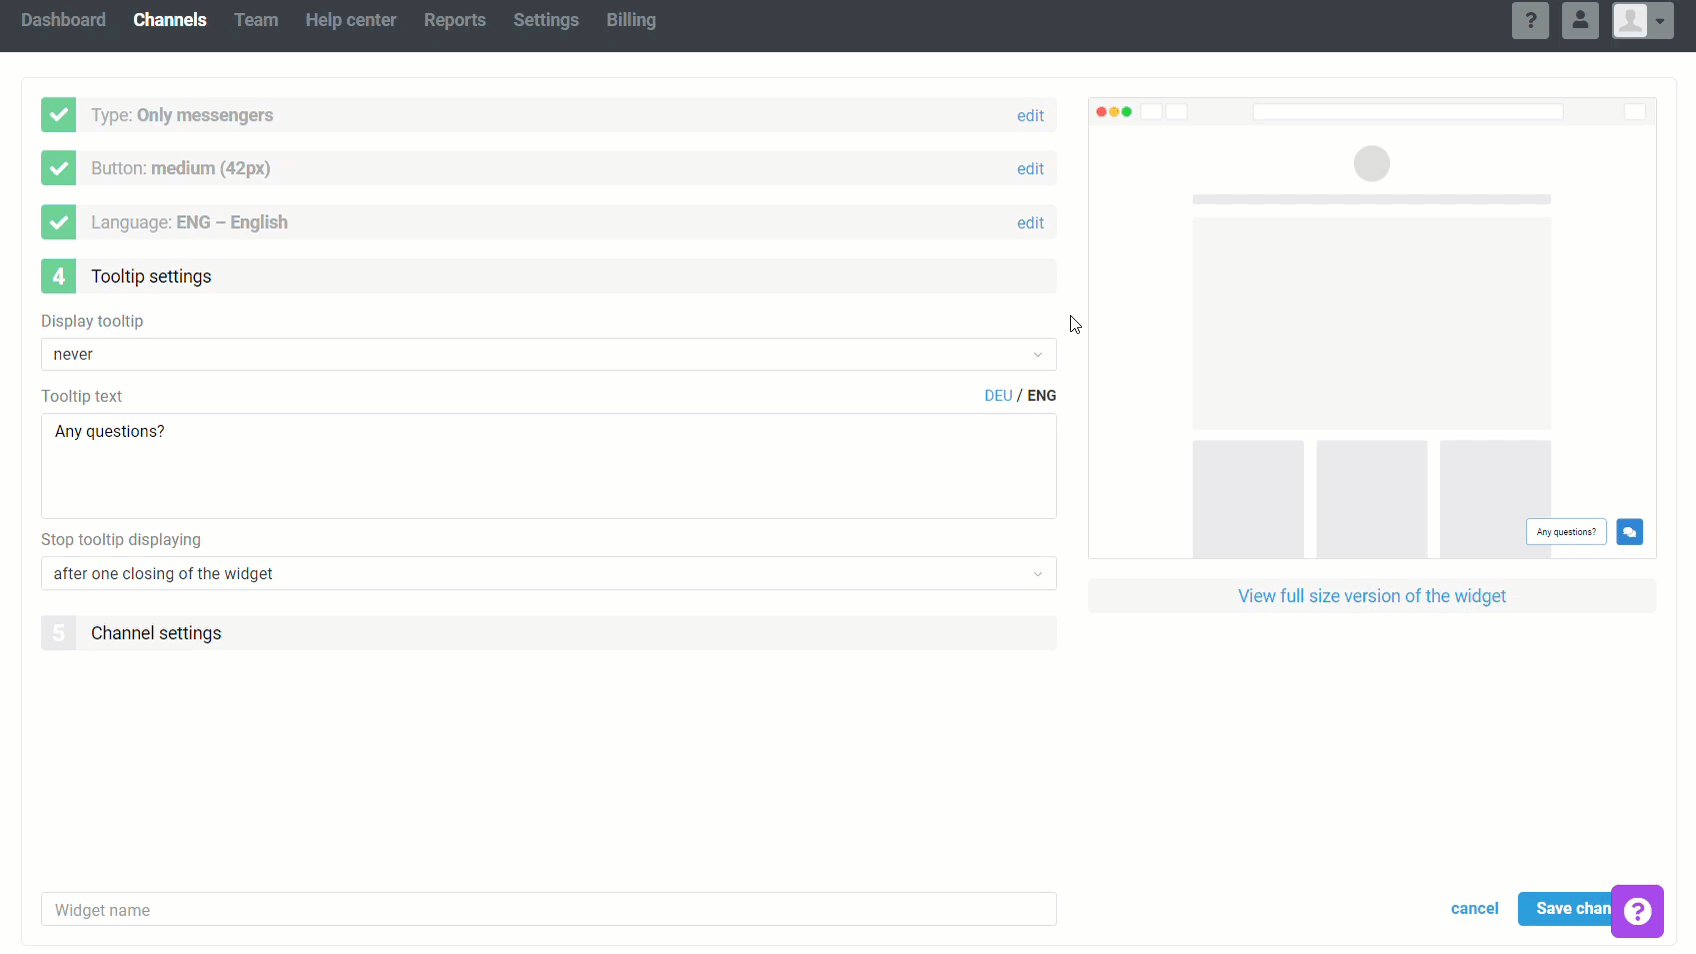
Tooltips are displayed the same way for all other channels when hovering over the widget buttons.
Widget type and customization
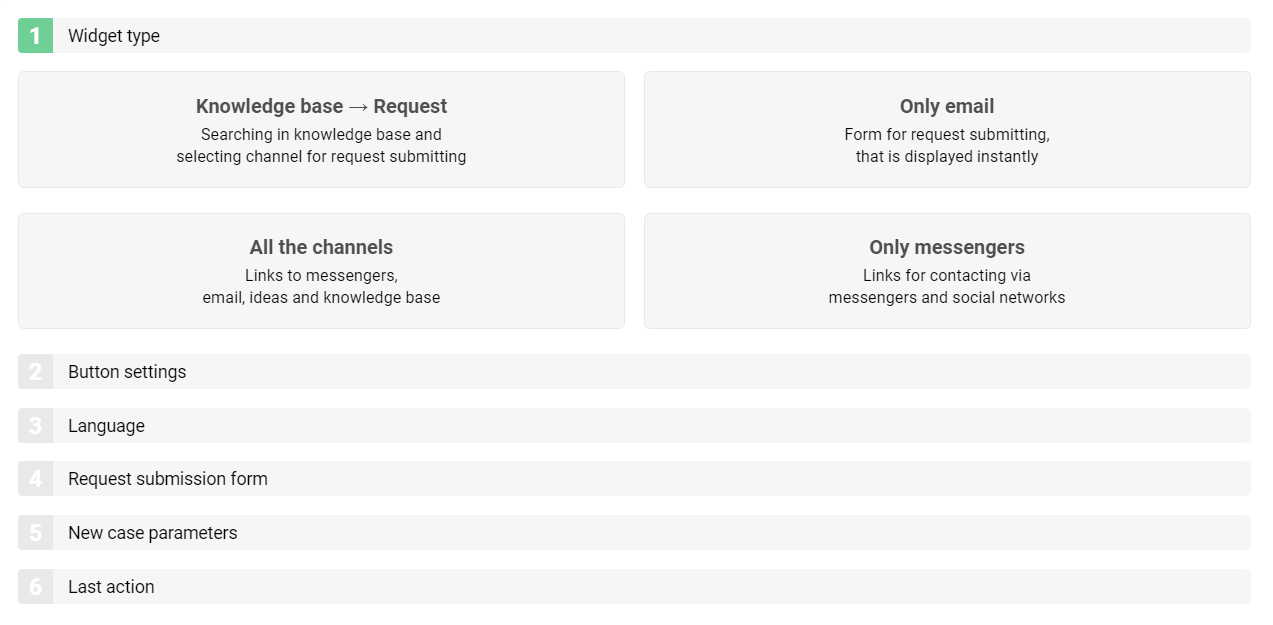
Depending on the tasks you solve and the channels used to communicate with customers, you can choose one of four types of widgets. Go to the detailed description of the settings by clicking on the name:
Knowledge base → Request: this option is convenient if customers often ask you simple questions of the same type, and you want to reduce the burden on staff a little.
All the channels: this type of widget combines all possible ways to contact you, including the "Knowledge Base" and "Ideas" channels: customers are free to choose and do what is more convenient for them.
Only email: suitable if you plan to accept cases from customers only through the feedback form.
Only messengers: customers can contact you through social networks and instant messengers.
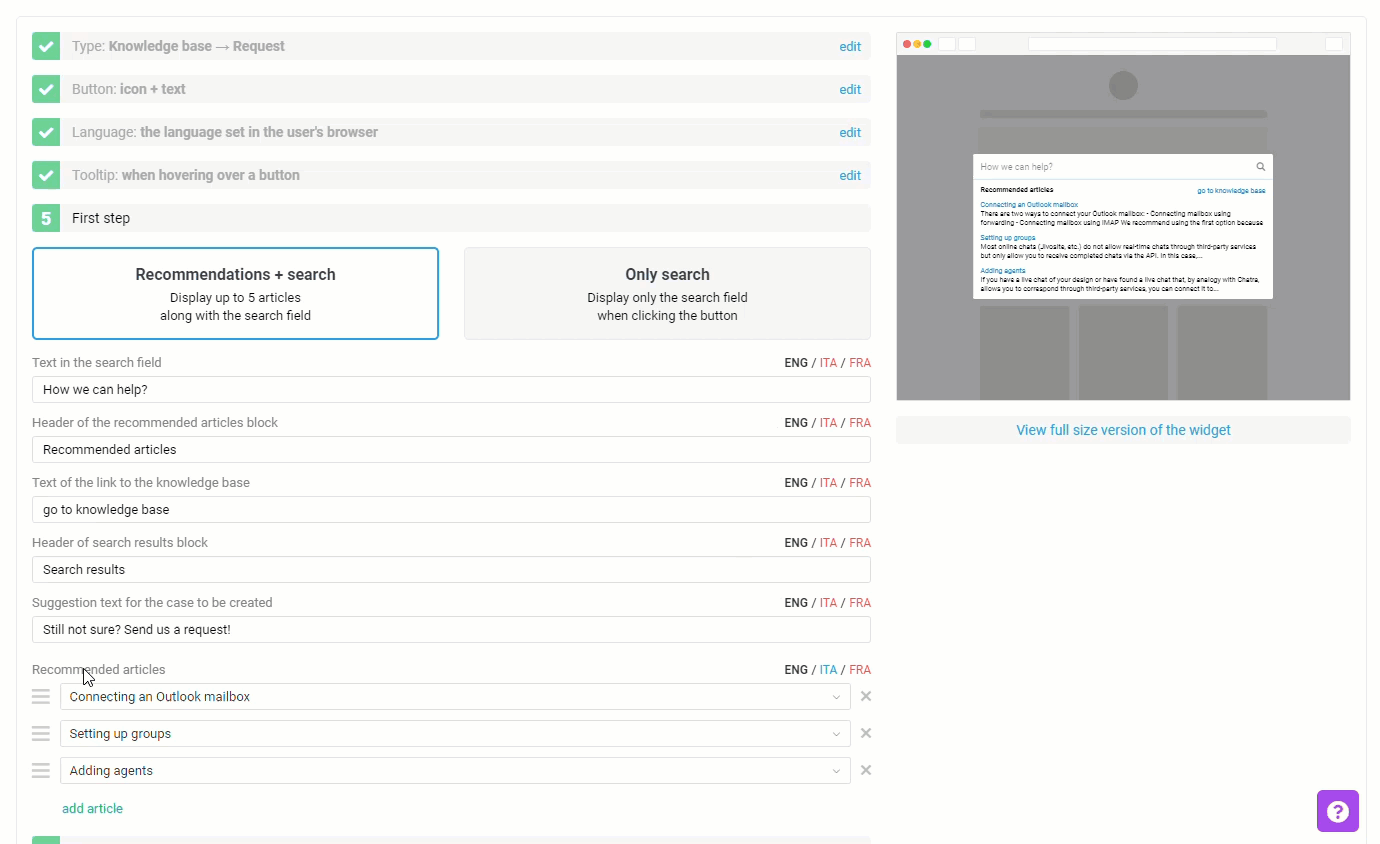
"Knowledge base → Request"
Logic: first, customers are prompted to search the knowledge base, and only if the answer is not found, contact support.
PRO tip: Having a self-service scheme in place helps to take the extra load off the team and increase customer satisfaction with your service at the same time. However, make sure you add content regularly and keep your knowledge base up to date.
Settings
1. In the settings, you can choose what customers see after clicking on the widget:
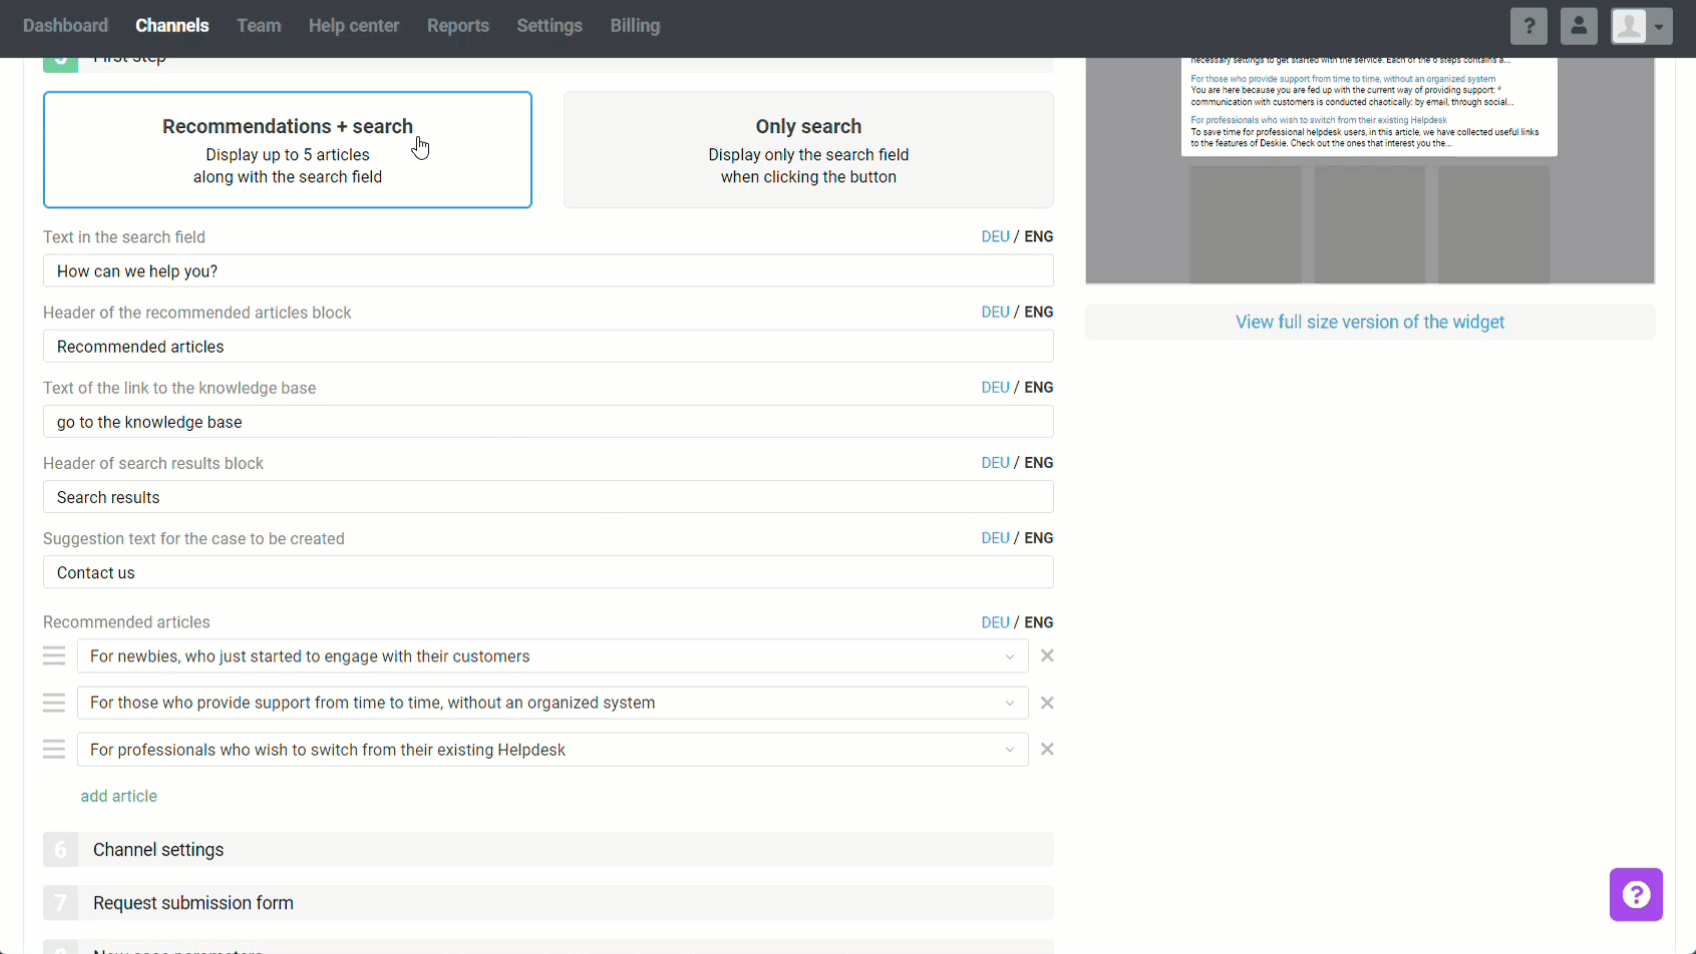
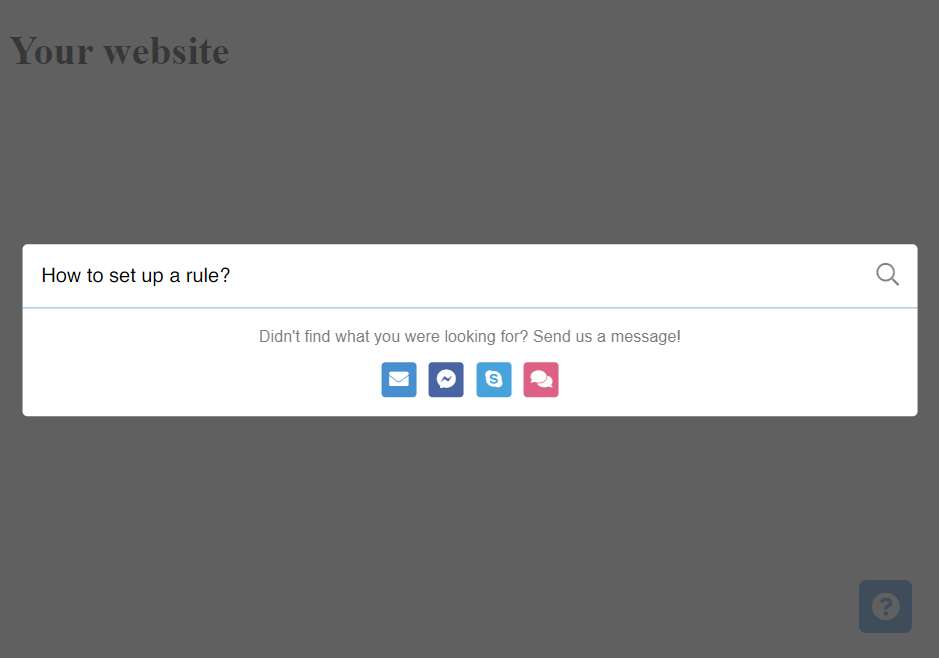
a) Only the search field:
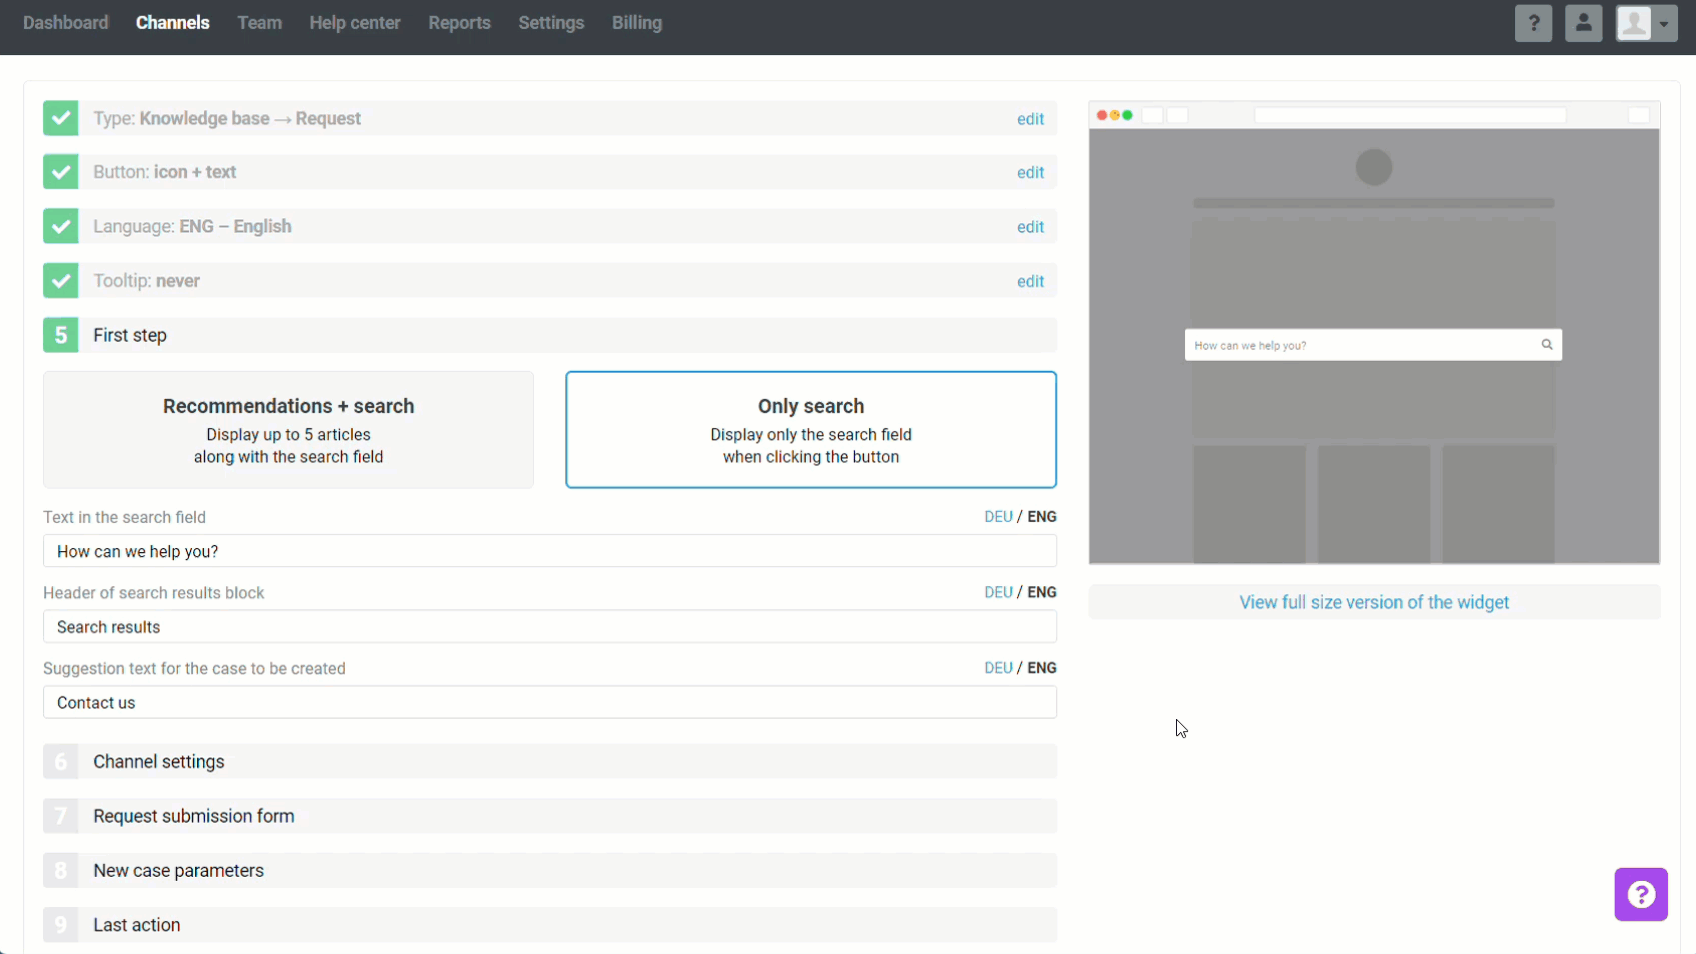
b) a search form and up to five knowledge base articles that you recommend reading:
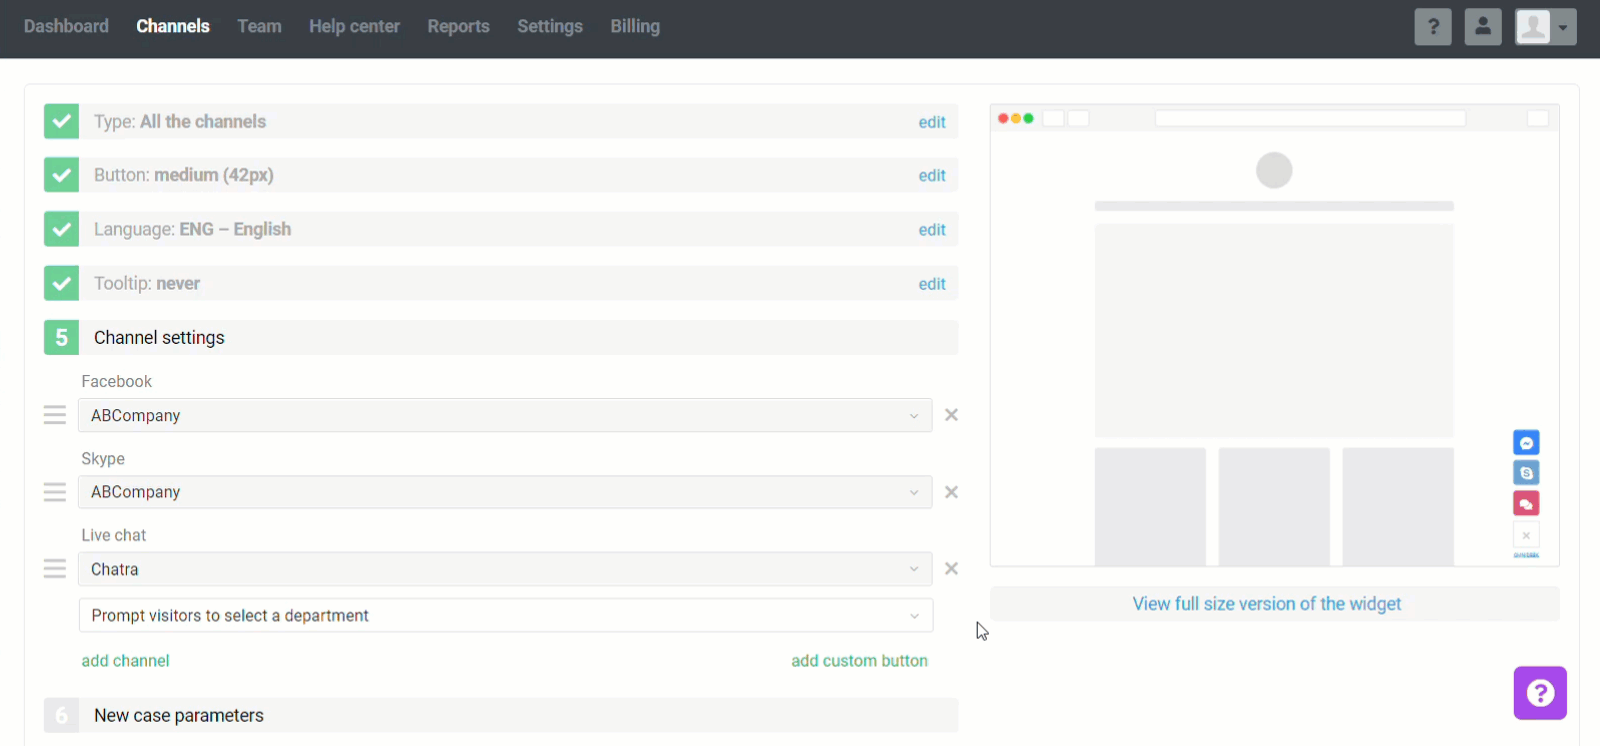
2. Choose the communication channels that customers can contact you through. All the channels connected are available.
These channels are visible in the search results window and the articles viewing window.
If there is an email among the channels you have selected, additional fields will appear such as settings for the feedback form, parameters of incoming requests, and actions after sending the request. You can find more details in the Only email widget section.
Those additional fields disappear if you turn off this channel, and the widget is good to go.
Quick links:
"All the channels"
This widget type combines all the ways to contact you, including the "Knowledge Base" and "Ideas" channels, which duplicate the corresponding sections from your Help Center. That means your customers can:
can ask for help through a convenient channel;
right in the widget window, without going to the Help Center itself, search for the answer in the knowledge base on their own;
leave their ideas or vote for the ideas of other customers.
Add all the channels you need. When adding the "Knowledge Base" and "Ideas" channels, you can specify a tooltip text when hovering over the button, set the icon and its color, and select which page/category opens by default.

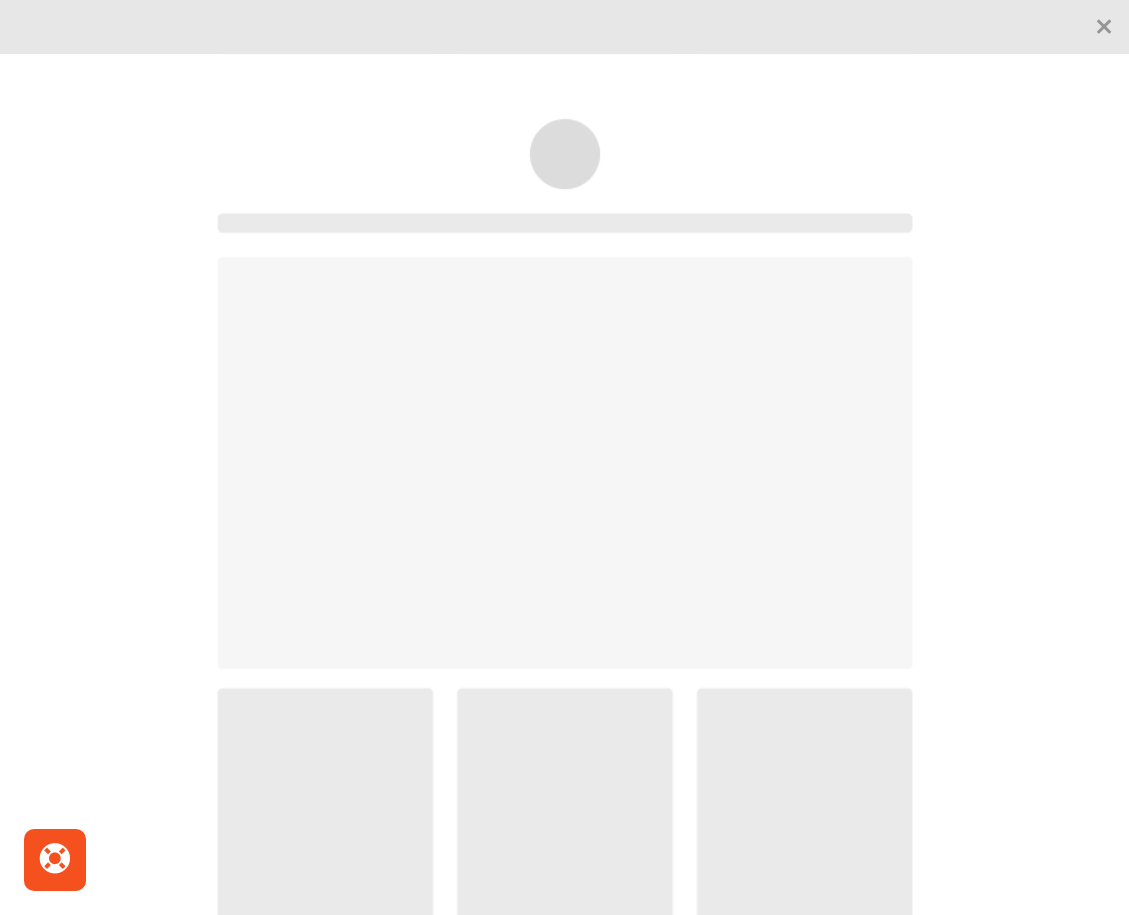
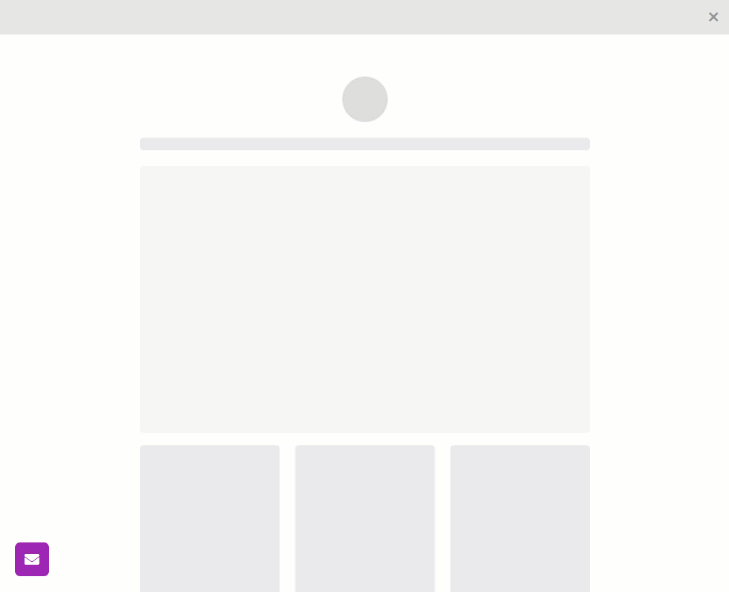
This is what the interaction with the knowledge base through the widget looks like:
The knowledge base color scheme in the widget inherits your Help Center settings. Pass-through authorization is also supported: if users are authorized in the Help Center, then using the knowledge base in a widget on your website, they are also authorized. More
By adding the "Ideas" channel to the widget, your customers can view the section on your website without going to the Help Center. They can also add a new idea directly from the widget. More
Suppose there is an email among the channels you have selected. In that case, the following appears on the widget creation page: the settings for the feedback form, parameters of incoming requests, and actions after sending the request. You can find more details in the Only email widget section.
Those additional settings disappear if you turn off this channel, and the widget is good to go.
Quick links:
"Only email"
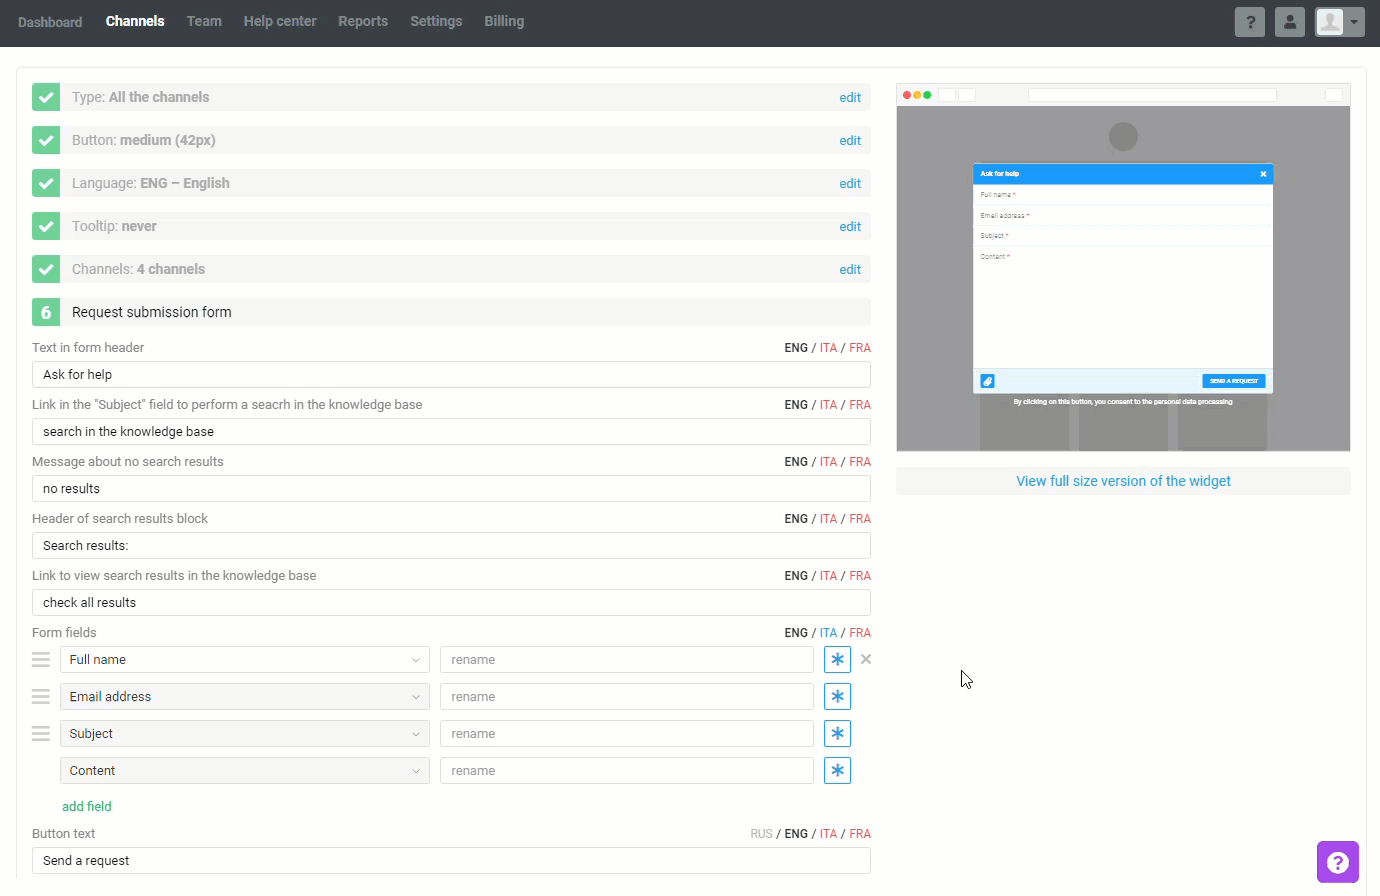
This widget type immediately opens a feedback form by email by clicking on the icon. Customers can also search articles in your knowledge base in the Subject field to find the answer without contacting support.
Setting up the feedback form
You can change the auxiliary text in the form, add the necessary fields, etc.
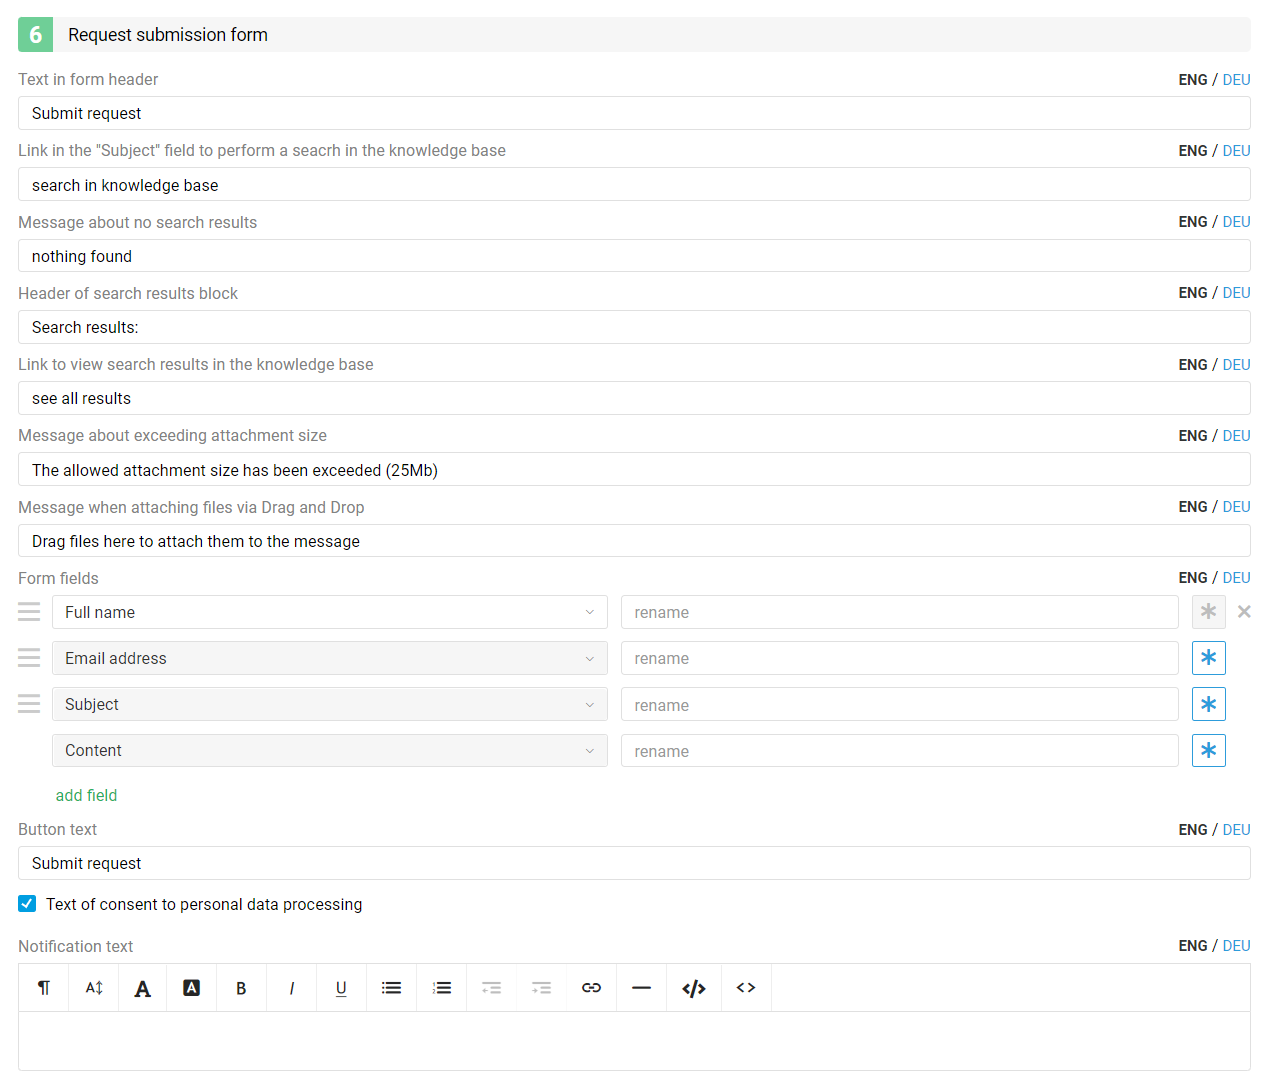
a) If you want to add a custom field so that customers enter the information you need, for example, contract number, account type, etc., first create these additional fields in the administrator account along the path Channels — Data fields. More
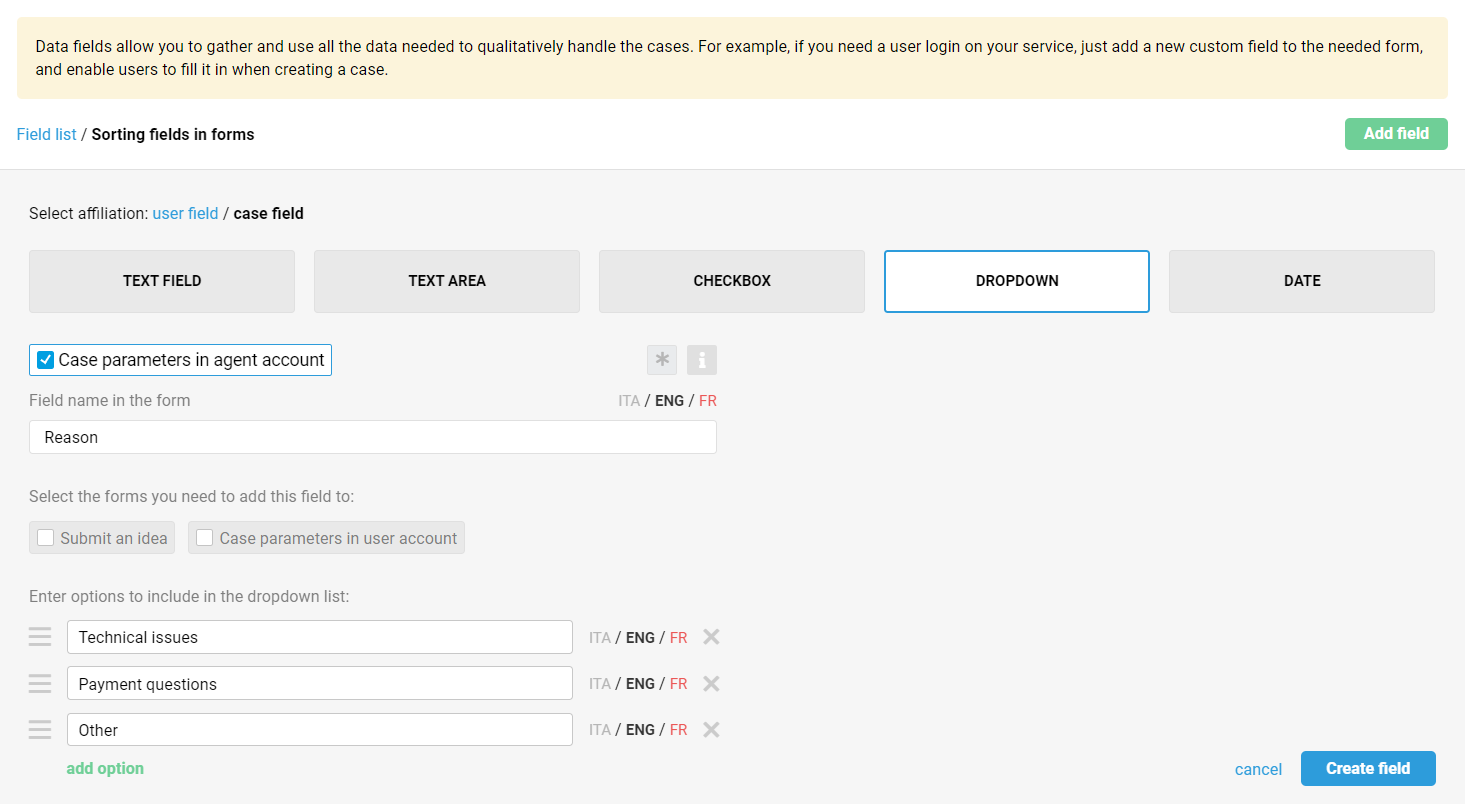
Then add the required fields to the feedback form and indicate with an asterisk whether they will be required or not.
b) If you have several emails connected to Deskie, you can choose which one to indicate as an email for replying to cases received from this widget and immediately set a specific group or add a label to such a case. These settings are helpful if you place different widgets on different pages of your website and want to track where exactly the customer sent the case from.
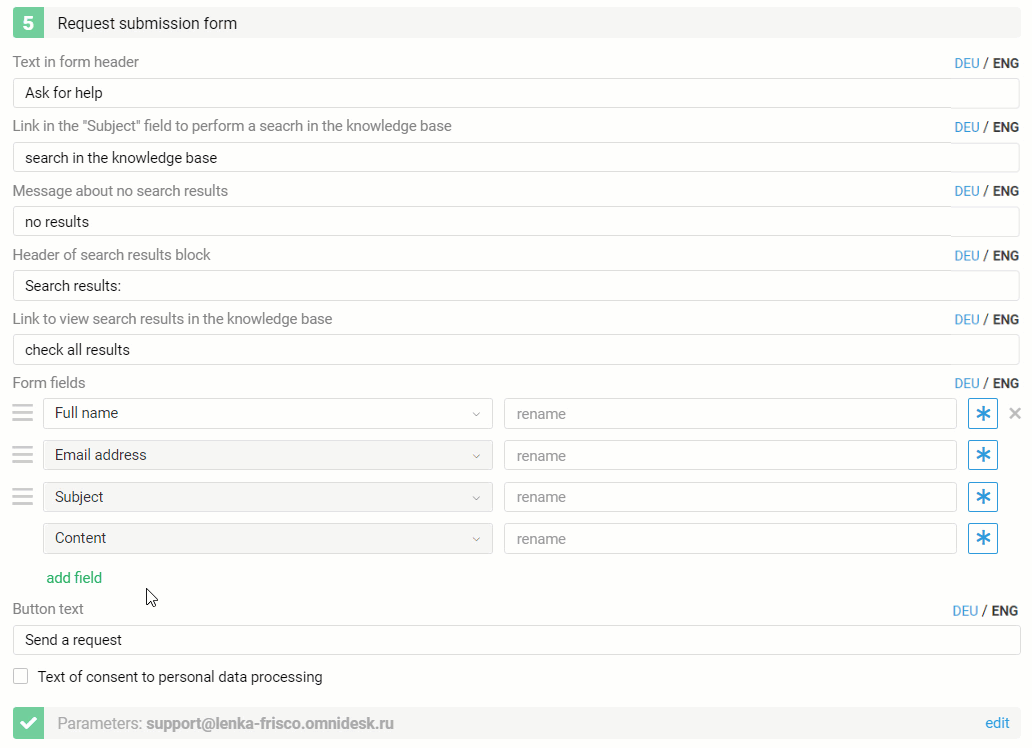
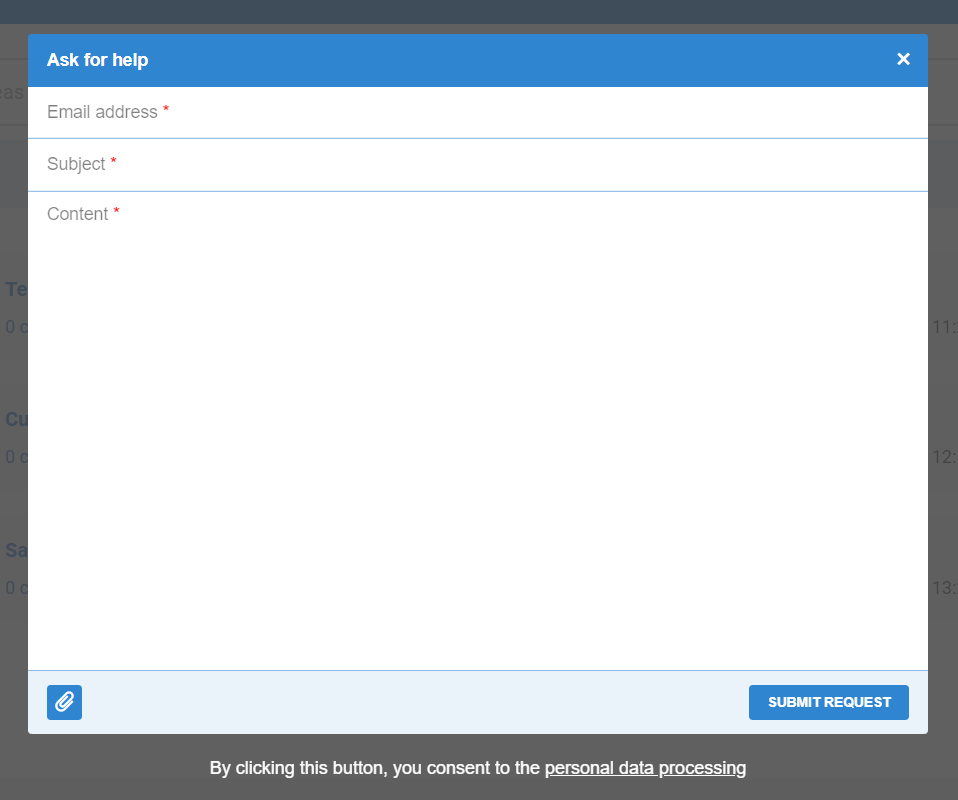
c) The checkbox "Text of consent to personal data processing" opens a block for adding a link to the agreement on the personal data processing. For this link to become active, add the notification text and the link manually.
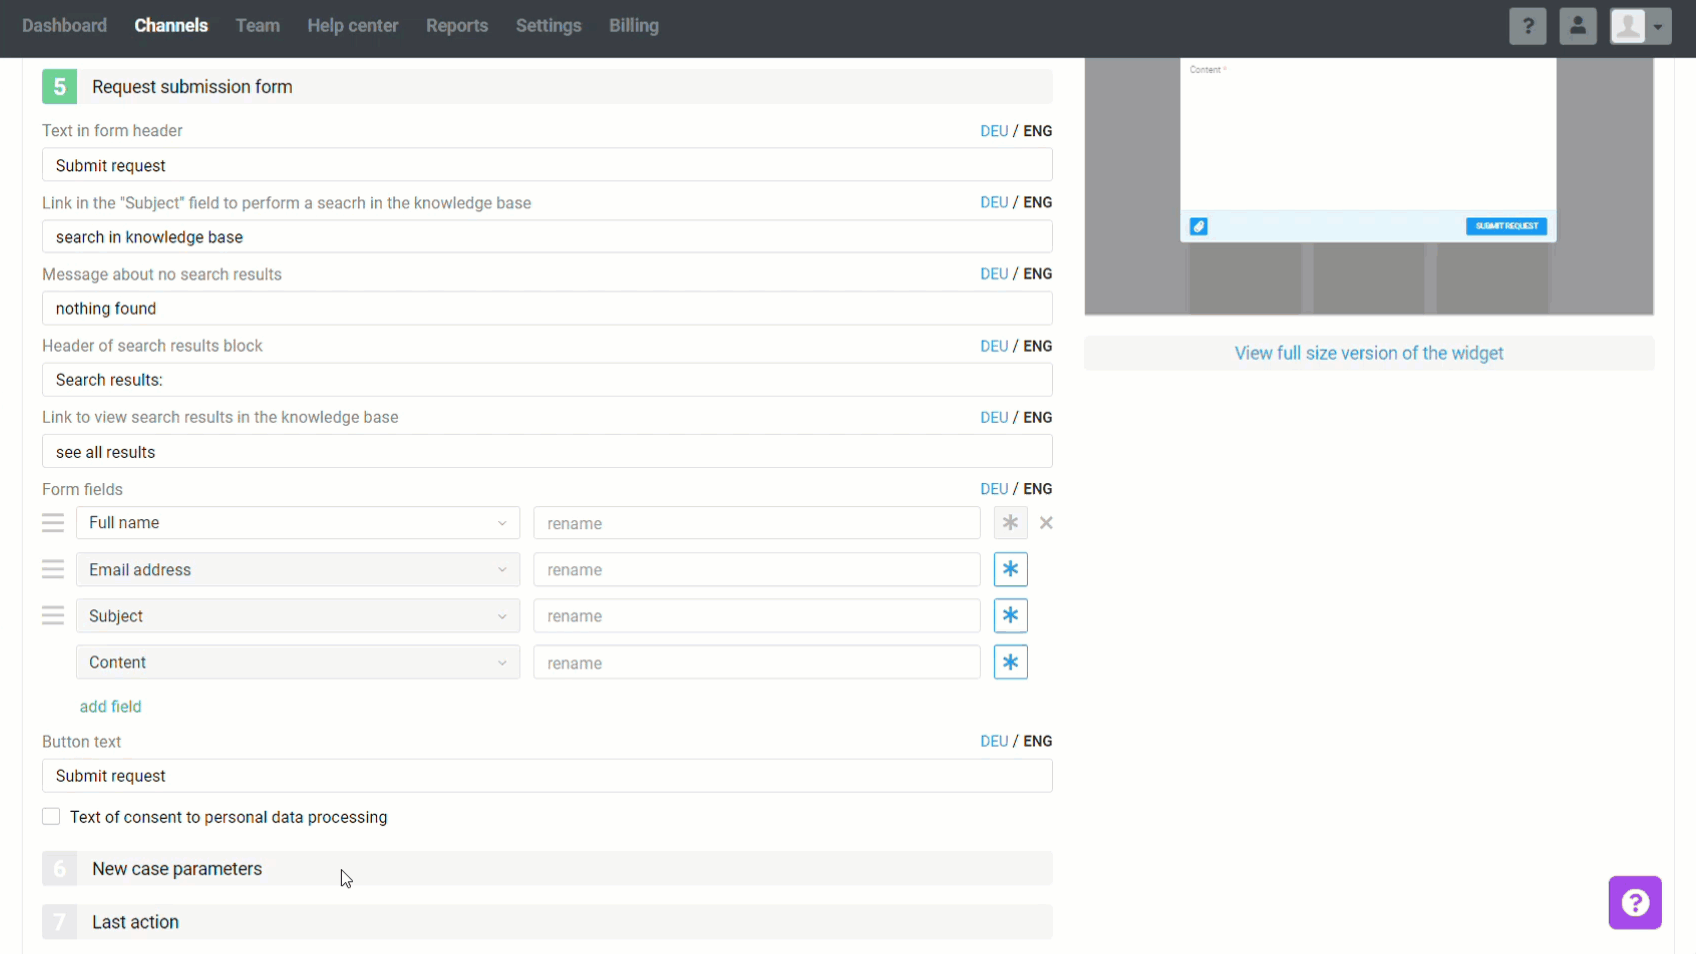
The option is enabled by default. However, just uncheck the checkbox if you don't need this link in some forms (for example, the one located inside your admin panel).
When this link is added to the widget, the request form will look like this:
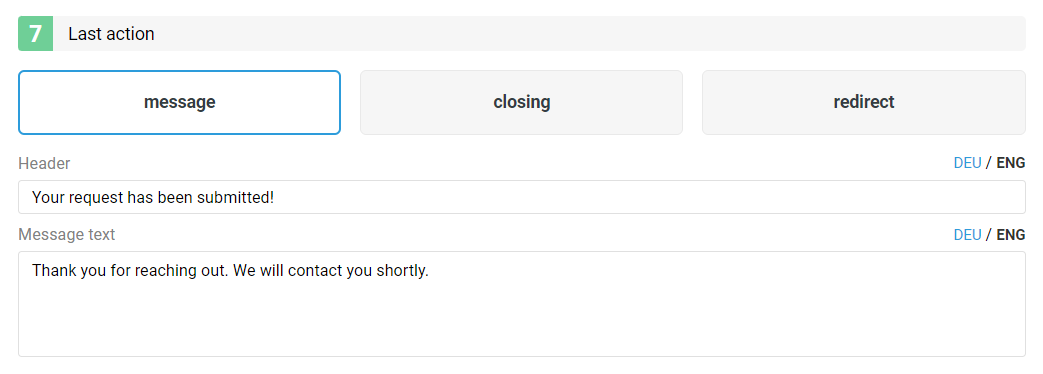
d) At the last step, you can choose what happens after the case is sent: display a message about a successfully created case, close the widget, or redirect to some other page.
e) For the feedback form by email, in addition to the display settings, there are advanced features that are activated using an additional script. They will work in any widget type as long as the Email channel is added. More
Quick links:
"Only messengers"
This widget type, by default, only includes synchronous communication channels that are enabled in your account. As a result, customers can contact you through social networks and instant messengers. It works in this way for almost all channels: when customers click on one of the channels, they will automatically go to the selected social network or messenger interface.
Quick links:
Adding custom buttons
You can add custom buttons in all widget types, except "Only email". Use them to collect links to all useful resources in the widget: you can add a link to the knowledge base, API documentation, or a page with a service cost calculator.
When adding a custom button, you need to choose its color icon, specify the name that will appear on hover, and the link that will open when clicked.
Adding a widget on a website page
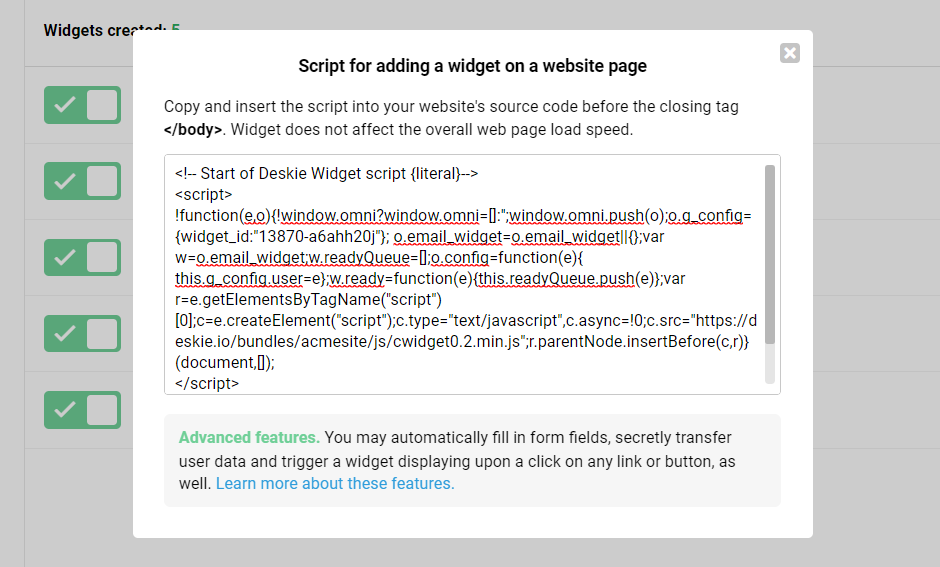
Right after creating the widget, a modal window will open with the code that you need to copy and paste into your website page:
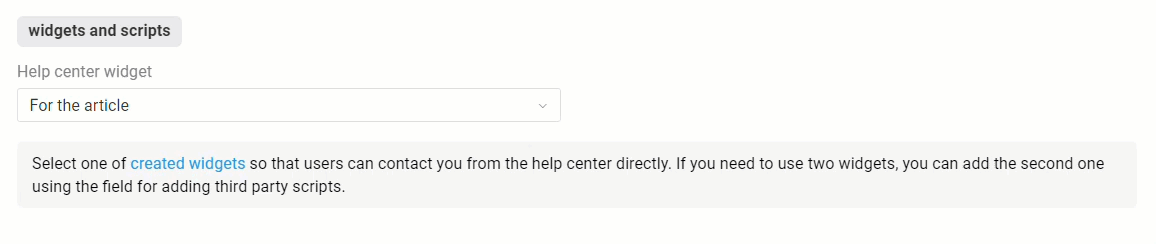
You can add a widget to your Help Center in your administrator account along the path Help center — Customization — widgets and scripts. More
Multilingualism in the widget
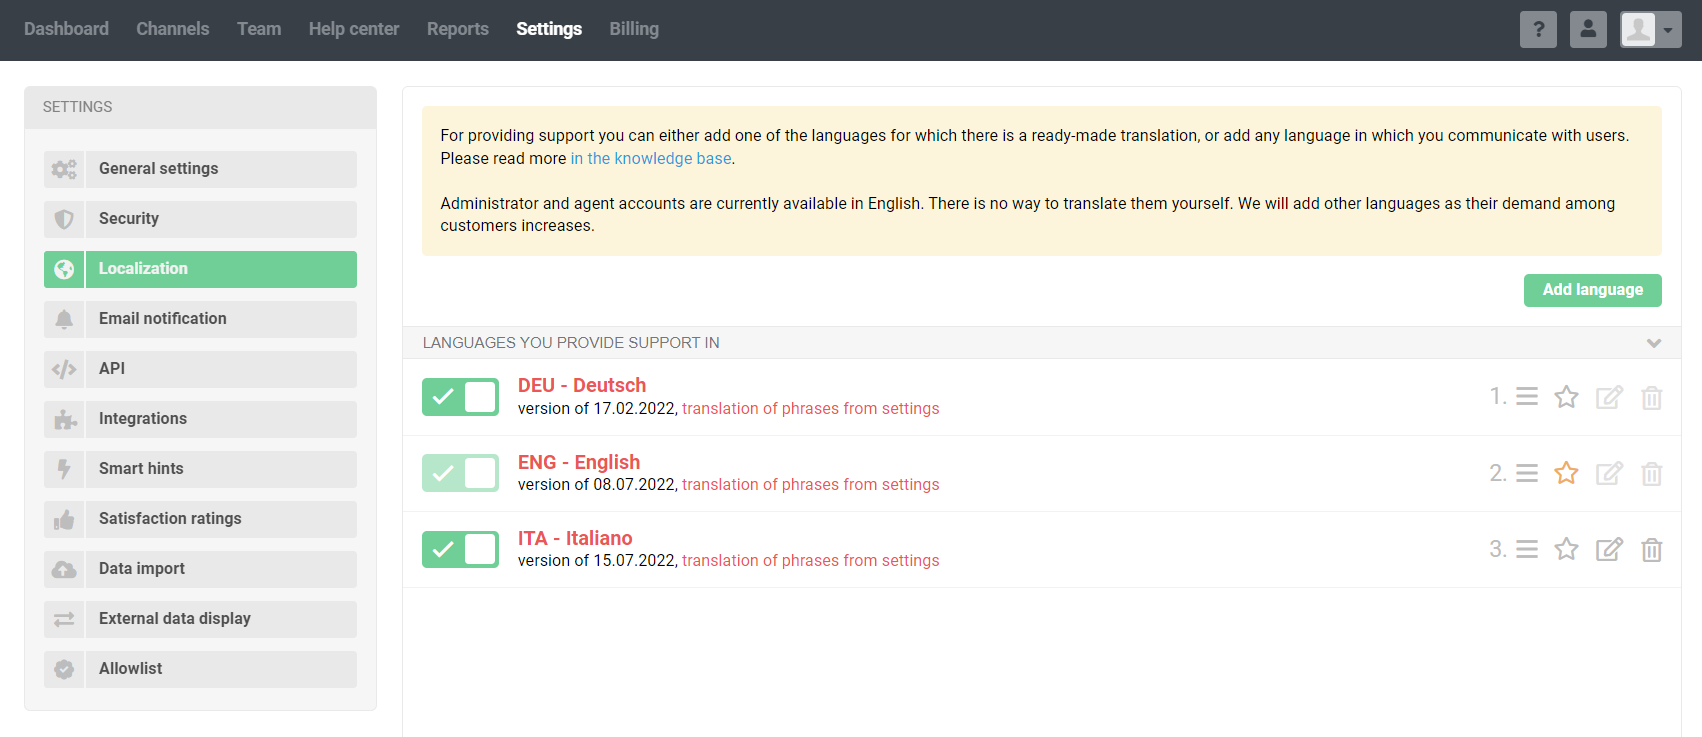
If you provide support in multiple languages, you can translate all widget elements visible to the customer into any language.
Note! We have already translated the basics into English, and you can add it to the list of languages. You will need to do translations into other languages yourself - download the language file and upload it in the administrator account settings.
When you have multiple languages added, an additional "Language" step appears when creating the widget to select one of the options.
1. If multiple languages have been added to Deskie, then when creating any type of widget, an item will appear to select the language in which the widget will be displayed.
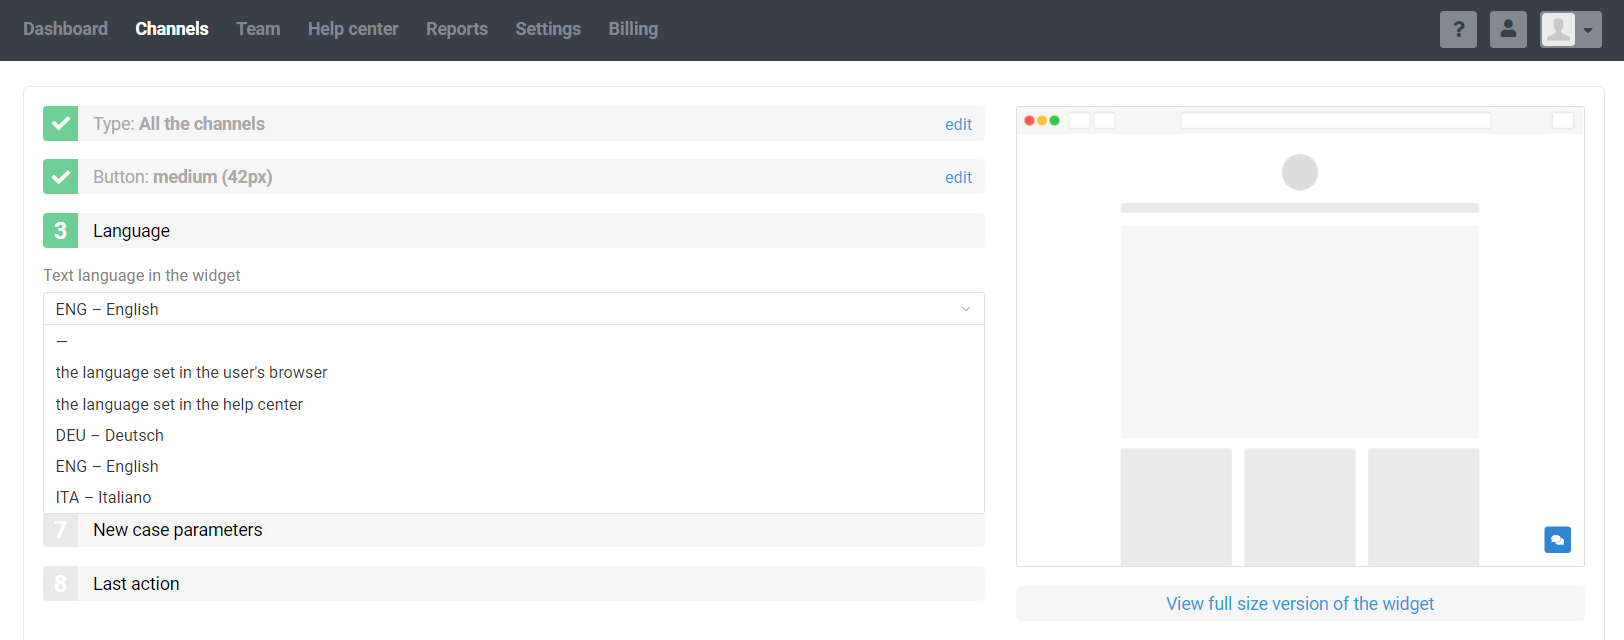
More about each option:
a) The language set in the user's browser
This option is beneficial if you have a multilingual website and customers from different countries ask you for help. With this setting, the widget's language will change depending on the language set in the user's browser settings.
Let's assume the user's browser is set to the language added to your Deskie account. In that case, the widget will be displayed in that language (provided that you translated all widget phrases into this language when creating the widget). If the user's browser is set to a language that is NOT in your Deskie account, the widget will be displayed in the default language (marked with an asterisk).
For example, you provide support to customers from Italy. In this case, it makes sense to set the default language to English - then, if you do not have Italian added, customers will still be able to understand the widget fields.
b) The language set in the Help Center
This option should be selected if you use the Deskie Help Center and create a widget that will be placed in the Help Center itself (administrator account - section "Help Center" - subsection "Customization" - block "widget and scripts"). If you select this option, the language of the widget will depend on the language selected in the Help Center.

The first time an unauthorised user visits the Help centre, it is displayed in the language that is set in their browser settings, provided that this language is in the list of support languages in your Deskie account. If the user's language is not on your list, the Help centre appears in the default language. If the user changes the language, we will save it in cookies for 30 days and the next time they visit the page will open in the language they selected last time. If more than 30 days have passed since the last visit, we will display the Help centre again in the language from the browser settings or in the default language.
c) One of the languages from the list
When creating a widget, you select a specific language in the "Language" item, so the widget will always be displayed in this language. This option is worth using if you need different widgets (different types, form fields, etc.) for each language.
2. After selecting the widget language, all subsequent fields will have radio buttons for adding translations into other languages. Switching between languages is also displayed in the widget preview.
3. There are two cases when the language indicators do not work for a specific field but the entire block.
a) When creating a Knowledge base → Request widget, in the block for selecting recommended articles, the language indicators keep track of whether all the selected articles have translations into other languages. If there is no translation for at least one article, the indicator will turn red.
If you still create a multilingual widget with articles not translated into other languages, then when the widget is displayed in these languages, articles without a translation will simply not be offered in the block with recommended articles. This moment can also be seen in the preview by switching the language of the block with recommended articles.
b) When creating widgets that contain a feedback form for inquiries by email, language indicators in the block with form fields also check for translations for all fields at once.
Suppose there is a field with no translation for some languages. You can either add a translation of the field name in its settings (administrator account - section "Channels" - subsection "Data fields") or simply rename the field name to another language right at the time of creating the widget.
Other
1. Widgets support the JavaScript events identifier used in Google Analytics and other similar services.
2. The size of attachments sent via the feedback form in the widget is 20 MB.
3. You can connect your own feedback form via the API: in this case, you can use your own design.
4. If you are working with Chatra or Chaport and don't need other channels in the widget, you can use their own widgets. Deskie widget allows customers to choose a convenient channel from several available ones.
5. If you correlated departments in Chatra with groups in Deskie, when setting up the integration, you would be able to select one of the connections while creating a widget for the Live Chat channel. More
6. If your website is built on WordPress you can also add widgets there.
7. For widgets, there is an API that allows you to control the widget's display on the page.
8. Some additional features of the email widget are activated via a script. For example, you can set up the "Subject" field in the form of a drop-down list or pass some user data invisibly. More
9. The widget displays a link to the Deskie website during the trial period. Right after the payment, it disappears.