The general logic for setting up notifications about new cases and customer replies is described here. Other instructions:
sound and browser notifications (2 minutes each to complete)
email notifications (2 minutes to complete)
notifications in Slack (10 minutes to complete)
notifications in Mattermost (5 minutes to complete)
notifications in Discord (5 minutes to complete)
To receive notifications in Telegram, you need to create a Telegram bot and set up rules in Deskie.
Creating a Telegram bot
Create a separate bot in Telegram to receive notifications. You will be able to use the same bot to send notifications to different agents and to different groups. Be aware that you will not be able to use a Telegram bot that you have connected as a customer channel for notifications.
1. Create a bot in Telegram. To do this:
a) In Search, type @BotFather or go to t.me/botfather ; b) click "Start" or type /start; c) select /newbot in the reply message from the bot or in the list of commands in the menu; d) enter the name of your new bot in Latin, followed by its username, which should end in "bot", either capitalized or underscored.
Once the bot has been successfully created, you will receive the bot's API token, which you will need to configure the rules in Deskie.
Please note that Telegram does not allow the bot to text the user first. To receive notifications from the bot in your private correspondence, be sure to send it at least one message and remember to ask the colleagues you set up notifications for to do the same. Find the bot by search or by following the link in the message from @botfather.
2. Chat ID will also be required to set up notifications.
At this point, decide whether the bot will send notifications to an individual user or to a group.
There are several ways to obtain a Chat ID:
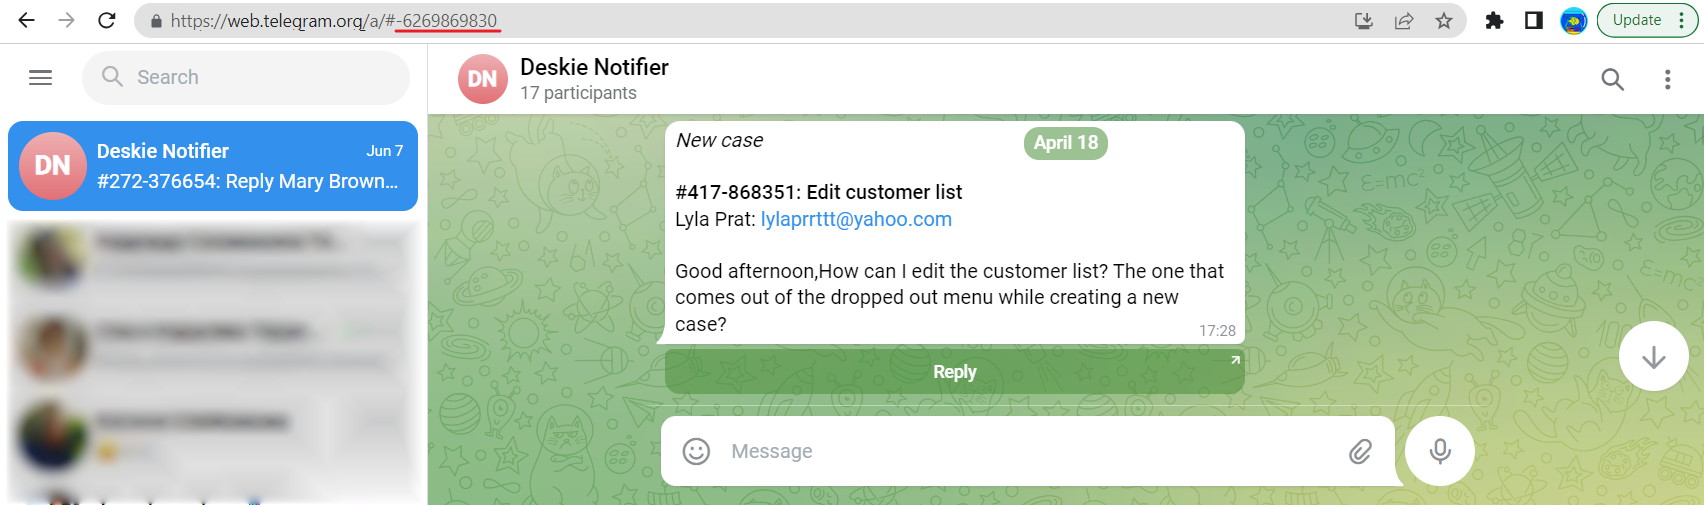
When it comes to a user and a regular group, the Chat ID is the same as the User ID or, respectively, the Group ID. So you can simply take it from the browser bar in the Telegram A-version web client. After logging in, open the desired group, chat with a colleague or "Saved Messages" if setting up notifications for yourself, and copy the numbers after the # symbol. The method is not suitable for supergroups;
ask the bot, for example, @username_to_id_bot or @myidbot. Please note that these bots are not associated with Deskie in any, so we cannot guarantee their performance;
via a JSON response from the Telegram API.
Let's describe the latter method in more detail. Go to https://api.telegram.org/bot[token_bot]/getUpdates (replace [token_bot] variable along with square brackets with the API token of the bot you created).
You should get the response: «{"ok":true, "result":[]}».
а. To get the chat ID with the user, send a few messages to the bot you created. Then go back to the tab opened in the previous step at https://api.telegram.org/bot[token_bot]/getUpdates, refresh the page and copy the obtained id.

b. The group chat ID will show up at https://api.telegram.org/bot[token_bot]/getUpdates as soon as the bot is added to the group. Refresh the page and copy the obtained id. The group chat ID is indicated by a minus sign ("-") in front of the numeric code.

Creating rules in Deskie
3. Create rules in Deskie that will send notifications to Telegram. Go to the admin account — Channels section — Rules subsection.
a. To receive Telegram notifications about new cases, create a rule for new cases:
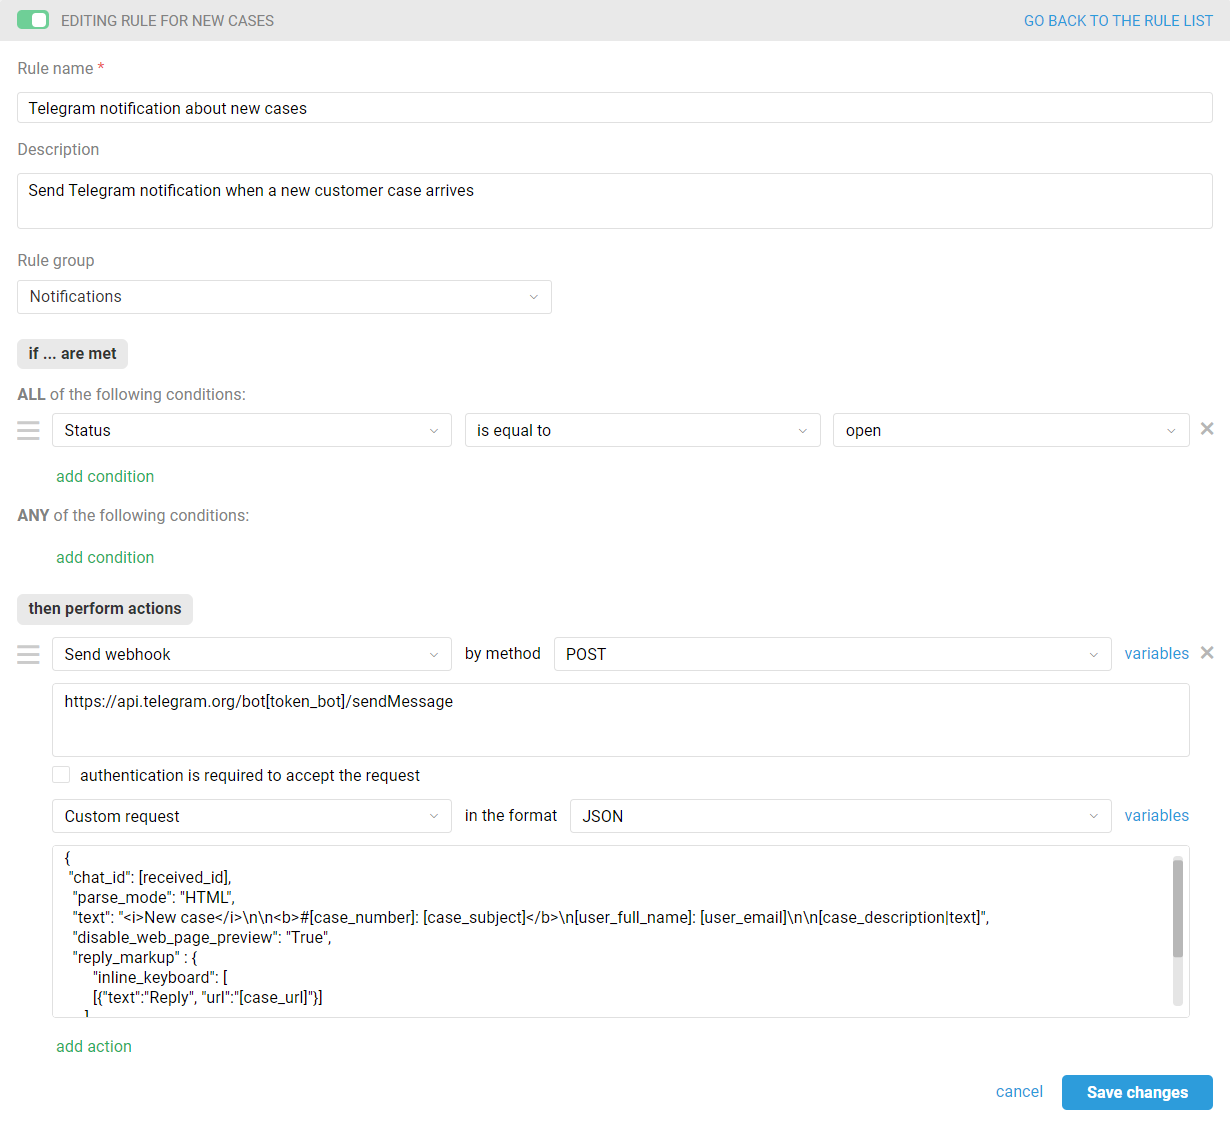
In the "then perform actions" box, select the "Send webhook" option, then specify the POST method. In the "URL for sending request to" field, insert the following link, replacing the [token_bot] variable along with brackets with the API token of the bot you created:
https://api.telegram.org/bot[token_bot]/sendMessage
Select the "Custom request" option below in JSON format and add request code with the variables you want. Replace variable [received_id] along with brackets with the user or group ID you received in step 2.
{
 "chat_id": [received_id],
  "parse_mode": "HTML",
  "text": "New case\n\n#[case_number]: [case_subject]\n[user_full_name]: [user_email]\n\n[case_description|text]",
  "disable_web_page_preview": "True",
  "reply_markup" : {
       "inline_keyboard": [
       [{"text":"Reply", "url":"[case_url]"}]
     ]
  }
}
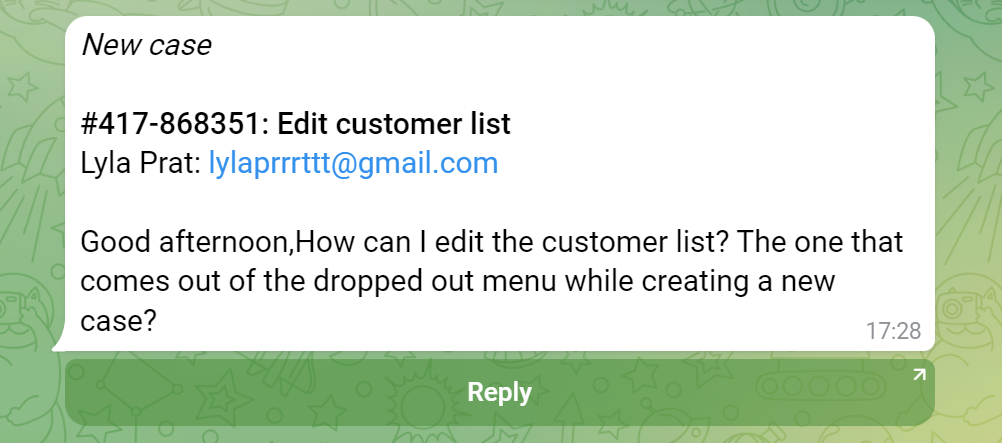
A notification using the above code would look like this:
b) To receive notifications in Telegram about new replies in chats and cases, create a rule for updated cases.
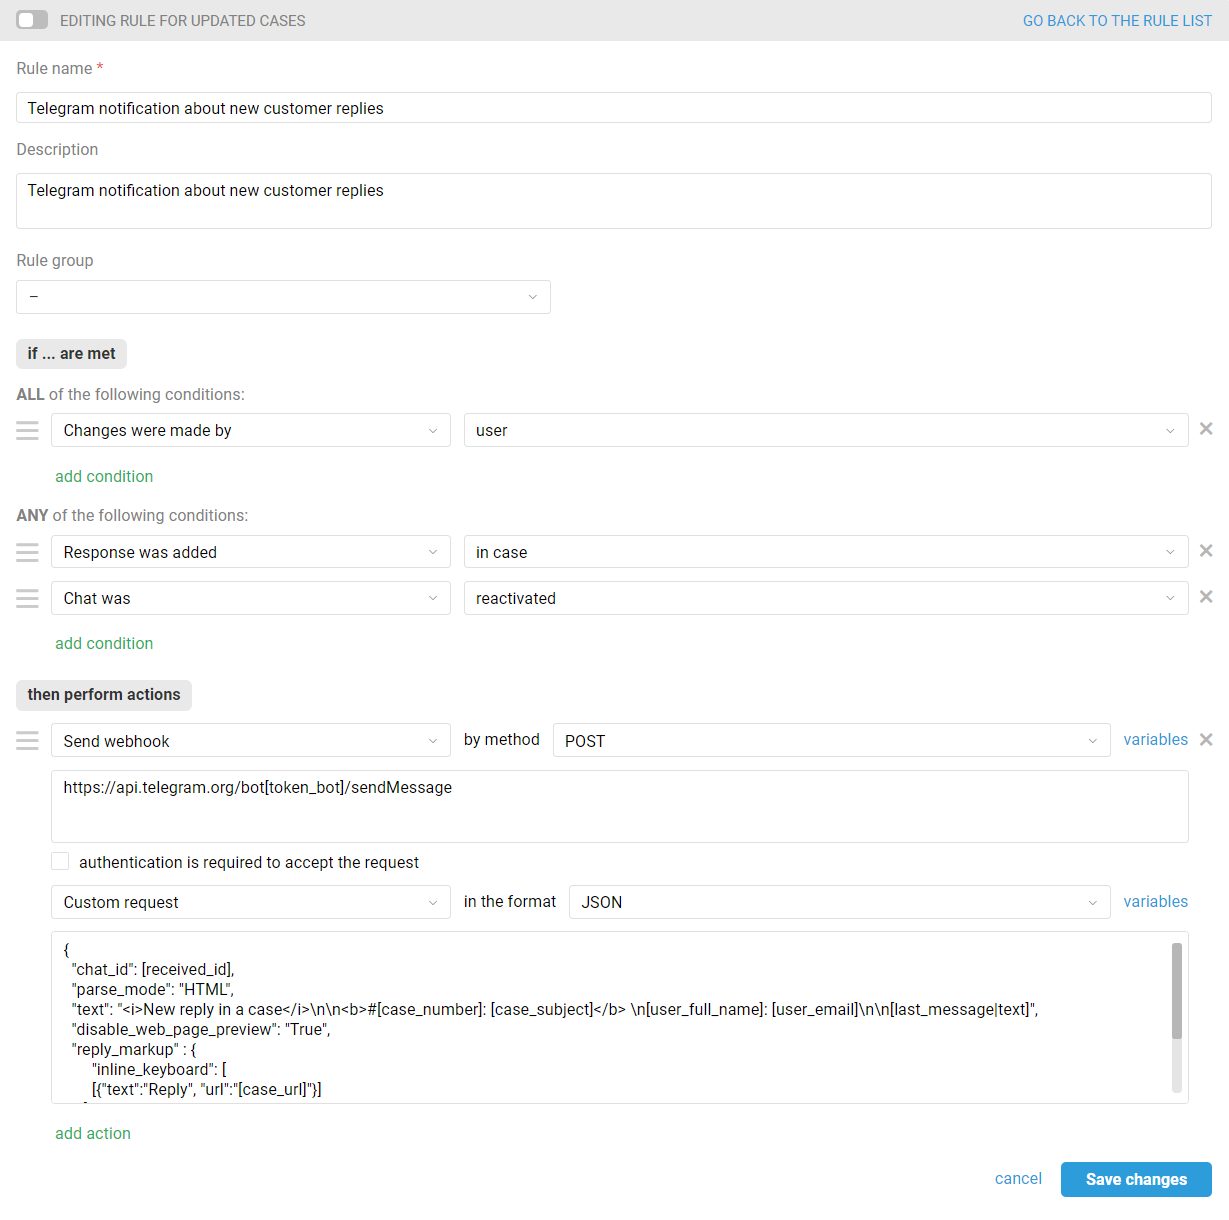
In the "then perform actions" box, select the "Send webhook" option, then specify the POST method. In the "URL for sending request to" field, insert the following link, replacing the [token_bot] variable along with brackets with the API token of the bot you created:
https://api.telegram.org/bot[token_bot]/sendMessage
Select the "Custom request" option below in JSON format and add request code with the variables you want. Replace variable [received_id] along with brackets with the user or group ID you received in step 2.
{
   "chat_id": [received_id],
   "parse_mode": "HTML",
   "text": "<i>New reply in a case</i>\n\n<b>#[case_number]: [case_subject]</b> \n[user_full_name]: [user_email]\n\n[last_message|text]",
   "disable_web_page_preview": "True",
   "reply_markup" : {
        "inline_keyboard": [
        [{"text":"Reply", "url":"[case_url]"}]
      ]
   }
}
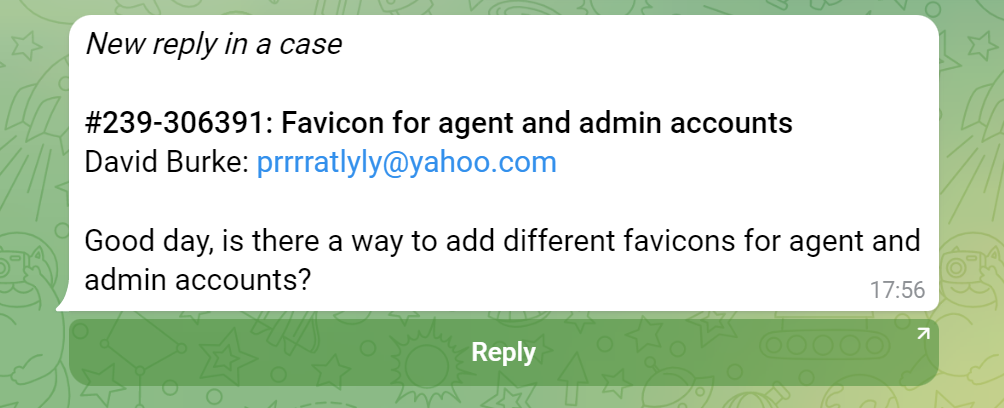
A notification using the above code would look like this:
This completes the notification setting. From now on you will receive notifications in Telegram and won't miss new messages from your customers.
PRO hint: In new chats, the case subject is formed based on the first message from the customer:
sometimes such a message can be quite long and break the layout of your notification;
the text of the message itself will then duplicate the subject.
To ensure this doesn't happen, it is better to create separate rules for new email-based cases and cases from synchronous channels and avoid using the [case_subject] variable in the request code for notification about new chats.
Advanced features
4. Add variables to the webhook code
You can add the data you want from Deskie to the notifications (user group, phone number, company, note text, etc.) so that the notifications are best suited to your tasks. You can also choose to display the items that best suit you.
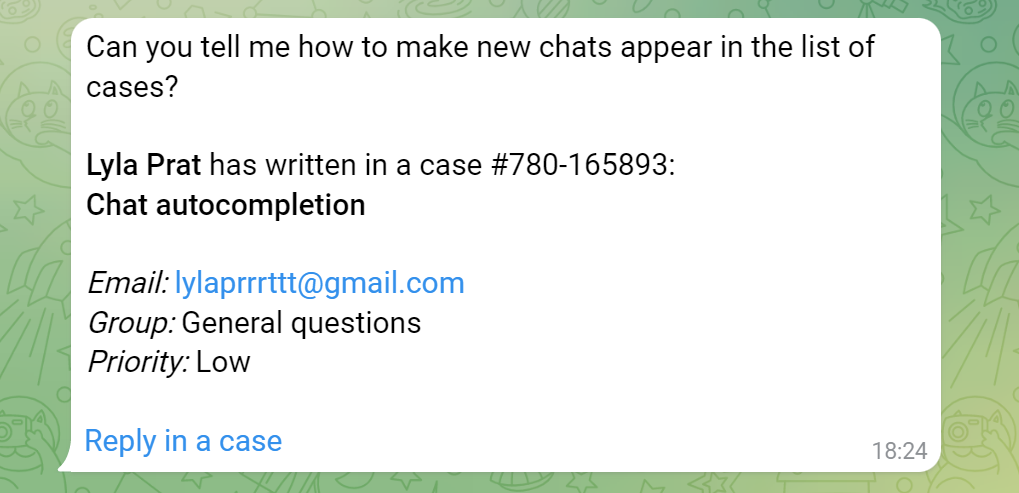
Example of a code and display of such a notification in Telegram:
{
   "chat_id": [received_id],
   "parse_mode": "HTML",
   "text": "[last_message|text]\n\n<b>[user_full_name]</b> has written in a case #[case_number]:  <b>[case_subject]</b>\n\n<i>Email: </i>
   [user_email]\n<i>Group: </i>[case_group]\n<i>Priority: </i>[case_priority]\n\n<a href=\" [case_url]\">Reply in a case</a>",
   "disable_web_page_preview": "True"
}
5. Use additional parameters in the webhook code:
a) "disable_notification" — to send "silent" notifications that won't distract you from your main tasks;
b) "protect_content" — to disable the ability to copy or forward notifications;
c) "message_thread_id" — to send notifications to a specified supergroup topic. To get the ID of the desired topic, click on the topic name and copy the numbers after the "/". For example, for https://t.me/supergroupname/10 message_thread_id is 10;
d) [variable|text] — converts the html formatting to plain text;
e) [variable|limit100] — trims the notification to the specified number of characters. Note that Telegram does not allow sending messages longer than 4096 characters in UTF-8 encoding.
Example of a code using the listed parameters:
{
    "chat_id": [received_id],
    "parse_mode": "HTML",
    "text": "<i>New reply in a case</i>\n\n<b>#[case_number]: [case_subject]</b> \n[user_full_name]:[user_email]\n\n[last_message|limit350]",
    "disable_web_page_preview": "True",
    "disable_notification": "True",
    "protect_content": "True",
    "message_thread_id":[received_topic_id],
    "reply_markup" : {
         "inline_keyboard": [
         [{"text":"Reply", "url":"[case_url]"}]
       ]
   }
}
Replace [supergroup_thread_id] in the code with your topic ID and specify the number of characters you want.
6. Add your own buttons
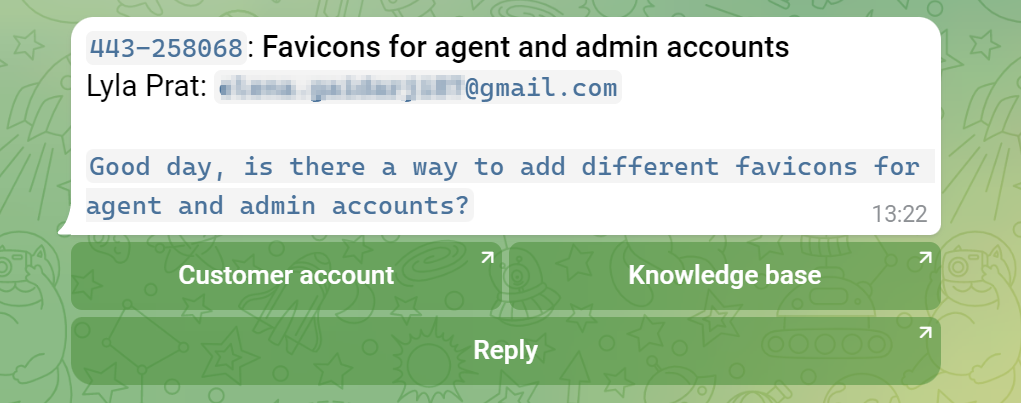
For example, you can quickly navigate to a customer's Deskie account, to your knowledge base, to the all cases list, etc.
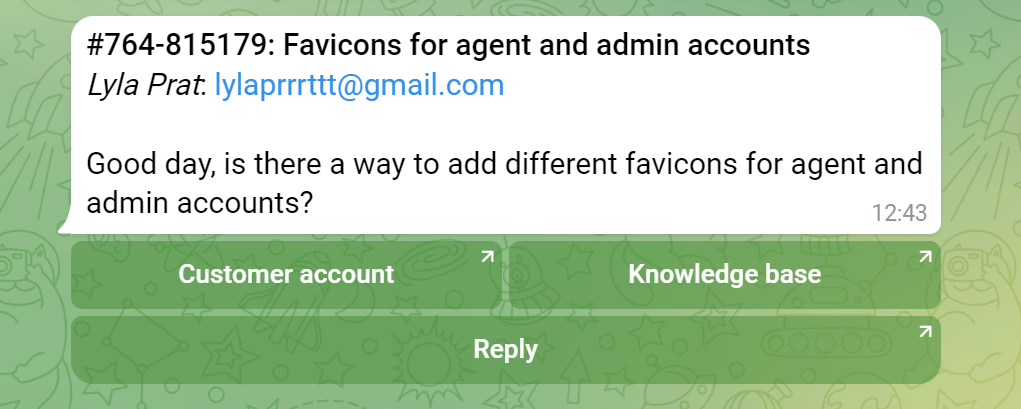
Example of a code in HTML and displaying such a notification in Telegram:
{
  "chat_id": [received_id],
  "parse_mode": "HTML",
  "text": "<b>#[case_number]: [case_subject]</b>\n<i>[user_full_name]</i>: [user_email]\n\n[last_message|text]",
  "disable_web_page_preview": "True",
  "reply_markup" : {
       "inline_keyboard": [
       [{"text":"Customer account", "url":"https://[domain].deskie.io/staff/users/record/[user_id]"},
        {"text":"Knowledge base", "url":"https://[domain].deskie.io/knowledge_base/"}],
       [{"text":"Reply", "url":"[case_url]"}]
     ]
  }
}
In the link to your knowledge base and customer account, specify the name of your subdomain in Deskie instead of [domain].
Example of a code in Markdown V2 and displaying such a notification in Telegram:
{
   "chat_id": [received_id],
   "parse_mode": "MarkdownV2",
   "text": "`[case_number]`: *[case_subject]*\n[user_full_name]: `[user_email]`\n\n`[last_message|text]`",
   "disable_web_page_preview": "True",
   "reply_markup" : {
        "inline_keyboard": [
        [{"text":"Customer account", "url":"https://[domain].deskie.io/staff/users/record/[user_id]"},   {"text":"Knowledge base",
   "url":"https://[domain].deskie.io/knowledge_base/"}],
          [{"text":"Reply", "url":"[case_url]"}]
        ]
}
In the link to your knowledge base and customer account, specify the name of your subdomain in Deskie instead of [domain].
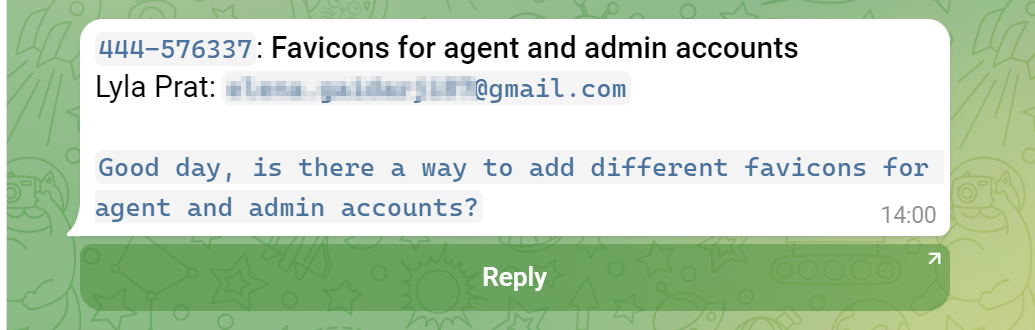
7. Select the desired markup format
Telegram supports different text markup formats. Select the desired markup by specifying one of the options in the "parse_mode" parameter:
a. HTML — this is the type of formatting we used for the examples in the main part of the article about setting up notifications.
b. Markdown V2 is the current syntax recommended to be used by Telegram.
In this markup language there is a restriction on the characters to be transmitted - such as '_', '*', '[', ']', '(', ')', '~', etc. The text or variables that contain them must be rendered as `code`, that is, use reversed single quotes, or backticks (Unicode U+0060) on both sides. Note that we do use backticks for [case_subject] and [user_full_name] in the code examples. If they contain one of these characters, the notification will not be delivered to Telegram. See the Telegram documentation for details;
The case number and email address in Markdown V2 can be copied in a single click.
Example of a code and displaying such a notification in Telegram:
{
  "chat_id": [received_id],
  "parse_mode": "MarkdownV2",
  "text": "`[case_number]`: *[case_subject]*\n[user_full_name]: `[user_email]`\n\n`[last_message|text]`",
  "disable_web_page_preview": "True",
  "reply_markup" : {
       "inline_keyboard": [
        [{"text":"Reply", "url":"[case_url]"}]
      ]
    }
 }
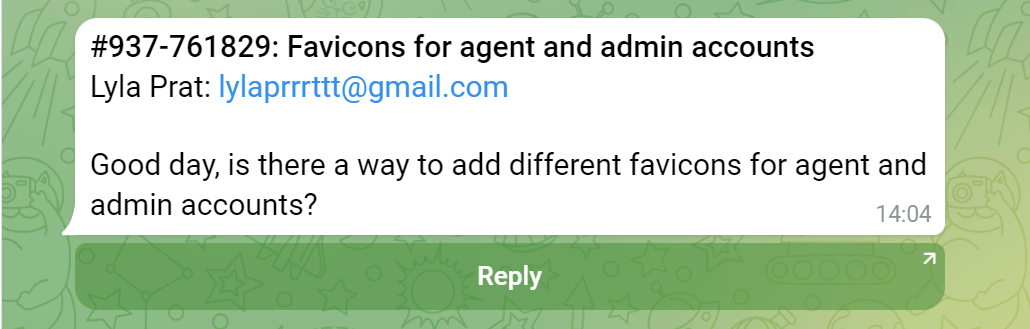
c. Markdown is considered obsolete by Telegram, but has retained support for this format for backward compatibility.
Example of a code and displaying such a notification in Telegram:
{
   "chat_id": [received_id],
   "parse_mode": "Markdown",
   "text": "*#[case_number]: [case_subject]*\n[user_full_name]: [user_email]\n\n[last_message|text]",
   "disable_web_page_preview": "True",
   "reply_markup" : {
        "inline_keyboard": [
        [{"text":"Reply", "url":"[case_url]"}]
      ]
    }
}
d. Entities — used as an alternative to parse_mode. Allows only one special entity to be passed. You need to know the exact length of the message. Suitable if you want to use special features or set up minimalistic notifications.
Example of a code and displaying such a notification in Telegram:
{
   "chat_id": [received_id],
   "text":"New reply in a case: [case_number]",
    "entities": [
        {
     "offset": 0,
         "length": 35,
         "type": "text_link",
         "url":"[case_url]"
     },
        {
         "offset": 0,
         "length": 35,
         "type": "bold"
         }
 ],
     "disable_web_page_preview": "True"
}

8. Add a mention of the agent via @username
If you want to mention the assignee, then:
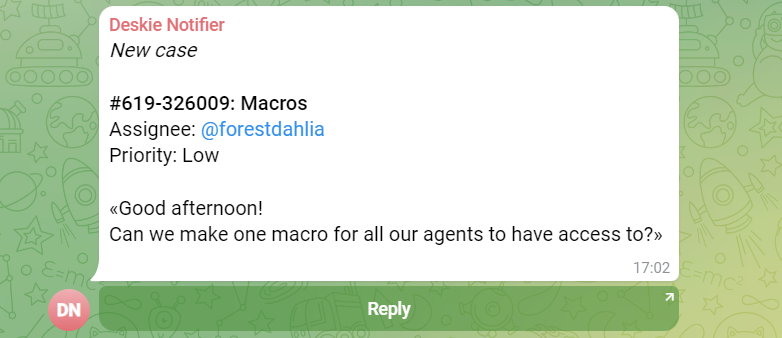
а. For each agent, create a rule for new cases that will send a notification mentioning the assignee in Telegram when a new case is received:
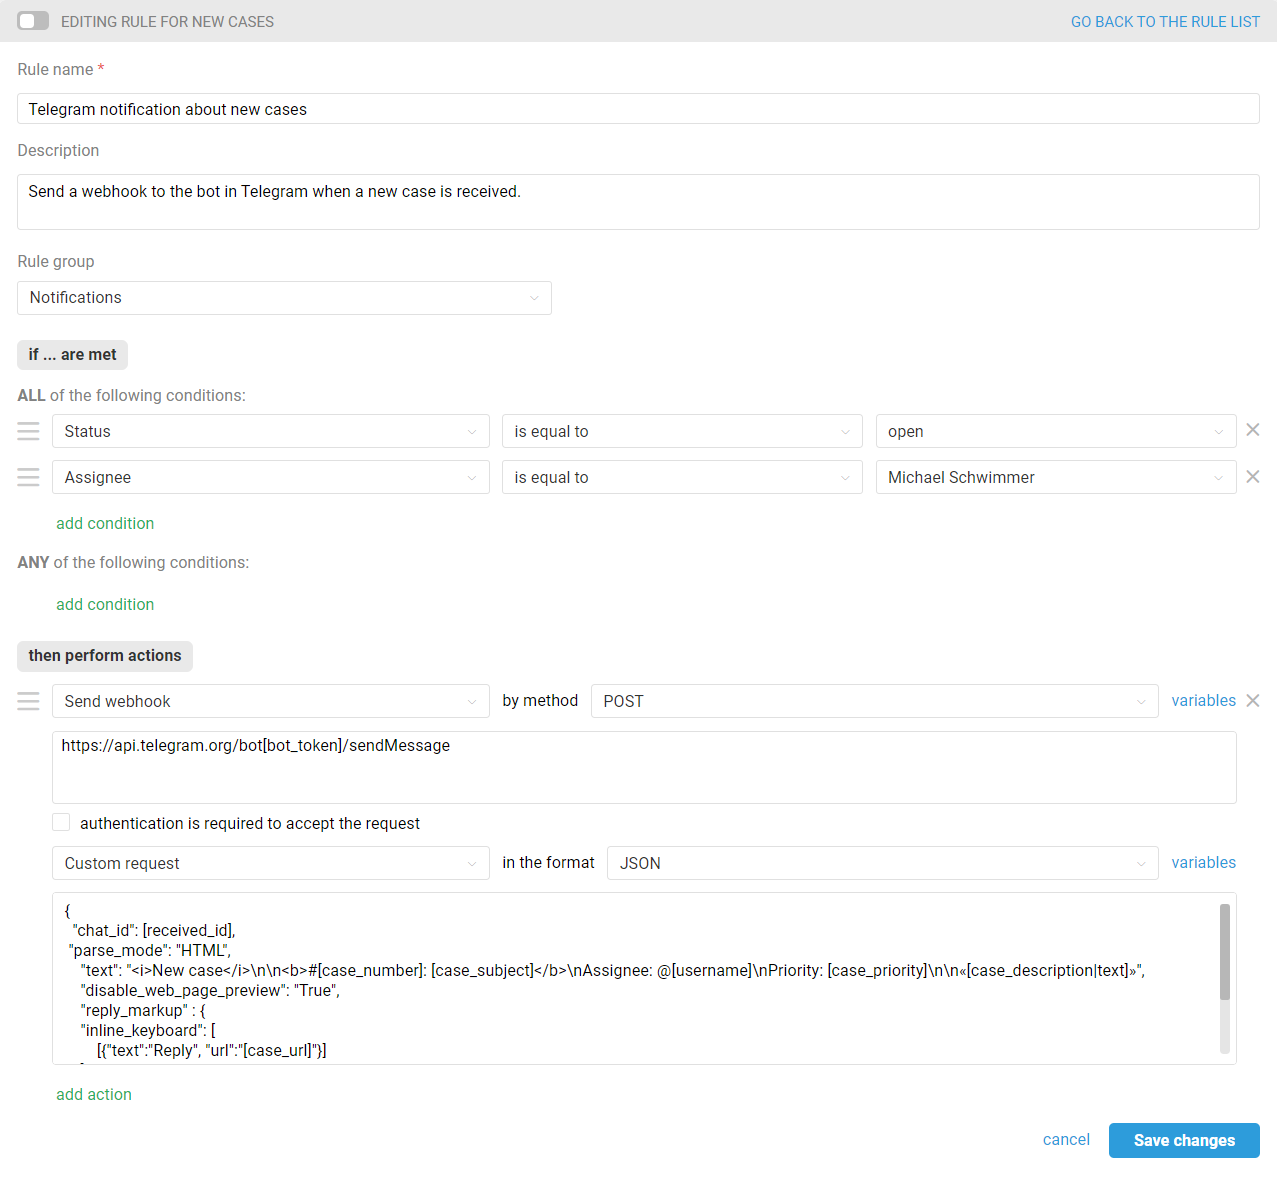
Use the following custom request text:
{
  "chat_id": [received_id],
 "parse_mode": "HTML",
    "text": "<i>New case</i>\n\n<b>#[case_number]: [case_subject]</b>\nAssignee: @[username]\nPriority: [case_priority]\n\n«[case_description|text]»",
    "disable_web_page_preview": "True",
    "reply_markup" : {
    "inline_keyboard": [
        [{"text":"Reply", "url":"[case_url]"}]
    ]
  }
}
Display example:
PRO hint: To add rules more quickly, use the clone function and then edit only the data of the agent mentioned in the rules. Combine the rules created for all agents into one group.
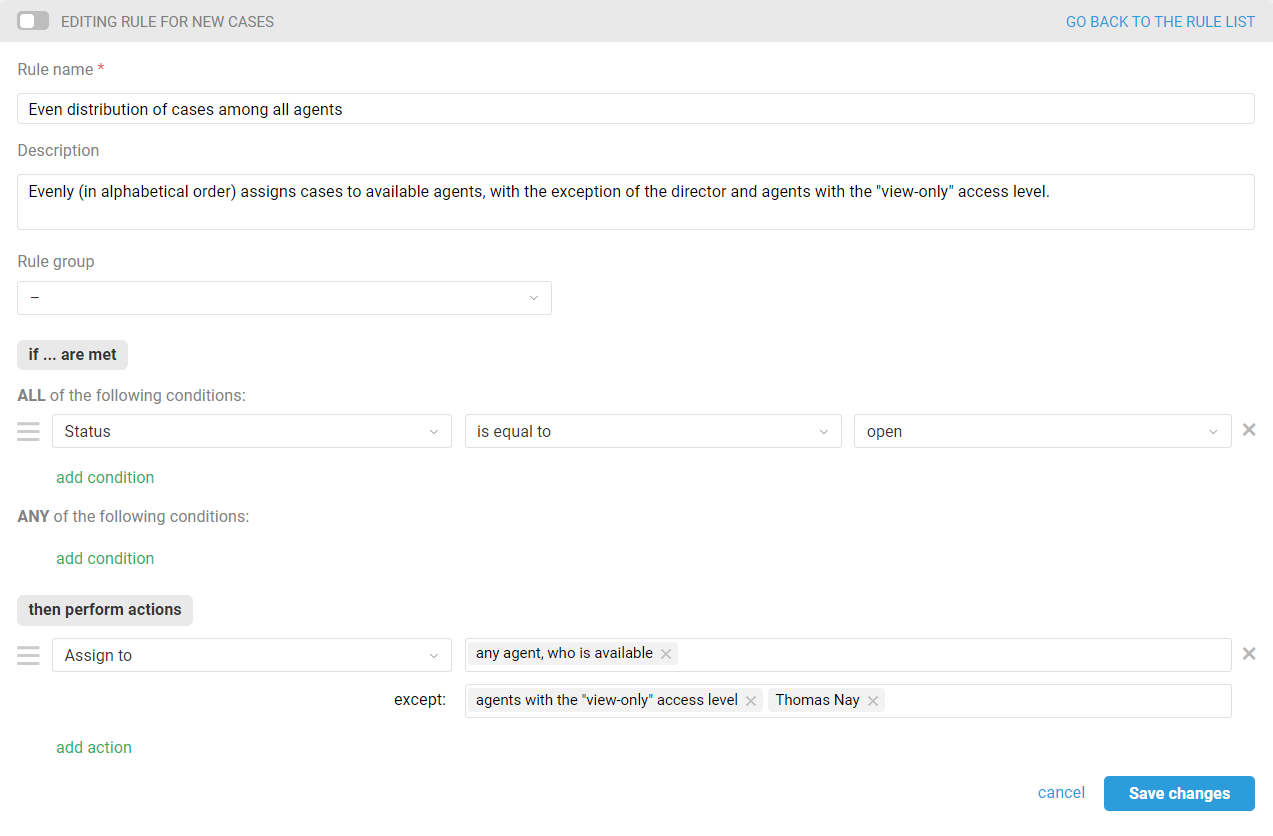
Place the created rule group after the rule which sets assignees in a case. For example, to evenly set available agents as assignees in cases, except the manager and those with "view-only" access, you can use a rule like this:
b. To send a notification mentioning the assignee in Telegram when a new response is received in a case, you will also need separate rules for each agent, now for updated cases. We also recommend grouping them together. Here is an example of such a rule:
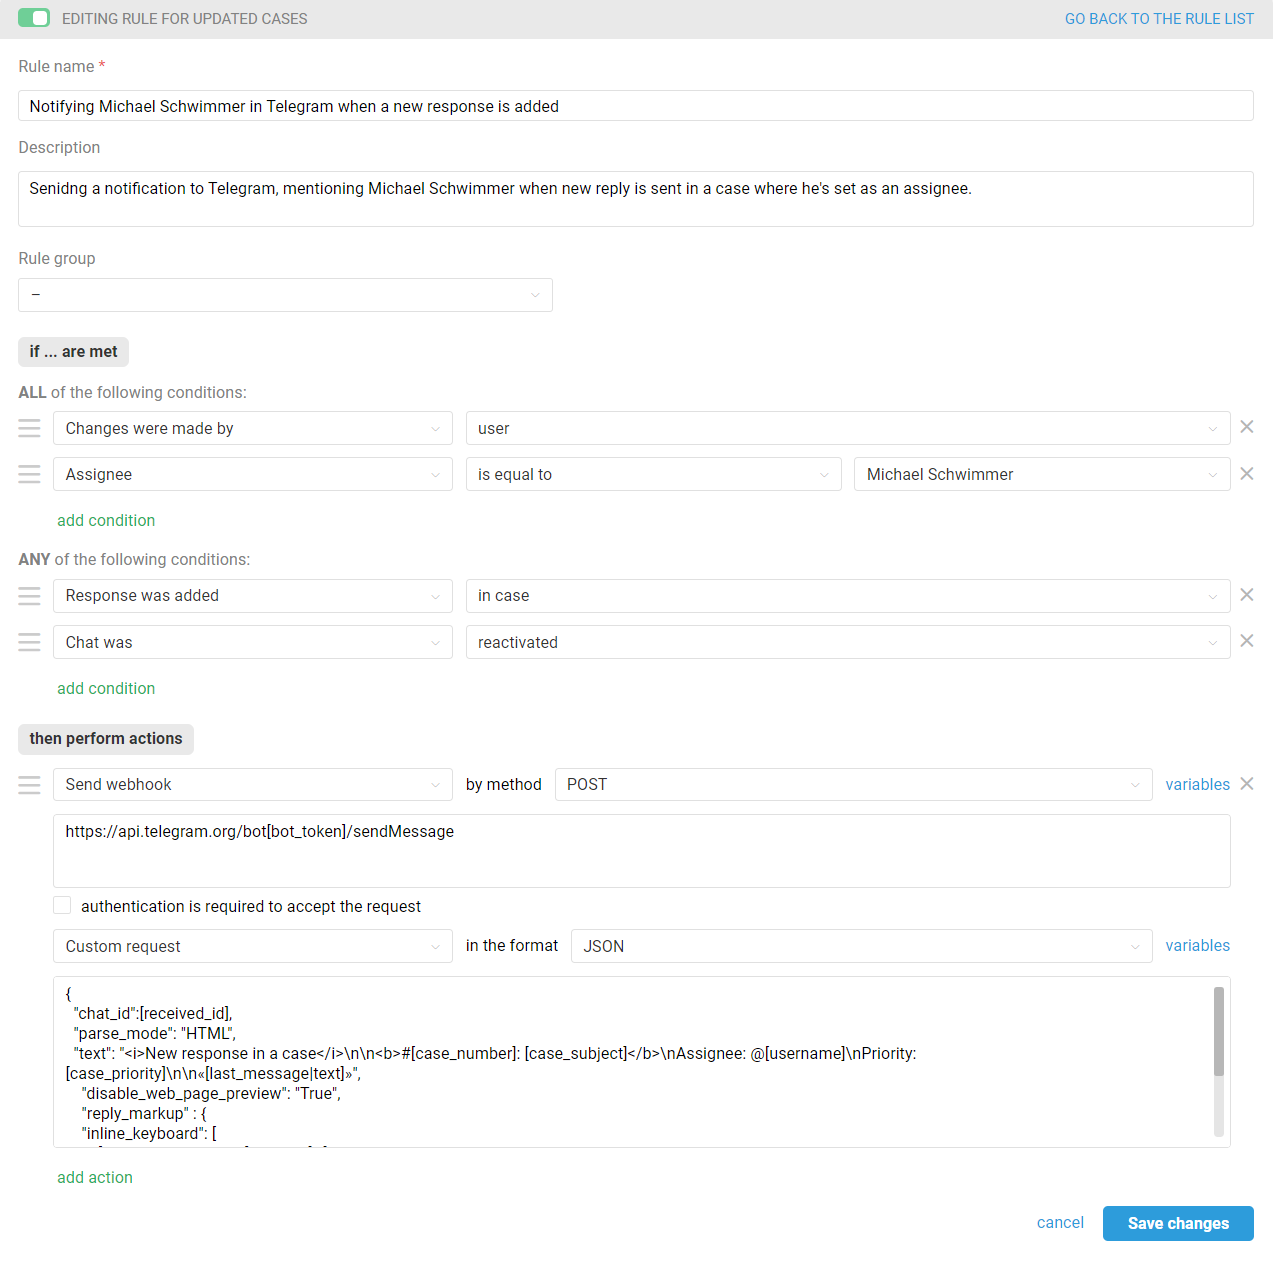
Use the following custom request text:
{
  "chat_id": [received_id],
 "parse_mode": "HTML",
    "text": "<i>New response in a case</i>\n\n<b>#[case_number]: [case_subject]</b>\nAssignee: @[username]\nPriority: [case_priority]\n\n«[last_message|text]»",
    "disable_web_page_preview": "True",
    "reply_markup" : {
    "inline_keyboard": [
        [{"text":"Reply", "url":"[case_url]"}]
    ]
  }
}
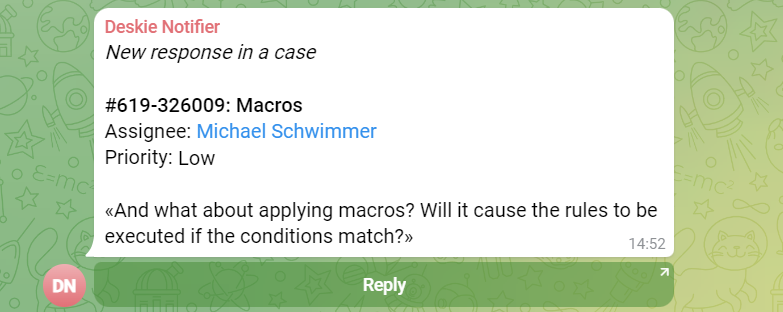
Please note that you must use the [last_message|text] variable to get the response text in the case in the "text" parameter.
Display example:

PRO Tip: To display the full name of the assignee instead of the username, use the following construction:
Assignee: <a href=\"tg://user?id=[user_id]\">[assigned_full_name]</a>
How to obtain a user ID is described in detail in step 2 of this instruction.
Display exapmle:
9. Send notifications to a specific group topic
You will need a "message_thread_id" to send notifications to a specific group topic.
Important: When you activate topics in a group's settings, the group is converted to a supergroup, and its Group ID and Chat ID are permanently changed to a different one. If you have been receiving notifications to a group and then enabled topics, it will not be enough for you to get only the ID of a particular thread. The Chat ID of the group, specified in your Deskie rule's request code, will need to be updated as well.
You can get the ID of the required topic via the link to it in Telegram itself. Click on the topic name and copy the numbers after the "/". For example, for https://t.me/supergroupname/10 message_thread_id is 10;
Specify the resulting message_thread_id in the text of the request code. Example:
{
  "chat_id": [received_id],
  "parse_mode": "HTML",
  "text": "<i>New response in a case</i>\n\n<b>#[case_number]: [case_subject]</b> \n[user_full_name]: [user_email]\n\n[last_message|limit350]",
  "disable_web_page_preview": "True",
  "message_thread_id":[received_topic_id],
  "reply_markup" : {
       "inline_keyboard": [
       [{"text":"Reply", "url":"[case_url]"}]
     ]
  }
}
Display example:
