The general logic for setting up notifications about new cases and customer replies is described here. Other instructions:
sound and browser notifications (2 minutes each to complete)
email notifications (2 minutes to complete)
notifications in Telegram (10 minutes to complete)
notifications in Mattermost (5 minutes to complete)
notifications in Discord (5 minutes to complete)
To receive notifications in Slack, you need to create a Slack application and set up rules in Deskie.
In the examples with the request code, we use the block method recommended by Slack. There is also an Attachment method query example in the Advanced features section.
Preliminary setup
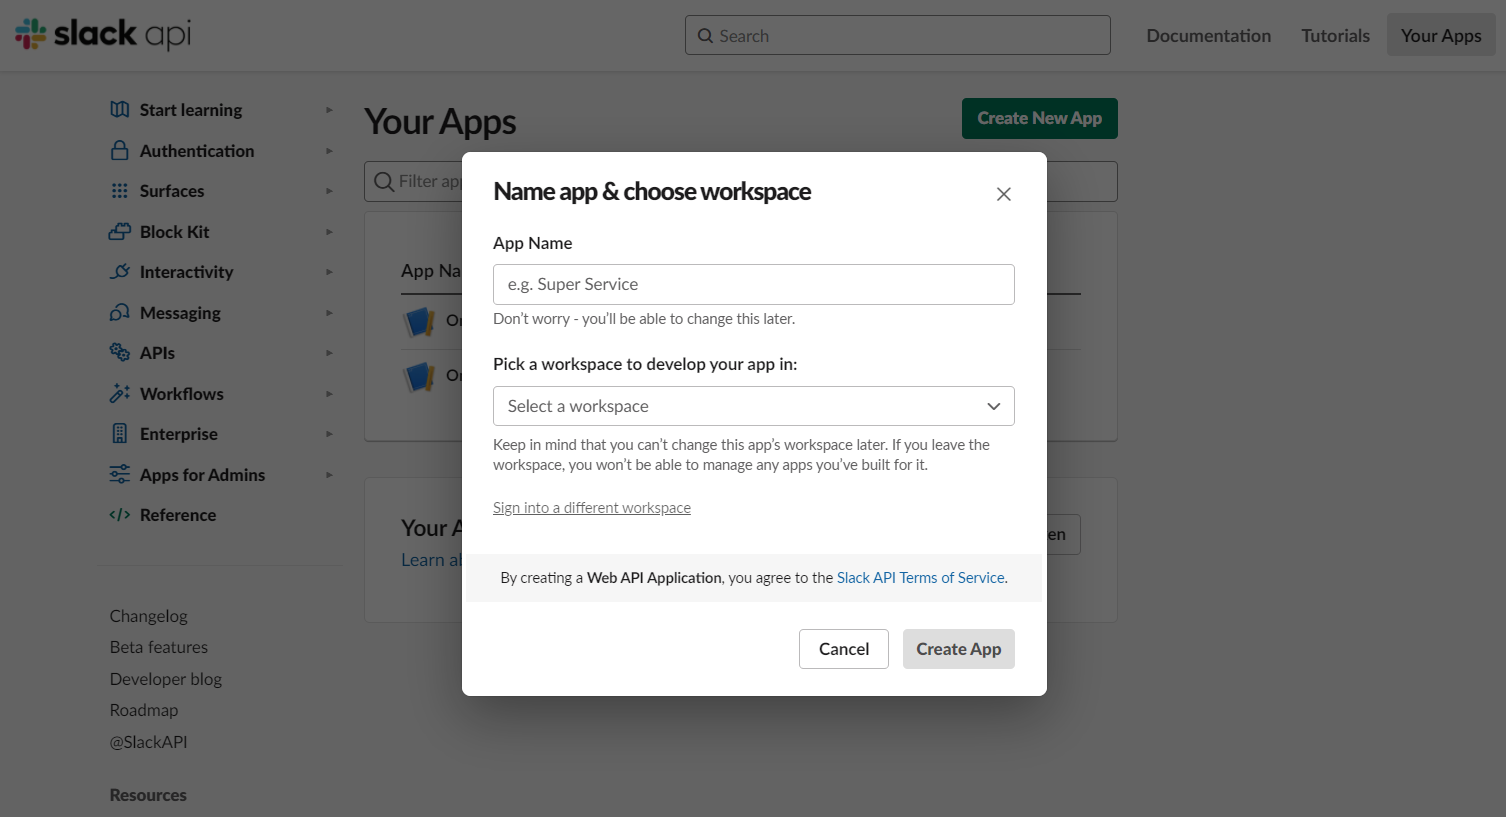
1. In your Slack account, go to the Slack application creation form. In the modal window, select Create an app → From scratch, specify a name for the app and select the workspace into which it will be added.
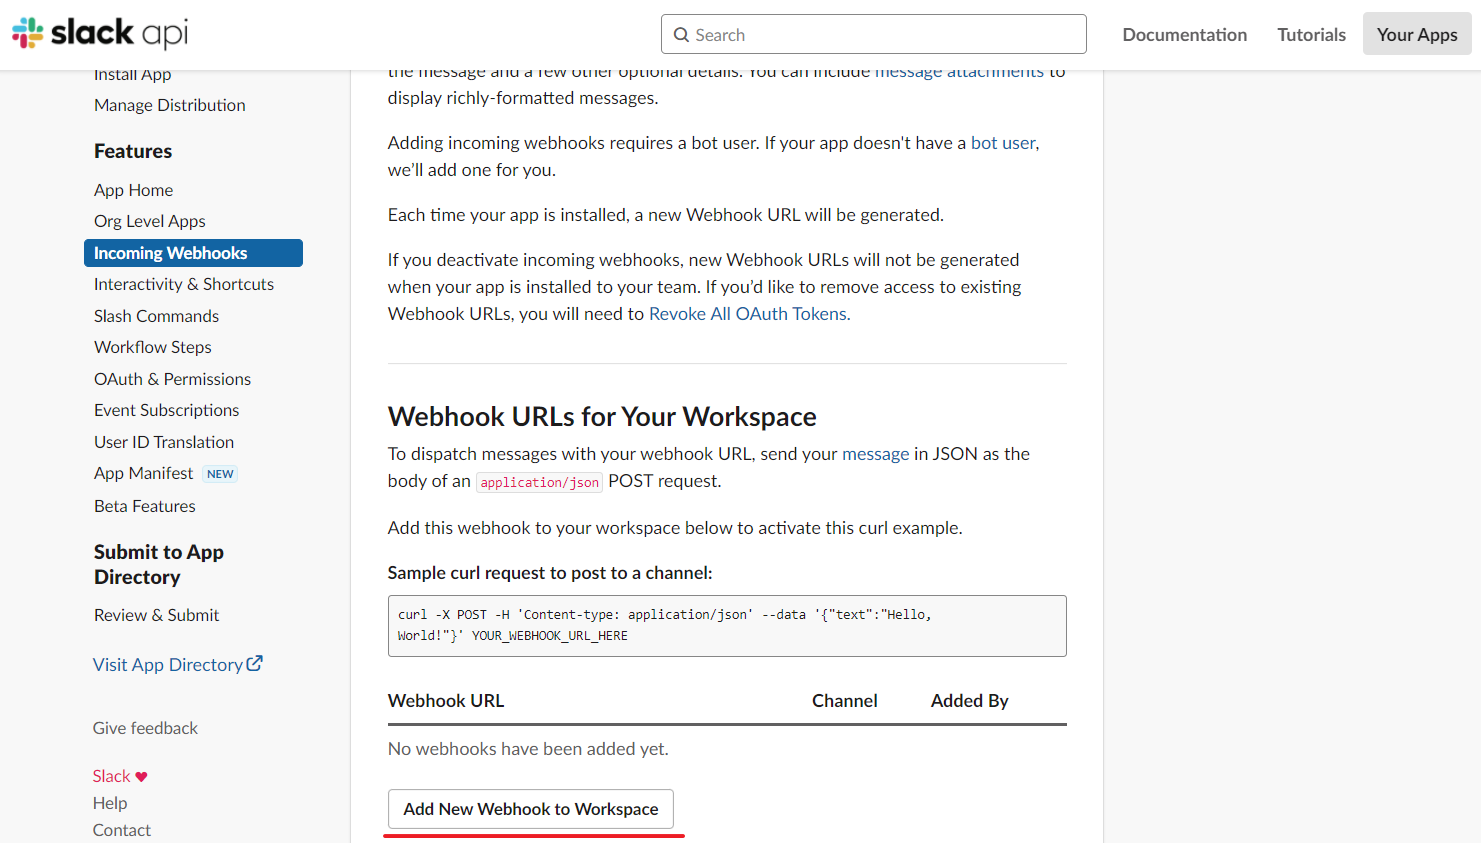
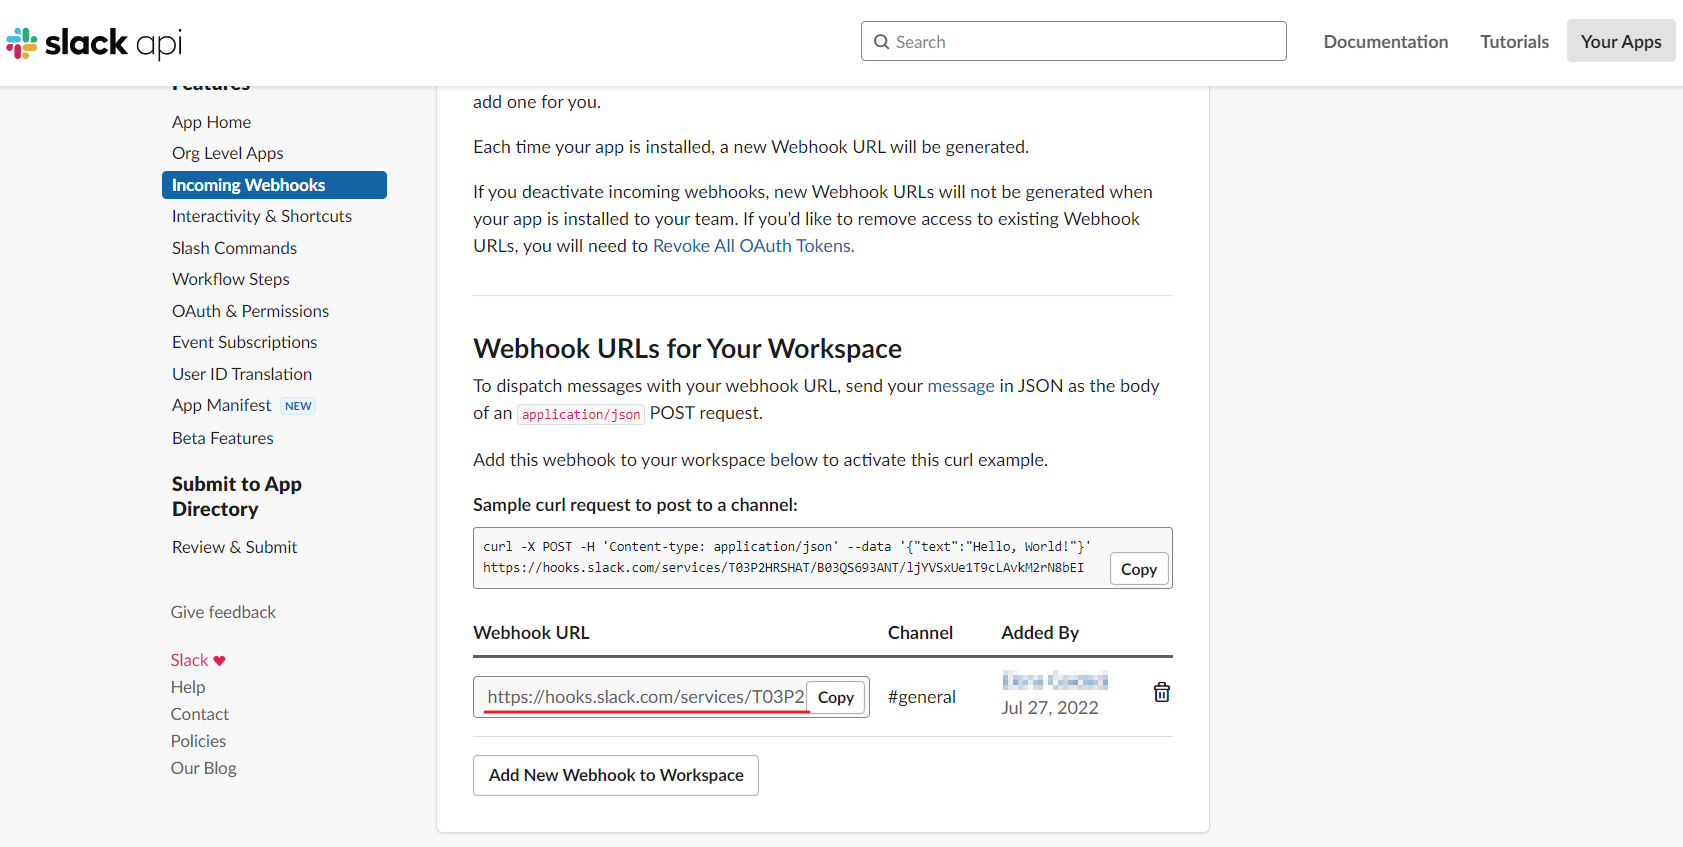
2. Go to the Incoming Webhooks section and activate incoming webhooks. At the bottom of the page, click on Add New Webhook to Workspace.
3. On the page that opens, select the channel where notifications from Deskie will be received, or an agent to have notifications received in direct messages on behalf of the app creator. Click on the "Allow" button.
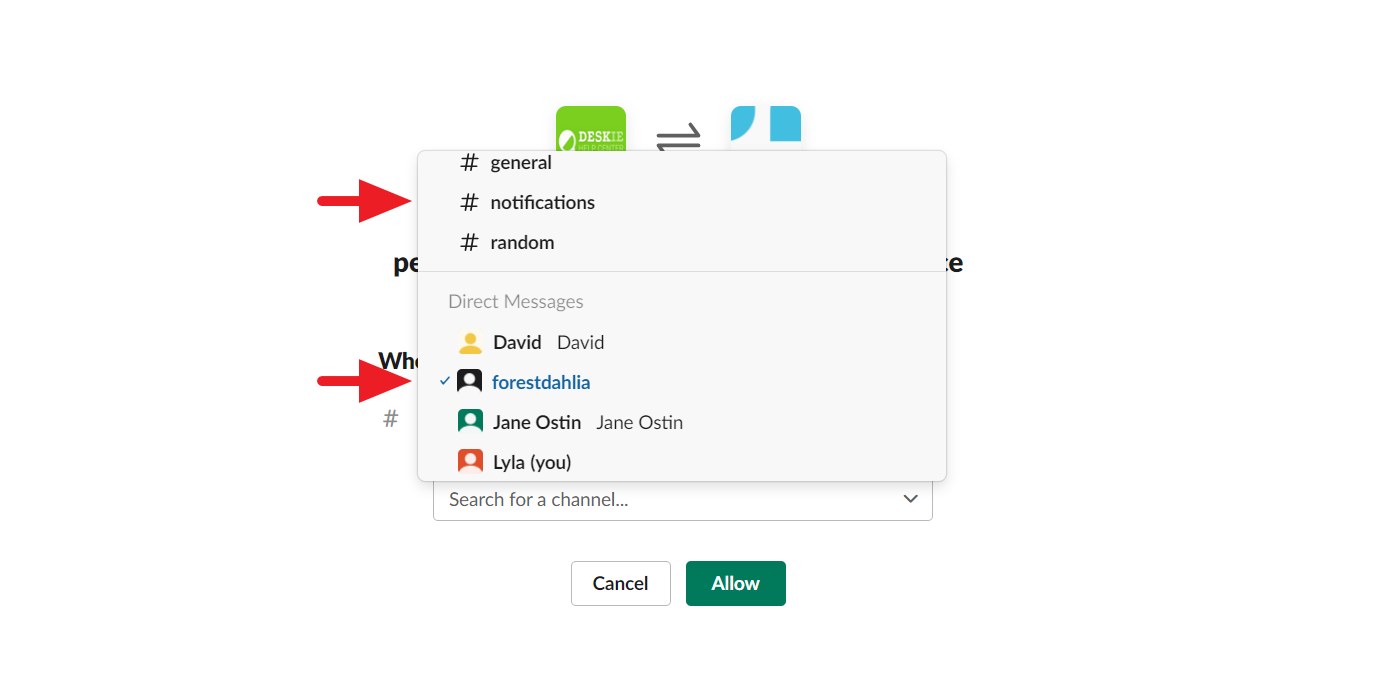
If you want to send notifications to direct messages, you will need to create a separate webhook URL for each agent.
4. Copy the webhook URL. You need it to send notifications to Slack from Deskie.
Creating rules in Deskie
5. Create rules in Deskie that will send notifications to Slack. Go to the administrator account — section "Channels" — subsection "Rules".
a) To receive notifications in Slack about new cases, create a rule for new cases.
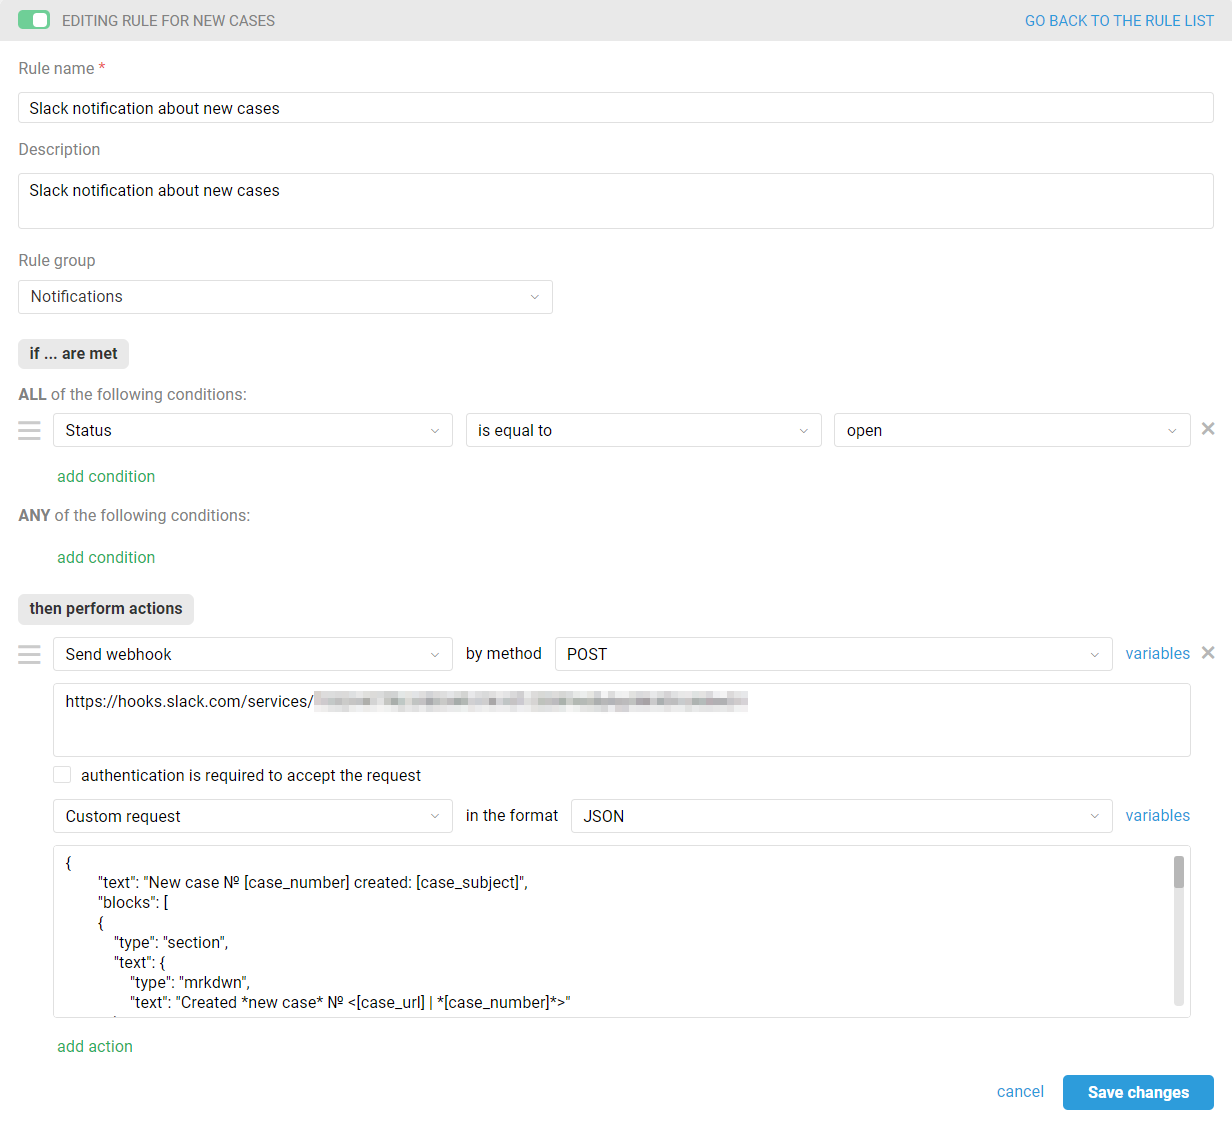
In the "then perform actions" box, select the "Send webhook" option, then specify the POST method. In the "URL for sending request to" field, insert the webhook URL you copied from Slack.
Select the "Custom request" option below in JSON format and add the request code:
{
        "text": "New case № [case_number] created: [case_subject]",
        "blocks": [
        {
            "type": "section",
            "text": {
                "type": "mrkdwn",
                "text": "Created *new case* № <[case_url] | *[case_number]*>"
            }
        },
        {
            "type": "section",
            "fields": [
                {
                    "type": "mrkdwn",
                    "text": "*Sender*\n[user_full_name] \n [user_email]"
                },
                {
                    "type": "mrkdwn",
                    "text": "*Group*\n[case_group]"
                }
            ]
        },
        {
            "type": "section",
            "text": {
                "type": "mrkdwn",
                "text": "*[case_subject]:*\n\n[case_description|text]"
            }
        },
        {
            "type": "divider"
        }
    ]
}
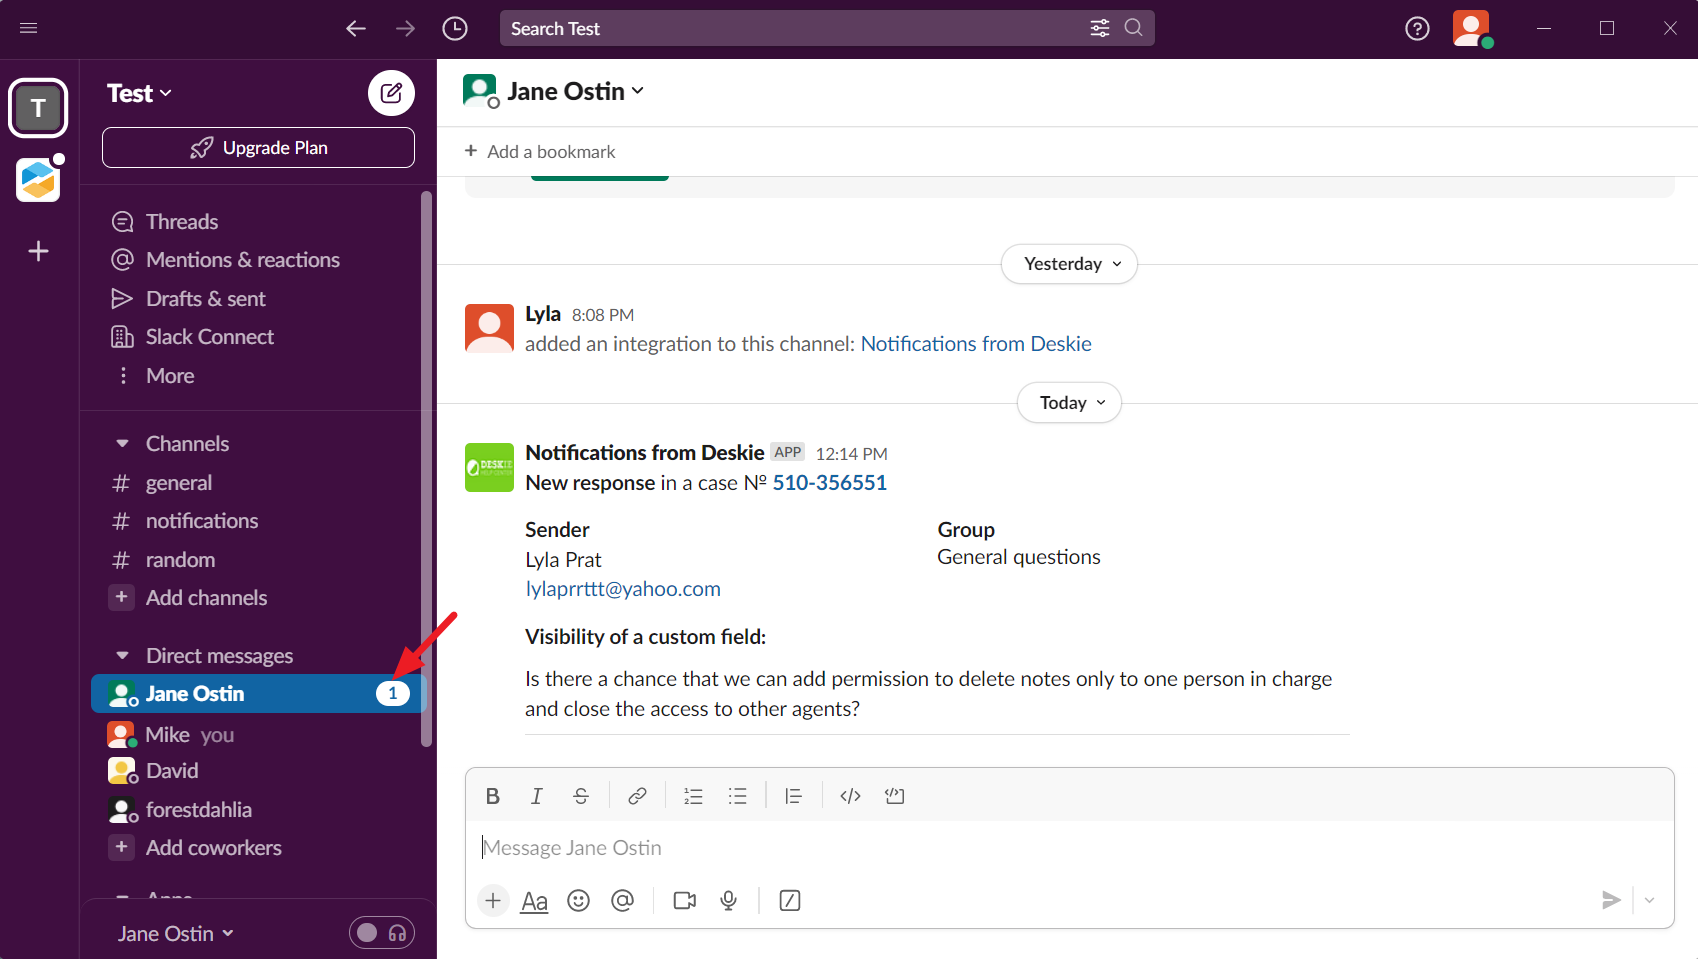
Display example:

b) To receive notifications in Slack about new replies in chats and cases, create a rule for updated cases.
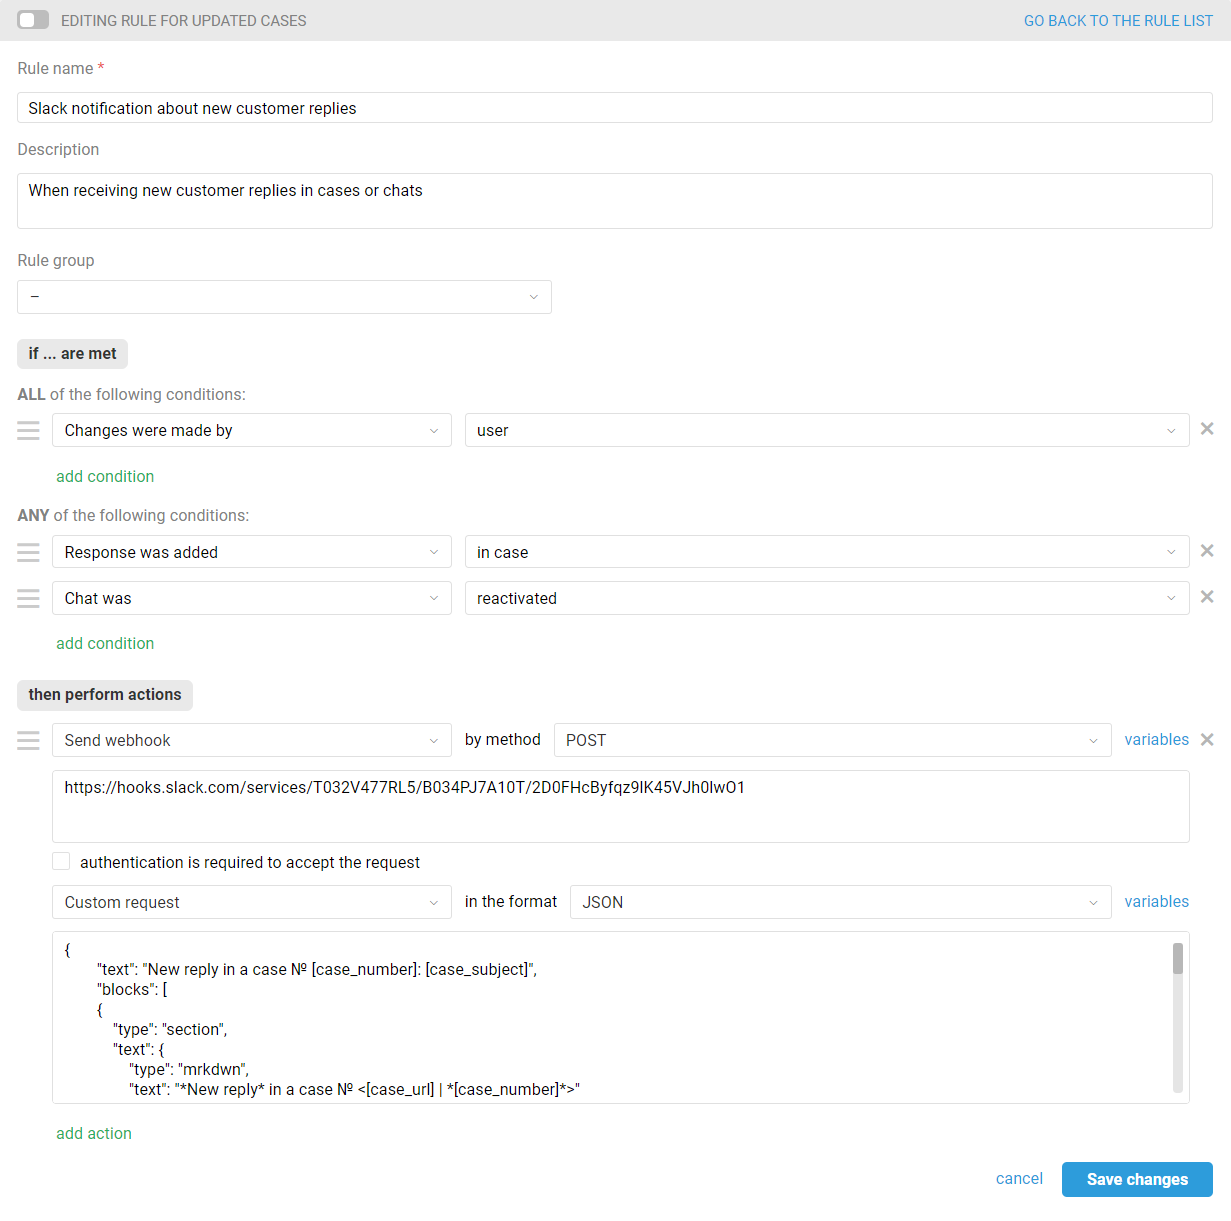
In the "then perform actions" box, select the "Send webhook" option, then specify the POST method. In the "URL for sending request to" field, insert the webhook URL you copied from Slack.
Select the "Custom request" option below in JSON format and add the request code:
{
        "text": "New reply in a case № [case_number]: [case_subject]",
        "blocks": [
        {
            "type": "section",
            "text": {
                "type": "mrkdwn",
                "text": "*New reply* in a case № <[case_url] | *[case_number]*>"
            }
        },
        {
            "type": "section",
            "fields": [
                {
                    "type": "mrkdwn",
                    "text": "*Sender*\n[user_full_name] \n [user_email]"
                },
                {
                    "type": "mrkdwn",
                    "text": "*Group*\n[case_group]"
                }
            ]
        },
        {
            "type": "section",
            "text": {
                "type": "mrkdwn",
                "text": "*[case_subject]:*\n\n[last_message|text]"
            }
        },
        {
            "type": "divider"
        }
    ]
}
Display example:

This completes the notification setting. From now on you will receive notifications in Slack and won't miss new messages from your customers.
PRO hint: In new chats, the case subject is formed based on the first message from the customer:
sometimes such a message can be quite long and break the layout of your notification;
the text of the message itself will then duplicate the subject.
To ensure this doesn't happen, it is better to create separate rules for new email-based cases and cases from synchronous channels and avoid using the [case_subject] variable in the request code for notification about new chats.
Advanced features
6. Use variables
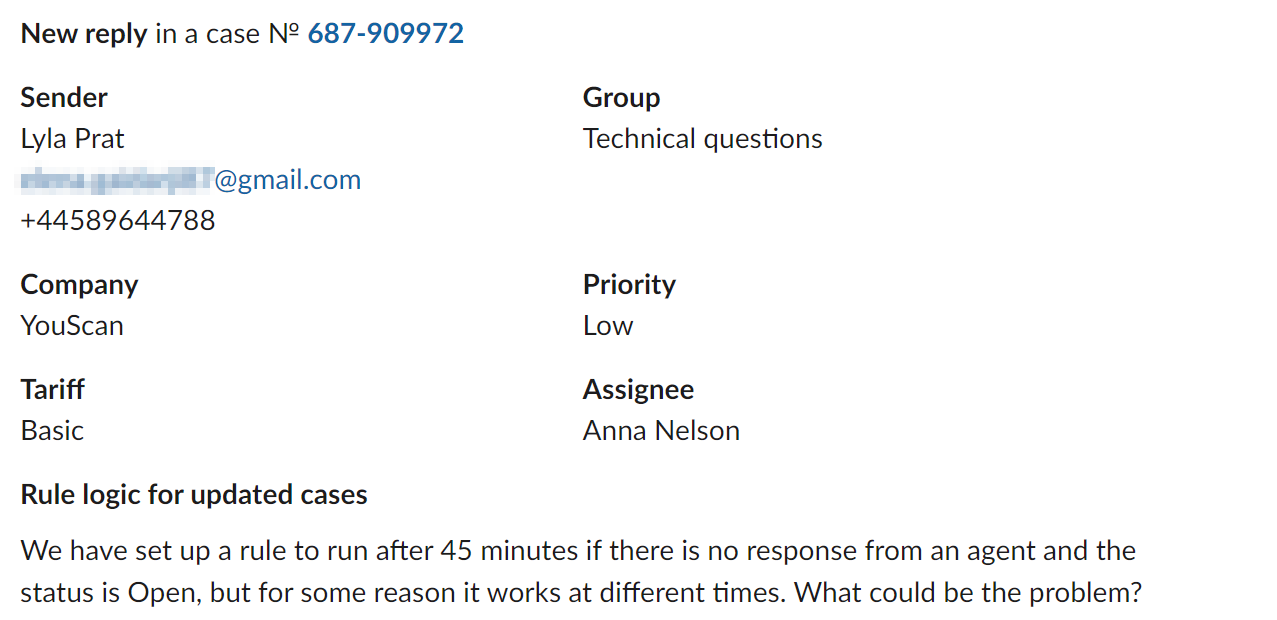
Add the variables you want with data from Deskie to the webhook code (customer phone number, company, note's text, custom fields' data, etc.) so that the notifications are as relevant as possible to your tasks. In addition, you can also choose the display of the items that suits you best.
Example of the request code:
{
    "text": "New reply in a case № [case_number]: [case_subject]",
    "blocks": [
        {
            "type": "section",
            "text": {
                "type": "mrkdwn",
                "text": "*New reply* in a case № <[case_url] | *[case_number]*>"
            }
        },
        {
            "type": "section",
            "fields": [
                {
                    "type": "mrkdwn",
                    "text": "*Sender*\n[user_full_name] \n [user_email]\n[user_phone]"
                },
                {
                    "type": "mrkdwn",
                    "text": "*Group*\n[case_group]"
                }
            ]
        },
        {
            "type": "section",
            "fields": [
                {
                    "type": "mrkdwn",
                    "text": "*Company*\n[user_company]"
                },
                {
                    "type": "mrkdwn",
                    "text": "*Priority*\n[case_priority]"
                }
            ]
        },
        {
            "type": "section",
            "fields": [
                {
                    "type": "mrkdwn",
                    "text": "*Tariff*\n[custom_field]"
                },
                {
                    "type": "mrkdwn",
                    "text": "*Assignee*\n[assigned_full_name]"
                }
            ]
        },
        {
            "type": "section",
            "text": {
                "type": "mrkdwn",
                "text": "*[case_subject]*\n\n[last_message|text]"
            }
        },
        {
            "type": "divider"
        }
    ]
}
Replace [custom_field] with your option by selecting an additional data field from the list of variables by clicking on the "variables" link to the right of the custom request in the rule.
Display example:
Make notifications more informative with the Slack API
7. Add the required items to the request
You can add emoji, images, hyperlinks, separators, etc. For more information on request syntax, see Slack's official documentation.
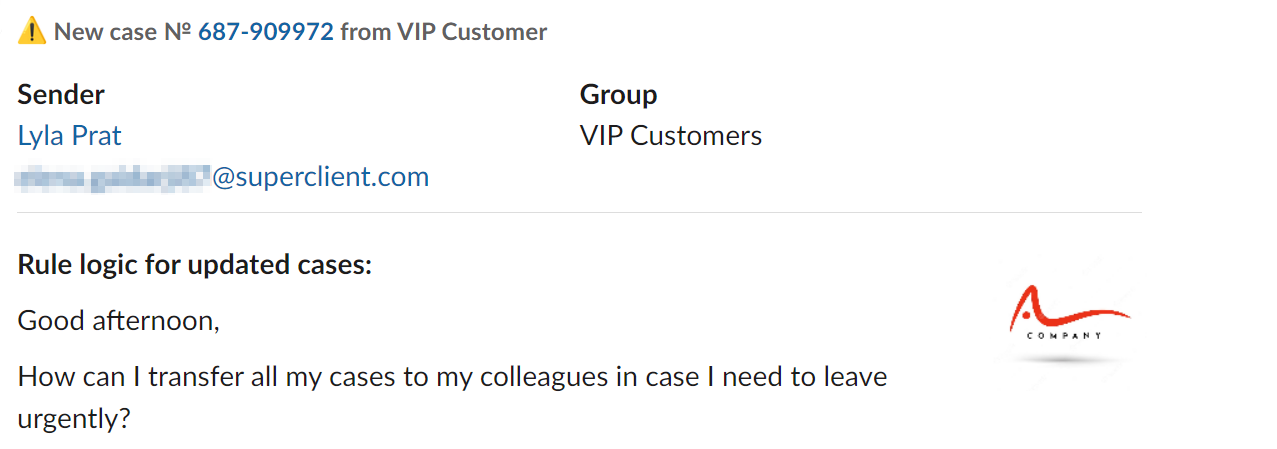
For instance, set up a separate rule for new cases to keep track of new cases from important customers. Let's say we will raise the priority of such cases and send a notification with the necessary information to Slack. To make sure you don't miss the notification, add the customer's company logo, a separator and an exclamation mark icon.
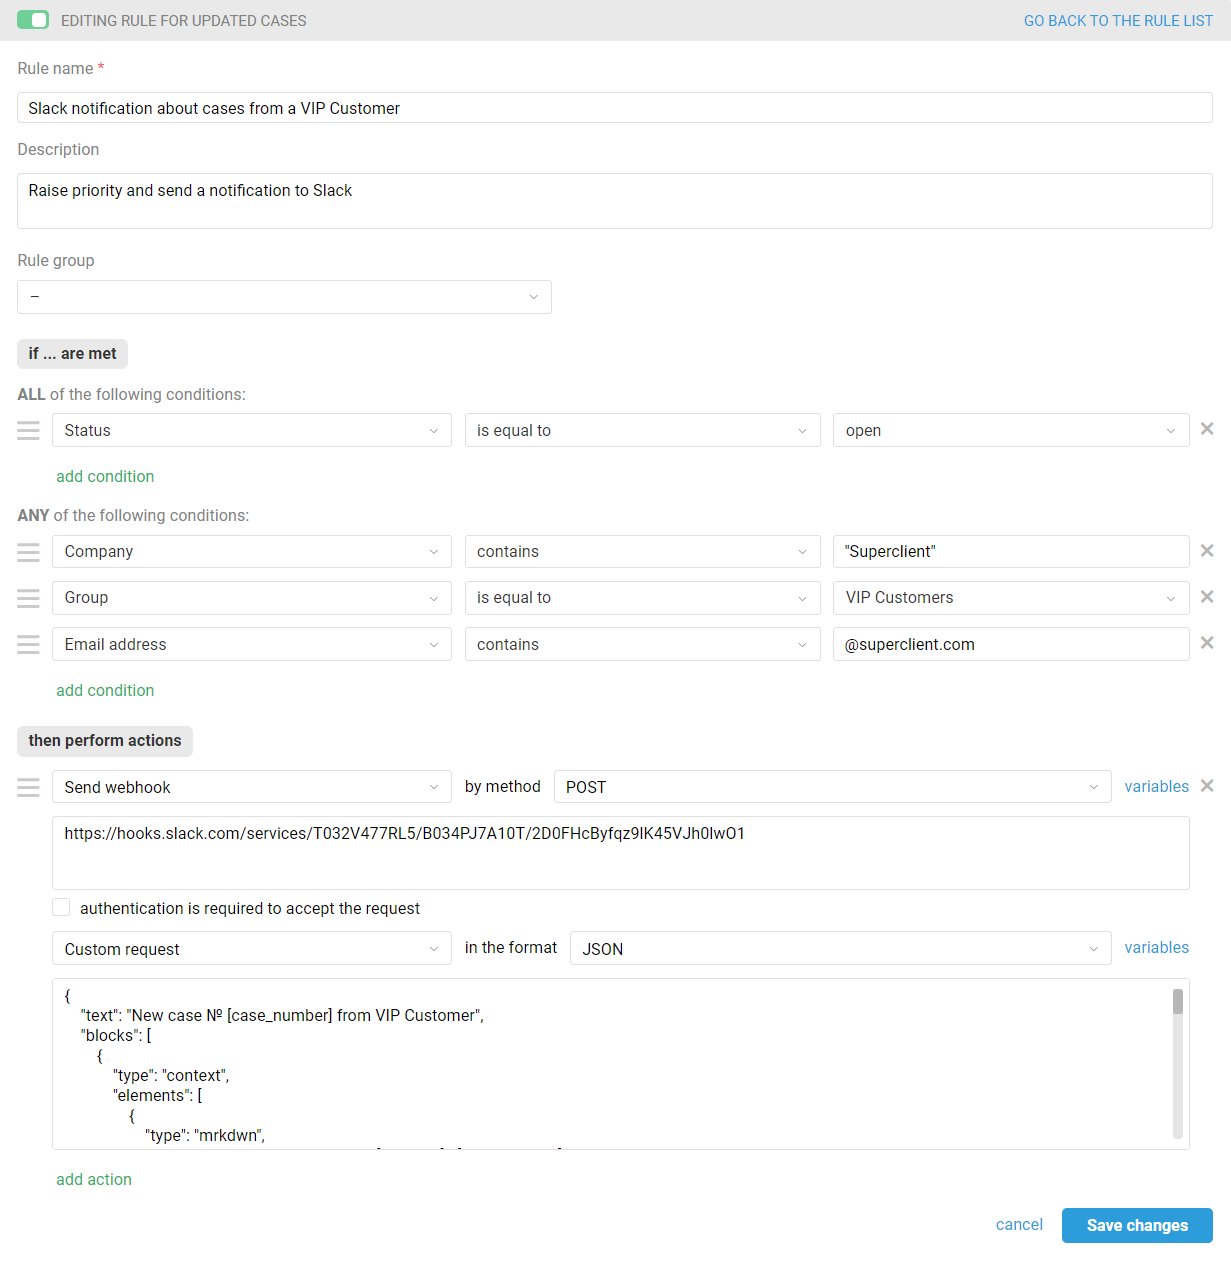
Example of the request code:
{
    "text": "New case № [case_number] from VIP Customer",
    "blocks": [
        {
            "type": "context",
            "elements": [
                {
                    "type": "mrkdwn",
                    "text": ":warning: *New case № <[case_url] | [case_number]> from VIP Customer*"
                }
            ]
        },
        {
            "type": "section",
            "fields": [
                {
                    "type": "mrkdwn",
                    "text": "*Sender*\n<https://happy.deskie.io/staff/users/record/[user_id]|[user_full_name]> \n[user_email]"
                },
                {
                    "type": "mrkdwn",
                    "text": "*Group*\n[case_group]"
                }
            ]
        },
        {
            "type": "divider"
        },
        {
            "type": "section",
            "text": {
                "type": "mrkdwn",
                "text": "*[case_subject]:*\n\n[case_description|text]"
            },
            "accessory": {
                "type": "image",
                "image_url": "[image url]",
                "alt_text": "VIP Company"
            }
        },
            {
            "type": "divider"
            }
    ]
}
Instead of [domain], enter the name of your Deskie account. Clicking on the username will take you to the user's Deskie profile.
Specify a link to the image you want instead of [image link] in the image_url parameter.
Display example:
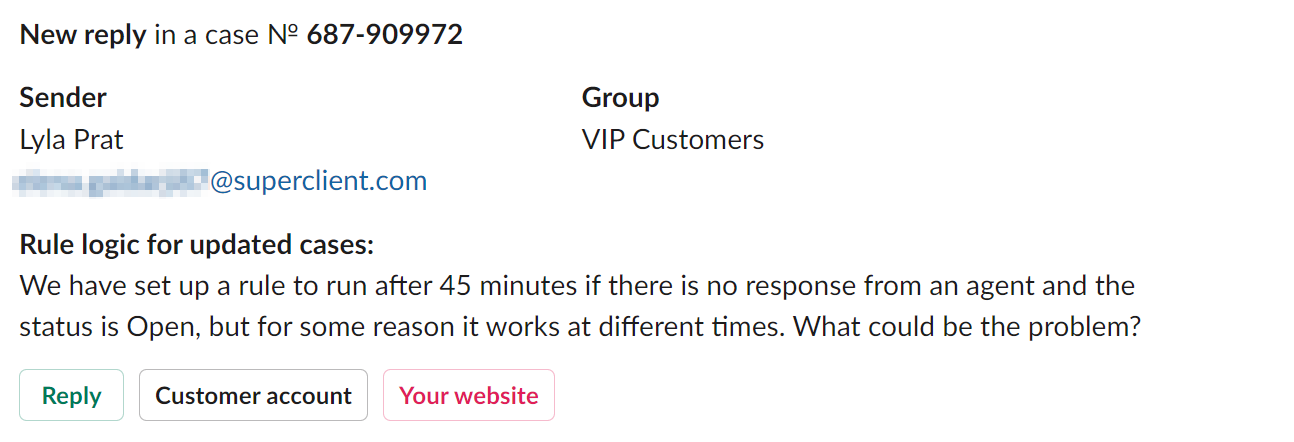
8. Add buttons
These can be used to quickly access the case page, the user's Deskie customer profile, your knowledge base, the list of all cases, etc.
Example of the request code:
{
    "text": "New reply in a case № [case_number]: [last_message|text]",
    "blocks": [
        {
            "type": "section",
            "text": {
                "type": "mrkdwn",
                "text": "*New reply* in a case № *[case_number]*"
            }
        },
        {
            "type": "section",
            "fields": [
                {
                    "type": "mrkdwn",
                    "text": "*Sender*\n[user_full_name] \n [user_email]"
                },
                {
                    "type": "mrkdwn",
                    "text": "*Group*\n[case_group]"
                }
            ]
        },
        {
            "type": "section",
            "text": {
                "type": "mrkdwn",
                "text": "*[case_subject]:*\n[last_message|text]"
            }
        },
        {
            "type": "actions",
            "elements": [
                {
                    "type": "button",
                    "text": {
                        "type": "plain_text",
                        "text": "Reply"
                    },
                    "style": "primary",
                    "url": "[case_url]"
                },
                {
                    "type": "button",
                    "text": {
                        "type": "plain_text",
                        "text": "Customer account"
                },
                    "url": "https://happy.deskie.io/staff/users/record/[user_id]"
                },
                {
                    "type": "button",
                    "text": {
                        "type": "plain_text",
                        "text": "Your website"
                    },
                                    "style": "danger",
                    "url": "https://yoursite.com/"
                }            ]
        },
        {
            "type": "divider"
        }
    ]
}
Instead of [domain], you need to enter the domain of your Deskie account. By clicking on the button with the name of the user you will be able to go to his/her Deskie profile.
Replace the text "Your site" inside the inverted commas with the desired one and provide a link to it instead of https://yoursite.com/.
Display example:
PRO tip: If you navigate to external links via buttons, Slack displays a warning:
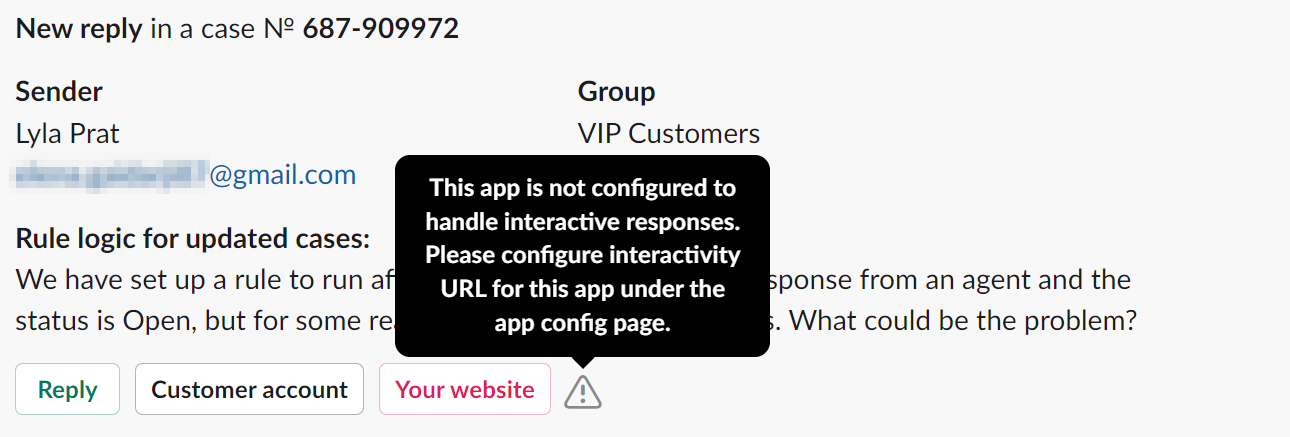
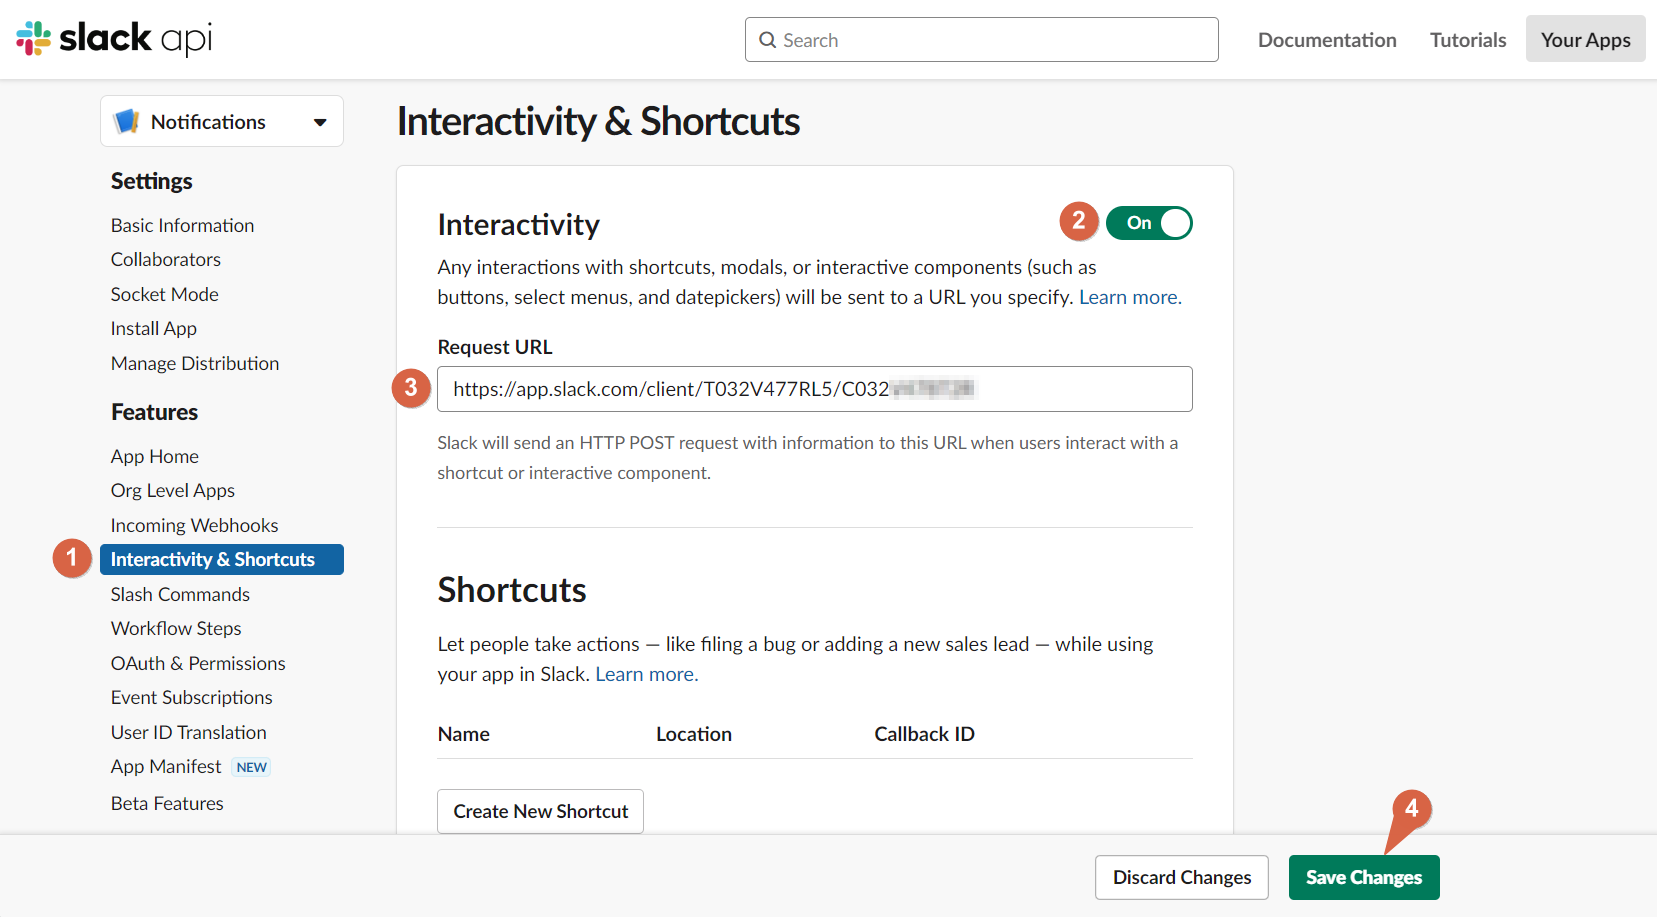
To remove this notification and allow such links, open the applications page, select the application you created to send notifications from Deskie and go to Interactivity & Shortcuts.
Move the slider to the active state. In the request URL field, type the link to the channel where the notifications will be received and then save the changes. You can get the link to the channel in the browser version of Slack.
If you use interactive tools for your Slack workflow, specify the link to which the HTTP request will be sent.

9. Use the Secondary Attachment method
Slack provides a Secondary Attachment Method as a secondary data transfer method. The content of such a notification can be collapsed, hidden and truncated, unlike the block method we covered in the main article.
Example of the request code:
{
    "attachments":[
        {
        "fallback":"New reply in a case № <[case_url]|[case_number]>",
        "pretext":"*New reply* in a case № *<[case_url]|[case_number]>*",
        "color":"#4CA9E4",
        "fields":[
             {
               "title":"Sender",
               "value":"[user_full_name] [user_email]",
               "short":true
               },
            {
               "title":"Group",
               "value":"[case_group]",
               "short":true
               },
            {
               "title":"[case_subject]",
               "value":"[last_message|text]",
               "short":false
            }
        ]
    }
 ]
}
Display example:

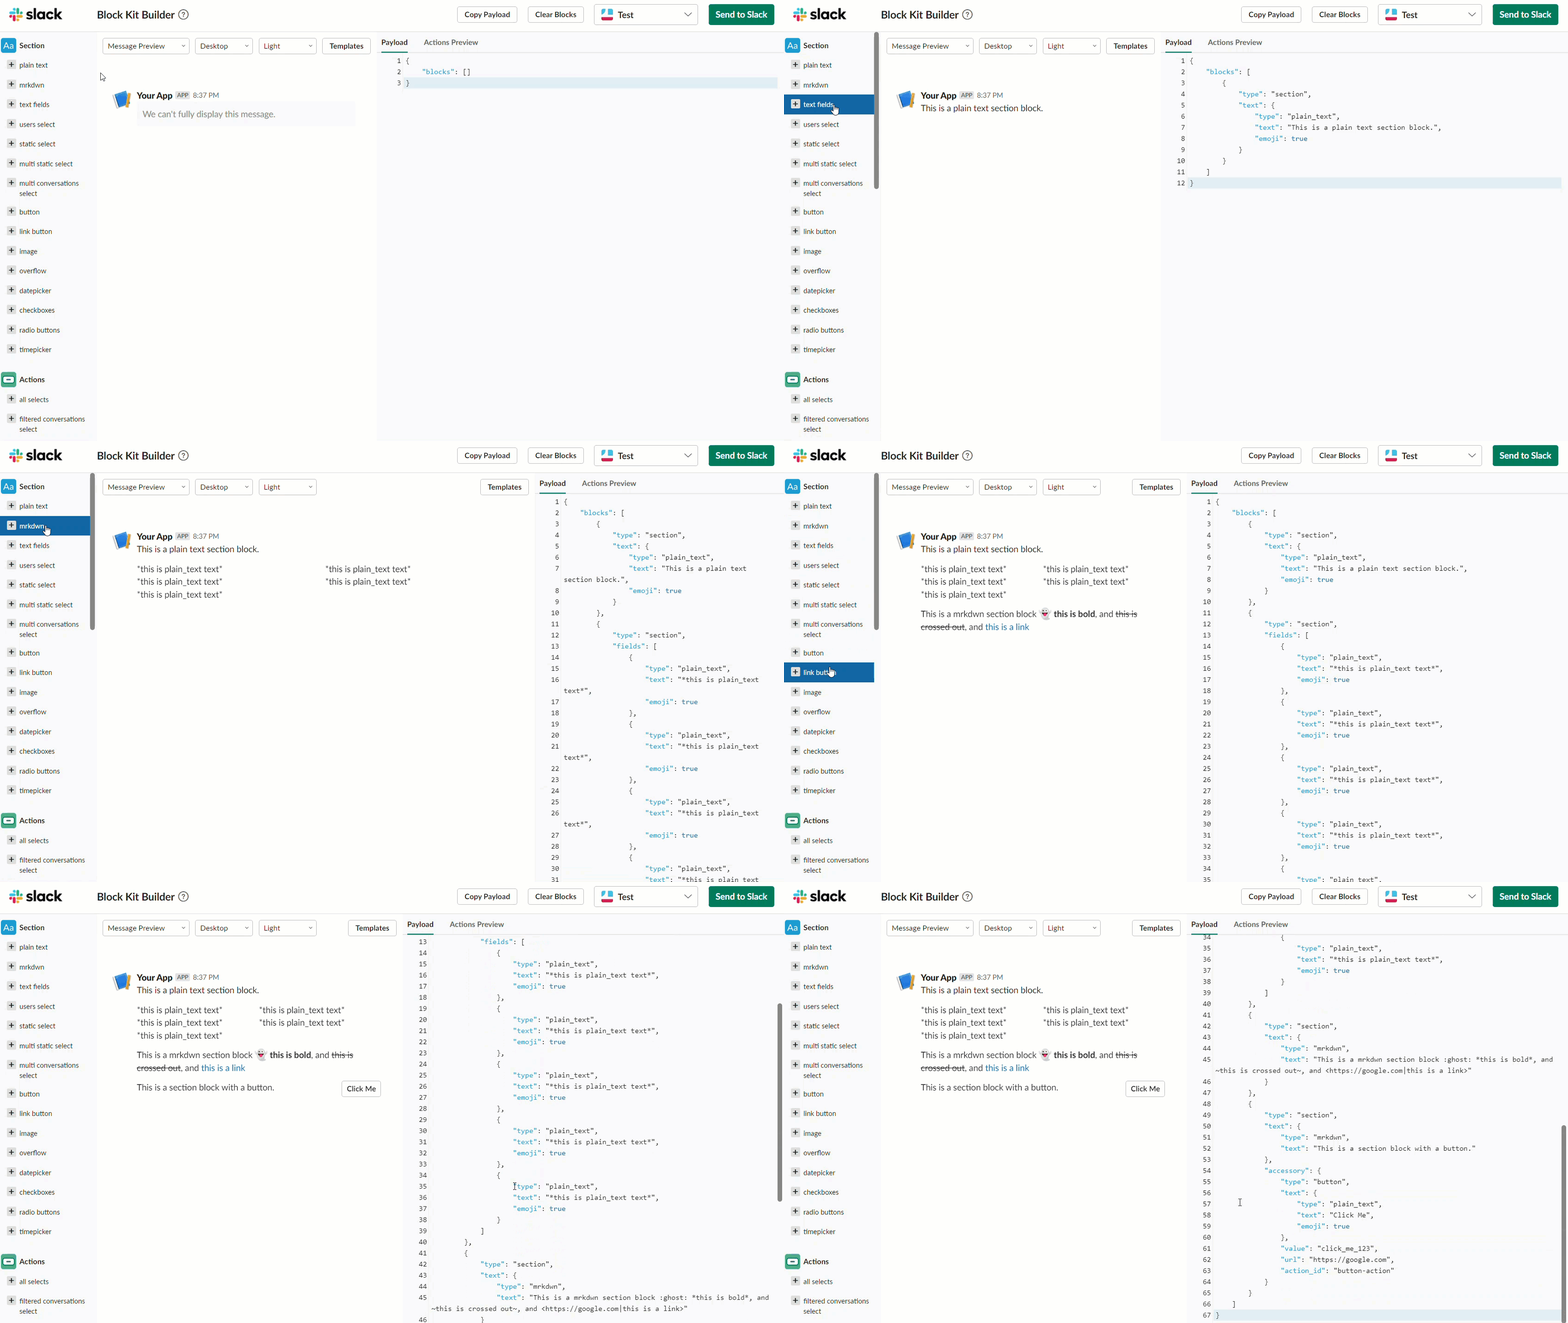
10. Use the official block kit builder
The block kit builder will make it easy to work with the request code and help you select the right elements.
11. Set up the bot's avatar
You can add an avatar for your bot to send notifications to here: api.slack.com/apps. Click on the desired app and go to Display Information.
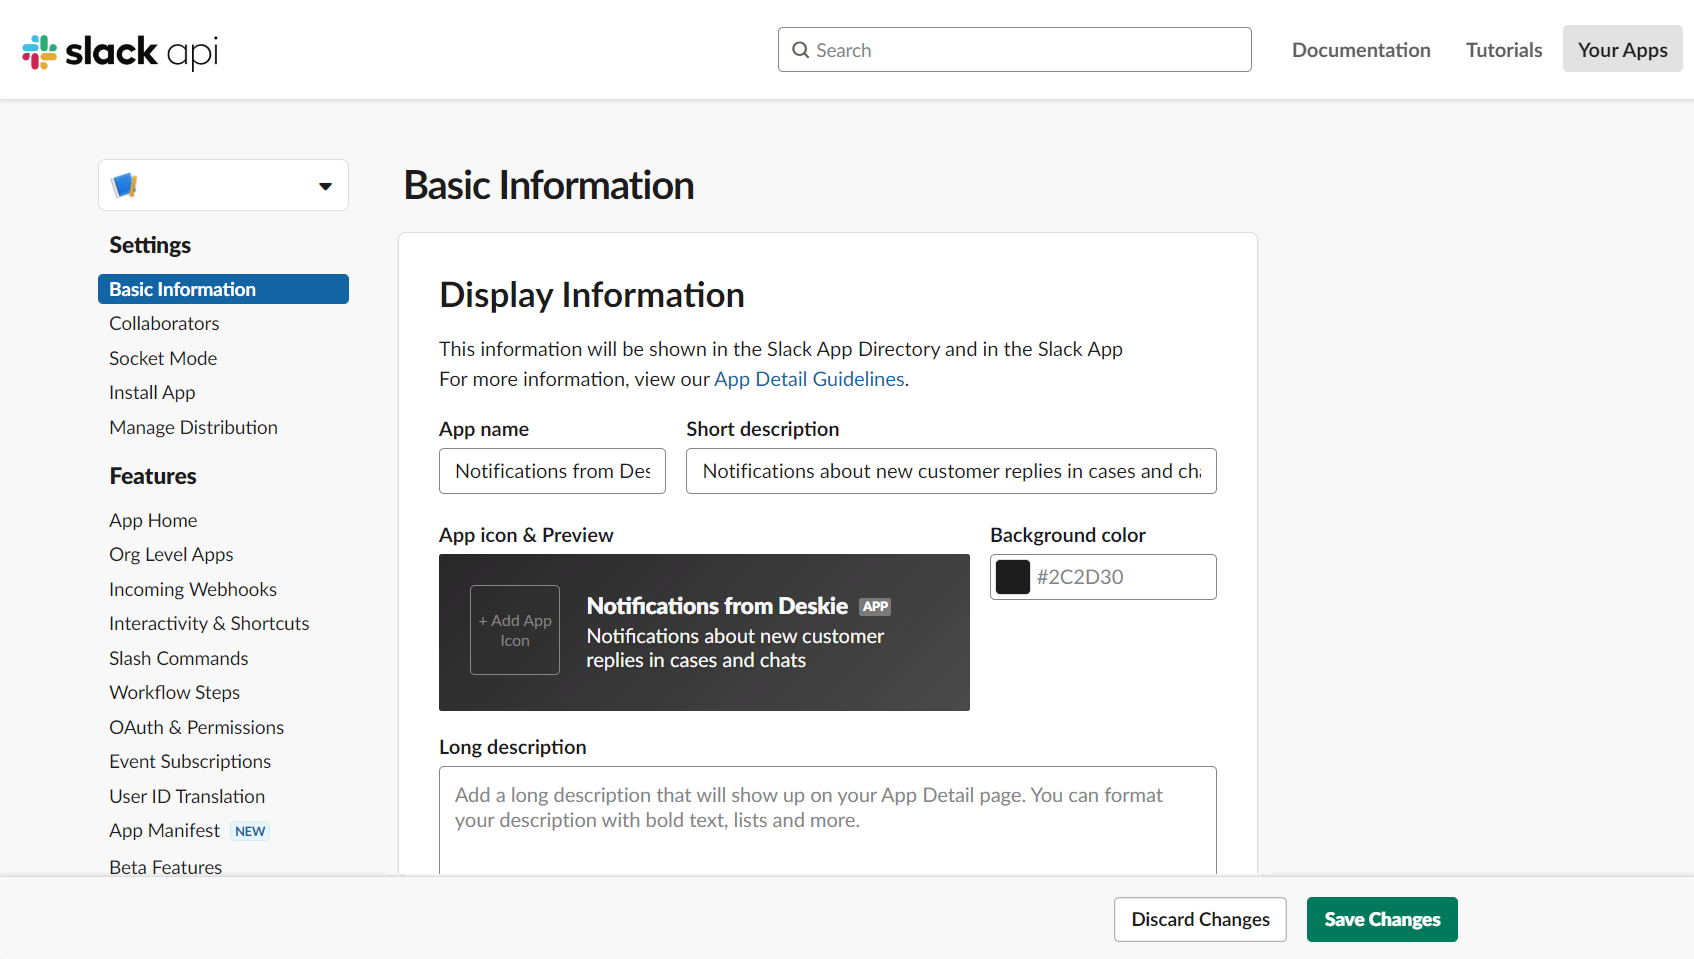
Display example:

12. Add a mention in the messenger
а. Mentioning everyone, channel members, a particular group, or those in the channel and online work through specifying @everyone, @channel, @group @here in the text, respectively. You can also use this mentioning format: <!channel>
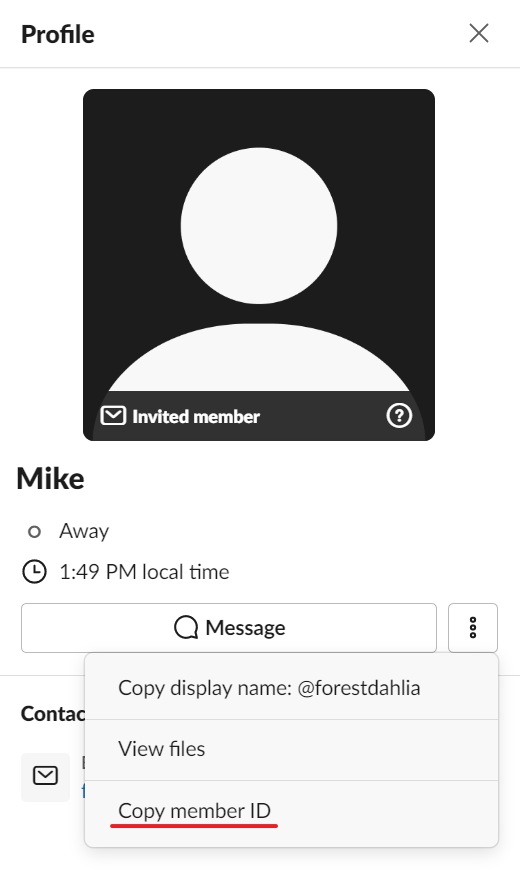
b. A specific agent can be mentioned by following @ with their ID inside angle brackets <>, i.e. as <@[User_ID]>, where [User_ID] should be replaced with the messenger user ID.
You can get the ID of the desired agent in Slack by accessing their profile:
13. Mention the assignee in Slack
You can tag an agent in Slack via <@[User_ID]>. But in order to implement this logic, you must first have an assignee — i.e. cases must be distributed among agents using rules.
a. Set up distribution rules
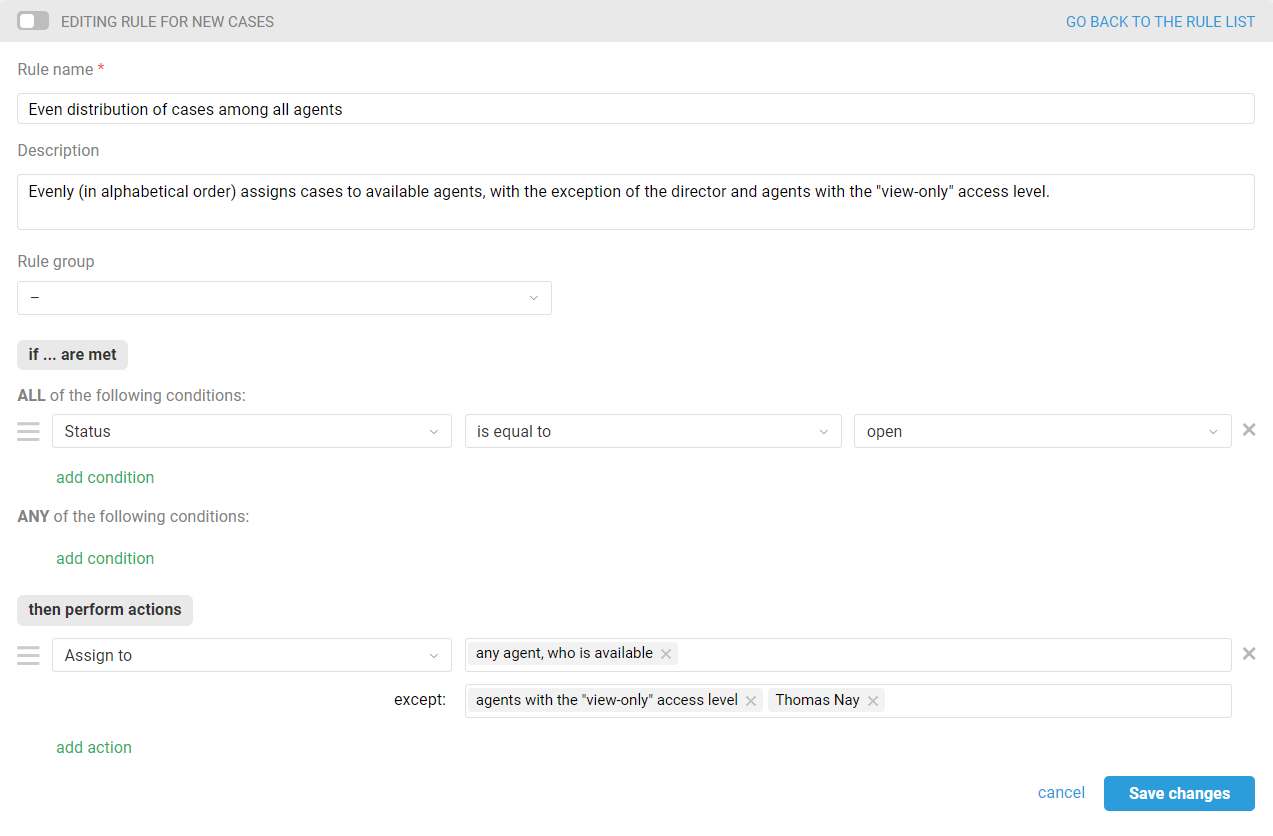
Examples of rules for the automatic distribution of cases can be found in a separate section of the knowledge base here. Or you can, for example, use this rule for new cases, to evenly assign all available agents to the case, except the manager and those who have "view only" access:
b. Create rules for sending a webhook mentioning the assignee
For each agent, create a rule that sends a notification with a mention to Slack. When a new case comes in, you will need such a rule for new cases:
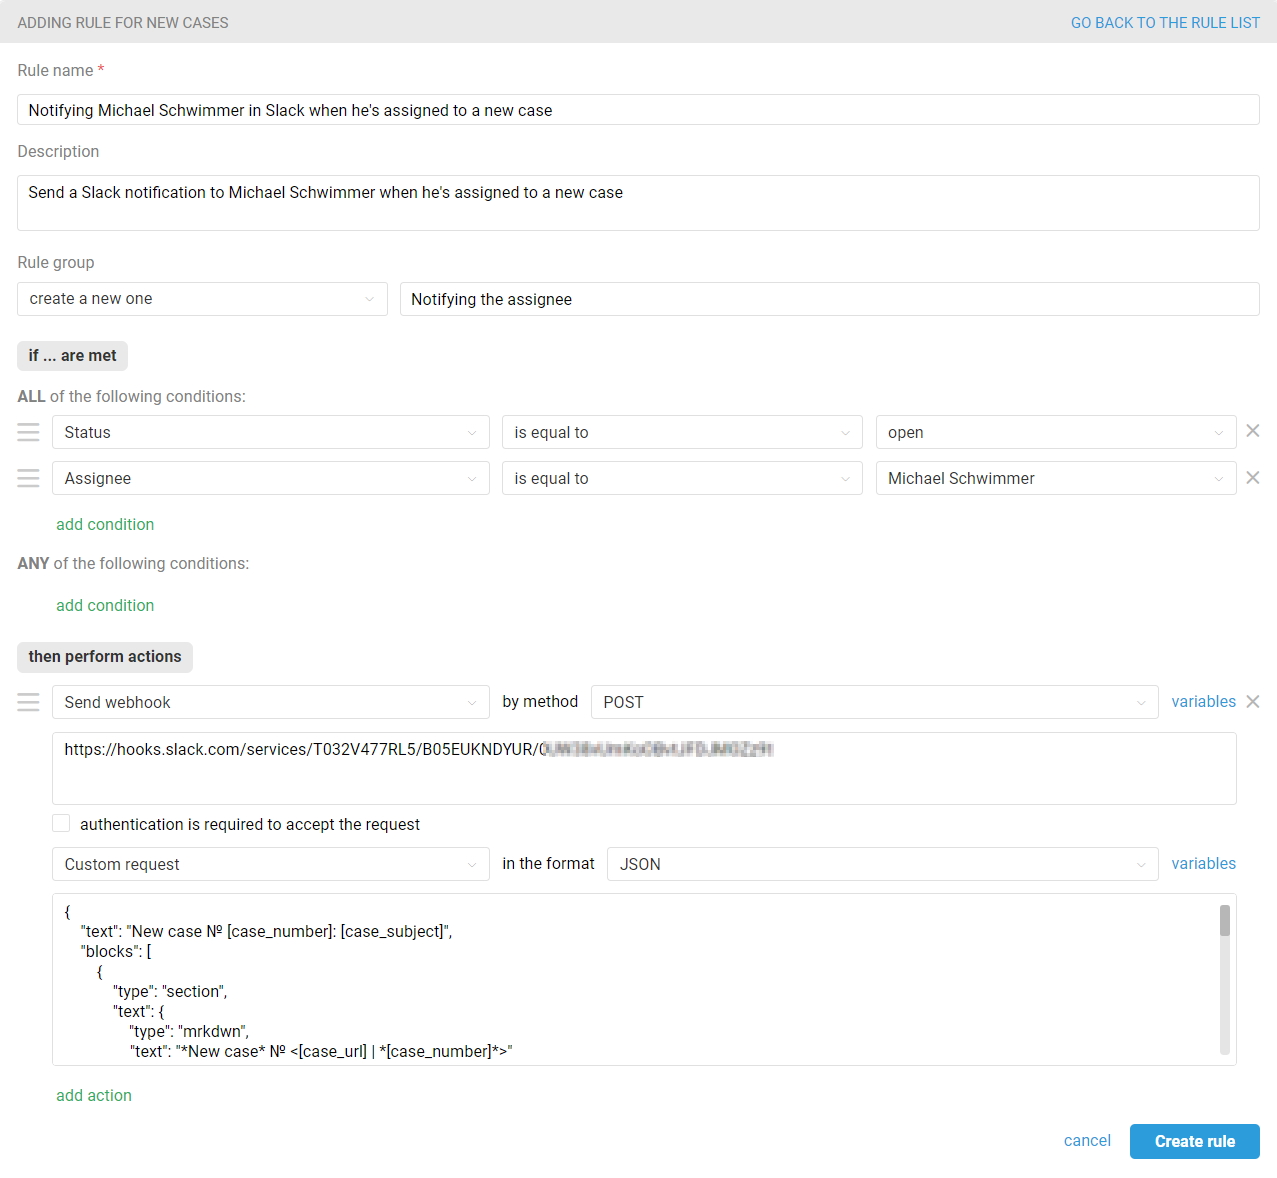
Use the following custom request text (see step 12 of this article on how to get a Slack member ID):
{
    "text": "New case № [case_number]: [case_subject]",
    "blocks": [
        {
            "type": "section",
            "text": {
                "type": "mrkdwn",
                "text": "*New case* № <[case_url] | *[case_number]*>"
            }
        },
        {
            "type": "section",
            "fields": [
                              {
                    "type": "mrkdwn",
                    "text": "*Assignee*\n<@[user id]>"
                },
                {
                    "type": "mrkdwn",
                    "text": "*Priority*\n[case_priority]"
                }
            ]
        },
        {
            "type": "section",
            "text": {
                "type": "mrkdwn",
                "text": "*[case_subject]*\n\n[case_description|text]"
            }
        },
        {
            "type": "divider"
        }
    ]
}
Display example:

To send a notification in Slack, mentioning the assignee when a new response is received in a case or chat, you will also need separate rules for updated cases for each agent. Here is an example of such a rule for updated cases:
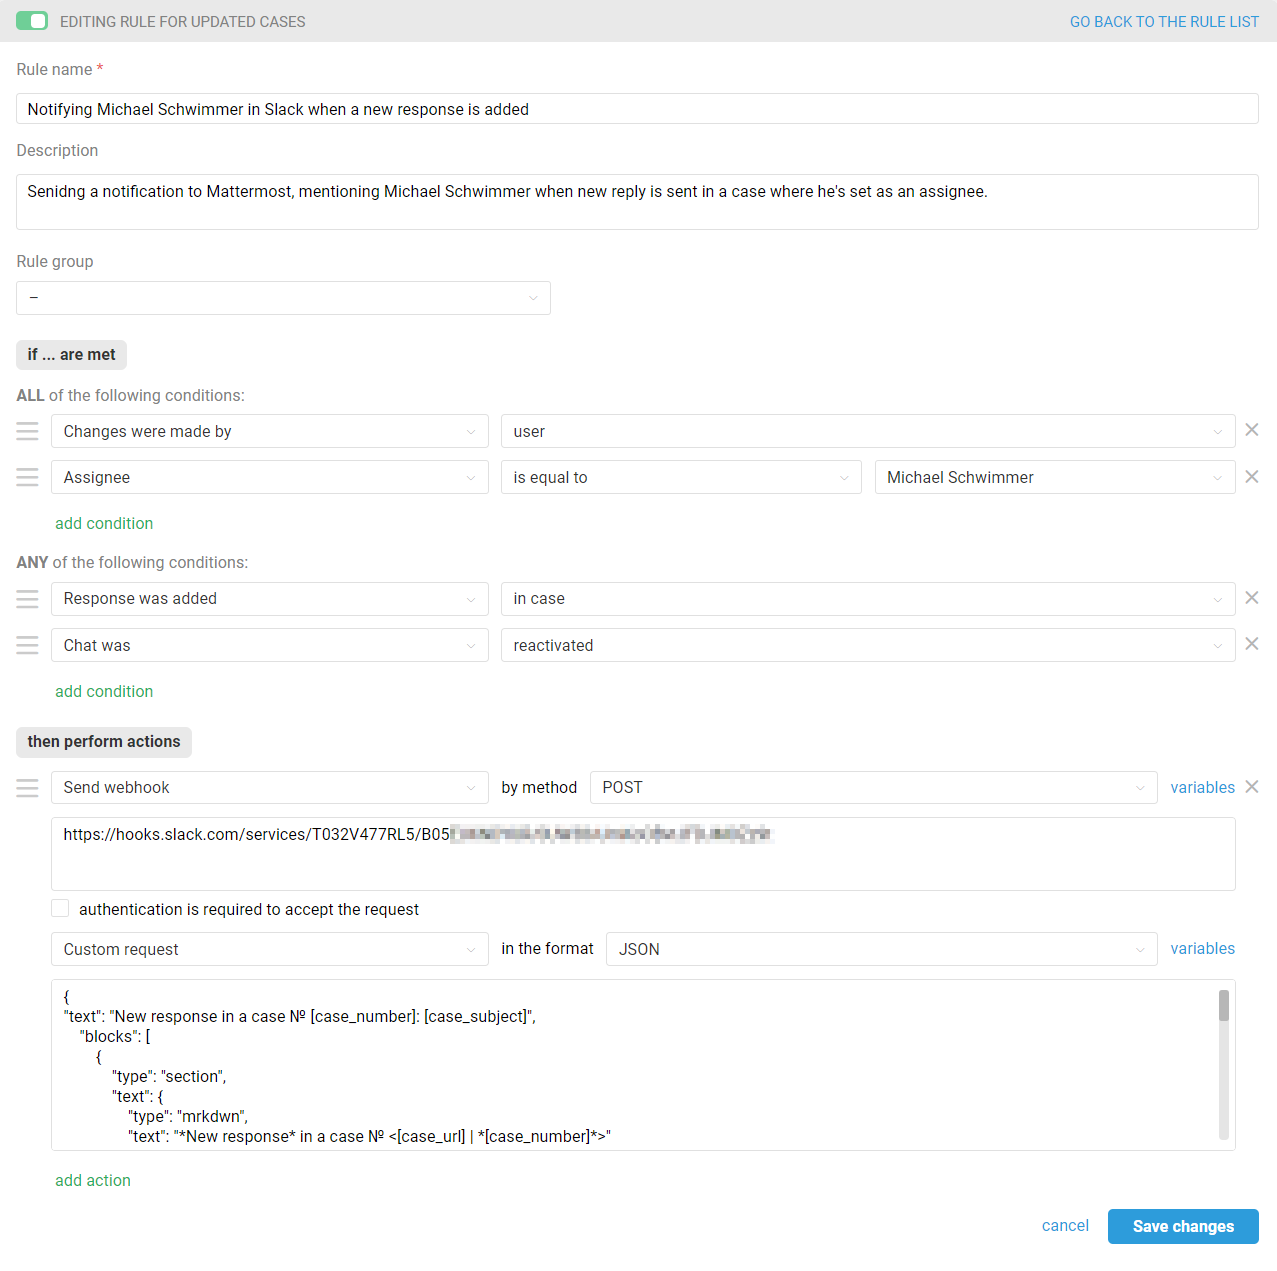
Use the following custom request text:
{
"text": "New response in a case № [case_number]: [case_subject]",
    "blocks": [
        {
            "type": "section",
            "text": {
                "type": "mrkdwn",
                "text": "*New response* in a case № <[case_url] | *[case_number]*>"
            }
        },
        {
            "type": "section",
            "fields": [
                              {
                    "type": "mrkdwn",
                    "text": "*Assignee*\n<@[user_id]>"
                },
                {
                    "type": "mrkdwn",
                    "text": "*Priority*\n[case_priority]"
                }
            ]
        },
        {
            "type": "section",
            "text": {
                "type": "mrkdwn",
                "text": "*[case_subject]*\n\n[last_message|text]"
            }
        },
        {
            "type": "divider"
        }
    ]
}
Please note that the [last_message|text] variable must be used in the "text" parameter to get the response text in the case.
Display example:

PRO hint: To add rules more quickly, use the clone function and then edit only the data of the agent mentioned in the rules. Combine the rules created for all agents into one group. Place the created rule group after the rule from point a which sets assignees in a case.
When sending notifications to direct messages, you need to add separate webhooks for each recipient in Slack (see step 2 of this guide) and specify them in the rules in the webhookURL field. Please note that in this case, the notifications will arrive in the personal correspondence in Slack on behalf of the app creator and that the app creator will also see the notifications received by the agent.
