Identifying users in chats is a rather complex task because simple methods have their disadvantages:
if you ask the user for their data (such as email address or phone number), the user might provide either someone else's data or the company's general email or phone number instead of their personal information;
if you try to verify their identity through another channel (for example, sending a code via email or SMS), you can still encounter delivery problems due to spam policies of email services or restrictions on delivery networks and zones by SMS providers.
This is precisely what is enabled by:
a new type of widget and a new API method that generates a code linked to a specific user;
new conditions in the rules that help automate the user identification process, ensuring that agents join the chat only after successful verification.
Let's take a closer look at the new features:
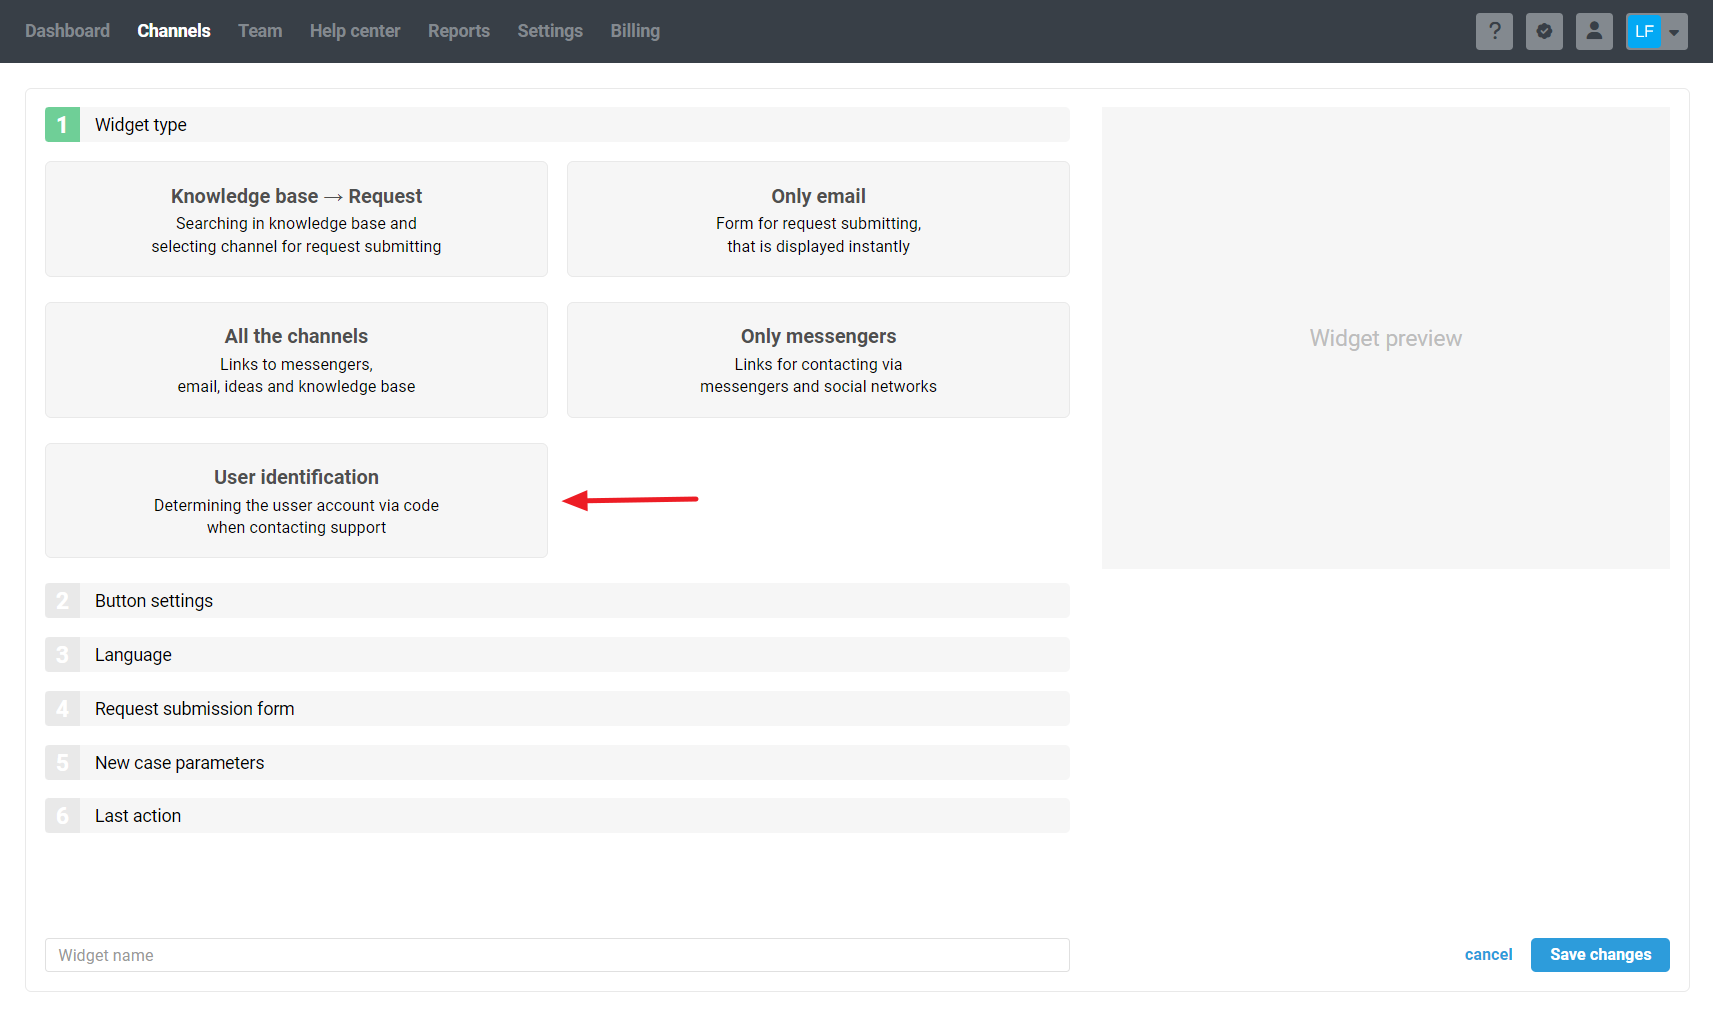
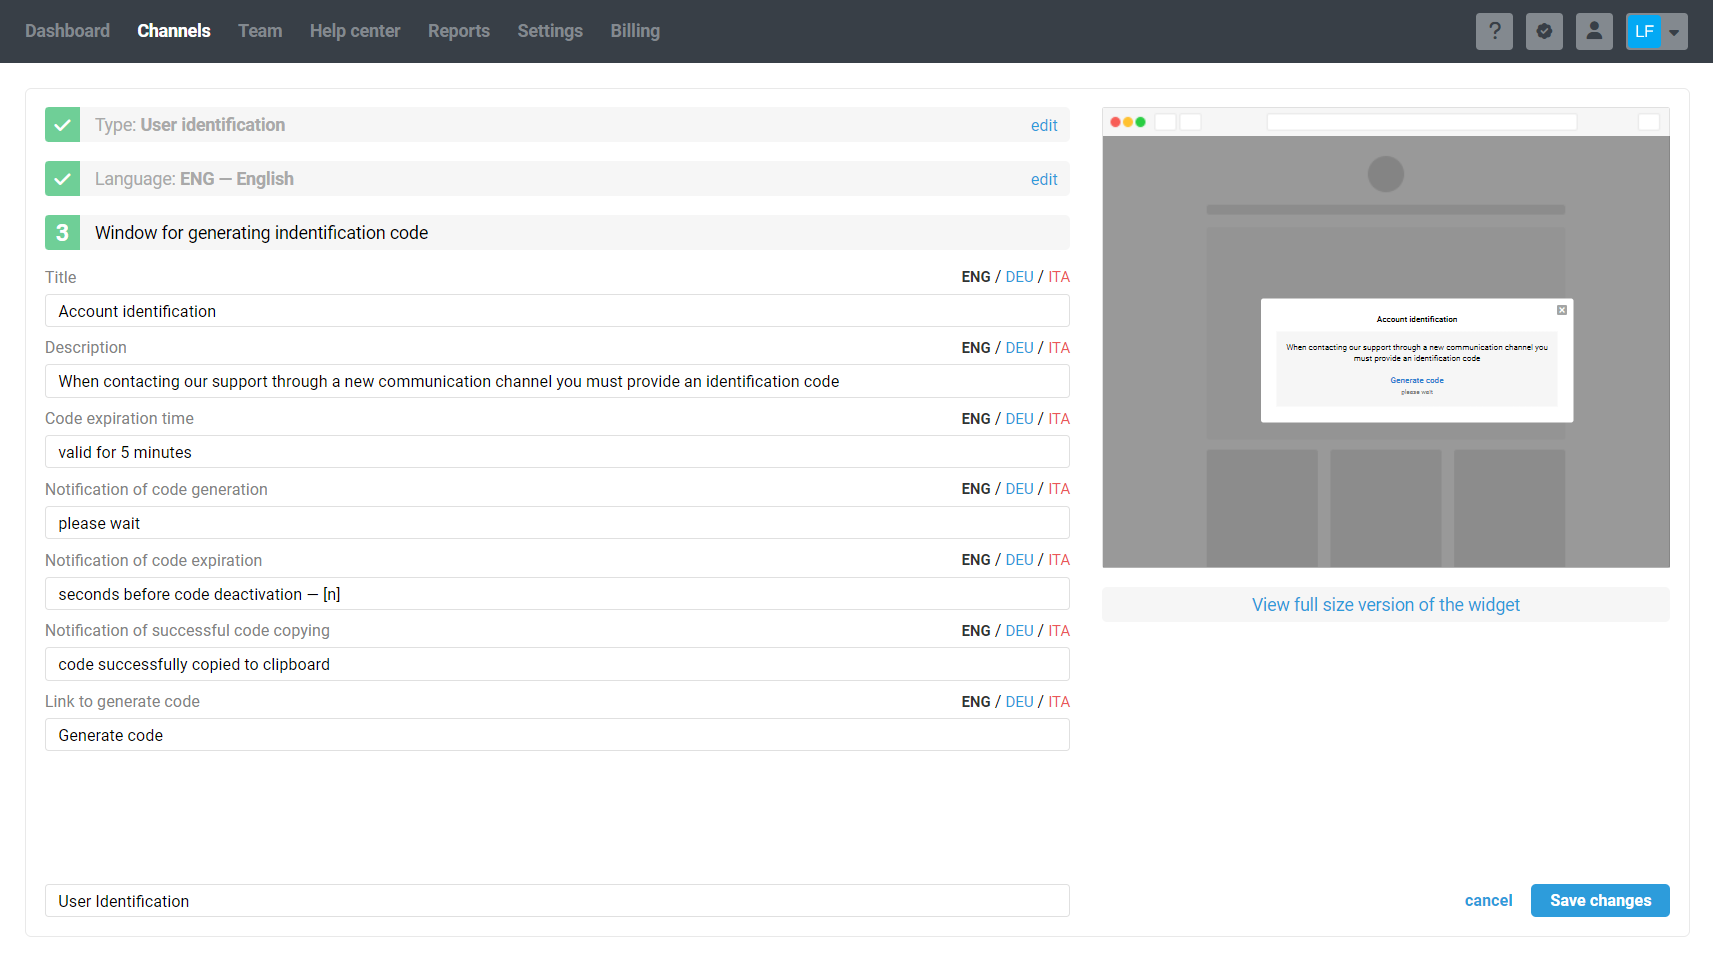
1. User Identification widget
If customers have personal accounts within your service, you can use this widget to identify them in chats.
There are different types of widgets in Deskie, which are created along the following path: administrator account → "Channels" section → "Widgets" subsection. Now there is another widget type there as well — "User identification".
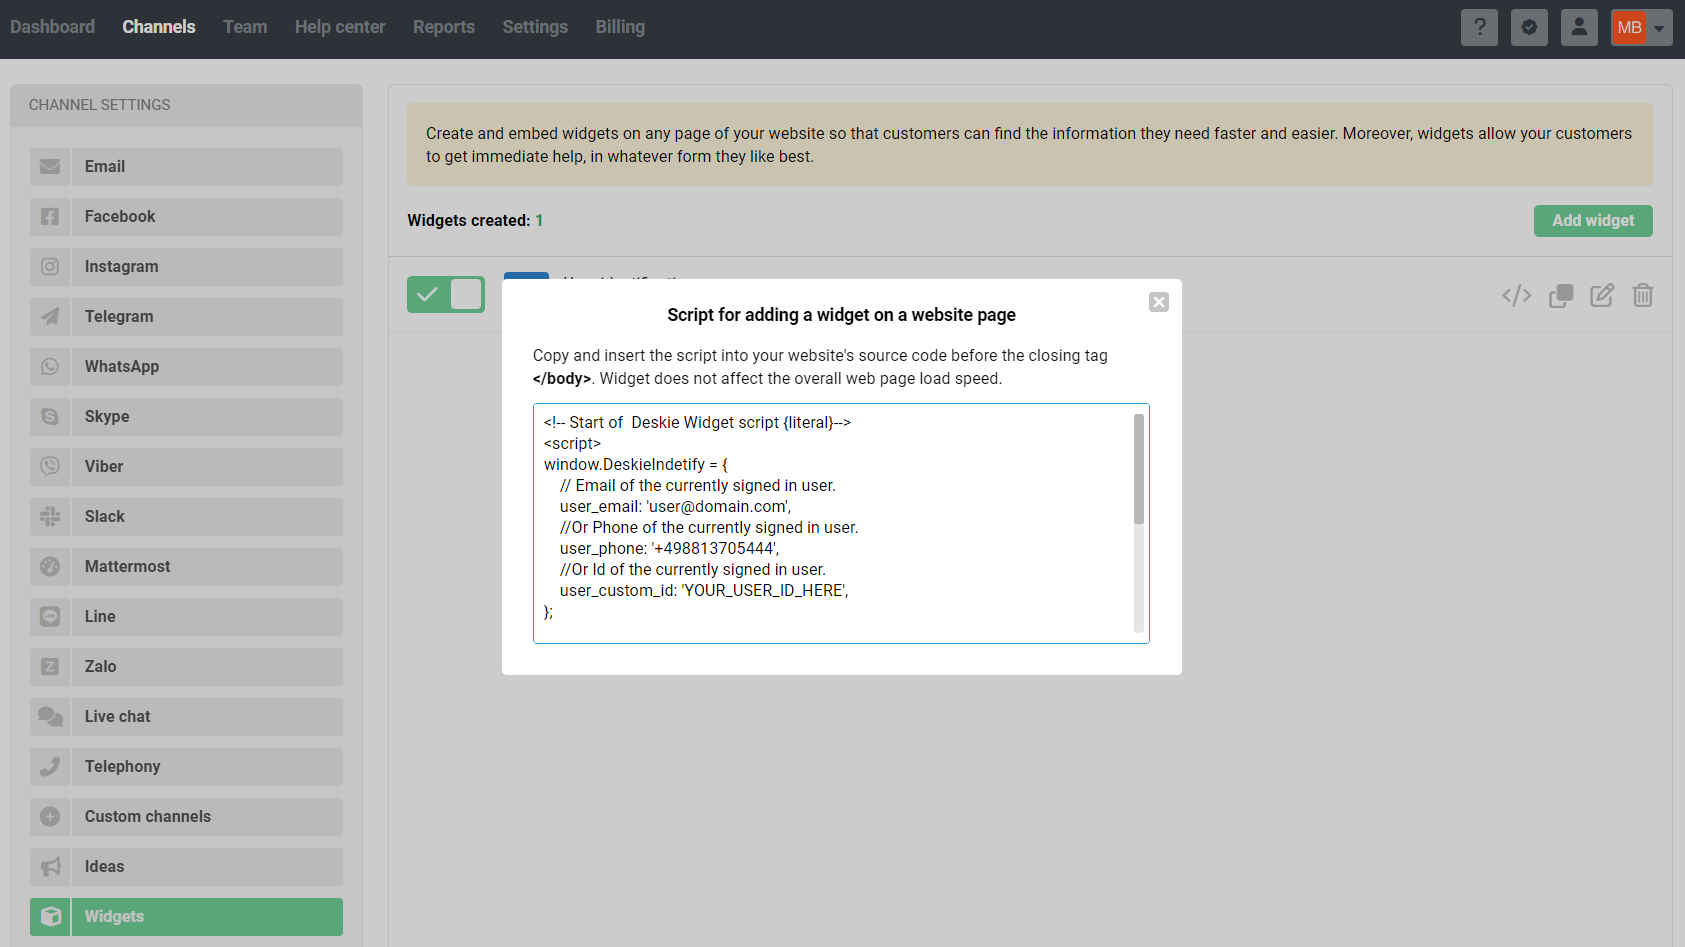
When a user is in a personal account on your service, you need to pass their data to the widget script in the appropriate fields. It can be their address, phone number, some custom user ID of yours (in this case you need to pass the custom channel ID in Deskie as well), and any other user data in Deskie. For example:
<!-- Start of  Deskie Widget script {literal}-->
<script>
window.DeskieIndetify = {
    // Email of the currently signed in user.
    user_email: '[email protected]',
    //Or Phone of the currently signed in user.
    user_phone: '+498813705444',
    //Or Id of the currently signed in user.
    user_custom_id: 'YOUR_USER_ID_HERE',
};

!function(e,o){!window.deskie?window.deskie=[]:'';window.deskie.push(o);o.g_config={widget_id:"74-m0ucuypa"}; o.type_widget = "identifier"; var
r=e.getElementsByTagName("script")[0];c=e.createElement("script");c.type="text/javascript",c.async=!0;c.src="https://deskie.io/bundles/acmesite/js/cwidget0.2.min.js";r.parentNode.insertBefore(c
,r)}(document,[]);
</script>
<!-- End of  Deskie Widget script {/literal}-->
To make the widget open when you click on the element you want, simply add the attribute class="deskie-identifier-widget" to it:
// A button that, when clicked, will open the widget.
<button class="deskie-identifier-widget">Account identification</button>
// A link that, when clicked, will open the widget.
<a class="deskie-identifier-widget" href="">Generate</a> the code and send it to the chat to pass the verification.
When the user copies the code from the widget and sends it in the chat, their profile from social media or messenger will be associated with the profile containing the data you provided to the widget.
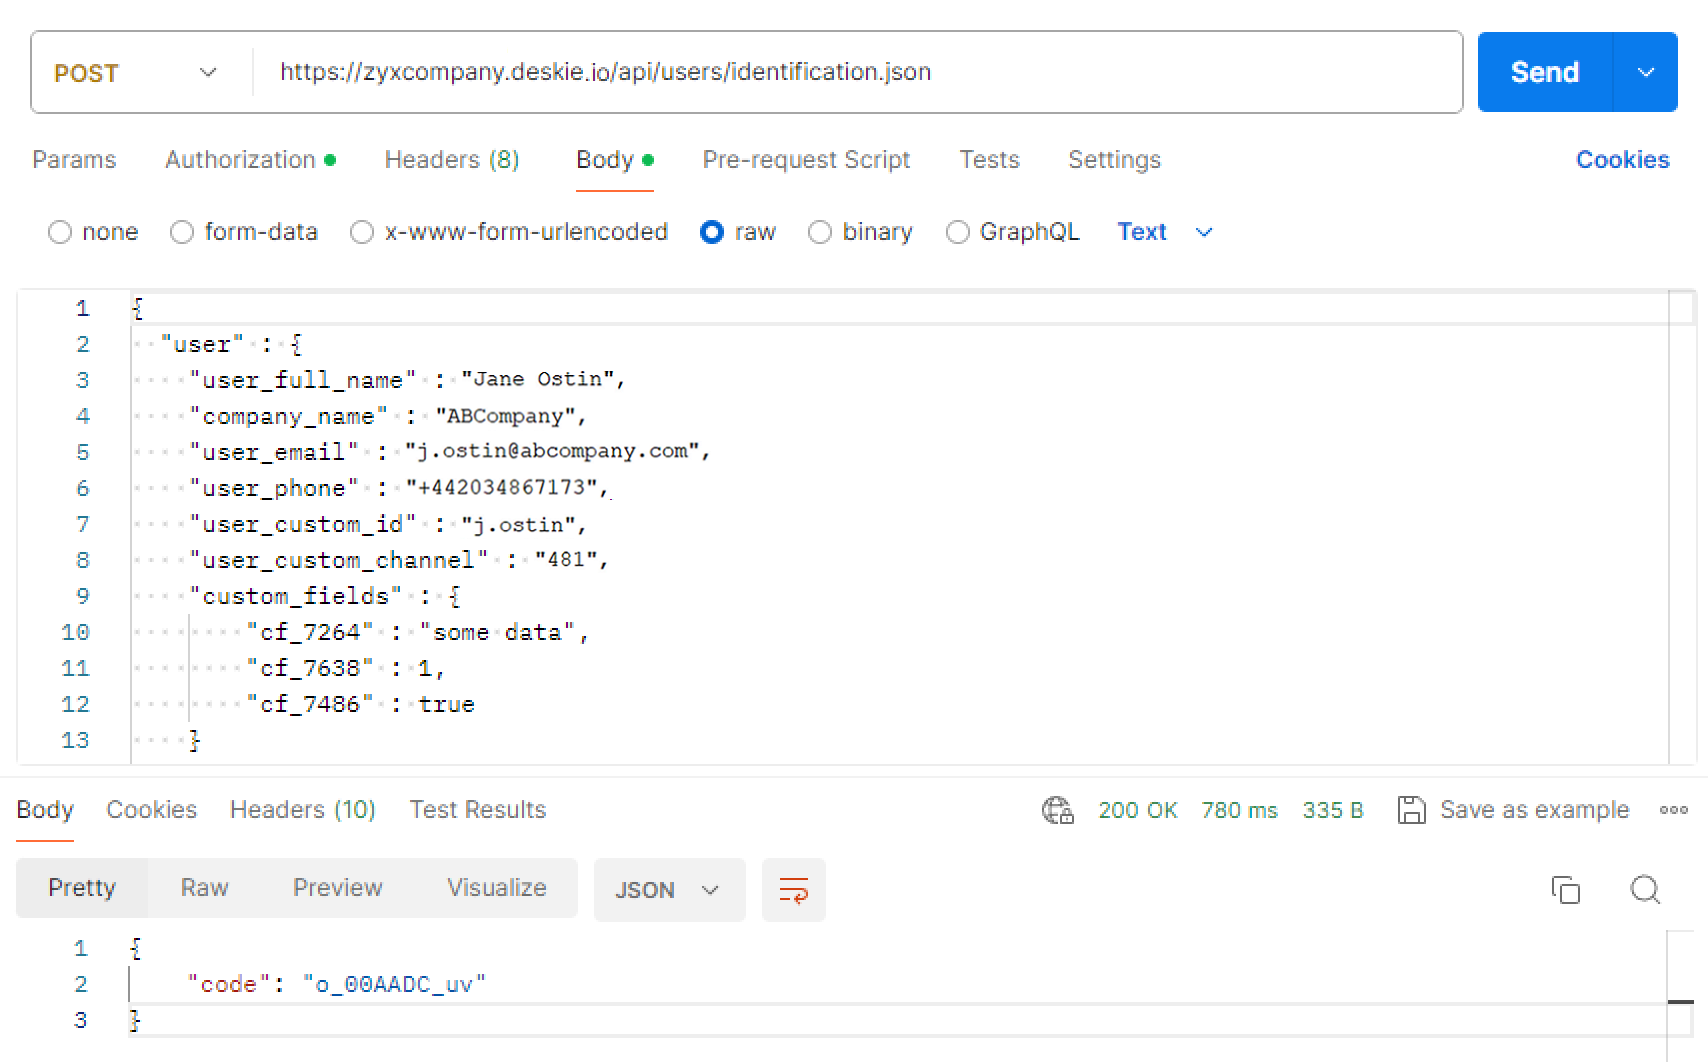
2. Obtaining identification code via API
In the API request parameters, you can also pass all the necessary user data, and in response, receive the identification code, which, like in the widget, is valid for only 5 minutes.
3. Conditions in the rules for automating the identification process
First, let's review the new conditions in the rules, and then we'll provide examples of such rules.
Here are the newly added conditions in the rules:
in all types of rules: "User — is identified / is not identified" — this condition checks whether the user profile from a specific social network or messenger has been successfully identified;
in all types of rules: "User has been created — after / before" — this condition helps if you want to set up identification only for new users while continuing to work with existing ones as before;
In rules for updated: "Identification code — was not sent / is invalid / is valid" — this condition helps set up rules to check user messages with the identification code.
Examples of rules for user identification
The flowchart of this scenario:
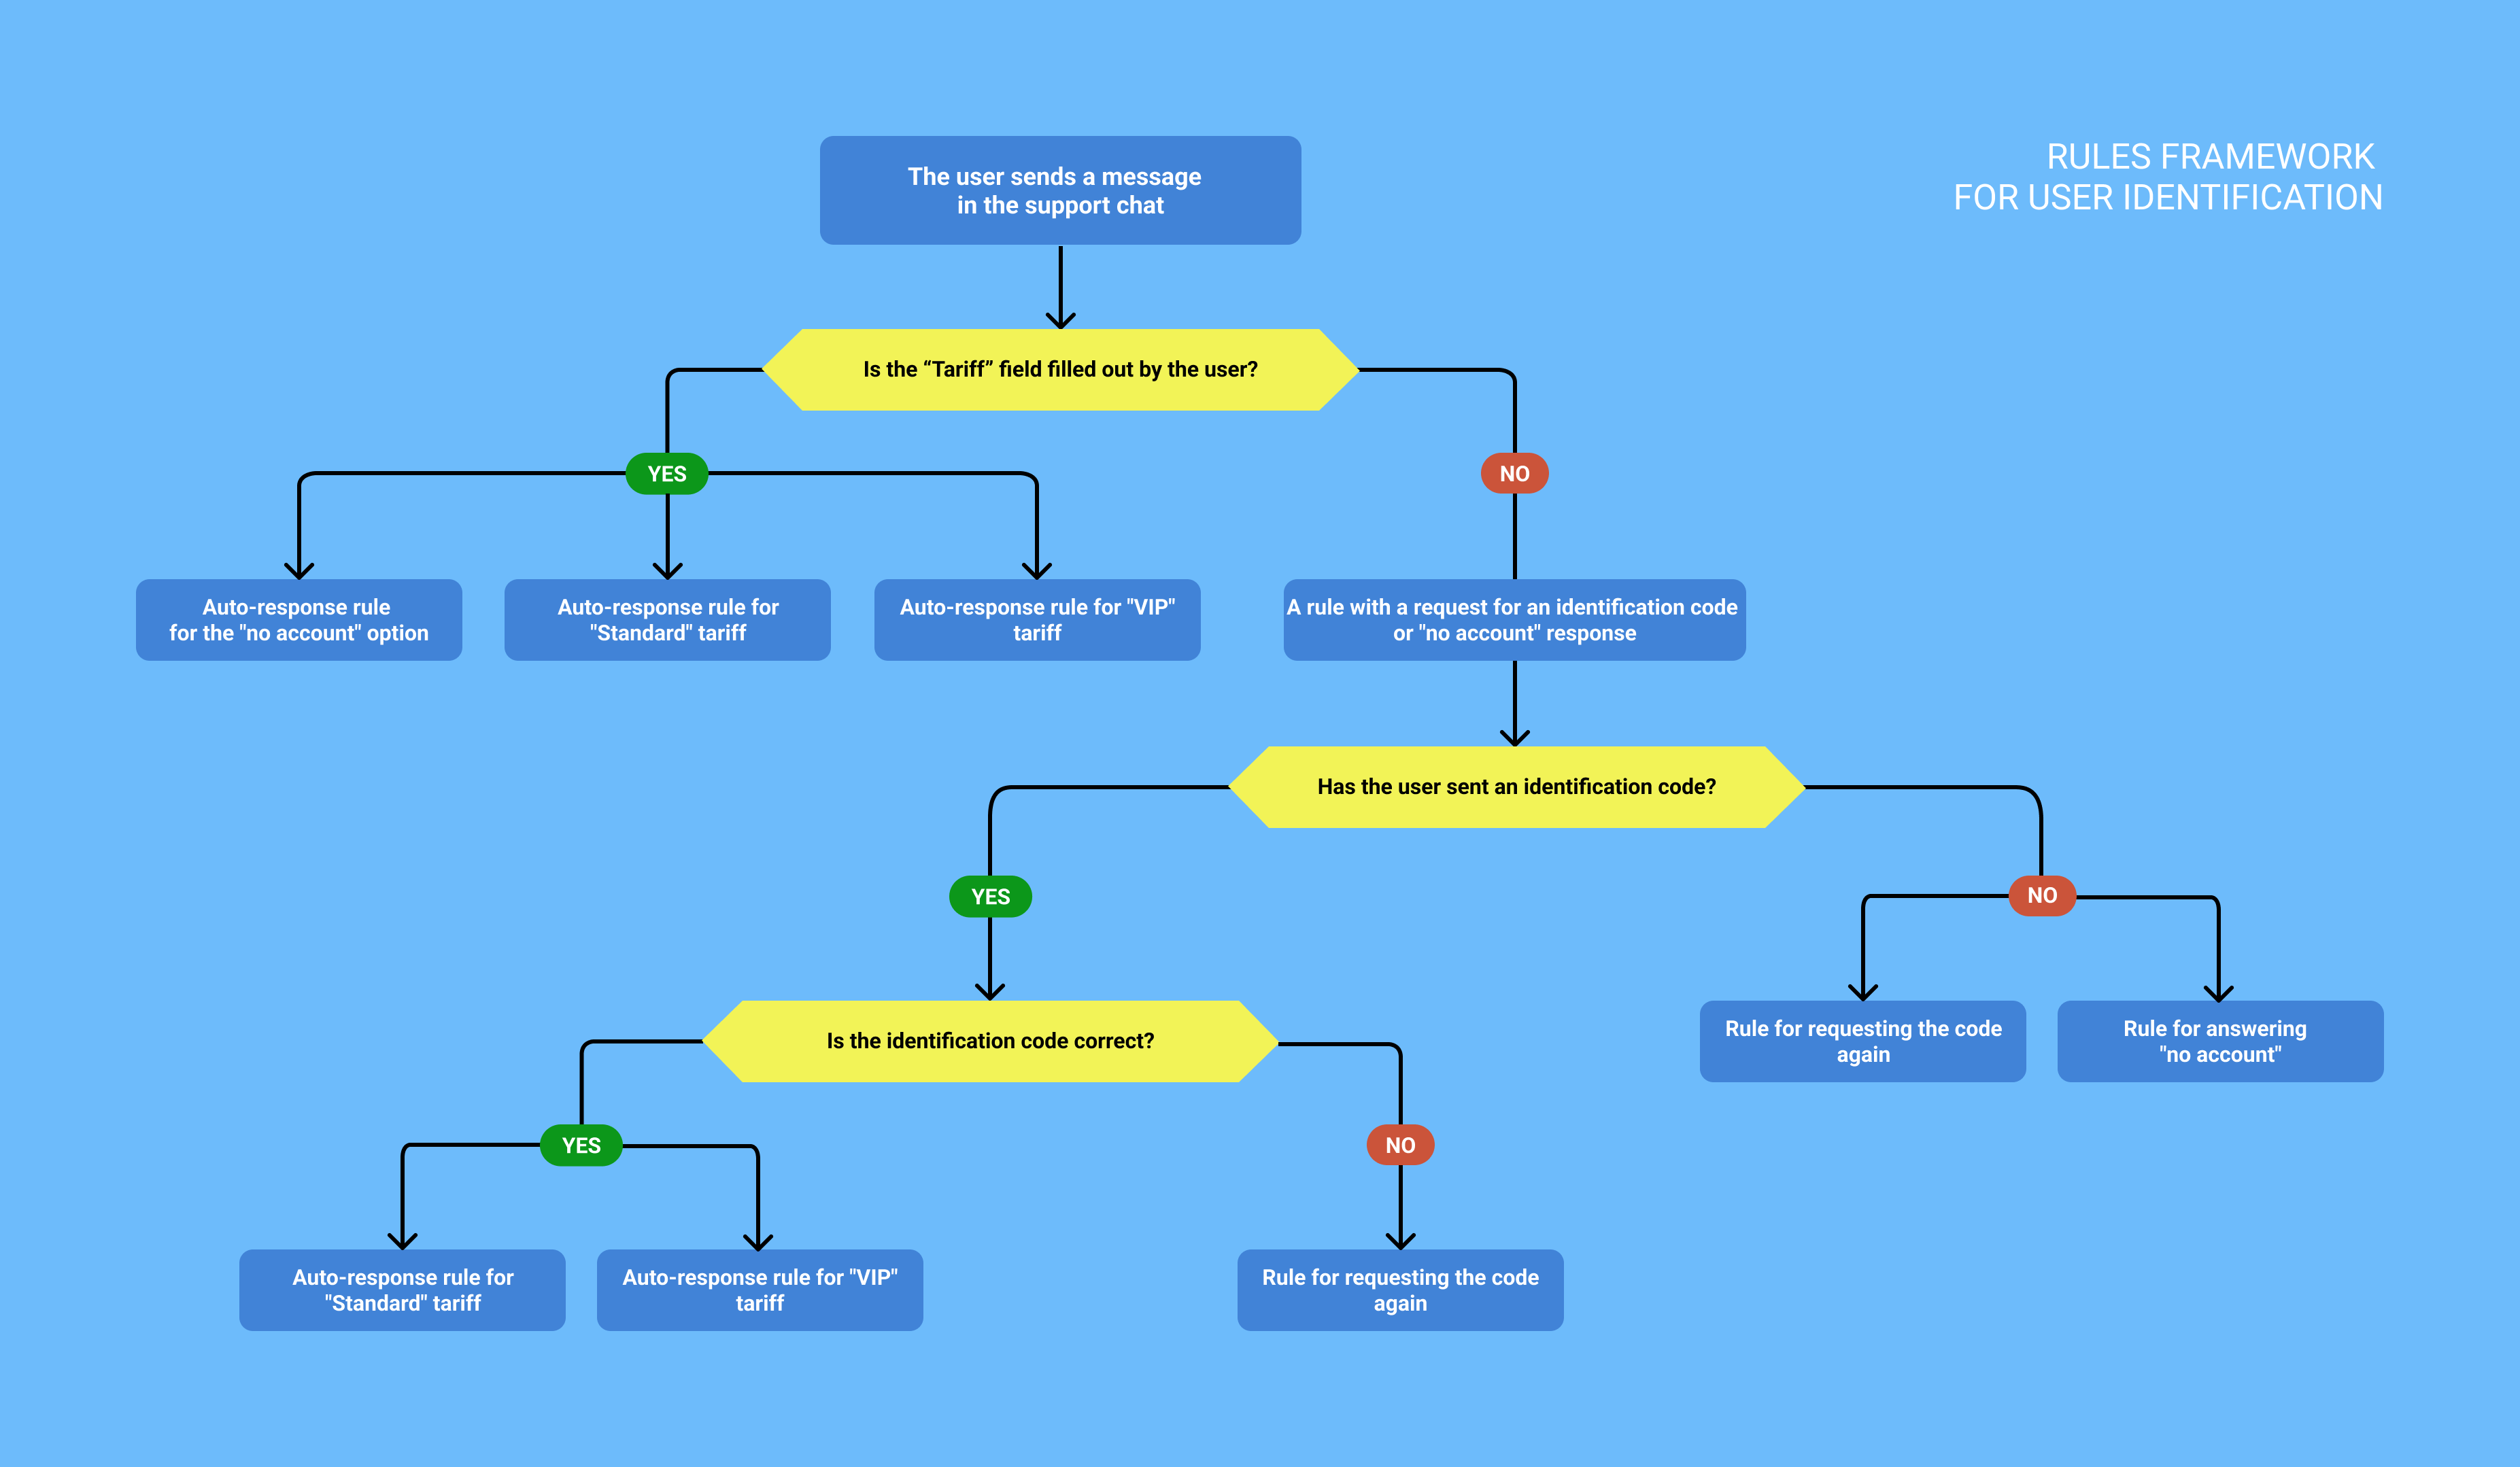
rule for new cases to send a request for an identification code
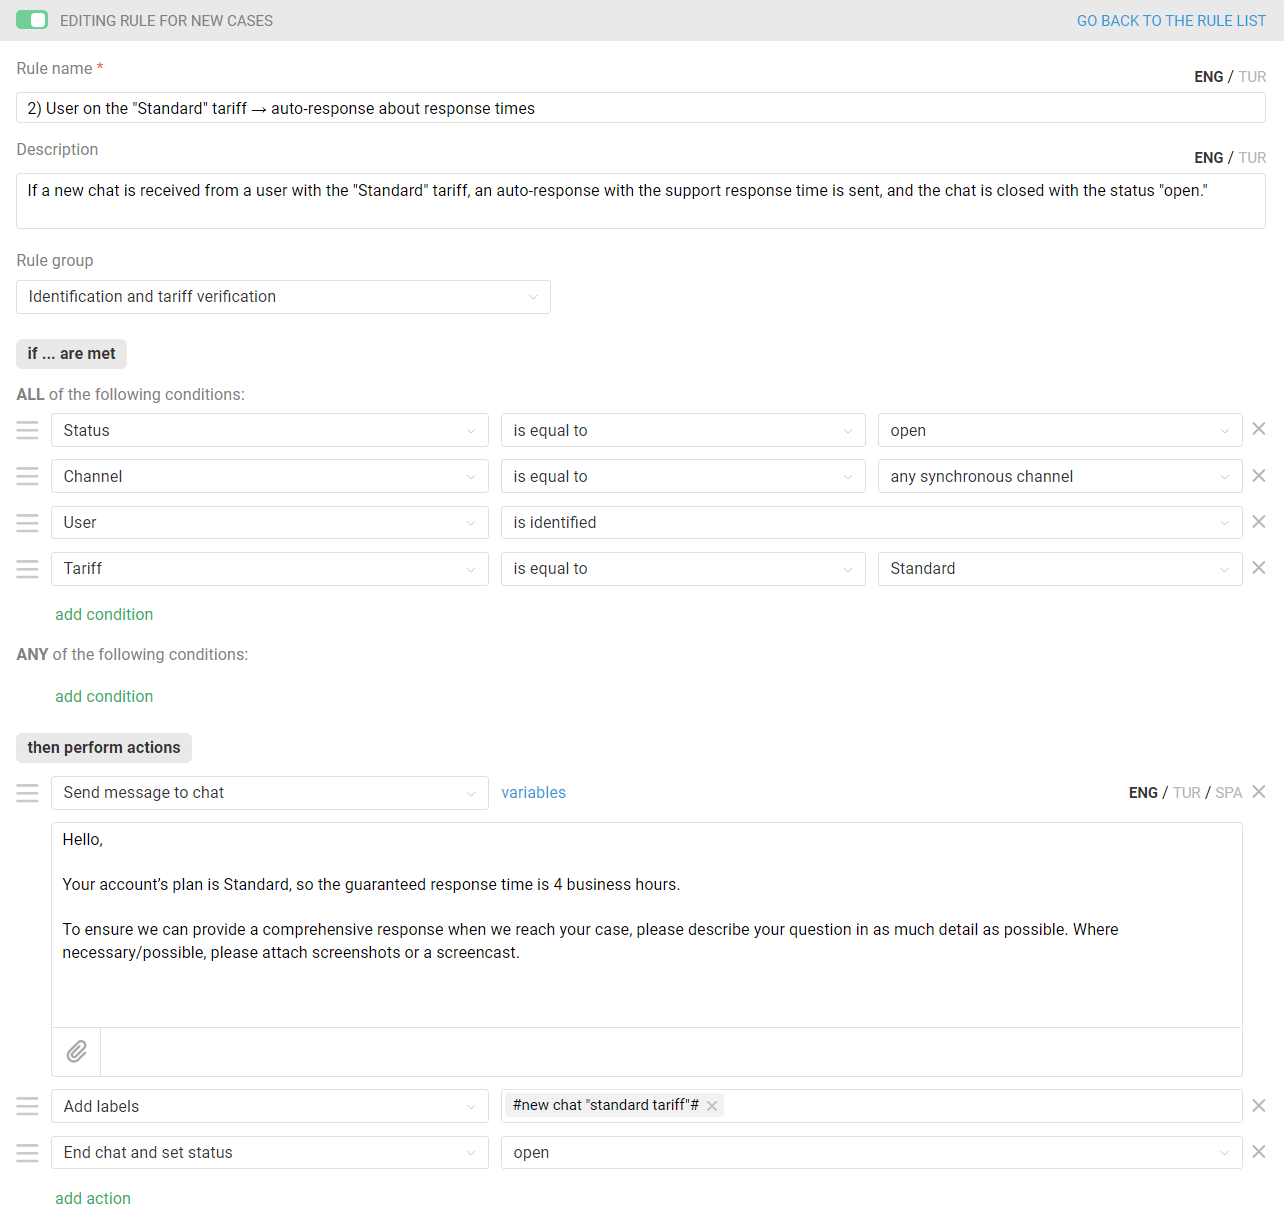
rule for new cases for users with the "Standard" tariff
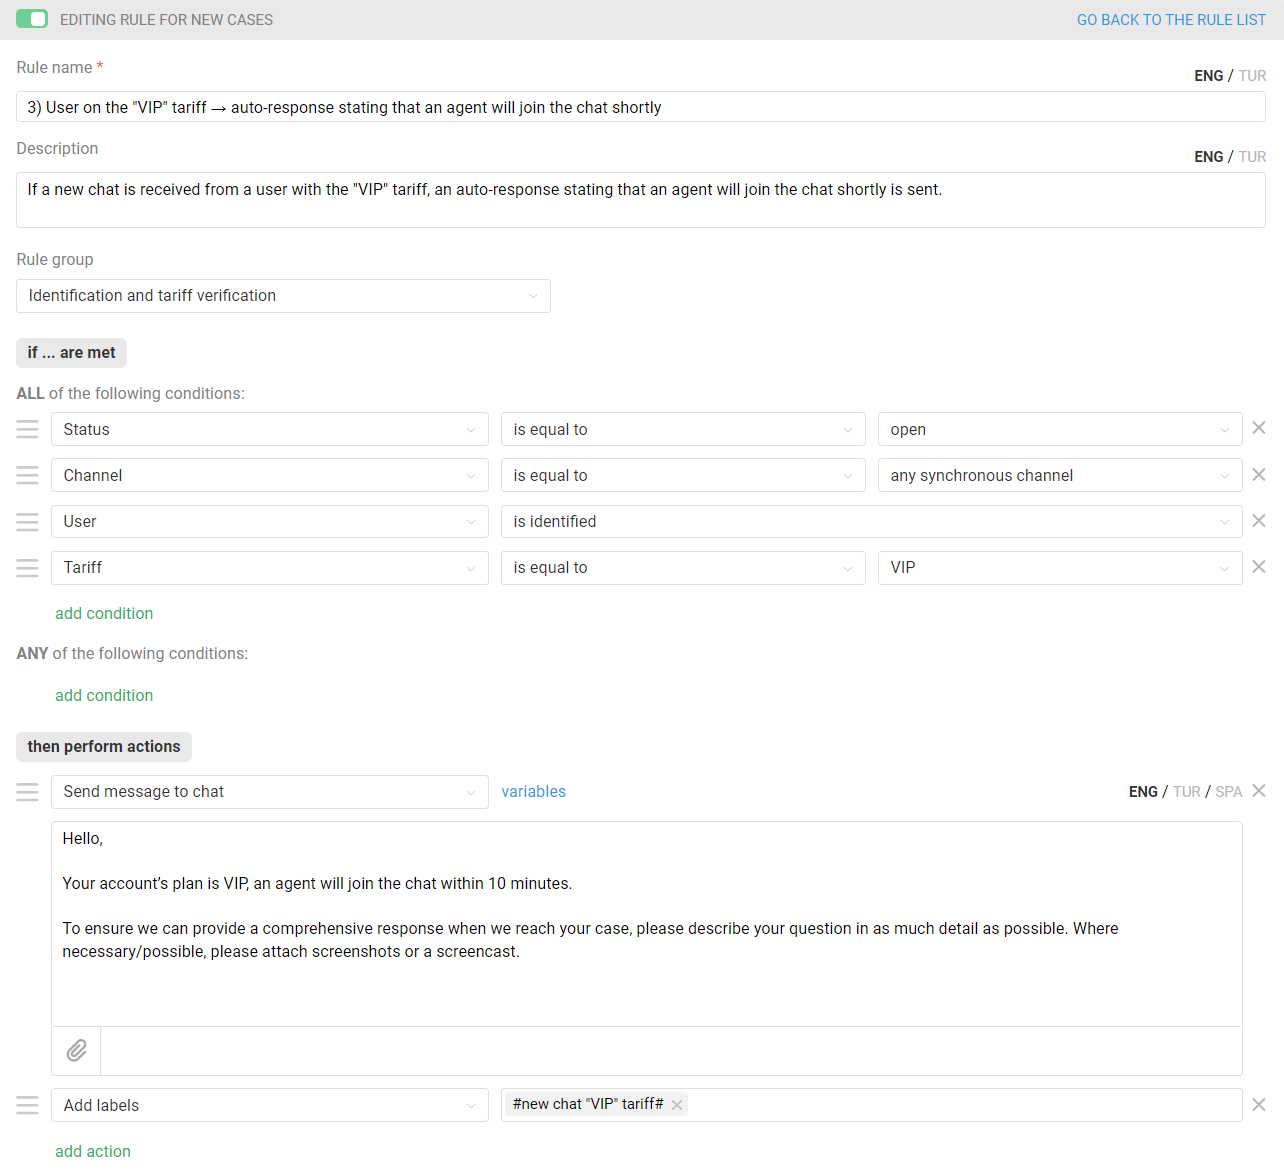
rule for new cases for users with the "VIP" tariff
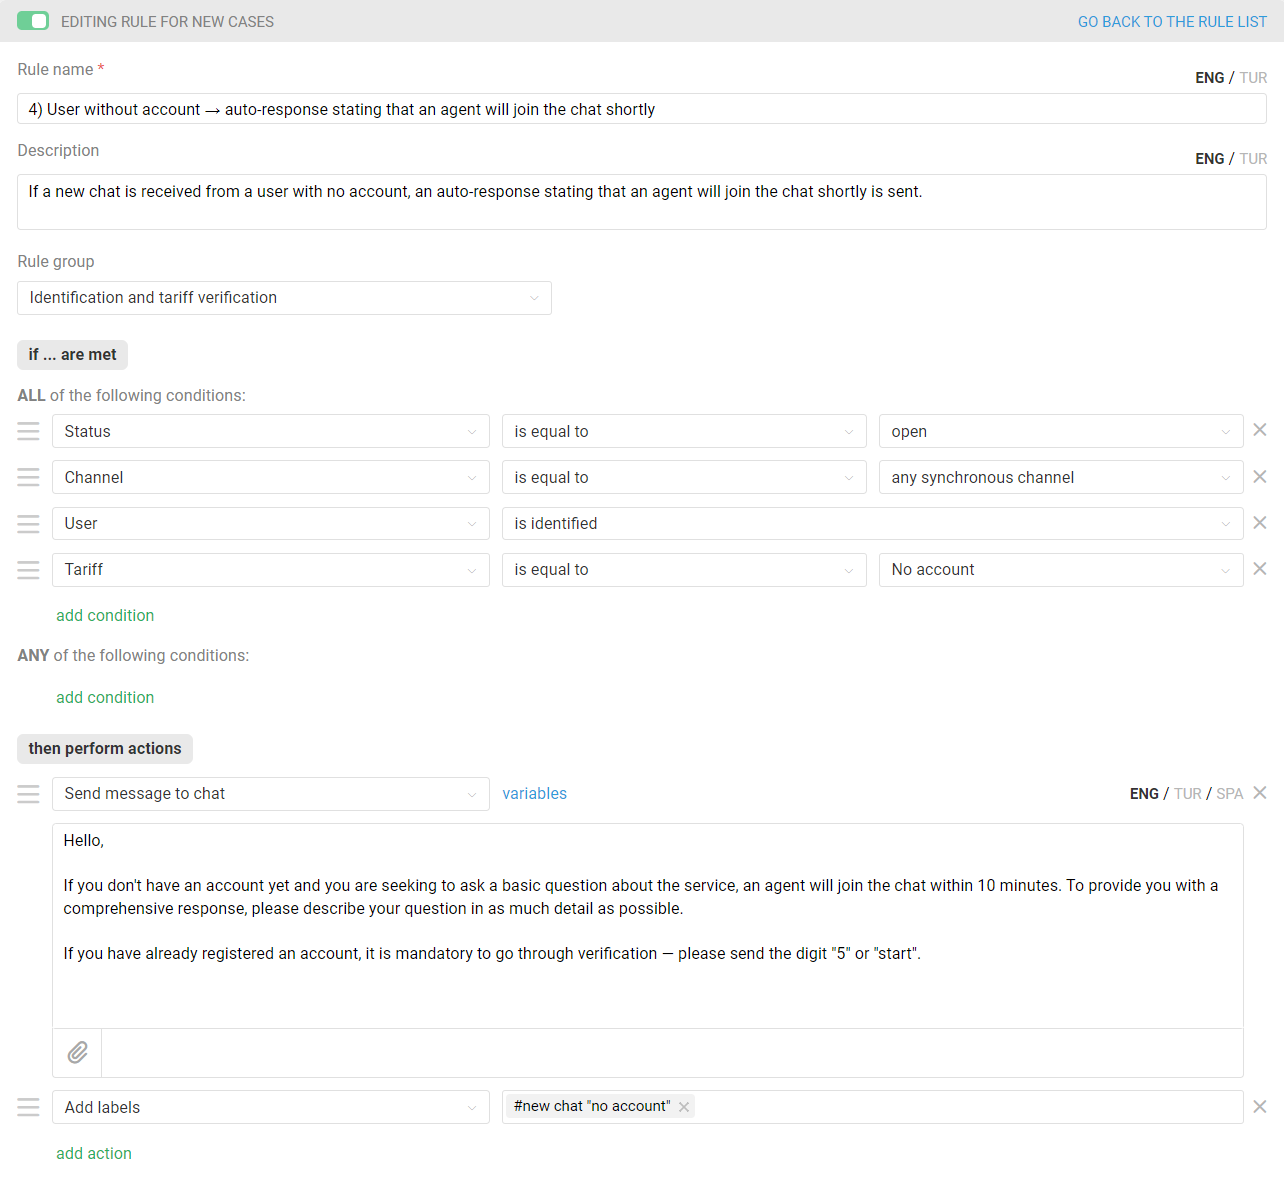
rule for new cases for users without an account
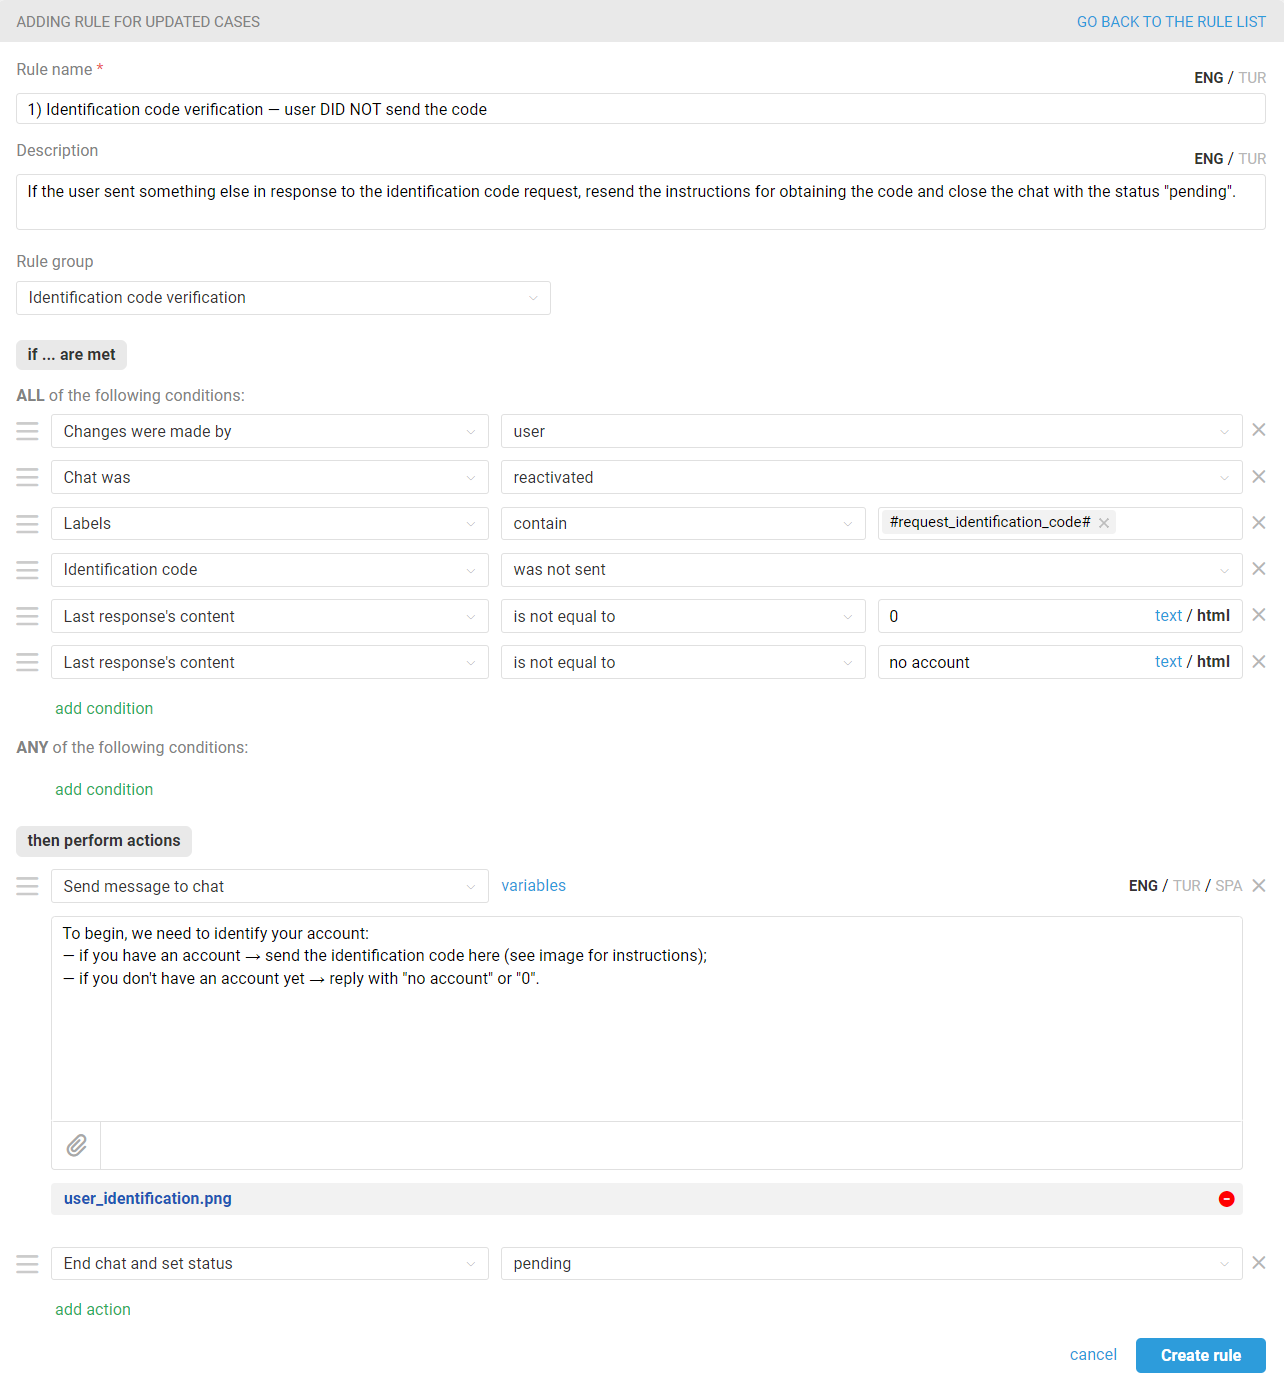
rule for updated cases when the user has not sent an identification code
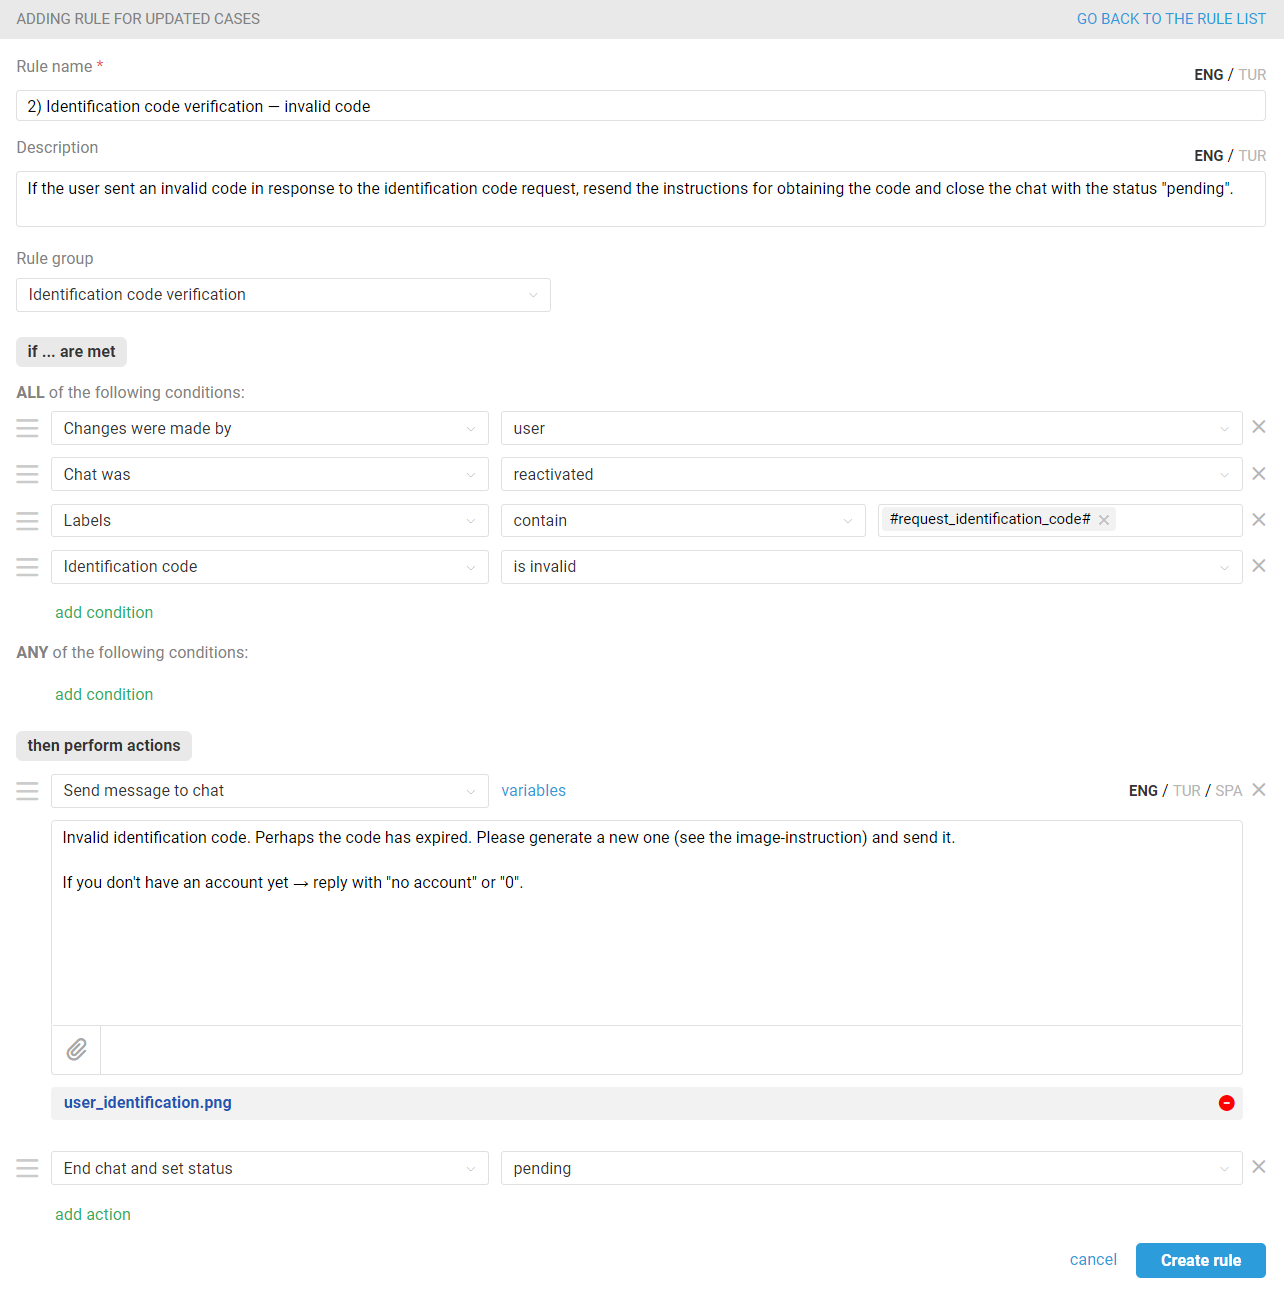
rule for updated cases when the user has sent an invalid identification code
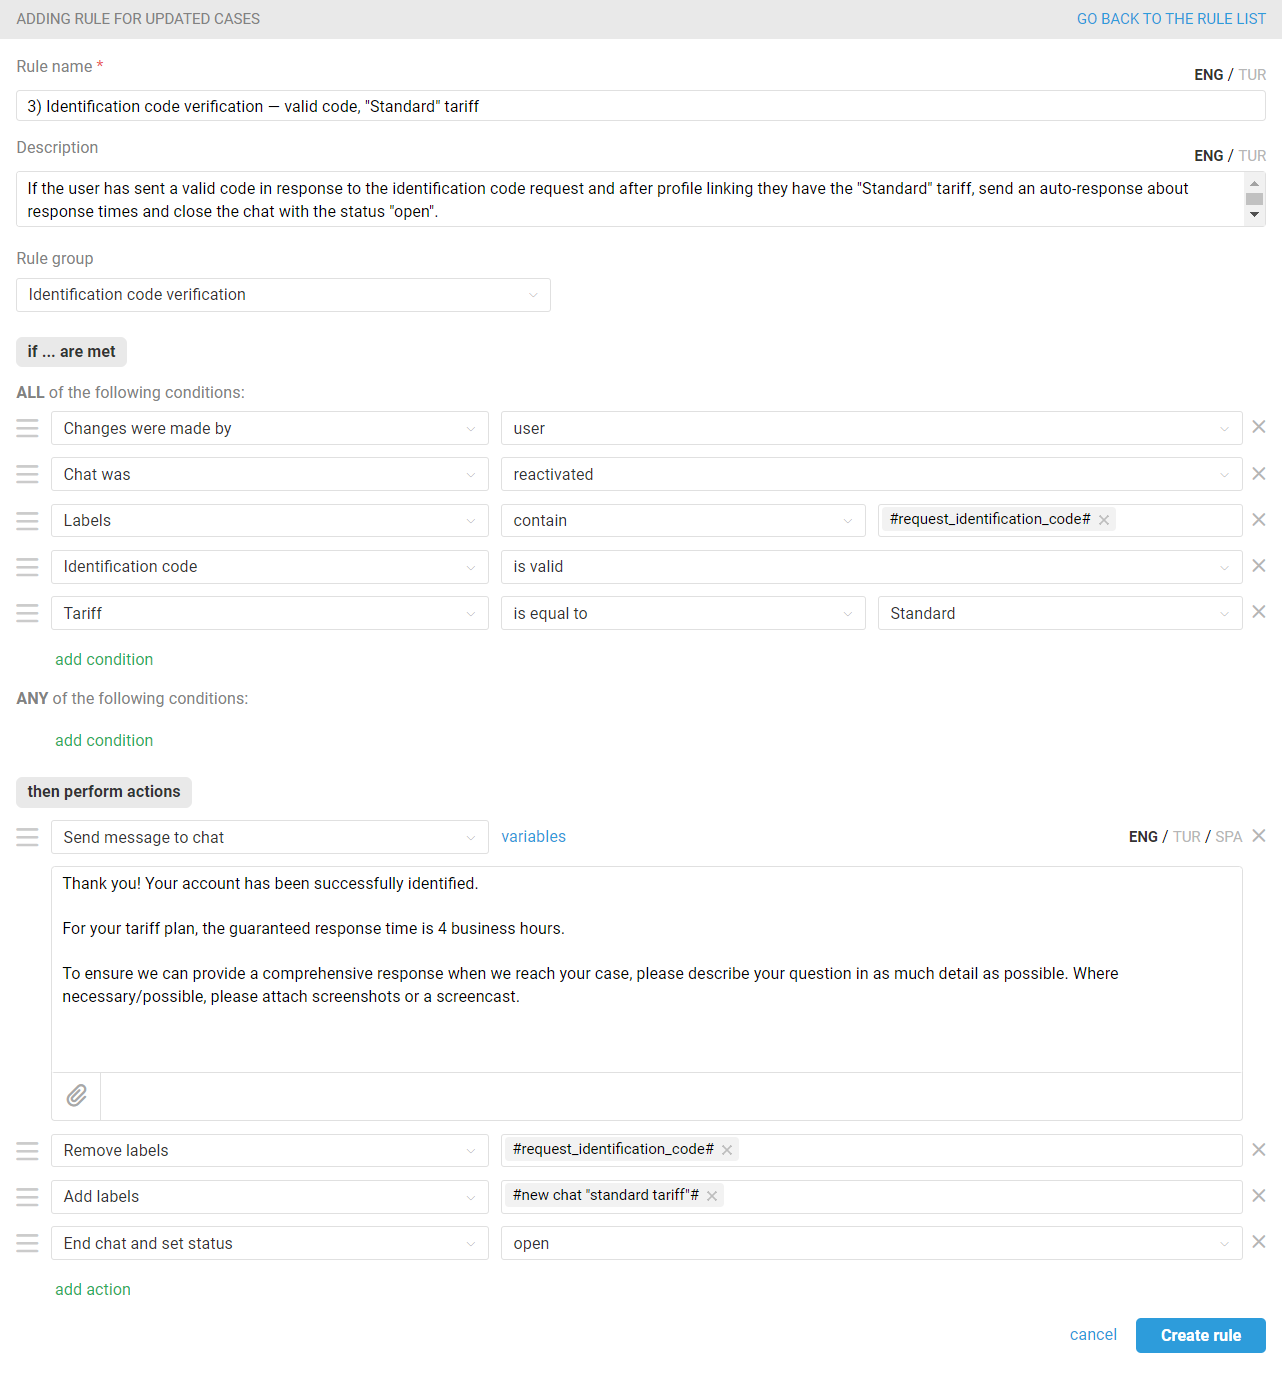
rule for updated cases when the user with the "Standard" tariff has sent a valid identification code
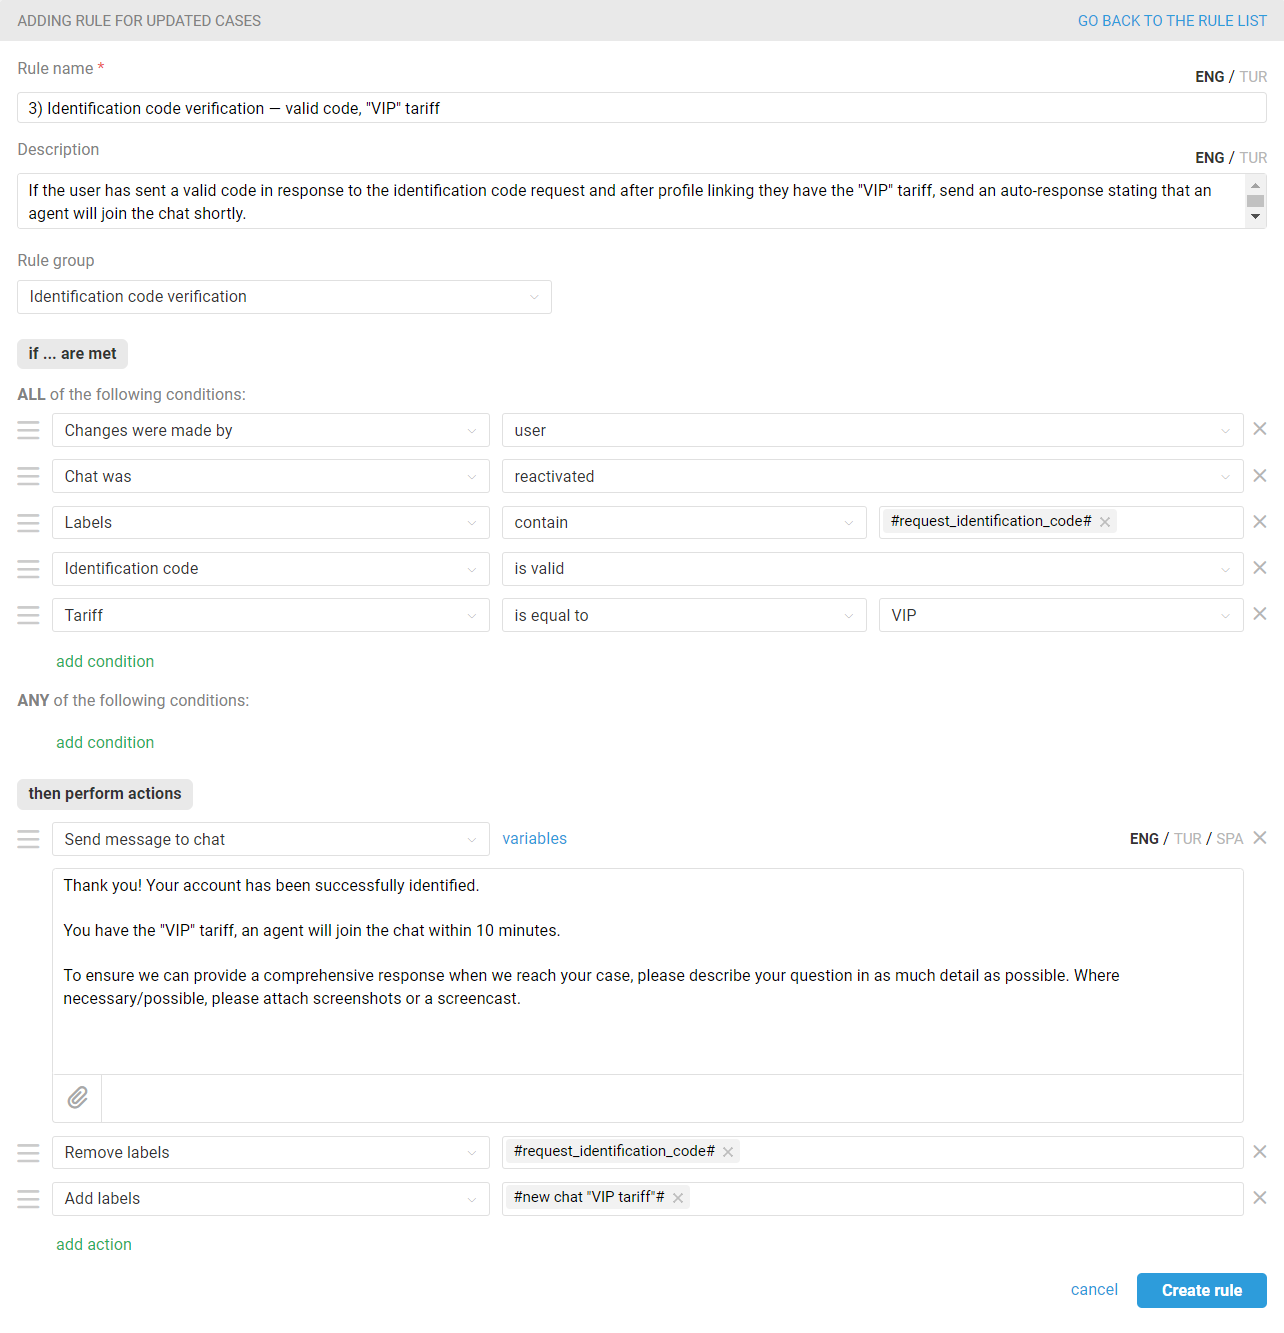
rule for updated cases when the user with the "VIP" tariff has sent a valid identification code
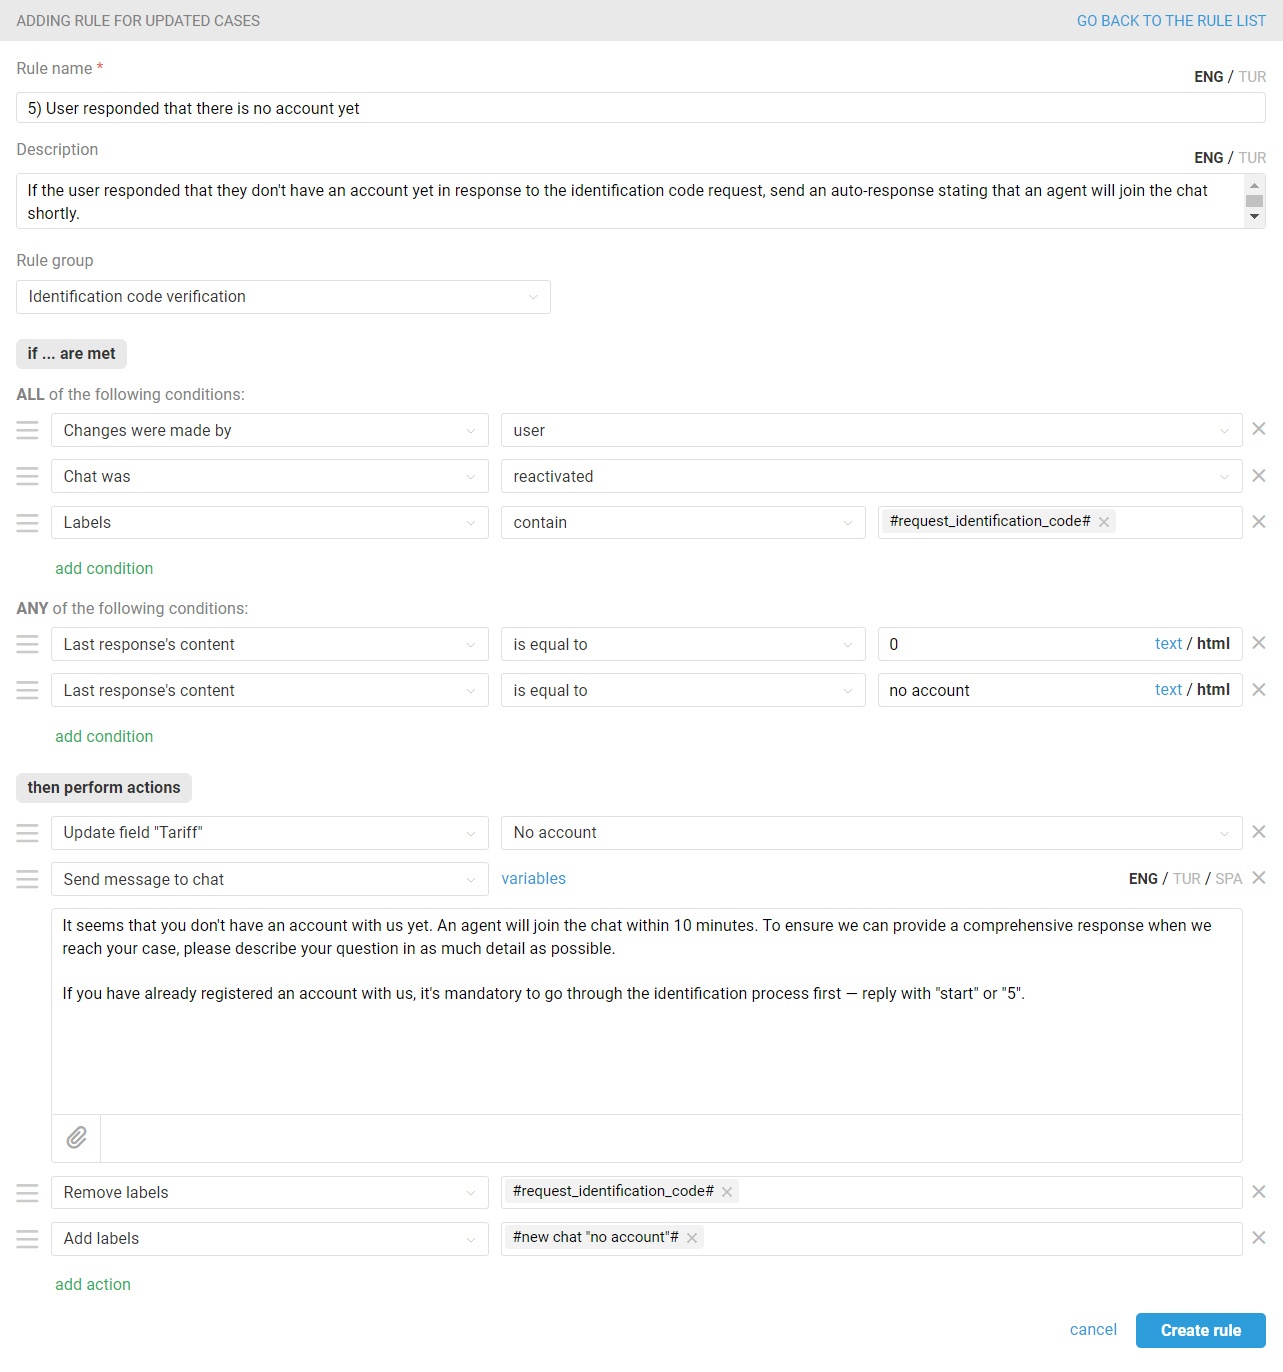
rule for updated cases when the user has responded that they do not have an account
rule for updated cases when the user, who did not have an account, now has one and wants to undergo identification
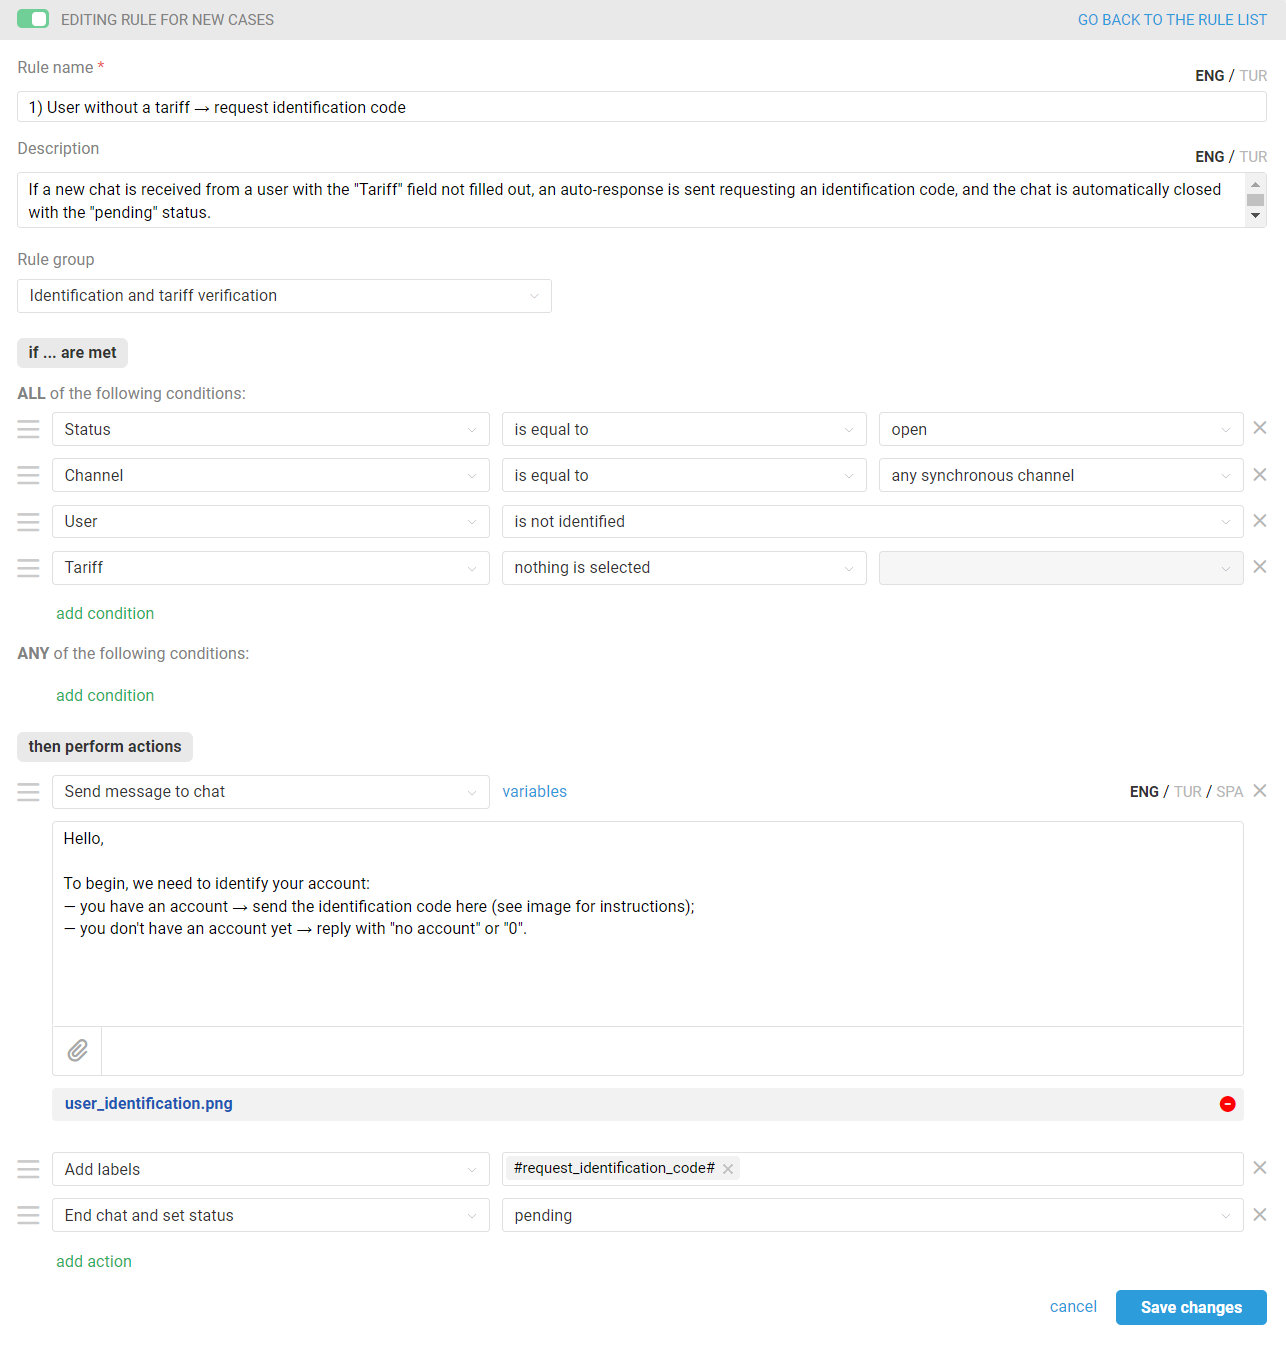
а. A rule for new cases that will be triggered in chats from unidentified users when the "Tariff" field is empty. It will send an auto-response to the chat with a code request and end the chat in the "pending" status so that agents are not distracted by it.
b. Additionally, three separate rules are needed for new cases when the "Tariff" field is not empty:
— rule for the "Standard" tariff:
Step 3: Create rules for updated cases that will check new responses from users in chats.
c. Let's create a rule for updated cases that will check if the user has sent something else in response to the identification code request. To do this, we need to use the condition "Identification code — was not sent", which checks whether the user's response matches the format of identification codes or not.
— rule for the "Standard" tariff:

All the rules for automatic identification are now ready.
Of course, it's best not to simply copy our example but to use it as a foundation and add additional conditions and actions that are specific to your needs. For example, setting up different rules for business and non-business hours, adding actions for automatic distribution of cases among agents when the user is already identified, and so on.
Examples of rules for common scenarios can be found in our knowledge base. We also cover the logic of automation rules in detail in our video tutorials on rules and chats, which can be found here.
4. Updating user data in Deskie.
During the process of identification, you transmit the current user data to Deskie, but over time, they may change (e.g., the tariff may change, the customer may refuse services, etc.). To ensure that Deskie always has up-to-date information about the user, you need to edit the user's data in Deskie when there are changes in your database. This can be done via the API:
execute a request to search for the user's profile in the desired channel to obtain their ID in Deskie: https://deskie.io/api/users#list_all_users;
execute a request to edit the user's data: https://deskie.io/api/users#edit_user.